8 Developing the Maintain Project Form Regions

Update the Milestone region and create the Tasks region on the Maintain Project Form.

About This Lesson

In the previous lesson, you developed the Maintain Project form to include things such as required fields and validations for modifying the DEMO_PROJECTS table to update project progress.

In this lesson, you learn to develop two regions on the Maintain Project form page: Milestones and Tasks. Both regions function as detail regions.

For the Milestones detail region, you update an existing interactive grid on the page with some basic updates that you learned in previous lessons, such as renaming the region in Page Designer, isolating audit details, and updating the Live Template options in the runtime. This interactive grid queries the DEMO_MILESTONES table.

For the Tasks detail region, you learn how to add an editable interactive grid in Page Designer by creating an interactive grid region and then converting it to be editable. Then you learn how to improve use of the columns in an editable interactive grid by converting the Milestone and Assignee columns each into a select list, the Name column into a text field, and the Is_Complete? column into a switch.

You also learn how to add a region display selector to toggle which regions are displayed in the runtime.

Finally, you update both of the Milestones and Tasks region Live Template Options in the runtime.

Starting from here:

Basic Projects App Export - Topic 6.sql

If you have not completed the previous lessons, you can use the appendix "Importing an Application into a Workspace" to import the above SQL script into your workspace and continue working from this lesson forward. You can find this script in the /files subdirectory of where you unzipped the .zip file accompanying this tutorial.

8.1 Updating the Milestones Interactive Grid

In addition to the DEMO_PROJECTS table, the app also contains the DEMO_MILESTONES and DEMO_TASKS tables. These two tables contain data for incremental milestones and tasks that help to track the progress of an entire project more precisely.

Currently, your app only supports changes to the status of entire projects. Modify the second Maintain Project interactive grid so that your users can view and change the status of these tasks and milestones.

Begin by updating the second interactive grid on page 5 which queries the DEMO_MILESTONES table .

To navigate to the Maintain Project form:

  1. From the Application home page, click 5 - Maintain Project .

To rename the second Maintain Project region (the name was inherited from a copy procedure in an earlier lesson):

  1. Scroll to the bottom of the Rendering tree or Layout tab, and click the Maintain Project sub region (note the italicized name).
  2. In the Property Editor:
    1. Identification: Title - enter Milestones

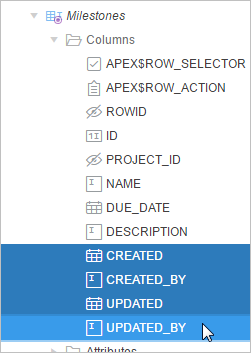
The Milestones region contains several columns that your users do not really need. One can be hidden from end users entirely (ID), while the rest are audit details that can be useful, but should not be altered by end users.

Note:

Oracle recommends hiding columns rather than deleting them in case you need them in the future.

To change how the columns display:

  1. In the Rendering tree under Milestones, expand the Columns folder.
  2. Select the ID column.
  3. In the Property Editor:
    1. Identification: Type - select Hidden
  4. In the Rendering tree, click the Created column to both select it and deselect the ID column. Press and hold the Ctrl key and to select the following columns:
  5. In the Property Editor:
    1. Identification: Type - select Display Only

8.2 Creating the Tasks Detail Region

The Projects page already has a smaller Detail region that queries the DEMO_MILESTONES table. Next, you need to add another detail region for the DEMO_TASKS table.

Add a new interactive grid from the Gallery to query the DEMO_TASKS table and configure it to display as a smaller detail region.

To add an interactive grid region from the Gallery:

  1. In the Gallery pane located below the Layout pane, click the Regions tab.
  2. Right-click Interactive Grid, select Add To, select Content Body, select Milestones, and select After.
    A new region appears in the Layout pane under the Milestones region.
  3. In the Property Editor:
    1. Identification: Title - enter Tasks
    2. Source: SQL Query - enter select * from demo_tasks where project_id = :P5_ID

      Note:

      The SQL select * from [Table_Name] will return all of the columns from the specified table. The where condition will limit the records returned to those for the current project.
    3. Source: Page Items to Submit - select P5_ID
    4. Layout: Start New Row - select Yes
    5. Appearance: Template - select Standard
    6. Server-side Condition: Type - select Item is NOT NULL
    7. Server-side Condition: Item - select P5_ROWID

Interactive grids are read-only by default, so you must configure the interactive grid to be editable.

To make an interactive grid editable:

  1. In the Rendering tree, under Tasks, select the Attributes folder.
  2. In the Property Editor:
    1. Edit: Enabled - select Yes
    2. Toolbar: Buttons - deselect Save

      Note:

      You deselect the Save button because there is already a Save button in the Maintain Project region, and it would be confusing for users to have multiples.

You must hide the ID and PROJECT_ID columns from view because they are not useful, but you must also perform an additional configuration on each to prepare them for a later step.

To clean up the Tasks region:

  1. In the Rendering tree, under Tasks, expand the Columns folder, and select the ID column.
  2. In the Property Editor:
    1. Identification: Type - select Hidden
    2. Source: Primary Key - select Yes

    Note:

    Defining the table's primary key is required later in this topic when child tables are added that relate to Task records.

    The primary key of a table uniquely identifies each row and ensures that no duplicate rows exist (and typically, this is its only purpose).

  3. In the Rendering tree, select the PROJECT_ID column.
  4. In the Property Editor:
    1. Default: Type - select Item
    2. Default: Item - select P5_ID

8.3 Updating the Columns in the Tasks Region

Next, you improve the usability of the Tasks region by changing how some of the columns display.

To convert the MILESTONE_ID column to a select list:

  1. In the Rendering tree under the Tasks region, expand the Columns folder.
  2. Select the MILESTONE_ID column.
  3. In the Property Editor:
    1. Identification: Type - select Select List
    2. Heading: Heading - enter Milestone
    3. Heading: Alignment - select start
    4. Layout: Column Alignment - select start
    5. List of Values: Type - select SQL Query
    6. List of Values: SQL Query - enter select name d, id r from demo_milestones order by 1
    7. List of Values: Display Extra Values - select No
    8. List of Values: Null Display Value - enter - Select Milestone -

To convert the ASSIGNEE column to a select list:

  1. In the Rendering tree under the Tasks region, select the ASSIGNEE column.
  2. In the Property Editor:
    1. Identification: Type - select Select List
    2. Heading: Alignment - select start
    3. Layout: Column Alignment - select start
    4. List of Values: Type - select Shared Component
    5. List of Values: List of Values - select TEAM MEMBERS
    6. List of Values: Display Extra Values - select No
    7. List of Values: Null Display Value - enter - Select Assignee -

To change the NAME column to a text field:

  1. In the Rendering tree under the Tasks region, select the NAME column.
  2. In the Property Editor:
    1. Identification: Type - select Text Field

To change the IS_COMPLETE_YN column to a switch:

  1. In the Rendering tree under the Tasks region, select the IS_COMPLETE_YN column.
  2. In the Property Editor:
    1. Identification: Type - select Switch
    2. Heading: Heading - enter Is Complete?

To convert the audit columns to display only:

  1. In the Rendering tree under the Tasks region, select the CREATED column to select it, then press and hold the Ctrl key to select all of the following columns:
    • CREATED

    • CREATED_BY

    • UPDATED

    • UPDATED_BY

  2. In the Property Editor:
    1. Identification: Type - select Display Only

8.4 Adding a Region Display Selector

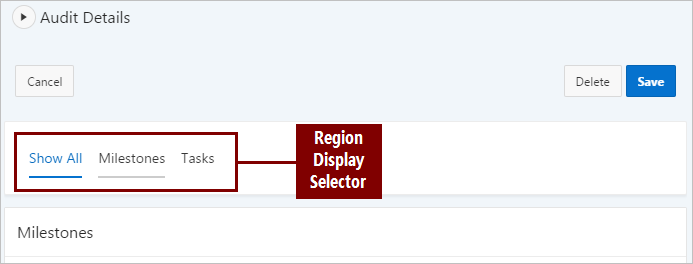
Now that you have added a Milestones detail and a Tasks detail to the Maintain Project form, the page looks cluttered. You can add a Region Display Selector so that your users can organize the page to view both Milestones and Tasks regions or just one of them.

First you must configure the Milestones region to be compatible with a Region Display Selector because originally you copied it from another region. The Tasks region, which you created from scratch, is compatible by default.

To configure the Milestones region for the Region Display Selector:

  1. In the Rendering tree or Layout, select the Milestones region.
  2. In the Property Editor:
    1. Advanced: Region Display Selector - select Yes

To add a region display selector:

  1. In the Gallery pane in the Regions tab, locate the Region Display Selector.
  2. Right-click Region Display Selector, select Add To, select Content Body, select Maintain Project, and select After.

    Tip:

    You can also drag the Region Display Selector from the Gallery and drop it above the Milestones region with the mouse.
  3. In the Property Editor:
    1. Identification: Title - enter RDS
    2. Appearance: Template - select Buttons Container
    3. Server-side Condition: Type - select Item is NOT NULL
    4. Server-side Condition: Item - select P5_ROWID
  4. Click Save and Run Page.
  5. Try clicking the Show All, Milestones, and Tasks in the region display selector to confirm their functionality.

8.5 Improving the Default Milestones Report in the Runtime

Remove the audit columns from view, sort the report by due date, and widen the Description column of the default Milestones report (which is an interactive grid) in the runtime.

To change the Milestones report in the runtime:

  1. In the runtime on the Milestones region, click the Actions button and select Columns.
    The Columns dialog displays.
  2. Deselect the Displayed checkbox for the following columns:
    • Created

    • Created By

    • Updated

    • Updated By

  3. Click Save.

To order the Milestones report by due date:

  1. On the Milestones region, click the Actions button, select Data, and select Sort.
  2. In the Sort dialog:
    1. Column - select Due Date
  3. Click Save.

(Optional) To widen the Description column:

  1. (Optional) Click and drag the dividers until you feel the content fits.

To save your changes to the default Primary report:

  1. Click the Actions button, select Report, and select Save.
    The system message "Default report saved for all users" displays.

8.6 Improving the Default Tasks Report in the Runtime

Finally, update the default Tasks report (which is also an interactive grid) by reconfiguring the columns.

To change the column order and hide columns from view:

  1. On the Tasks region, click the Actions button and select Columns.
    The Columns dialog displays.
  2. In the columns pane, select Name.
  3. Click the move up icon ( ^ ) until the Name column appears below the Row Actions column.
  4. Select the Is Complete? column.
  5. Click the move up icon ( ^ ) until the Is Complete? column appears below the Assignee column.
  6. Deselect the following columns:
    • Project id

    • Created

    • Created By

    • Updated

    • Updated By

  7. Click Save.

To freeze a column in place:

  1. On the Tasks region, click the Name column heading.
  2. Click the Freeze icon (snowflake).

To order the Tasks report by Start date and End date:

  1. On the tasks region, click the Actions button, select Data, and select Sort.
    The Sort dialog appears.
  2. In the Sort Dialog:
    1. Column - select Start date
    2. Press the Add icon ( + ) to add a new column.
    3. Select the new column.
    4. Column - select End date
    5. Click Save.
  3. Finally, resize the columns to fit. When you are finished, click the Actions button, select Report, and select Save.
    The system message "Default report saved for all users" appears.
  4. On the Developer Toolbar, click Application #### to return to the Application home page.

The Milestones and Tasks detail regions of the Maintain Project form are complete.

Proceed to the next lesson.