7 Developing the Projects Pages

Develop the Projects report and form pages to support your users’ project management tasks.

About This Lesson

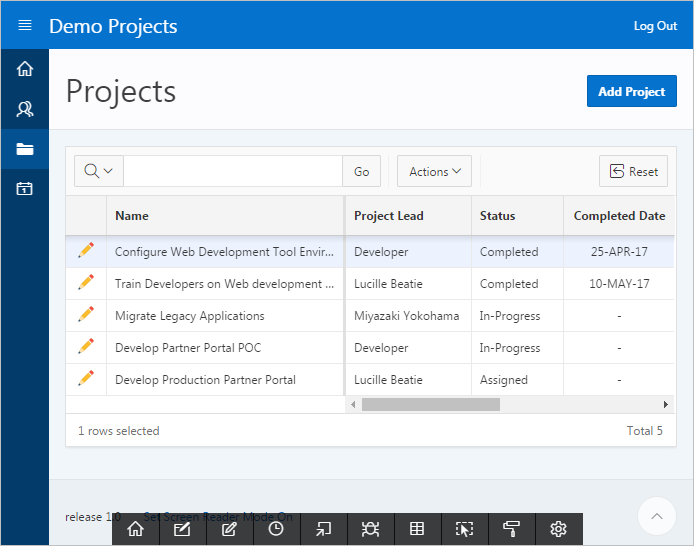
You used the Create Application Wizard to generate a report and form for the DEMO_PROJECTS table. This generated some default output similar to the raw Home and Team Members pages in the previous lessons, except the Projects report uses an interactive grid and the Projects form is a separate page (not a modal dialog).

The Maintain Project form is a master detail form (or "master detail" for short). A master detail reflects a one-to-many relationship between two tables in a database. Typically, a master detail form displays a master row and multiple detail rows within a single HTML form. With this form, users can insert, update, and delete values from two tables or views.

In this lesson, you learn how to create a shared list of values (LOV) in Shared Components and then add it to the report in Page Designer. You also tweak the report to look more like the Team Members report for visual consistency.

For the form, you learn how to change the page directly in the runtime by using Live Template Options with the Developer Toolbar. Then in Page Designer you learn how to create a static list of values, a dynamic action, and a validation.

Finally, you learn how to copy sub regions between pages in Page Designer.

Starting from here:

Basic Projects App Export - Topic 5.sql

If you have not completed the previous lessons, you can use the appendix "Importing an Application into a Workspace" to import the above SQL script into your workspace and continue working from this lesson forward. You can find this script in the /files subdirectory of where you unzipped the .zip file accompanying this tutorial.

7.1 Updating the SQL Query and Displayed Columns

Begin by updating the Projects report page by updating the SQL query of DEMO_PROJECTS and reconfiguring the default displayed columns in the Primary report (similar to what you did for the Team Members pages).

Unlike the Team Members page, the Projects report page uses an interactive grid. An interactive grid is similar to an interactive report, but features more functionality to support more sophisticated interaction with data sets.

To update the SQL query and column display of an interactive grid:

  1. In the App Builder overview of your app, click 4 - Projects to open the Projects report in Page Designer.
  2. In Page Designer, select the Projects region.
  3. In the Property Editor:
    1. Source: SQL Query - delete the current contents, then copy and paste the following code:
      select ID
      , NAME
      , DESCRIPTION
      , PROJECT_LEAD
      , COMPLETED_DATE
      , STATUS
      , CREATED
      , CREATED_BY
      , UPDATED
      , UPDATED_BY
      , (select count('x')
         from demo_milestones m
         where m.project_id = p.id
        ) milestones
      , (select count('x')
         from demo_tasks t
         where t.project_id = p.id
        ) tasks
      from DEMO_PROJECTS p
      

      Note:

      The milestone and task statistics (lines 11 and 15, respectively) are determined using inner SQL select statements.
    After you enter the SQL statement, when you change the page focus by clicking elsewhere on the page outside of the SQL Query field, Page Designer validates the code automatically. If there is no error, the field displays normally with a blue triangle to indicate an unsaved change. If an error is found, the area turns red in the Property Editor and triggers an error message.
  4. Click Save and Run Page.
    1. If the Focus Page dialog appears, click Try Again.

To remove extraneous columns in the runtime:

  1. In the application runtime, click Actions and select Columns.
    The Columns dialog displays.
  2. In the left-hand pane of the Columns dialog, deselect the box adjacent to following columns to hide them from view:
    • Id

    • Created

    • Created By

    • Updated

    • Updated By

  3. Click Save.
    The interactive grid refreshes with the chosen columns hidden.

Two columns are not sortable by default (Name and Description), so you should enable this function.

To enable sorting for a column in an interactive grid:

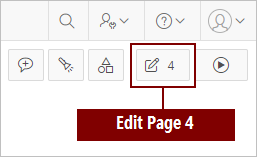
  1. Click Edit Page 4 on the Developer Toolbar to return to Page Designer.
  2. In the Rendering tree, under the Projects region, expand the Columns folder.
  3. Press and hold the Ctrl key, then click the following items to select them:
    • NAME

    • DESCRIPTION

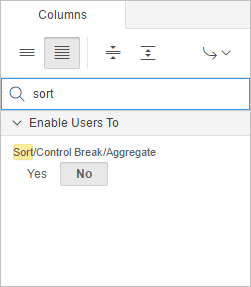
To find sort attributes in the Property Editor, enter a search in Filter Properties:

  1. Above the Property Editor, click the Filter Properties field and enter sort.
    The Property Editor displays only fields containing the "sort" string.
  2. For Enable Users To: Sort/Control Break/Aggregate, select Yes.
  3. Click Save.

7.2 Adding Names to the Project Lead Column with a Shared LOV

If you look at the runtime, you can see that the Project Lead column of the Projects report currently displays numeric identifiers instead of names of users. This is technically accurate, but not user-friendly.

The Project Lead ID's are pulled from the DEMO_PROJECTS table. However, the DEMO_TEAM_MEMBERS table contains the names associated with each product lead ID. To convert the numeric IDs into the names of the team members, you must create a connection between the two tables.

To connect the two tables to the Project Lead column, create a shared list of values (LOV) and add it to the Projects page interactive grid.

To access the Shared Components menu:

  1. Do one of the following:

To create a shared LOV:

  1. Under Other Components, click List of Values.
  2. Click Create.
    The Create List of Values Wizard displays.
  3. Verify that From Scratch is selected and click Next.
  4. In the Name and Type section:
    • Name - enter Team Members

    • Type - select Dynamic

  5. Click Next.
  6. For Query, delete the current contents, and copy and paste the following code:
    select full_name as display
    , id as return
    from demo_team_members
    order by 1
    
  7. Click Create List of Values.
    The TEAM MEMBERS list of values appears.
  8. Click the Edit Page 4 button on the toolbar to return to Page Designer.

You have created the LOV. Next, add it to the PROJECT_LEAD column of the Projects interactive grid.

To add an LOV to a column in Page Designer:

  1. In the Rendering tree, under the Projects region, expand the Columns folder.
  2. Select the PROJECT_LEAD column.
  3. In the Property Editor:
    1. Identification: Type - select Select List
    2. Heading: Alignment - select start
    3. Layout: Column Alignment - select start
    4. List of Values: Type - select Shared Component
    5. List of Values: List of Values - select TEAM MEMBERS
    6. List of Values: Display Extra Values - select No
    7. List of Values: Null Display Value - enter - Select Project Lead -
You have added and configured the LOV to the PROJECT_LEAD column.

7.3 Updating the Appearance of the Projects Report Page

The Create Application Wizard generates buttons on pages for you automatically, but you should always evaluate and reconfigure them as necessary to best suit your users.

Move the Create button to the Breadcrumb region (similar to what you did on the Team Members report page).

Additionally, change the appearance template of the interactive grid to the one for interactive reports for a consistent look across your app.

To move a button in Page Designer:

  1. In the Layout tab, right-click the CREATE button.
  2. Select Move To, select Breadcrumbs, and select Create.

    Tip:

    You can also drag and drop the Create button from the Projects region into the Create Placeholder in the Breadcrumbs region.
  3. In the Property Editor:
    1. Identification: Label - enter Add Project
    You have updated the button.

To change the appearance template of the Projects region:

  1. In the Rendering tree or Layout, select the Projects region.
  2. In the Property Editor:
    1. Appearance: Template - select Interactive Report
  3. Click Save and Run Page to see the updated Create button in the runtime.

7.4 Customizing the Projects Report Columns

In the runtime, you should update the interactive grid that make it easier to read.

Prioritize the name of the project by freezing it in place on the page. Then move the Description column to the end of the grid and apply a default sort rule to all columns with the Data submenu in the Actions menu.

To freeze a column in an interactive grid:

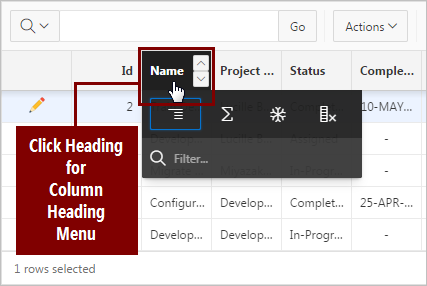
  1. Click Name (the heading of the Name column).
    The Column Heading Menu appears.
  2. Click the Freeze icon (snowflake).
    Freeze icon
    The column freezes in place and a horizontal scroll bar appears under the rest of the columns. Now the Name column is always visible on the page.

To change the order of columns:

Tip:

You can also drag and drop columns into place to reorder them by clicking and holding the Drag Handle that appears when you hover the mouse cursor over a column heading.
  1. Click the Actions button and select Columns.
    The Columns dialog appears.
  2. Click the Description column to select it.
  3. Below the pane, click the move down button (down arrow) several times until Description appears at the bottom of the list (below Tasks).
  4. Click Save.

To sort the records by their creation date:

  1. Click the Actions button, select Data, then select Sort.
    The Sort dialog appears.
  2. In the Sort dialog:
    1. Column - select Created
  3. Click Save.
  4. (Optional) Adjust the widths of all the columns as necessary so that none are too wide (such as Milestones and Tasks) nor too narrow (such as Description).
  5. When you are finished, click the Actions button, select Report, and click Save.
    The report saves your changes.
The Projects report page is complete. Next, develop the Projects form, Maintain Project.

7.5 Changing the Project Form Appearance with Live Template Options

Consistency is important for your application’s usability. Update the properties of the Project form modal dialog to match the look and function of the Maintain Team Member modal dialog. Some of this should seem familiar because you are applying the same set of settings from earlier in the tutorial to a new page.

Use the Live Template Options on the Developer Toolbar to modify the appearance of the form in the runtime, then switch to Page Designer for more elaborate changes (such as moving buttons and changing the condition of fields).

To navigate to the Maintain Project page:

  1. On the Projects page in the runtime, click the Edit icon (pencil) adjacent to the name of any project.
    The browser navigates to the Maintain Project form.

To update the page using Live Template Options:

  1. On the Developer Toolbar, click Quick Edit.
    The page goes into Quick Edit mode.
  2. Hover your mouse over the Maintain Project region (not the page title).
    A wrench icon appears in the top-right corner.
  3. Click the wrench icon.
    The Live Template Options dialog appears.
  4. In Live Template Options:
    1. Header - select Hidden but accessible
    2. Style - select Remove UI Decoration
    3. Item Padding - select Slim Padding
    The page updates with each change.
  5. Click Save.

7.6 Updating the Project Form in Page Designer

For the Projects report, you moved a Create button to the top-right of the page in the Breadcrumb region. Note that the same space is empty on the Maintain Project form. The default placement of a Create button in Page Designer is in the top-right corner of the page, but you can place any button in the placeholders (especially since nothing is there now).

You also need to change some fields to required and add the TEAM MEMBERS LOV to the Project Lead field (similar to the changes you made to the Maintain Team Member form).

Begin with the buttons.

  1. On the Developer Toolbar, click Edit Page 5 to return to the page in Page Designer.

To move the navigation buttons for the project entries to the Create position:

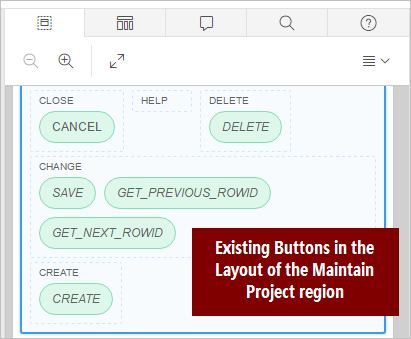
  1. In the middle of the Layout tab, locate the existing buttons near the bottom of the Maintain Project region (not the sub region).
  2. Press and hold the Ctrl key and click the following buttons to select both of them:
    • GET_PREVIOUS_ROWID

    • GET_NEXT_ROWID

  3. In the Property Editor:
    1. Layout: Region - select Breadcrumb
    2. Layout: Button Position - select Create

    The Previous and Next buttons move into the CREATE placeholder in the Breadcrumb region.

    Note:

    If you save and run the page, only the Next button appears when you view the first project in the list in the runtime because technically there is not a previous entry in the list.

To make the Name field required:

  1. In the Content Body region, select the P5_NAME item.
  2. In the Property Editor:
    1. Identification: Type - select Text Field

To add a LOV to the Project Lead field:

  1. Select the P5_PROJECT_LEAD item.
  2. In the Property Editor:
    1. Identification: Type - select Select List
    2. List of Values: Type - select Shared Component
    3. List of Values: List of Values - select TEAM MEMBERS
    4. List of Values: Display Extra Values - select No
    5. List of Values: Null Display Value - enter - Select Project Lead -

    Note:

    The P5_PROJECT_LEAD item uses the List of Values defined in Shared Components in the Team Members lesson.

7.7 Creating a Static LOV of Statuses

Currently, your users must manually type one of the words "Assigned," "In-Progress," or "Completed" into the Status field in order to update a project. This process is slow and prone to human error. You should convert this field to a selectable list of options.

Earlier you created a dynamic list (TEAM MEMBERS) that queries two tables to replace numeric identifiers in the Project Lead fields with names. You can use the simpler static list element for the Project status list because the Status information can be contained in a single table.

Create and apply a list of possible options to the Status field in the Maintain Project form.

To define a list with static values:

  1. In the Layout or Rendering tree, select the P5_STATUS item.
  2. In the Property Editor:
    1. Identification: Type - select Select List
    2. List of Values: Type - select Static Values
    3. List of Values: Static Values - delete the current contents, then enter STATIC2:Assigned,In-Progress,Completed

      Note:

      Specifying STATIC2 displays the records in the order entered, rather than alphabetically.
    4. List of Values: Display Extra Values - select No
    5. List of Values: Display Null Values - select No

A good business practice is to require users to input a date for when a project is updated to "Completed."

To make the Completed Date required when a project status is changed to Completed:

  1. Select the P5_COMPLETED_DATE item.
  2. In the Property Editor:
    1. Appearance: Template - select Required

Often when an item is required, you update Appearance: Template to Required and the Validation: Value Required to Yes in the Property Editor. However, do not change the Value Required attribute because the item is only mandatory when the status is Completed, not for the other statuses.

Next, add a custom validation later to accommodate this business rule.

7.8 Creating a Dynamic Action

Dynamic Actions within Oracle Application Express are used to declaratively define client-side behaviors without writing JavaScript or AJAX. Instead, the Application Express engine implements the necessary code based on your declaration.

Add a Dynamic Action to the P5_STATUS item so that when it is set to Completed it triggers the Completed Date field to display.

To create a Dynamic Action:

  1. In the Rendering tree, right-click the P5_STATUS item and select Create Dynamic Action.
    A Dynamic Actions folder populates as a child to P5_STATUS.
  2. In the Property Editor:
    1. Identification: Name - enter Show Completed Date
    2. Client-side Condition: Type - select Item = Value
    3. Client-side Condition: Value - enter Completed

      Important:

      The capitalization and spelling of the When: Value attribute must match the data entry value exactly in order for the dynamic action to fire.
  3. In the Rendering tree, under the Show Completed Date dynamic action, expand the True folder and select Show.
  4. In the Property Editor:
    1. Affected Elements: Items(s) - select P5_COMPLETED_DATE

For Dynamic Action types such as Show, Enable, and Expand Tree, it is important to also include the corresponding opposite action. In that way the affected elements are set one way if the When Condition evaluates to True and the opposite if the When Condition evaluates to False. Here, the P5_COMPLETED_DATE item is shown when P5_STATUS equals Completed, and is hidden when any other status is selected. To add an opposite action:

  1. In the Rendering tree, right-click Show.
  2. Select Create Opposite Action.

7.9 Adding a Validation for the Completed Date

Add a validation for the Completed Date so that when a user changes the status to Completed, they must also add the Completed Date.

To add a validation for the Completed Date:

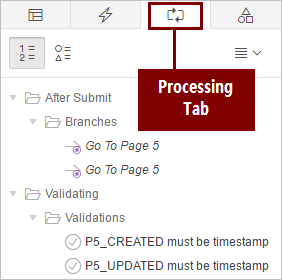
  1. On the Maintain Project page in Page Designer, select the Processing tab (two arrows chasing one another) above the Rendering tree.
  2. Right-click the Validating folder and select Create Validation.
  3. In the Property Editor:
    1. Identification: Name - enter Completed Date is Not Null
    2. Validation: Type - select Item is NOT NULL
    3. Validation: Item - select P5_COMPLETED_DATE
    4. Error: Error Message - enter #LABEL# must have some value
    5. Error: Associated Item - select P5_COMPLETED_DATE
    6. Server-side Condition: Type - select Item = Value
    7. Server-side Condition: Item - select P5_STATUS
    8. Server-side Condition: Value - enter Completed

      Note:

      The #LABEL# text within the Error Message will be substituted with the label of the associated item. If the item label is updated the error message also reflects the updated value. This improves consistency and ensures that messages have up-to-date label references.

      Tip:

      After you click within the Error Message field, you can click the Help tab in the Central Pane to view examples of error messages. You can also view the Help tab for example entries for other attributes too.

      Note:

      This condition ensures that the validation only fires when the Status item is Completed.

To add a Validation for Completed Date is not Forward Dated:

  1. Right-click the Validating folder and select Create Validation.
  2. In the Property Editor:
    1. Identification: Name - enter Completed Date is not Forward Dated
    2. Validation: PL/SQL Expression - enter :P5_COMPLETED_DATE <= sysdate
    3. Error: Error Message - enter #LABEL# cannot be forward dated
    4. Error: Associated Item - select P5_COMPLETED_DATE
    5. Server-side Condition: Type - select Item is NOT NULL
    6. Server-side Condition: Item - select P5_COMPLETED_DATE
  3. Click Save.

7.10 Copying a Sub Region to a Different Page

In an earlier topic you created a sub region called Audit Details for the Maintain Team Member form. Since the four items included in that region are the same as those on the Maintain Project page and are associated with the exact same database columns, you can copy them to the Maintain Project form and save some time. Copying the region also copies the previously defined template and template options.

First delete the four existing audit detail columns on the Maintain Project form, then copy the Audit Details sub region from the Maintain Team Member form to the Maintain Project form and modify it to fully suit its destination.

Note:

If you do not delete the audit columns, the item names in the copied Audit Details region are renamed with a unique name to ensure all page items have unique names (for example, when P5_CREATED is copied to its destination, it is renamed to P5_CREATED_1). While this automatic renaming does not break the page processing, Oracle does not recommend this approach.

To delete the four existing audit items on Maintain Project form:

  1. In the Layout tab, press and hold the Ctrl key and click the following items to select them:
    • P5_CREATED

    • P5_CREATED_BY

    • P5_UPDATED

    • P5_UPDATED_BY

  2. Do one of the following:
    • Right-click one of the items and select Delete.
    • Press the Delete key.
  3. Click Save

To copy the Audit Details sub region from Page 3 to Page 5:

  1. In Page Designer, navigate to Page 3.
  2. Click the Rendering tab.
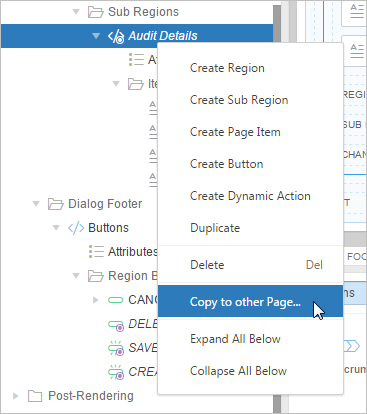
  3. In the Rendering tree, right-click the Audit Details sub region and select Copy to other Page...
  4. In the Copy Region dialog:
    1. To Page - enter 5
    2. Copy Region Items - select Yes
  5. Click Next.
  6. Click Copy.
  7. Navigate back to Page 5 to confirm the Audit Details sub region copied to page 5 Content Body as a region (not a sub region).

To update the Audit Details sub region for the Maintain Project form:

  1. On page 5, in the Rendering tree or Layout, select the Audit Details region.
  2. In the Property Editor:
    1. Layout: Parent Region - select the first Maintain Project
  3. Click Save and Run Page.
  4. Try out these functions to see how the page responds:
    • Change the Status and see how the Completed Date is shown or hidden depending on the status selected.

    • Save a record with a Status of Completed and no Completion Date - An error message should display.

    • Save a record with a Completion Date in the future - An error message should display.

  5. When you are finished, click Application #### on the Developer Toolbar to return to the Application home page.

You have made substantial revisions to the Projects report and Maintain Project form. In the next lessons, you add more regions to the form so that users can view more details of the project and further control their project management.

Proceed to the next lesson.