Calculating Detailed Profitability Models

Processing times may be affected by calculation selections. You can run the operations directly from the screen or schedule a suitable time.

Running the Model Calculation creates two views for use within Reports, which you can use to create custom reports:

  • HPMD_DEMO_STAGE_BALANCE_V—Contains the stage balance information viewed within the Stage Balance Report.

  • HPMD_DEMO_LEVEL_0_CONTRIB_V—Contains the contribution information for each source and destination combination at Level Zero.

Caution:

There is a new dependency for the Detailed Profitability calculation engine on the dimension hierarchy reporting tables that were previously optional. To deploy these tables, select Calculate, and then Manage Database, and then select the Reporting Tables and Views tab. You must redeploy these tables each time you redeploy the Detailed Profitability application. To check whether the tables must be redeployed, see step 5 in Deploying Detailed Profitability Reporting Views.

To calculate a model:
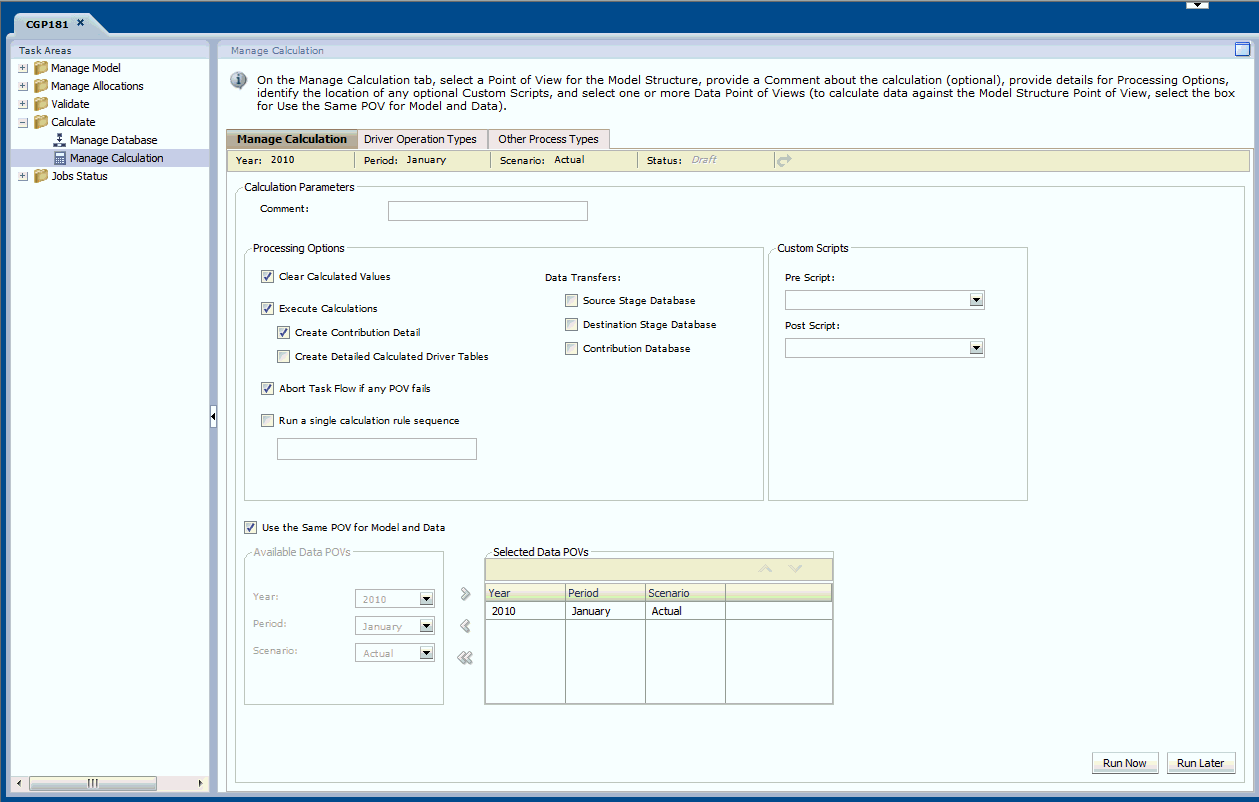
  1. From Oracle Hyperion Enterprise Performance Management Workspace, select Navigate, then Applications, then Profitability, and then select the application that you want to calculate.
  2. In an open model, from Task Areas, select Calculate, and then Manage Calculation.

    Use the Manage Calculation tab to select the parameters for the calculation.
  3. In the Task bar, select the POV for the model, and then click Load the POV status Load the POV status icon.
  4. Optional: Under Calculation Parameters, in Comment, enter a brief description or name for the calculation.
  5. Optional: Under Processing Options, check Clear Calculated Values to remove previously calculated data before beginning this calculation.
  6. Under Execute Calculations, select the additional types of data that you want to generate for this calculation:
    • Check Create Contribution Detail to include all contributions in the model in the calculation.

    • Check Create Detailed Calculated Driver Tables to retain the Calculated Driver tables that store the calculated driver values before the next source intersection is processed.

      Note:

      If this option is selected, a large number of tables may be generated. so you must ensure that there is enough storage space available. Be aware that processing time might increase.

  7. Optional: If you selected multiple POVs, check Abort Task Flow if any POV fails. If one of the POVs fails, the calculation is stopped, and the remaining POVs are not calculated.
  8. If you select Run a single calculation rule sequence, enter the individual sequence number.
  9. Under Data Transfers, select the Oracle Essbase analysis databases that you want to transfer data into:
    • Source Stage Database: Includes Source Stage Dimensions (including 'Source Measures Dimension') with stage prefix, Attribute Dimensions if any associated, ‘MeasuresDetailed’ Dimension, contains the detail of the source stage at level 0.

    • Contribution Database: Includes Source Stage Dimensions with stage prefix, Destination Stage Dimensions with stage prefix, 'MeasuresDetailed’ Dimension, Attribute Dimensions if any associated, contains the detail from the Level 0 Contribution Table and the single measure ReceivedPriorStage.

    • Destination Stage Database: Includes Destination Stage Dimensions with stage prefix, Destination Measures Dimension, Attribute Dimensions if any associated, contains data from the destination stage table aggregated to the Level 0 members.

  10. Optional: If you have Custom Scripts, enter the name of any pre- or post-calculation scripts that must be run.

    Custom scripts are stored within the HPM Product Schema in the HPM_SQL_SCRIPT. For information on pre- or post-calculation scripts, see the Oracle Hyperion Profitability and Cost Management Administrator's Guide

  11. Optional: Under Use the Same POV for Model and Data, clear this option if you want to use a different POV to access Data; otherwise, the POV selected at the top of the screen is used for both model and data.

    To set a different POV for Data:

    1. Clear the Use the Same POV for Model and Data check box to enable POV selection.
    2. Under Available Data POVs, select the Year, Period, and Scenario for the new Data POV.
    3. Use the arrow keys to move the selected POV under Selected Data POVs.
    4. Repeat step 11.b and step 11.c to create additional Data POVs.
  12. Calculate the model, using one of the following options:
    • Click Run Later to submit a calculation task for further scheduling data and the time of execution. A confirmation message indicates that the job has been created and identified the assigned taskflow ID. See Scheduling Detailed Profitability Task Flows.

      Note:

      If this option is not selected when the task is created, you cannot schedule the task.

    • Click Run Now to run the calculations immediately.

      A confirmation message indicates that the job has started and identifies the assigned taskflow ID. Select Jobs Status, and then Job Library to monitor the task status.

      Caution:

      Depending on the size and complexity of the model, this operation may take significant time.