Management Ledger Database Deployment Process

For the first deployment of a Management Ledger database, you should select the Replace Database option to create the database in its entirety. After the first deployment, when you need to redeploy the calculation database, you can select deployment options to retain data already in the cube or to discard it upon restructure.

Any errors in the deployment are reported in hpcm.log.

Note:

  • Reporting cube deployment fails when a generic dimension is associated with a dynamic hierarchy type. An ASO cube cannot have attribute dimensions associated with dynamic generic dimensions.

  • Oracle recommends that, before importing data or artifacts, you create a backup of the data in Oracle Hyperion Enterprise Performance Management Workspace and Oracle Essbase. Contact your administrator for assistance.

To deploy Management Ledger databases:
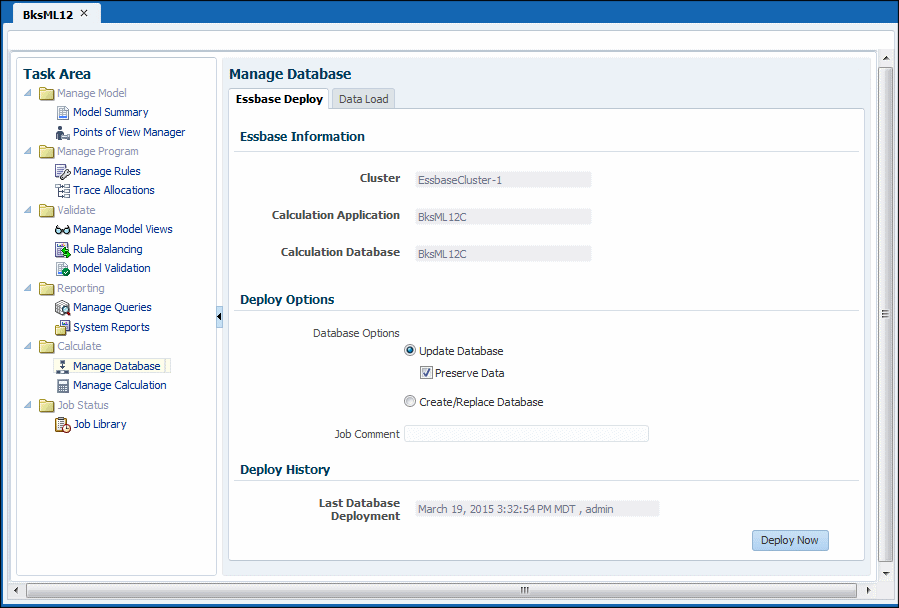
  1. In an open model, from Task Areas, select Calculate, and then Manage Database.

    The Manage Database screen is displayed (Figure 12-1).

    Figure 12-1 Management Ledger Essbase Deploy Screen


    The Management Ledger Essbase Deploy screen displays the information described in the following steps.
  2. Confirm that the Essbase Deploy tab is selected.
  3. Under Essbase Information, review the following information:
    • Cluster displays the name of the Essbase database server that contains the model.

    • Calculation Application displays the name of the application being deployed.

    • Calculation Database displays the name of the Essbase database to which the application is being deployed.

  4. Under Deploy Options, select appropriate Database Options for deploying the Management Ledger database:
    • For the first deployment of a database, all selections are grayed out. This option creates the entire database for the first time.

    • To redeploy an existing database, select Update Database to retain existing artifacts and property settings in the new database, and change the outline to reflect current metadata.

      Optional: Select Preserve Data to build and restructure the Essbase cube while preserving data. This option can be time-consuming, based on the size of the outline and the amount of data present.

      Note: After deleting dimension members, the Archive Data and Reload After Deploy option for redeploying the cube to Essbase and preserving the data is not guaranteed to always work, depending on how Essbase is able to deal with those deleted members. As a workaround, you may have to export all data and remove the data for the deleted members and then reload the data in a separate step after deploying the cube without the Archive Data and Reload After Deploy option selected.

    • Alternatively, select Create/Replace Database to remove the database and applications completely, and recreate them.

      Caution:

      If you plan to select this option, you must first back up your data and then reload it yourself once the database is recreated.

  5. Optional: Enter a comment in the Job Comment box. The comment will display in the Job Library.
  6. Optional: Under Last Database Deployment, review the date and time of the previous deployment.
  7. Click Deploy Now to deploy the database.

    A confirmation message is displayed, indicating that the job has been submitted.

    Caution:

    Depending on the size and complexity of a model, this operation may take a significant amount of time.

  8. Monitor the progress of the deployment on the Job Status page using the taskflow ID.
  9. Calculate the model (Calculating Management Ledger Models).