Managing Global Settings
Use the Global Settings page to manage system-wide settings for push notifications.
Navigation:
In the left panel of the Notification Administration fluid navigation collection, select the Global Settings item.
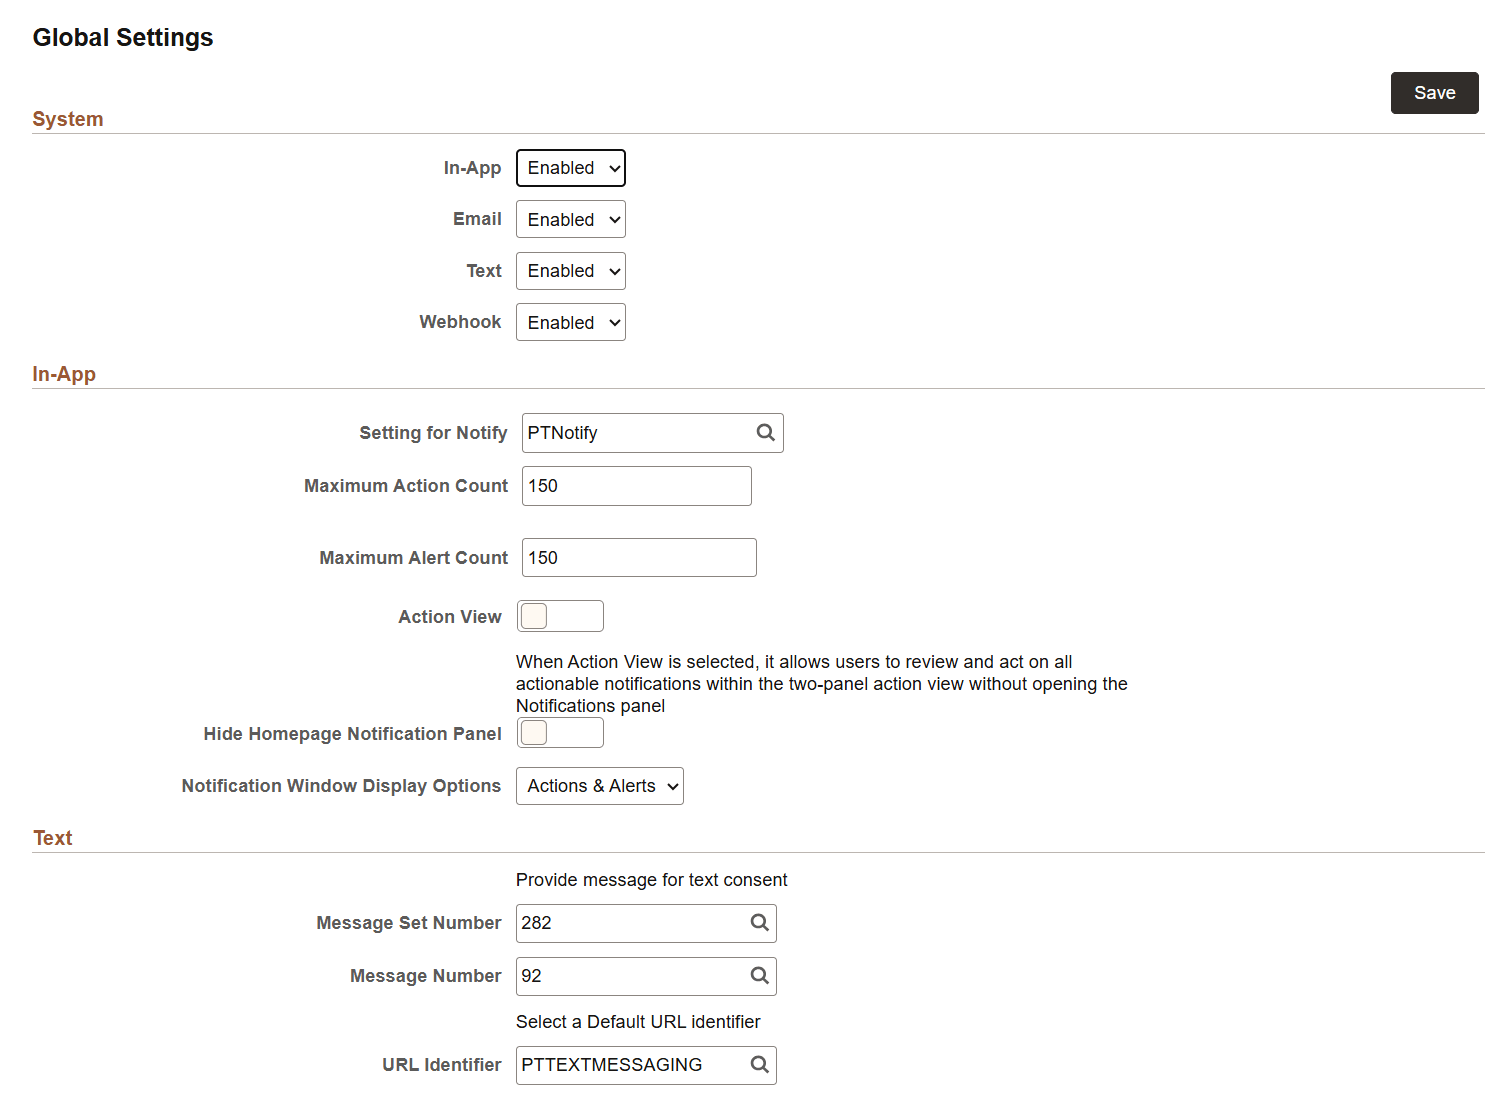
This example illustrates the fields and controls on the Global Settings page. You can find definitions for the fields and controls later on this page.
System
Use the fields in this section to enable or disable notification delivery options system wide.
| Field or Control | Description |
|---|---|
|
In-App |
Enables in-application delivery of notifications in the Notifications panel. See the “In-App” section below for additional fields that are revealed when this option is enabled. Important: Even when in-app is disabled, certain notifications will be delivered to users’ Notifications panel. For example, in the current release, alerts from the Process Scheduler are not managed via Notification Administration: Notification Settings. |
|
|
Enables delivery of notifications via email. |
|
Text |
Enables delivery of notifications via text messages. Additional configuration is required to complete system configuration for text messages. See the “Text” section below for additional fields that are revealed when this option is enabled. |
|
Webhook |
Enables delivery of notifications to other applications that support webhook endpoint, such as Slack, Teams, and so on. Additional configuration is required to complete system configuration for this notification channel. See the "Webhook" section later in this topic. |
In-App
| Field or Control | Description |
|---|---|
|
Setting for Notify |
Select PTNotify. It contains information on the notification channels, which you configure on the Notification Settings page. See Setting Properties on the Fluid Tab and Applications User’s Guide: Sending Ad Hoc Notifications from Fluid Components. |
|
Maximum Action Count |
Enter the maximum number of actions to be displayed to the user within the Notifications panel. The default value is 150. Note: Users can personalize the Notifications panel by specifying a different maximum number. See Applications User’s Guide: Personalizing the Notifications Panel and Your Notifications. |
|
Maximum Alert Count |
Enter the maximum number of alerts to be displayed to the user within the Notifications panel. The default value is 150. Note: Users can personalize the Notifications panel by specifying a different maximum number. See Applications User’s Guide: Personalizing the Notifications Panel and Your Notifications. |
|
Action View |
Enables the two-panel action view for all users system wide. Important: Review the following important considerations in “Enabling the Two-Panel Action View” before enabling the two-panel action view on your system. |
|
Hide Homepage Notification Panel |
Hides the Notification Panel on a homepage for all users system wide. By default, this option is disabled. When the option is disabled, the Notification Panel continues to be available on the homepage, and users can use homepage personalization to show or hide the panel. When this option is enabled, the system hides the Notification Panel on the homepage for all users. The system also hides the related notification panel setting in Personalize Homepage and sets the Show Notifications Panel option to disabled globally. This option applies only to the Notification Panel that appears on the homepage. It does not remove the Notifications icon from the banner. |
|
Notification Window Display Options |
Select the notification types to appear in the Notification panel.
|
Text
To complete system configuration to support text messaging, each of the following values is required.
| Field or Control | Description |
|---|---|
|
Message Set Number |
Enter a number for the message set containing the message to be displayed to users when they consent to receive text messages. Note: The default value is 282. |
|
Message Number |
Enter a number for the message to be displayed to users when they consent to receive text messages. This message is displayed on the Notifications page of My Preferences, where users set their notification preferences. See Applications User’s Guide: Personalizing Notifications. Note: The default value is 92. |
|
URL Identifier |
Select the URL identifier that defines your Twilio account details used for outbound and inbound text messaging. See the “Defining the PTTEXTMESSAGING URL Identifier” section below for instructions on how to configure PTTEXTMESSAGING correctly. Note: Select the default value of PTTEXTMESSAGING or define a custom URL identifier that has the same properties as PTTEXTMESSAGING. |
|
Hide Revoke Consent for User |
When you select this check box, the Revoke Consent button on the My Preferences - Notifications page is not displayed system wide. That is, a user cannot revoke the consent for receiving text notifications. The Hide Revoke Consent for User check box is not delivered by default. Based on your business requirements, application developers can control the display of this check box by using a custom application class on the User Data Mapping page. |
(Optional) Defining the PTTEXTMESSAGING URL Identifier
Important:
If you wish to provide your users with text messaging as a notification option for the delivery of push notifications or the ability to send inbound text messages, then you must establish an account with Twilio.
To define the PTTEXTMESSAGING URL identifier:
-
Select .
-
Search for and select PTTEXTMESSAGING.
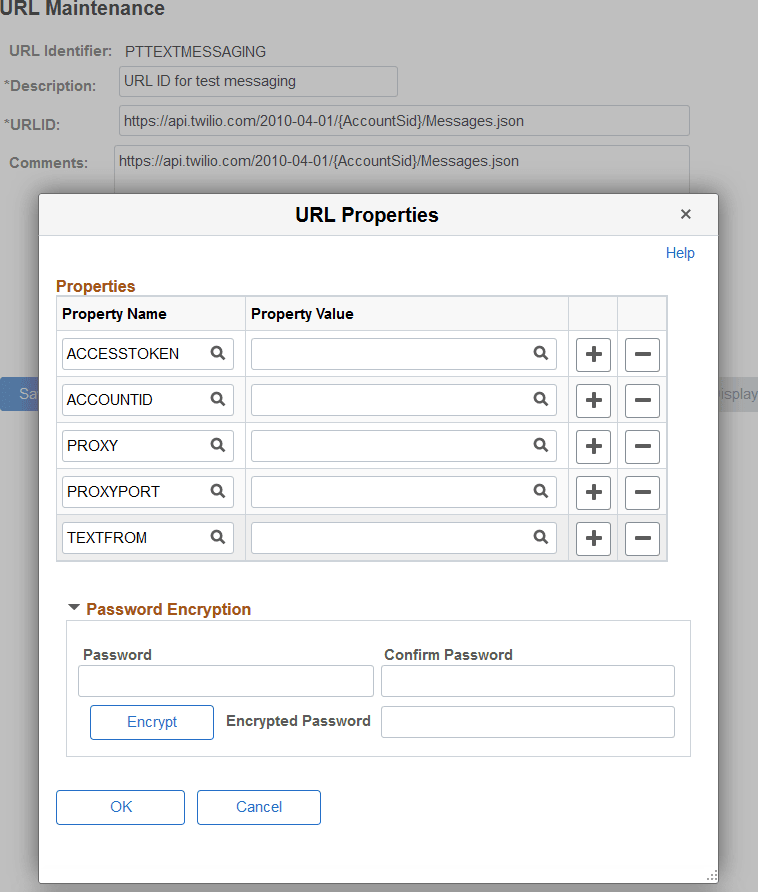
This example illustrates the fields and controls on the URL Maintenance page and URL Properties page for the PTTEXTMESSAGING URL identifier. You can find definitions for the fields and controls in the following section.
-
In the URLID field, replace the {AccountSid} placeholder with your Twilio account ID.
-
Click the URL Properties link and enter the following properties and values:
Field or Control Description ACCESSTOKEN
The access token for your Twilio account.
Note: Use the password encryption utility on this page to encrypt the access token.
ACCOUNTID
Your Twilio account ID.
PROXY (as required)
The fully qualified domain name of your proxy server.
PROXYPORT (as required)
The HTTP port on your proxy server.
TEXTFROM
The phone number associated with your Twilio account.
Enter the phone number in international phone number format (known as E.164), which is a number of up to fifteen digits in length starting with a +. Do not include any other non-numeric characters such as spaces, dashes, periods, or parenthesis. For example:
+15555550100
Webhook
The webhooks notification channel enables PeopleSoft Notifications to send outbound messages to external systems that support webhook endpoints, such as Slack, Teams. The Webhooks framework is integrated with the PeopleSoft Notification Framework, allowing notifications to be delivered through webhook endpoints using a standardized configuration.
Before you can use webhook as a notification channel, you must ensure that the following configurations are completed:
- As a prerequisite, webhooks must be configured in Integration Broker using the Webhooks Framework. For more information on webhook configuration, see Managing Webhooks.
- Add a notification and configure it as a webhook notification. For a description of this step, see Managing Notification Configurations.
- Associate users with the webhook endpoint that should receive their notifications. See Associating Users with Webhook Endpoint Configuration for more information.
(Optional) Enabling the Two-Panel Action View
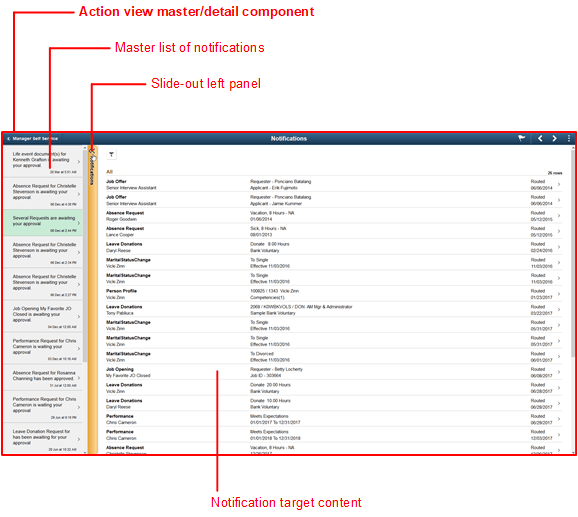
The two-panel action view uses the master/detail architecture. A user’s list of notifications (the master) is displayed in the left panel, while the actionable transaction (the detail) is displayed on the right. The action view master/detail component has both AJAX transfers and the slide-out left panel enabled.
- The action view master/detail component is the container.
- The master list of notifications is displayed in the left panel.
- If the notification target content includes an inner left panel, then the left panel collision handling that is set on the action view master/detail component enables the slide-out left panel.
- The component for the notification target is displayed on the right.
Any component and page that could be displayed as a detail transaction in the action view must conform to the general restrictions on being displayed within a master/detail component as described in Guidelines and Limitations for Master/Detail Components.
In addition to these general guidelines, evaluate each target component and page that could be displayed in the action view as the result of a notification:
-
If the target is a fluid activity guide, another master/detail component, or a fluid navigation collection, it cannot be displayed within the action view; however, it can be set to display in a new browser window. You must add the &ICDisplayNotify=N query string parameter to the notification when it’s published.
-
Pages in the target fluid component cannot include an “application header”—that is, any of the Custom Header group box types (Left, Right, Middle, or Bottom) must be hidden when displayed in the action view.
-
Since the action view master/detail component controls the title in the fluid banner, for each page defined within the target component, you should add a group box of type Page Title that is defined to be visible when the page is rendered within a master/detail component. This Page Title group box provides context that is lost when the page title is not displayed in the fluid banner. To hide this page title if the page is rendered outside of a master/detail component, use the psc_hideinmode-notmd style.
-
If the target content is a fluid component that employs the 8.54 two-panel construct (that is, it was built from the PeopleTools 8.54 PSL_TWOPANEL layout page or it was designed with an internal left panel similar to PSL_TWOPANEL), your implementation must ensure that the internal two-panel is initialized (using initializeTwoPanel) so that left panel collision handling can occur.