Defining All Participating Nodes
This section discusses how to:
-
Define default local nodes.
-
Define portal host nodes.
Defining Default Local Nodes
To define default local nodes on all systems:
-
Access the Configure Unified Navigation navigation collection. (See Configure Unified Navigation Fluid Navigation Collection.)
-
In the Configure Unified Navigation navigation collection, expand the Single Signon Setup section and select the Configure Node for SSO link to open the Nodes page in the target area.
-
If the node name already exists in the system, then select that node definition. Otherwise, add a new value for the non-standard node name.
-
Select the Node Definitions page:
-
Enter a description for the node.
-
Verify that the node type is PIA.
-
For default local nodes, the Default Local Node, Local Node, and Active Node check boxes must be selected.
Note:
When configuring a remote node definition for this node, only the Active Node check box must be selected.
-
For default local nodes only, set the authentication option to Password or Certificate. If the authentication type is password, enter a node password.
Note:
When configuring a remote node definition for this node, you must enter the same node password.
-
Enter the default user ID for the node.
Note:
When configuring a remote node definition for this node, you must enter the same default user ID. If necessary, create a user profile for this ID.
-
Create a check token ID for the node, which is required for single signon configurations.
Note:
When configuring a remote node definition for this node, you must enter the same check token ID.
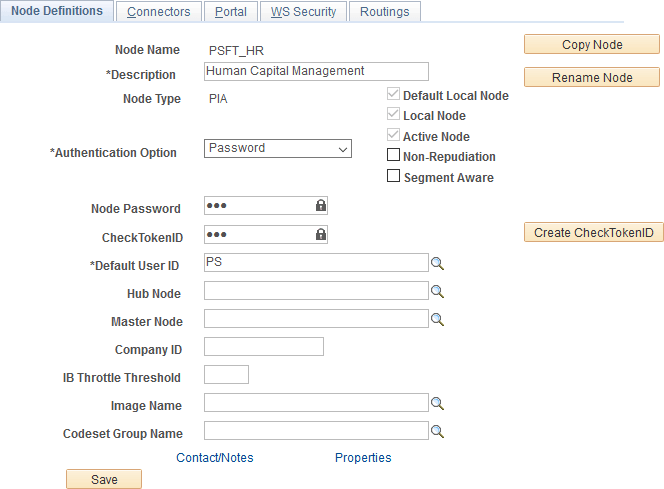
This example illustrates the fields and controls on the Node Definitions page showing the default local node for the portal system (HCM).
-
-
Select the Connectors page:
-
Enter the ID for the shared integration gateway in the Gateway ID field.
Note:
When configuring a remote node definition for this node, use the same ID.
-
Enter PSFTTARGET as the connector ID.
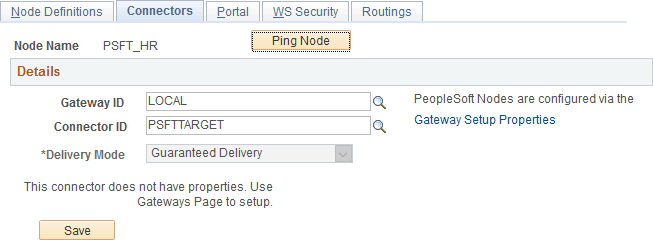
This example illustrates the fields and controls on the Connectors page showing the default local node for the portal system (HCM).
-
If the remote node will use the shared integration gateway and you did not add this node to the gateway configuration previously, do so now. If you are creating all node definitions before configuring the gateway, then remember the node name for each default local node and enter into the gateway properties later.
-
-
Select the Portal page:
-
Ensure that the correct default portal is selected.
-
Ensure that a value is defined for the Tools Release field.
-
Enter values for the Content URI Text field and the Portal URI Text field as are appropriate for the web server port and site on this local system.
Note:
When configuring a remote node definition for this node, use the same values as defined on the local system.
-
For each remote node definition, enter the name of the default local node of the remote system in the Network Node Name field.
Note:
Do not set this field on local node definitions.
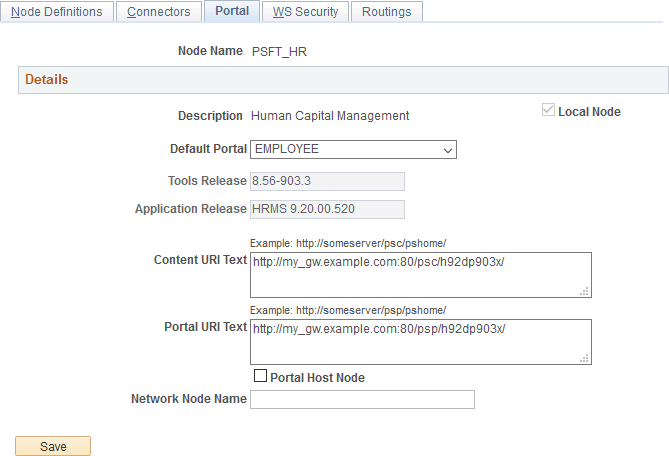
This example illustrates the Portal page showing default local node of the portal system (HCM).
-
Save the node definition.
-
-
Repeat steps 2 through 6 for each default local node on each content provider system.
-
Then, using the values specified in the local node definitions, repeat steps 2 through 6 for each remote definition of each default local node.
Defining Portal Host Nodes
To define portal host nodes on all systems:
-
Access the Configure Unified Navigation navigation collection. (See Configure Unified Navigation Fluid Navigation Collection.)
-
In the Configure Unified Navigation navigation collection, expand the Single Signon Setup section and select the Configure Node for SSO link to open the Nodes page in the target area.
-
If the node name already exists in the system, then select that node definition. Otherwise, add a new value for the non-standard node name.
-
Select the Node Definitions page:
-
Enter a description for the portal host node.
-
Verify that the node type is PIA.
-
For portal host nodes, the Local Node and Active Node check boxes must be selected.
Note:
When configuring a remote node definition for this node, only the Active Node check box must be selected.
-
For portal host nodes, the Authentication Option field value is None.
-
Enter the default user ID for the node.
Note:
When configuring a remote node definition for this node, you must enter the same default user ID. If necessary, create a user profile for this ID.
-
-
Select the Connectors page:
-
Enter the ID for the shared integration gateway in the Gateway ID field.
Note:
When configuring a remote node definition for this node, use the same ID.
-
Enter PSFTTARGET as the connector ID.
Note:
If you click the Ping Node button for a remote node that is a portal host node, the following error will be displayed:
Integration Broker Service:
Destination node does not match the local  node. (158,506)
-
-
Select the Portal page:
-
Ensure that the correct default portal is selected.
-
Ensure that a value is defined for the Tools Release field.
-
Enter values for the Content URI Text field and the Portal URI Text field as are appropriate for the web server port and site on this local system.
Note:
When configuring a remote node definition for this node, use the same values as defined on the local system.
-
Select the Portal Host Node check box only for a node definition for a remote portal host node.
Note:
Do not select this check box on local node definitions.
-
For each remote node definition, enter the name of the default local node of the remote system in the Network Node Name field.
Note:
Do not set this field on local node definitions.
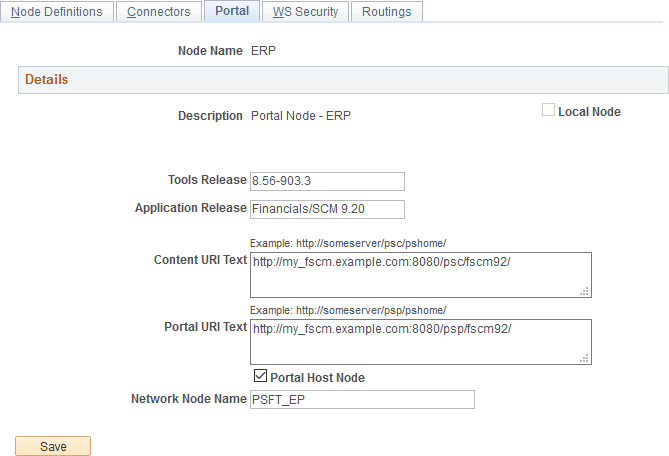
This example illustrates the Portal page showing the definition of a remote portal host node (ERP from the FSCM system).
-
Save the node definition.
-
-
Repeat steps 1 through 6 for each portal host node on each content provider system.
-
Then, using the values specified in the local node definitions, repeat steps 1 through 6 for each remote definition of each portal host node.