17 Agent Creation
This section covers the creation of AI agents through the visual flow builder or through code.
Multi-agent Systems and Supervisor Patterns
A multi-agent system is an AI application design in which a user request is handled by multiple cooperating agents instead of one large, all-purpose agent.
Each agent has its own role, instructions, model configuration, memory policy, and allowed tools. The flow defines how the request moves between those agents and how the final answer is produced.
This design is useful when a workflow naturally separates into specialist responsibilities. For example, one agent can retrieve data, another can call an API, another can summarize findings, and a supervisor can decide which specialist to use and combine the results into a single response.
Note:
As a design principle, it's best to start with the smallest agent design that meets the requirements. Add multiple agents when separation of concerns improves reliability, security, maintainability, or observability more than it increases cost and complexity.Benefits of Multi-agent Systems
- Specialization: give each agent a focused job, prompt, and tool set instead of one crowded instruction block.
- Routing and decomposition: let a supervisor interpret the request, split it into subtasks, and choose the right specialist for each subtask.
- Tool and data isolation: expose sensitive or high-impact tools only to the agents that are responsible for using them.
- Governance and troubleshooting: make handoffs, tool ownership, memory settings, and failure points easier to inspect.
When to Choose Multi-Agent or Single Agent Designs
A single agent with more tools is often the right first design. It is simpler to test, cheaper to run, and easier to reason about when the task has one clear objective and one permission model. Use a multi-agent design when the workflow benefits from explicit roles, bounded tool access, or a supervisor that can coordinate multiple specialist outputs.
| Design Question | Use single agents when... | Use multi-agents when... |
|---|---|---|
| Task shape | The request has one main objective and one response stile. | The request must be decomposed, routed, verified, or synthesized across specialties. |
| Tools and data | The same instruction set and permission model can safely govern all tools | Different agents need different tools, data sources, or access boundaries. |
| Instructions | The prompt remains clear even with all business rules and tool guidance in one place. | Instructions are easier to maintain as smaller, role-specific prompts. |
| Cost and latency | You want the shortest path from user message to answer. | The reliability, governance, or maintainability benefits justify extra orchestration. |
| Troubleshooting | Failures are simple to debug in one trace. | You need explicit handoffs, state isolation, and clearer ownership for each step. |
Supported Pattern: Orchestrator/Supervisor
The current canvas experience supports the orchestrator / supervisor pattern. In this pattern, the Chat Trigger receives the user message, optional Guardrails evaluate the input, and a Supervisor Agent acts as the orchestrator for the rest of the flow.
The supervisor should focus on planning, routing, delegation, and final response synthesis. It decides which agent should handle a task, sends that agent a scoped instruction, reviews the result, and then either delegates another step or returns the final response. Agents should be narrower specialists: they do the assigned work, use their attached tools, and return useful results to the supervisor.
About the Visual Flow Canvas
An agent is assembled by dragging nodes and tool templates from the left palette onto the canvas, then connecting the nodes in the order the request should travel.
Selecting a node opens a configuration panel at the bottom of the screen.
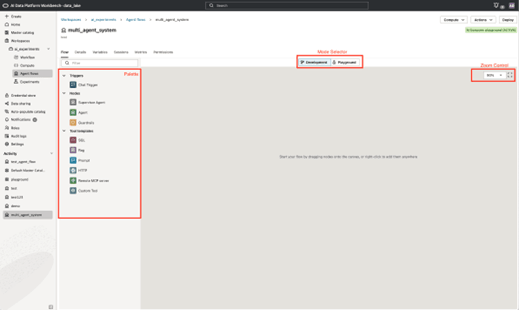
| Canvas Element | Purpose |
|---|---|
| Chat Trigger | Entry point for a user message. In the screenshot this node is labeled Message and typically sits at the top of the flow.
A chat trigger node can be connected to an agent, a supervisor agent, or a guardrails node. Only one chat trigger is allowed per canvas. Chat trigger nodes can be configured to enable agents to read provided files and write output in specified file formats. The file types supported depend on the model used. For supported files types, look for specific models in Offered Pretrained Foundational Models in Generative AI. |
| Guardrails | Optional policy and safety layer placed before or after model work. The guardrails policies include PII, content moderation, and prompt injection detection.
A guardrails node can filter traffic between a chat trigger and an agent node, between a supervisor and executor agents, or between agent and tool nodes. We recommend a single guardrails node between the chat trigger and the agent node. |
| Supervisor Agent | The orchestrator. It receives the user request, decides which executor agent or tool should handle each task, and coordinates the final answer.
Only one supervisor agent is allowed in a canvas. |
| Agent | An executor agent. Each executor should have a clear specialty, such as data retrieval, API lookup, summarization, or document question answering.
Use an agent / executor agent for a single agent system. |
| Tool templates | Reusable capabilities that can be attached to individual executor or supervisor agent. Tool templates include SQL, RAG, Prompt, HTTP, Remote MCP server, and Custom Tool. |
| Development / Playground | Mode selector above the canvas. Development is used while editing the agentic system; Playground is used to initiate test sessions and inspect agent behavior.
Playground requires that an AI compute is attached to your agent. |
| Zoom control | Canvas zoom selector. The screenshots show 60 percent and 90 percent zoom levels. |
Create an Agent
You can create an agent in a workspace where have you have Manage permission.
- Click
 Create Agent or click Create in the top right.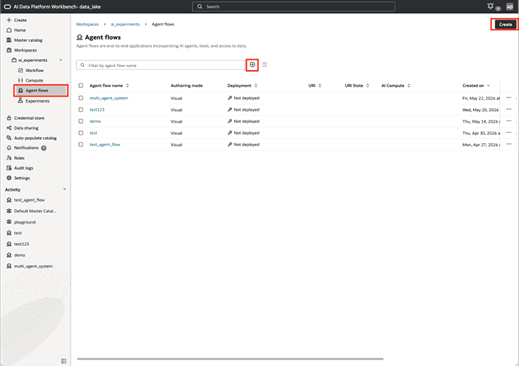
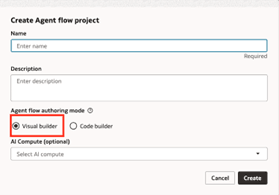
- For Agent flow authoring mode, select Visual builder.
Add Chat Trigger and Agent to Visual Builder Canvas
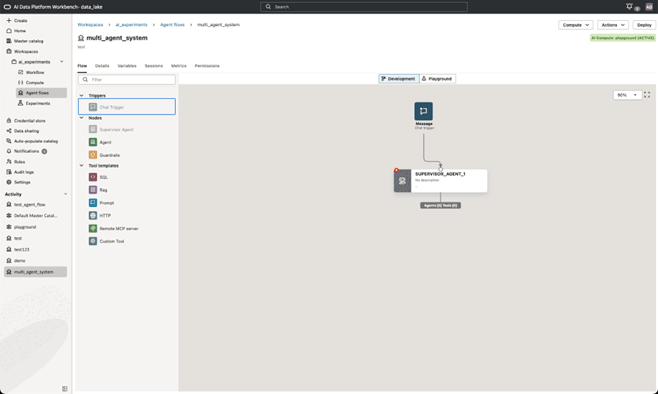
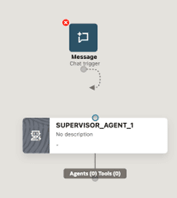
Your first step after creating an agent with the Visual Builder should be to add a chat trigger and a supervisor agent.
- Click and drag a Supervisor Agent to the canvas.
Configure a Supervisor Agent
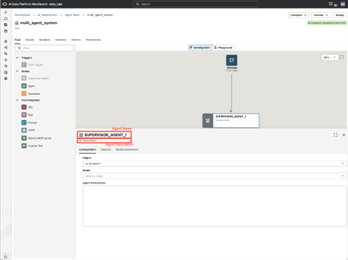
You need to configure a supervisor agent added to your Visual Builder canvas with instructions outlining the supervisor role.
| Field | Configuration |
|---|---|
| Agent Name | Provide a descriptive name for your supervisor agent. A good, descriptive name will be beneficial when debugging the system behavior through traces and logs. |
| Agent Description | Provide a description of the agent purpose, role, and general behavior. Useful for documentation purposes. |
| Region | Choose the region where the OCI Generative AI model used by Supervisor Agent is hosted. See Generative AI Models by Region. |
| Model | Choose the OCI Generative AI service model used by the supervisor. The dropdown lists the models available in the region you selected. |
| Agent instructions | Describe the supervisor role, routing rules, delegation policy, tool-use expectations, and final response format. |
- Navigate to the agent in your workspace.
- Click the Supervisor Agent node on your canvas.
- Provide a meaingful name and description for your supervisor agent.
- Enter the region and model for the OCI Generative AI service model used by the supervisor.
- Provide the agent instructions for your Supervisor Agent.
Suggested Supervisor Instructions
You should use the Instructions field for a Supervisor Agent to make the supervisor responsible for orchestration, not for doing every task itself.
Keep the instructions concrete so routing decisions are predictable. See the following for an example of a set of Supervisor instructions:
You are the supervisor for a multi-agent system.

Responsibilities:
- Understand the user's request and break it into subtasks.
- Select the most appropriate agent or tool for each subtask.
- Do not perform specialist work yourself when an agent is available.
- Ask for clarification only when required information is missing.
- Combine agent outputs into a concise final answer.
- Mention important assumptions, limits, or failed tool calls in the final answer.

Routing rules:
- Use the SQL agent for structured data questions.
- Use the HTTP agent/tool for external API lookups.
- Use the RAG agent/tool for document or knowledge-base questions.
- Use the prompt tool for reusable prompt-only transformations.
Configure Supervisor Agent Memory and State Isolation
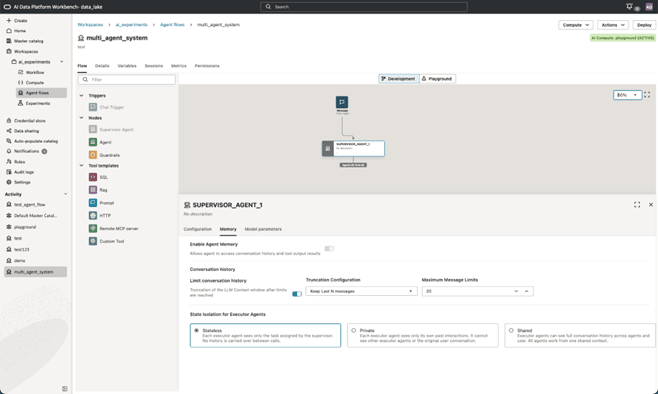
The Memory tab for a Supervisor Agent controls how much conversation and tool-output history is available to the supervisor and how much context is shared with executor agents.
| Field | Configuration |
|---|---|
| Enable Agent Memory | Enable when users need multi-turn continuity. Disable for isolated, one use tasks.
This field cannot be disabled for Supervisor Agents. |
| Limit conversation history | Enable to truncate the LLM context window after the specified limit is hit. Disable to show the full history. |
| Truncation configuration | If Limit conversation history is enabled, use this field to set the conditions for truncating the the context window.
Options are:
|
| Maximum Message Limits and Token Budget | One or both of these options is displayed, depending on your choice for Truncation Configuration.
Default values are 20 messages and 5000 tokens. We recommend starting with moderate values and adjusting as needed. |
| State Isolation for Executor Agents | Select Stateless, Private, or Shared.
|
- Navigate to the agent in your workspace.
- Click the Supervisor Agent node on your canvas.
- Click the Memory tab.
- Choose whether to enable Limit conversation history. Select a Truncation Configuration and set limits, if enabled.
- Choose an option for State Isolation for Executor Agents.
Models Parameter Tab
The model parameters tab lets you configure model-specific parameters that are available for the selected model.
Model parameters can be configured separately for supervisor and executor agents. Parameters you can use include temperature, top K, top P, and frequency penalty.
Note:
Only a subset of models exposes configurable parameters. Furthermore, the parameters vary across model families.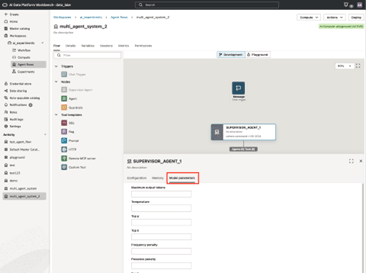
Add Guardrails to an Agent
You can add additional layers of protection to your agents by adding one or more guardrail nodes to your canvas.
| Guardrail | Options | When to Use |
|---|---|---|
| Personal identifiable information (PII) |
|
Use when the flow must block or mask sensitive personal data before or after model processing. |
| Content moderation prevention | Input and Output rows with Block, Inform, and Allow options. | Use to define how the flow handles hate, sexual, violent, toxic, derogatory, or harassing content. |
| Prompt Injection detection | Input row with Block and Allow options. | Use to reduce the chance that malicious instructions override the system or agent instructions. |
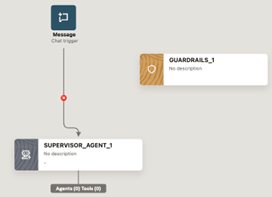
- Delete the connection between Chat Trigger and Supervisor Agent by hovering over the connection and clicking the red X.
Add Executor Agents and Tools to an Agent
You can add executor agents to tools to perform specialized work for the supervisor agent.
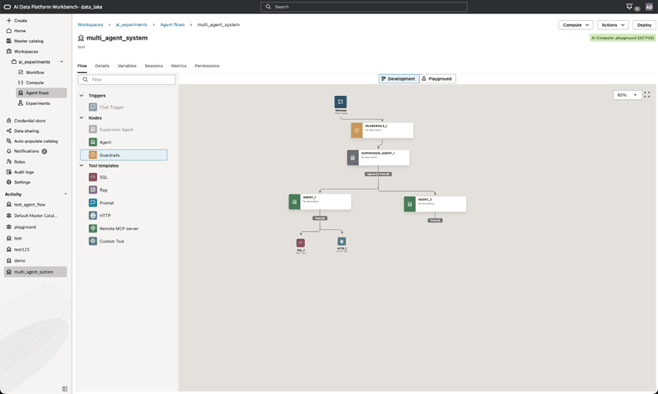
- Navigate to the agent in your workspace.
- Drag an Agent node from the palette to your canvas. Agent nodes should be placed below a Supervior Agent.
- Drag Tools from the palette to your canvas.
- Click and drag the connector handle on your Supervisor Agent to connect to the Agent nodes.
- Click and drag the connector handle on your Agents to connect to the Tool nodes.
Executor Agent Configuration
Agent nodes can be configured by modifying settings on their Configuration, Memory, and Model tabs to help you define the purpose of each agent.
Agents should be configured narrowly, given a specific function and goal, so the supervisor agent can route work reliably.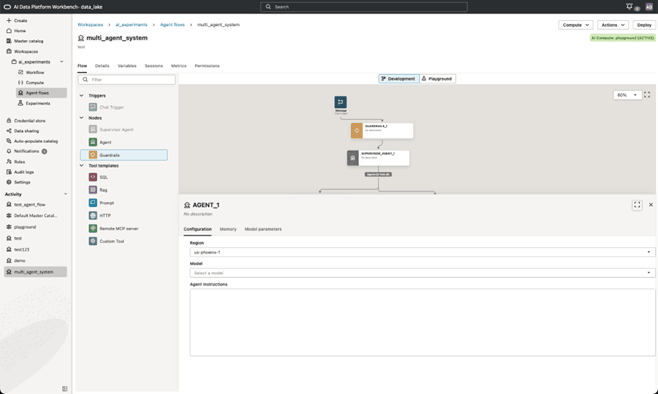
Table 17-1 Agent Configuration Tab
| Field | Configuration |
|---|---|
| Agent Name | Best practice is to name each executor agent according to its specialty, such as SQL_AGENT, DOCUMENT_AGENT, API_AGENT, or SUMMARY_AGENT.
The name of each executor agent is visible to the supervisor agent, so use descriptive names. |
| Agent Description | Provide a detailed description of each executor agent. The description of each executor agent is visible to the supervisor agent. |
| Region | Choose the region where the OCI Generative AI model used by the Agent is hosted. See Generative AI Models by Region. |
| Model | Choose the OCI Generative AI service model used by the agent. The drop-down menu lists the models available in the region you selected.
Select a model that fits the executor task. Executor agents don't need to use the same model as the supervisor agent. |
| Agent instructions | Describe exactly what the executor should do, what tools it may use, and what output structure it should return. |
Executor Agent Memory Tab
In the case of executor agents connected to a supervisor agent, the memory for executors is configured in the supervisor node and applied to all executor agents.
| Field | Configuration |
|---|---|
| Enable Agent Memory | Enable when users need multi-turn continuity. Disable for isolated, one use tasks. |
| Limit conversation history | Enable to truncate the LLM context window after the specified limit is hit. Disable to show the full history. |
| Truncation configuration | If Limit conversation history is enabled, use this field to set the conditions for truncating the the context window.
Options are:
|
| Maximum Message Limits and Token Budget | One or both of these options is displayed, depending on your choice for Truncation Configuration.
Default values are 20 messages and 5000 tokens. We recommend starting with moderate values and adjusting as needed. |
| State Isolation for Executor Agents | Select Stateless, Private, or Shared.
|
Executor Agent Model Parameters Tab
The model parameters tab lets you configure model-specific parameters that are available for the selected model.
Note:
Only a subset of models exposes configurable parameters. Parameters also vary across model families.Examples of parameters include temperature, top K, top P, and frequency penalty. Model parameters can be configured separately for supervisor and executor agents.
Suggested Executor Instructions
You are the SQL executor agent.

Responsibilities:
- Translate the supervisor's task into safe SQL tool usage.
- Use only the SQL tools attached to this agent.
- Return a concise answer plus any important query assumptions.
- Do not invent data. If the tool cannot answer, say what is missing.
- Return structured output with: answer, evidence, assumptions, and follow_up_needed.
Checklist for Agents through Visual Builder
Use this list as a guide to ensure you've included and configured every necessary component for an agent built using the Visual Builder.
Build Checklist
- The agent has exactly one expected entry point: Chat Trigger / Message.
- Guardrails are connected in the intended position and enabled where required. We recommend inserting guardrails between the trigger message and the agent.
- The Supervisor Agent has a selected region, selected model, and orchestration instructions. Same for executor agents.
- Configure memory of the multi-agent system in the Memory tab of the Supervisor agent. Select executor state isolation that matches the privacy and continuity requirements.
- Each executor Agent has a clear specialty and narrow instructions.
- Each tool is attached only to the agent that should use it.
- No node is disconnected.
- An AI compute is attached to the agentic system to test individual tools and for running the Playground experience.
Table 17-2 Common Issues
| Issue | Likely Cause | Suggested Action |
|---|---|---|
| Supervisor does not call an executor | Supervisor instructions are too vague or no executor is connected. | Add explicit routing rules and confirm the executor node is connected to the supervisor. |
| Executor returns broad or off-topic answers | Executor instructions are too general. | Make the executor role narrower and define the required output structure. |
| Tool is not used | Tool is disconnected or attached to the wrong agent. | Check the tool connection and the agent tool count badge. |
| Guardrail does not fire | Guardrail section is configured but not enabled. | Open the guadrails node and confirm the section toggle is on. |
| Context leaks across agents | State isolation is set to Shared or memory is broader than intended. | Use Stateless or Private isolation for stricter separation. |
| Follow-up questions lose context | Memory is disabled or truncation is too aggressive. | Enable memory and adjust the maximum message limit. |
Agents Through Code
You can bring your own LangGraph code base to AI agents in Oracle AI Data Platform or create a brand new LangGraph agent directly on the platform through the agent coding experience.
You can use the AI Data Platform utility Python library aidputils to configure your foundational model and import system tools to your agent. For aidputils API reference, see Aidp-utils API for Oracle AI Data Platform.
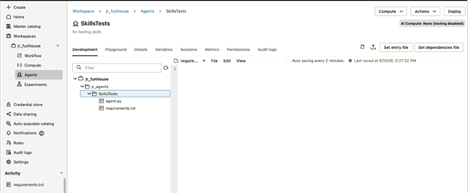
You create an agent through code by either uploading an existing code file or creating code files directly in your agent through the inline editor.
- Python (.py)
- JSON
- TXT
- CSV
- PSV
- SH
- Folder
You can see and navigate through the available code files by clicking the file selector drop-down list.
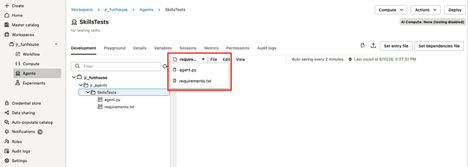
Entry and Dependency Files
Entry files are code files that have the class with setup and invoke methods expected for an agent defined as code. AI Data Platform requires you to set an entry file for agents through code.
Dependency files are files that include third-party libraries required by your agent defined as code. Dependency files are typically requirements.txt files that contain a list of the required third-party libraries.
Note:
Third-party libraries are installed when you test your code in the editor by clicking the Play button or when you test the agent through the Test tab. We recommend install third-party libraries by testing the code first. Errors during installation of the libraries are displayed in the output cell.Agent Class
AgentBasic is a template class for setting up and invoking a simple conversational agent using a stateful LangGraph workflow. It demonstrates the structure required for minimal agent development with two main methods:
setup(): Initializes the agent workflow and defines the graph.invoke(user_query, **kwargs): Runs the agent on a user message and returns the response.
It can be directly run and tested using a main() function before integration into a larger system.
Definition
class AgentBasic:
    def __init__(self) -> None:
        self.graph = None
    def setup(self) -> None:
        self.graph = StateGraph(MessagesState)
        self.graph.add_node(mock_llm)
        self.graph.add_edge(START, "mock_llm")
        self.graph.add_edge("mock_llm", END)
        self.graph = self.graph.compile()
        system_prompt = "Be a helpful assistant."
    async def invoke(self, user_query: str, **kwargs):
        user_message = HumanMessage(content=user_query)
        messages = {"messages": [dict(user_message)]}
        try:
            return self.graph.invoke(messages)
        except Exception as e:
            import traceback
            logger.error(f"Exception while calling invoke {e}", exc_info=True)
            print("Stack trace:\n", traceback.format_exc())
Test Invocation
This test invocation is ideal for initial functional testing.
Note:
Include a main entry point for stand-alone testing.import asyncio
async def main():
test_agent = AgentBasic()
test_agent.setup()
result = await test_agent.invoke("Hi there")
print("Agent response:", result)
if __name__ == "__main__":
asyncio.run(main())
- The script creates an agent, sets it up, and sends a sample user message.
- The agent responds ({"messages": [{"role": "ai", "content": "hello world"}]} in this example).
Usage Guide
Create an Agent class with the setup and invoke methods.
| setup() | Initializes the agent workflow | agent.setup() |
| invoke() | Runs the agent with a user message | await agent.invoke("Your question") |
- Asynchronous:
invoke()is an async method; use it withawaitor run in an async loop. - Testing: The included
main()guard (if __name__ == "__main__":) makes it easy to test the agent before deployment.
Build an Agent Through Code by Upload
You can build your end-to-end agent application with existing code by uploading your LangGraph code base.
Note:
You can upload individual files and folders up to a maximum of 500 files, each file can have a maximum size of size of 500MB. The upload is limited to a total size of 5GB.- Click Upload.

Build an Agent Through Code by Creating New Code
You can build your end-to-end agent application with existing code by creating code directly in your agent through the code editor.
- Python (.py)
- JSON
- TXT
- CSV
- PSV
- SH
- Folders
- Click Add new file.

Set an Entry File for Agents through Code
Your AI agent through code requires an entry file that has the required class, setup, and invoke methods expected for your agent.
- Right-click the entry file and click Set entry file. You can also select the file and click the Set entry file button in the top right of the code editor.
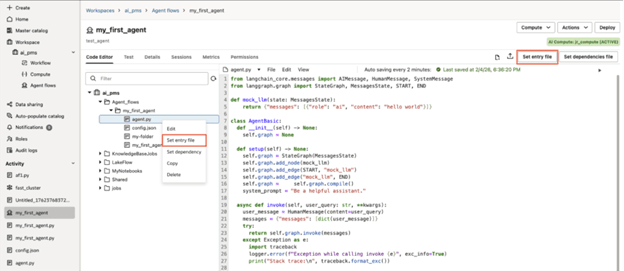
Set a Dependency File for Agents through Code
You need to set a dependency file for agents flows through code that contains any third-party libraries your code is dependent on.
- Right-click the dependency file and click Set dependency. You can also select the file and click the Set dependencies file button in the top right of the code editor.
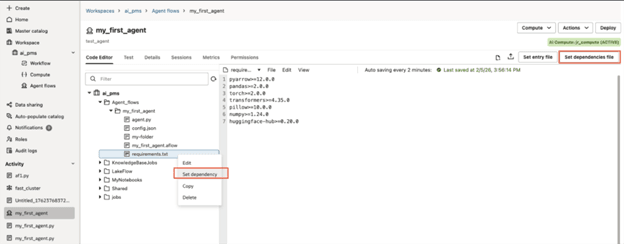
Test Agent Code
You can test the code used for your agent from the Test tab to validate and debug code.
- Click the Playground tab.

- Click Play to test the selected code file.
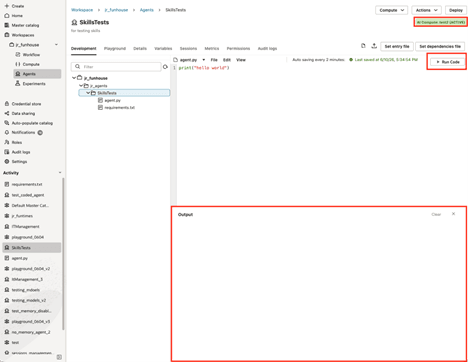
Agent Skills in Coding Experience
Agent Skills let an agent discover and use task-specific instructions, reference files, templates, assets, and optional executable scripts without hardcoding that domain knowledge into the agent’s instructions.
A skill is stored as a folder in your agent code base. Each skill has a required SKILL.md file that describes what the skill does and how the agent should use it. A skill can also include supporting files such as schemas, examples, prompts, templates, assets, or scripts.
For more information, see Agent Skills Overview.
- The agent discovers that a skill exists.
- The agent activates the skill only when it is relevant.
- The agent loads additional files from the skill folder only when needed.
- The agent may run an explicitly declared skill entrypoint, if the skill allows it.
When to use Agent Skills
- Domain-specific instructions
- Coding or data analysis workflows
- SQL generation guidance
- Business process playbooks
- File templates
- Schema references
- Reusable scripts for safe calculations, transformations, or lookups
How Skills Work at Runtime
At runtime, the host application determines which skill directories are available, such as project-level and user-level skill folders. The platform loads each skill’s metadata from SKILL.md and builds a catalog keyed by skill name.
The agent can then use skill-related tools:
| Tool | Purpose |
|---|---|
activate_skill(name) |
Loads the skill instructions from SKILL.md. |
list_skill_files(name, path) |
Lists files available inside a skill folder. |
load_skill_file(name, path) |
Loads a supporting file from the skill folder. |
run_skill_entrypoint(name, entrypoint, args_json, timeout_seconds) |
Runs an explicitly declared Python entrypoint, if allowed by the skill. |
Some environments may also embed a summary of available skills directly into the system prompt. In that setup, the agent can discover available skills from the prompt, then use activate_skill when it needs the full instructions.
Skill Folder Structure
A skill uses an Agent Skills-style folder layout:
<skills_dir>/
	some-skill/
		SKILL.md
		references/
		...
		scripts/
		...
		assets/
		...
Only SKILL.md is required. The other folders are optional.
| Folder or File | Required | Purpose |
|---|---|---|
SKILL.md |
Yes | Main skill metadata and instructions. |
references/ |
No | Supporting documentation, schemas, examples, or templates. |
scripts/ |
No | Python scripts that may be run only when explicitly declared as entrypoints. |
assets/ |
No | Static assets used by the skill. |
Writing SKILL.md
Each skill must include YAML frontmatter at the top of SKILL.md, followed by Markdown instructions.
Basic Example
---
name: sql-helper
description: Helps the agent write safe SQL queries using project schemas.
license: internal
compatibility: "agent-platform"
metadata:
  owner: data-platform
  domain: analytics
allowed-tools: "analyzeQuery inspectSchema"
---

# SQL Helper

Use this skill when the user asks for SQL generation, query review, or schema-aware analysis.

Before writing SQL:
1. Inspect the relevant schema files in `references/`.
2. Prefer explicit column names.
3. Avoid destructive statements unless the user explicitly asks for them and the environment allows them.
Table 17-3 Supported Frontmatter Fields
| Field | Required | Description |
|---|---|---|
| name | Yes | Unique skill name used by the catalog and tools. |
| description | Yes | Short description used for discovery and routing. |
| license | No | License or usage policy for the skill. |
| compatibility | No | Compatibility note for supported runtimes or platforms. |
| metadata | No | String-to-string metadata map. |
| allowed-tools | No | Space-separated list of tools this skill permits. |
| entrypoints | No | List of executable entrypoints declared by the skill. |
Adding Supporting Files
Supporting files let a skill keep detailed content outside the main instructions. This keeps SKILL.md focused while still giving the agent access to richer context. For example:
skills/
	sql-helper/
		SKILL.md
		references/
			warehouse_schema.md
			query_style_guide.md
			examples.md
The agent can inspect these files with:
list_skill_files("sql-helper", "references")
load_skill_file("sql-helper", "references/warehouse_schema.md")
- Database schemas
- API examples
- Prompt templates
- Style guides
- Domain glossaries
- Step-by-step playbooks
- Test cases or examples
Creating an Executable Skill
A skill can optionally expose reusable executable behavior through run_skill_entrypoint. This is intended for controlled operations such as calculations, transformations, validation, or fetching structured data.
- The skill must include
run_skill_entrypointin allowed-tools. - The script must be explicitly declared in the entrypoints section of
SKILL.md.
Example Executable Skill
skills/
	statistics-helper/
		SKILL.md
		scripts/
			summarize_numbers.py
SKILL.md
---
name: statistics-helper
description: Computes basic summary statistics for numeric data.
allowed-tools: "load_skill_file list_skill_files run_skill_entrypoint"
entrypoints:
  - name: summarize_numbers
    script: scripts/summarize_numbers.py
    func: run
    description: Returns count, min, max, mean, and median for a list of numbers.
---

# Statistics Helper

Use this skill when the user asks for basic descriptive statistics.
scripts/summarize_numbers.py:
from statistics import mean, median

def run(*, values: list[float]) -> dict:
    if not values:
        raise ValueError("values must not be empty")

    return {
        "count": len(values),
        "min": min(values),
        "max": max(values),
        "mean": mean(values),
        "median": median(values),
    }
Example invocation:
run_skill_entrypoint(
  name="statistics-helper",
  entrypoint="summarize_numbers",
  args_json="{\"values\": [10, 20, 30, 40]}",
  timeout_seconds=10
)
The runner returns structured output that includes exit_code, stdout, stderr, and a best-effort parsed result when the script prints or returns JSON.
Rules for Executable Entrypoints
- Located under the skill’s scripts/ directory
- Declared in the skill’s entrypoints frontmatter
- Allowed by the skill’s
allowed-toolssetting
The platform does not provide general-purpose arbitrary script execution. Scripts that are not declared in SKILL.md are not runnable.
The script runner uses a timeout, defaults to 10 seconds, runs Python with isolated-mode behavior, and applies path restrictions. However, subprocess-based execution is not a full operating system sandbox. For production use, higher isolation such as containers, restricted filesystems, or network controls should be considered.
Tool Permissions with allowed-tools
allowed-tools acts as a skill-level permission gate. For a documentation-only skill, you may allow only file-reading tools:
allowed-tools: "load_skill_file list_skill_files"For a skill that can execute declared scripts, include run_skill_entrypoint:
allowed-tools: "load_skill_file list_skill_files run_skill_entrypoint" Do not add run_skill_entrypoint unless the skill genuinely needs executable behavior.
How to Let Your Agents Discover and Use Skills
To supplement your agent with skills, you must instantiate a skill catalog, a skill middleware and convert skills into tools using the following objects from the aidpUtils library:
| Tool | Purpose |
|---|---|
discover_skill_catalog |
Determine default skill search locations (project + user) Build a SkillCatalog from discovered directories |
SkillMiddleware |
Append available skills summary and routing rules to system prompt.
Provide factory helpers for workspace-driven middleware construction. |
make_skill_tools |
This method returns the skill discovery tools – activate_skill, list_skill_files, load_skill_file, and run_skill_entrypoint. These tools can be used by the agent to activate and run different skills. |
Here’s an example of what your entry file would include:
from aidputils.agents.skills.discovery import discover_skill_catalog
from aidputils.agents.skills.middleware import SkillMiddleware
from aidputils.agents.skills.tools.factories import make_skill_tools
...
class SchoolGradeAgentWithEmbededSkills:
	...
	def init(self) -> None:
		...
		self.catalog = discover_skill_catalog(skill_folder_whitelist=None)
		self.skill_middleware = SkillMiddleware(self.catalog)
		self.tools = make_skill_tools(self.catalog)
You can debug your skills catalog by adding this logger statement to your code. This will print every skill discovered in the skills catalog:
for info in self.catalog.list():
	logger.info("skill_id=%s name=%s desc=%s root=%s skill_file=%s", info.skill_id, info.name, info.description, info.root_dir, info.skill_file)
Skill Precedence
The platform can load skills from multiple locations, such as project-level and user-level directories. The catalog aggregates those locations into a single name-keyed list of skills.
When multiple stores contain a skill with the same name, precedence determines which one is used. Later stores override earlier ones, which allows a host application to control whether user-level skills, project-level skills, or workspace-level skills take priority.
Skill Authoring Best Practices
Keep SKILL.md focused
Use SKILL.md for the core instructions the agent needs immediately after activation. Put long schemas, examples, and reference material in references/.
Write clear descriptions
The description field is used for discovery. Make it specific enough for the agent to know when to activate the skill.
description: Helps generate BigQuery SQL using the finance warehouse schema.description: Helps with data.Use explicit entrypoint names
entrypoints:
   - name: validate_query
   - name: summarize_numbers
- name: transform_csventrypoints:
- name: run
- name: do_it Return structured results
Executable scripts should return JSON-serializable results whenever possible. This makes the output easier for the agent to inspect and use.
Avoid unnecessary execution
Prefer instructions and reference files when possible. Use executable entrypoints only for operations that genuinely require code.
Add a New Skill
You can add new Agent skills by creating a new folder inside the skills directory and adding the necessary files and folders.
Add a New Executable Capability to an Existing Skill
You can add a new executable operation to an existing skill to expand the capabilities of SKILL.md.
Agent Skills Troubleshooting
If you encounter issues with implementing Agent Skills, check this list for help resolving your problem.
The agent does not see my skill
- The skill folder is located under a configured skills directory.
- The folder contains SKILL.md.
- SKILL.md has valid YAML frontmatter.
- The frontmatter includes both name and description.
The agent activates the wrong skill
Check for duplicate skill names across skill directories. If two skills have the same name, catalog precedence determines which one is used.
A supporting file cannot be loaded
- The file is inside the skill folder.
- The path does not include traversals such as ../.
- The file is not hidden.
- The file is not excluded, such as __pycache__ or .pyc.
An entrypoint will not run
- run_skill_entrypoint is included in allowed-tools.
- The entrypoint is declared in SKILL.md.
- The script path is under scripts/.
- The script is a .py file.
- The function name in func exists in the script.
- The arguments are a valid JSON object.
An entrypoint times out
Increase timeout_seconds only if the operation is expected to take longer. For long-running or resource-intensive operations, consider moving the operation to a dedicated service or more isolated execution environment.
Example: Complete Agent Skill
This example demonstrates what a complete agent skill would look like after implementation.
Folder Structure
skills/
	customer-support-reply/
		SKILL.md
		references/
			tone_guide.md
			refund_policy.md
			escalation_rules.md
SKILL.md
---
name: customer-support-reply
description: Helps draft customer support replies using the company tone guide and policy references.
allowed-tools: "load_skill_file list_skill_files"
metadata:
  owner: support-operations
  domain: customer-support
---

# Customer Support Reply

Use this skill when the user asks for help drafting, reviewing, or improving a customer support response.

Workflow:

1. Identify the customer’s issue.
2. Load the relevant policy file from `references/` if needed.
3. Draft a clear, empathetic response.
4. Avoid making commitments that are not supported by policy.
5. Recommend escalation when the request matches the escalation rules.
This skill does not run code. It gives the agent structured instructions and optional policy files that can be loaded only when relevant.
Agent Testing
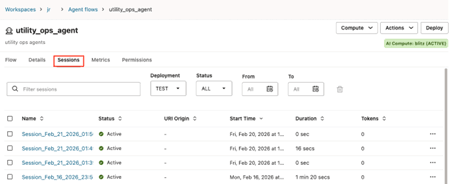
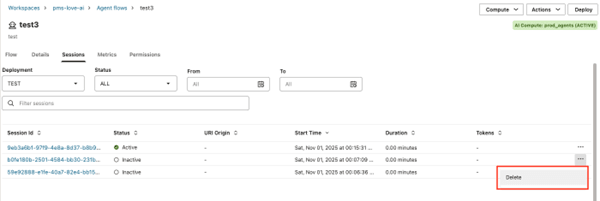
You can test your agents to preview and debug their output. You can also create and manage testing sessions to explore different testing scenarios for your agents.
The first step to test an agent is to attach your agent to an AI compute. The action of attaching an agent pushes a copy of your agent to an AI compute. As long as your agent is attached to an AI compute, any changes you made to your agent are propagated to the attached compute every time you click on on the Test button.
The Run now command and Playground access your files differently.
- Run now runs the agent in your workspace, meaning it automatically has access to paths like
/Workspace/.... - Deployed agents and agents in the Playground run a packaged copy of the agent on the attached AI compute. The package holds the files and folders of the entry file and subfolderrs. Parent and sibling workspace folders are not included.
A file opened with an absolute workspace path works with Run now, but fails in Playground and deployment scenarios. To avoid this failure and make the agent work in both Run now and Playground scenarios:
- Put the file inside the agent folder: By putting the file in the file folder or subfolder of the entry, the file is included in the package and is included when the agent is deployed or tested in the Playground.
- Open the file with a relative path: A relative path ensures that the file can still be located when the package is extracted to a different location.
import json import os CONFIG_PATH = os.path.join( os.path.dirname(os.path.abspath(__file__)), "config", "settings.json" ) with open(CONFIG_PATH) as f: config = json.load(f) - Use the Skills folder: For files shared across agents, you can use the skills folder
.agents/skills/to load skills tools rather than including them by path. - Use agent parameters or session variables: For values that change often, we recommend using agent parameters or session variables for each deployments. You can also use a catalog volume for larger files.
Note:
You can use the same methods to ensure files included in a Custom tool are deployed successfully to other locations.After you click the Test button, you are taken to the test playground.
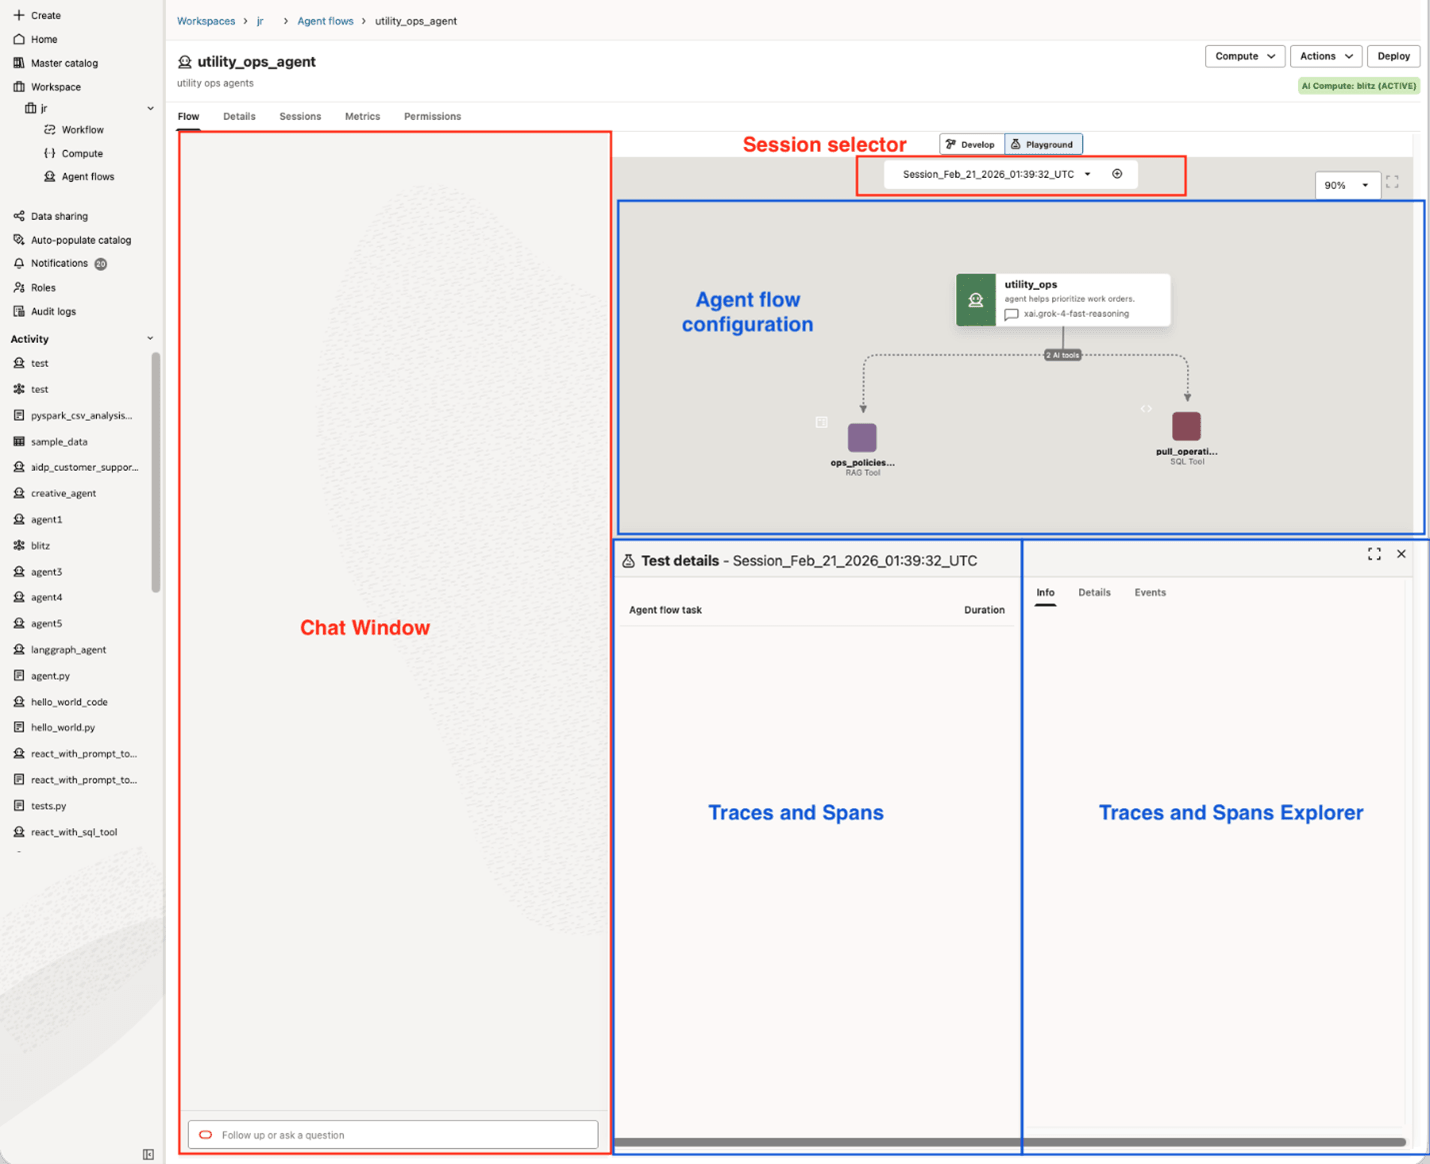
- A chat window where you can initiate a session and start chatting with the agent, or resume an existing session
- A graph-based representation of the agent
- A panel showing a tree of traces and spans generated during the session
- A traces and spans explorer panel that displays traces and spans attributes, input/output. The Details tab includes IDs, start and end time, execution time, while the Events tabs highlight any errors during the execution.
The Playground lets you interact and test each agent independently if you wish to do so. By default, the supervisor agent is selected, but you can choose to chat with and test each executor agent independently. This allows you to simulate the behavior of a supervisor agent issuing requests to executor agents. To do this, you select the agent you want to test in the drop-down menu in the chat window.
Traces and spans are displayed in the central panel as soon as you create your first message. Each task corresponds to a different user message. You can click on the left caret to expand the trace and inspect the spans.
Test your Agents in the Playground
You can test visual builder and LangGraph-based agents from the Test playground to validate and debug your agents.
- At the top of the canvas, click Playground. It may take several seconds to push the agent to your attached compute.

Create an Agent Test Session
You can create a test session to initiate a new conversation with your agent.
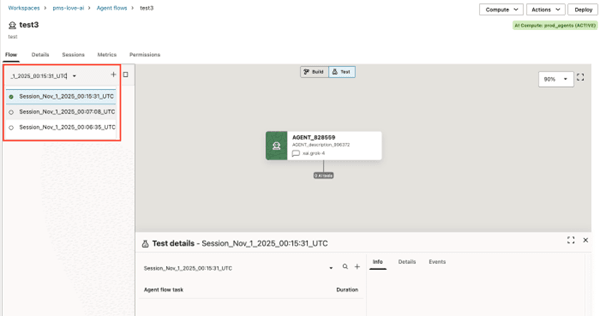
- In the session selector, click Create a session.
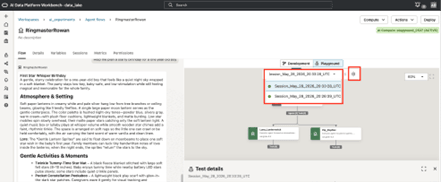
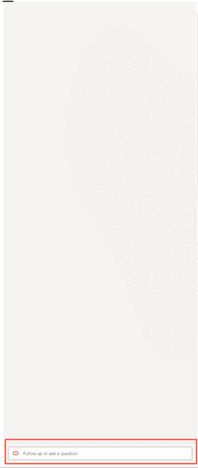
- Start a dialog with your agent by entering a query in the chat box.