18 About Agent Tools
Oracle AI Data Platform supports tool templates that can be configured to access your data and fit your use cases.
Agents support configurations that consist of a single agent that can interface with one or more tools. AI Data Platform offers three tool templates that can be configured for use through visual flows or code:
- Custom Code: The Custom Code tool allows AI developers to implement their tool using Python. Developers package their tool in a ZIP, upload it to their workspace, and configure it as a node in their agent. Custom Code tools are intended for cases where built in tools don't provide the integration they need.
- HTTP Request: The HTTP Request tools lets developers use supported REST API calls in their agents, leveraging the AI Data Platform APIs and the functions they provide. Agents can use REST APIs to create workspace objects, check details, pull lists, or modify existing objects. For a full list of available APIs, see REST API for Oracle AI Data Platform.
- Prompt: The prompt tool allows the AI developer to define a parametrized prompt that can be issued to an LLM for their choice. Common use cases for a prompt tool include email drafting tasks, translation tasks, style conversion, git commit message, and code explanations.
- RAG: The RAG tool lets agents pull relevant external knowledge before generating a response. In AI Data Platform, the RAG tool queries a knowledge base (26ai Vector Search) and retrieves semantically relevant document chunks. Those chunks are then passed to the agent for response generation.
- SQL: The SQL tool enables agents to execute SQL queries against structured data sources registered via external catalogs, such as Oracle Autonomous AI Lakehouse, Oracle Autonomous AI Transaction Processing, or Oracle Autonomous AI Database. The tool is intended for scenarios where the SQL queries are predefined and can be parametrized. The objective is to let an agent assign values to the parameters. This tool is not an NL2SQL tool that generates a SQL query based on a natural language prompt.
Note:
The SQL tool only performs queries against data in an external catalog. It does not support data stored in a standard catalog.
Agent Tools through Visual Flow
When you add tools to agents through visual flow, you can find tools under Tool templates in your agent. You add a tool to your agent by dragging and dropping it into the visual flow canvas. After dragging the tool node on the canvas, the node automatically connects with the agent.
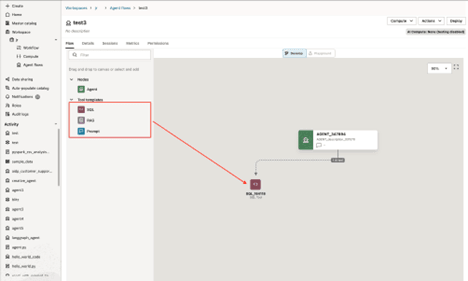
Each tool can be configured in the Parameters tab and be tested independently of the agent by clicking on the Test tab.
Note:
You must attach an AI Compute to your agent before you can test a system tool. If no compute is attached, the Test tab is disabled.Agent Tools through LangGraph Code
You add tools to your LangGraph coded agents through an instance of the AIDPToolConf() class.
from aidputils.agents.toolkit.configs import AIDPToolConf
aidp_tool =  AIDPToolConf(name, description, tool_class, conf, params)
- Name: A descriptive name to help users and the LLM understand the purpose of the tool.
- Description: A thorough summary that provides sufficient information for users and LLMs to understand what the tool does.
- tool_class: The supported tool type,
PromptTool,SQLTool,RAGTool,HTTPTool, andMCPTool. - conf: The tool configuration. This information is hidden from the LLM.
- params: The parameters exposed to the LLM.
Custom Tool
The Custom Code tool lets agent developers extend Oracle AI Data Platform with their own Python code.
You package your tool implementation as a ZIP file, upload it to your workspace, and configure it as a Custom Code tool node in the agent. The agent calls your code as a tool, with parameters supplied by the LLM at runtime.
The Custom Code tool is intended for cases where the built-in tools (HTTP, SQL, RAG, MCP) do not cover the integration you need — for example, when you need to perform local computation, parse a domain-specific format, or compose multiple steps that should appear to the agent as a single tool call.
AI Data Platform has the following limits when uploading a ZIP file with Python code for your custom code tool:
| Constraint | Limit |
|---|---|
| Maximum ZIP size | 10 MB |
| Maximum file size inside the ZIP | 10 MB per file |
| Maximum total uncompressed size | 500 MB |
| Path traversal | Blocked (../ rejected) |
Note:
Custom Code tools run on the AI compute attached to your agent. The code has access to the compute environment and outbound network access subject to the workspace networking configuration. Only upload code from sources you trust.Custom Code Tool Parameters
On the Parameters tab, you configure the static settings for each tool class in the package. The Tool Class dropdown lets you switch between the tools discovered in the package.
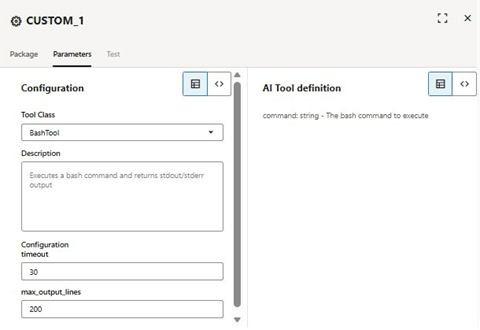
- Tool class: Select the tool class to configure. The drop-down is populated from the classes registered in
tool_implementation.py. - Description: A clear, concise description of what the tool does. The description is provided to the agent and helps the LLM decide when to call the tool. The default description is read from tool_config.json and can be overridden here.
- Configuration: The static settings the tool needs at runtime. These are the keys defined in the conf object of
tool_config.json. Examples include timeout, base_dir, max_output_lines, and credential references. Configuration values support{{variable}}runtime parameter references. Session variables are not currently substituted into custom-tool configuration; if you need a session value, pass it as a runtime parameter from the agent. - AI tool definition: The schema exposed to the agent, including the tool name, description, and the runtime parameters the agent can pass. The schema is rendered automatically from the schema array in
tool_config.json.
Custom Code Tool Authoring
A Custom Code tool package is a ZIP file with the following structure:
my_tool.zip
├── tool_implementation.py    # Required. Contains the tool class(es).
├── tool_config.json          # Required. Tool metadata and schema.
├── requirements.txt          # Optional. Python dependencies.
├── utils/                    # Optional. Helper modules.
│   ├── __init__.py
│   └── helpers.py
├── config/                   # Optional. Static configuration files.
│   └── settings.yaml
└── wheels/                   # Optional. Bundled wheel files for offline install.
    └── humanize-4.15.0-py3-none-any.whl
tool_implementation.py
Each tool class extends CustomToolBase and is decorated with @BaseTool.register. The class must implement the _execute_tool class method, which receives the tool configuration, the runtime parameters from the agent, and the system context variables, and returns a value, like dict, str, or list.
The following is a blank example template of a tool_implementation.py:
"""Custom Code tool implementation."""
from aidputils.agents.tools.custom_tools.base import CustomToolBase


@BaseTool.register
class MyTool(CustomToolBase):
    """Brief description of what the tool does."""

    @classmethod
    def _validate_config(cls, conf, runtime_params, **context_vars):
        """Optional. Validate configuration before execution.
        Raise ValueError to abort the call.
        """
        # Example: require an api_key in the tool configuration
        if not conf.get("conf", {}).get("api_key"):
            raise ValueError("api_key is required")

    @classmethod
    def _execute_tool(cls, conf, runtime_params, **context_vars):
        """Required. Implement the tool logic.

        Args:
            conf: the AIDPToolConf dict. User configuration values
                live under conf["conf"] when the tool is invoked from
                a deployed agent. During a Test run the tool may
                receive a flat conf dict; the Developer Toolkit example
                below uses a small _get_cfg helper that tolerates both
                shapes.
            runtime_params: the runtime parameters passed by the
                agent at invocation time.
            context_vars: system context (such as datalake_id).

        Returns:
            Any value (dict, str, list, ...). It will be wrapped into
            the MCP response by the framework.

            To signal a failure, raise an exception:
              - ValueError -> INVALID_CONFIG
              - any other exception -> TOOL_EXECUTION_ERROR
            Do NOT return {"error": "..."}; the framework wraps a
            successful return in {"response": ..., "success": True},
            so a returned error dict is treated as a normal payload
            and the agent will not see it as a failure.
        """
        tool_conf = conf.get("conf", conf)
        param_value = runtime_params.get("my_param", "")
        # Tool logic here
        return {"output": f"Processed: {param_value}"}

    @classmethod
    def _transform_response(cls, response):
        """Optional. Transform the response before MCP formatting."""
        return response
tool_config.json
The tool_config.json file describes the tools in the package — their display name, description, version, runtime parameter schema, and default configuration values. Each tool registered in tool_implementation.py must have a corresponding entry in the tools array.
tool_config.json:{
"displayName": "My Tool Package",
"description": "Brief description of the tool package.",
"tools": [
{
"toolClassName": "MyTool",
"displayName": "My Tool",
"description": "Clear description of when the agent should call this tool.",
"version": "1.0.0",
"schema": [
{
"name": "my_param",
"type": "string",
"description": "What this parameter is for."
}
],
"conf": {
"timeout": 30
}
}
]
}
Schema Field Types
The Parameters tab in the visual builder accepts string, number, and boolean. The runtime accepts a wider set when authoring tool_config.json by hand: int, integer, float, double, number, numeric, bytes, list, array, sequence, dict, map, mapping, set, tuple, none, null, plus generic forms like list[int]. These wider types are usable from JSON but are not exposed in the UI dropdown.
requirements.txt
The requirements.txt file lists the Python dependencies your tool needs. Standard pip syntax is supported, including version specifiers and comments. The file is optional — if your tool only uses the Python standard library or pre-installed packages, you do not need a requirements.txt.
The following is a blank example of requirements.txt:
# List third-party dependencies one per line.
# Examples:
# humanize>=4.0
# python-dateutil>=2.8,<3.0
# beautifulsoup4==4.12.3
AI Data Platform filters the dependencies in requirements.txt before installing them on the AI compute, to prevent runtime conflicts with the platform itself. The filtering rules are as follows:
| Category | Example | Action |
|---|---|---|
| Platform packages | langgraph, langchain-core, langchain-oci, langchain_mcp_adapters, pyyaml | Discarded (would break the agent runtime). |
| Pre-installed packages | oci, requests, requests-toolbelt, websockets, cryptography, certifi, pyopenssl, urllib3, pydantic, pydantic-core, pydantic-settings, numpy, oracledb, sqlalchemy, aiohttp, httpx, httpx-sse, anyio, jsonschema, orjson | Skipped (already available, no need to declare). |
| URL or VCS installs | git+https://..., -e ./local_pkg | Blocked (security). |
| Everything else | humanize, beautifulsoup4, jmespath | Installed. |
Note:
Dependencies declared inrequirements.txt are installed during the full deployment of the agent. Dependencies are not installed during a single test run from the configuration panel. If your tool depends on third-party packages, deploy the agent first and then exercise the tool from the Playground.
For tools that need dependencies which are not pre-installed and where deterministic, offline installation is important, you can bundle .whl files inside a wheels/ directory at the root of the ZIP. The platform installs from the local wheels directory first and falls back to the package index only if needed. This is the recommended approach for production tools.
Bundling wheels for offline install
pip download \
  --dest wheels/ \
  --platform manylinux_2_28_x86_64 \
  --python-version 3.11 \
  --only-binary=:all: \
  -r requirements.txt
Tool Lifecycle Hooks
Custom Code tools support three lifecycle methods. Only _execute_tool is required.
| Method | When called | Purpose |
|---|---|---|
| _validate_config | Before _execute_tool | Validates the configuration. Raise ValueError to abort the call before it runs. |
| _execute_tool | On every tool invocation | Required. Implements the tool's behavior. Returns any value (dict, str, list) and raises an exception to signal a failure (ValueError → INVALID_CONFIG, any other exception → TOOL_EXECUTION_ERROR). Do not use a returned {"error": "..."} dict as it is treated as a normal payload. |
| _transform_response | After _execute_tool | Transform the response before it is wrapped in the MCP format and returned to the agent. |
| prompt_template | string | Prompt template used by the LLM, with variables in {{variable}} format for dynamic insertion |
Configuration values versus runtime parameters
Custom Code tools have two distinct sources of input that are easy to confuse. Configuration values come from the Configuration section of the Parameters tab and are baked into the tool when the agent is deployed. Runtime parameters come from the agent at invocation time and are different on every call.
- Configuration values are accessed via conf.get("conf", conf). Use them for things that do not change between calls — base URLs, credential references, timeouts, output limits.
- Runtime parameters are accessed via runtime_params.get("name"). Use them for the values the agent actually decides at call time — the query, the file path, the request body.
Note:
Configuration values can pass through template substitution and may arrive as strings even when you defined them as numbers. Always coerce numeric configuration values defensively, for example:int(tool_conf.get("timeout", 30)).
Multiple Tools Per Package
A single ZIP can contain multiple tool classes. Each class registered with @CustomToolBase.register becomes a separate tool in the agent. The Tools panel on the Package tab lists all discovered tools and lets you enable each one independently. Each tool is configured separately on the Parameters tab via the Tool Class dropdown.
Code Tool through LangGraph Code
From the code builder, a Custom Code tool is registered through the aidpUtils Python library by referencing the uploaded package and selecting one of its tool classes.
from aidputils.agents.toolkit.tool_helper import create_langgraph_tool
 from aidputils.agents.toolkit.configs import AIDPToolConf

hello_tool_conf = AIDPToolConf(
     name="hello_tool",
     description="Returns a hello world greeting.",
     tool_class="HelloTool",  # the class registered with @BaseTool.register
     conf={},                  # values from tool_config.json "conf"; supports {{variable}} substitution
     params=[
         {"name": "name", "type": "string",
          "description": "Name to greet."}
     ],
 )

hello_tool = create_langgraph_tool(hello_tool_conf.model_dump())
tool_class must be the exact class name registered via @BaseTool.register in tool_implementation.py. The framework looks the class up in BaseTool.tool_class_registry[tool_class]. conf mirrors the conf object of the matching entry in tool_config.json.
Note:
Do not placepackage_path or tool_class_name inside conf as they are not consumed.
Test Agent Custom Code Tools
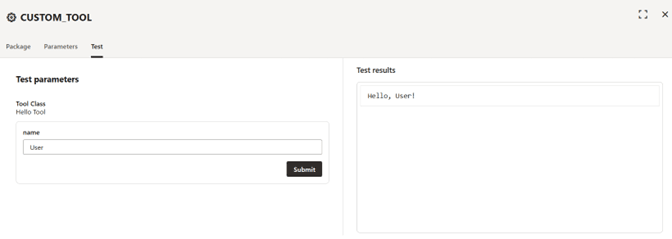
The Test tab lets you execute the tool without running the full agent. Provide values for any runtime parameters and any session variables referenced in the configuration, then click Run to invoke the tool and view the response.
Note:
If your tool depends on third-party packages declared inrequirements.txt, the dependencies are installed during the full deployment of the agent, not during a single test run. To test code that depends on additional packages, deploy the agent first and then invoke the tool from the Playground.
Add a Custom Tool to an Agent
You can add a custom tool to your agents to allow you to use your own Python code to extend Oracle AI Data Platform.
Note:
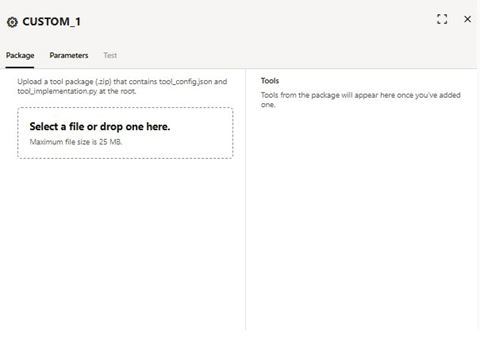
An AI compute must be attached to your agent prior to adding a custom code tool. AI compute is required to install dependencies and run the tool.- In the Package tab, click to select the ZIP file with your custom code or drag and drop it on to the screen. Wait for the upload to complete.
- Review the list of discovered tools in the Tools section of the Package tab. Each tool class found in your
tool_implementation.pyis listed with its class name, description, and version.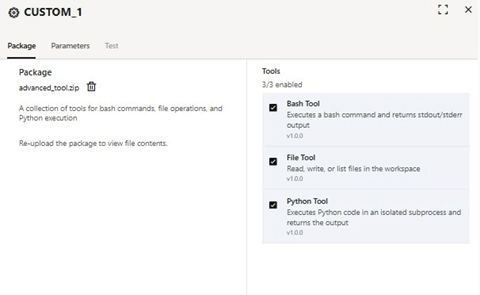
- Optional: Click the Test tab. Provide test parameters and click Submit. See test results in the Test results pane.
Remote MCP Server Tool
Agent developers can connect their agent flows to remote model context protocol (MCP) servers using the Remote MCP Server tool.
The MCP tool is available in both the visual builder as well as in the code builder experiences. In the code builder experience, the MCP connection can be configured through the aidpUtils Python library. In this section, we walk you through both the visual builder and code builder experiences.
Note:
This feature supports MCP servers with HTTP-streamable transports (remote servers). Local, stdio-transport MCP servers are not supported.MCP Credentials in Oracle AI Data Platform Credential Store
When configuring your MCP server, you need to select whether the remote MCP server requires No Authentication or a Bearer token. If your MCP server requires an authentication token, that token needs to be added to your Credential Store before it can be referenced by the MCP server.
When creating an MCP server credential, you select the Secret token option for Credential type, then provide the identifier key, such as an API Key and the token value. For more information, see Create Credentials (Preview).
Note:
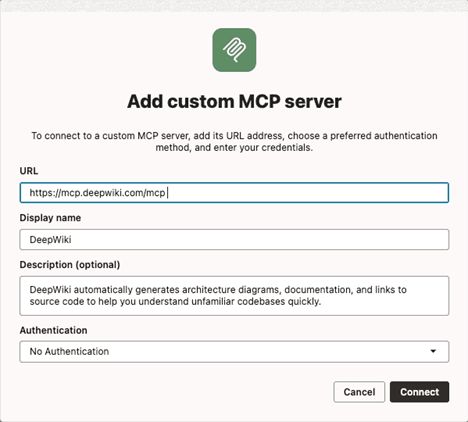
A single credential can hold multiple keys.Publicly available MCP servers do not require additional authentication. For example, connecting to https://mcp.deepwiki.com/mcp would look like this:
How to Expose MCP Tools to the Agent
Once a successful connection to the remote MCP server has been established, you can start configuring which tools hosted on the server you want to expose to your agent. The MCP server configuration panel is shown below in the case of the DeepWiki MCP server.
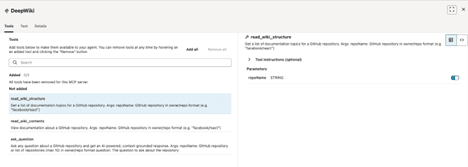
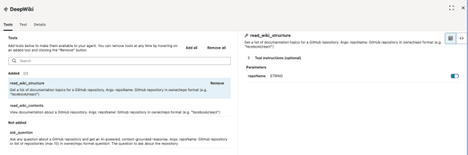
On the left, the Tools tab displays a list of tools available in the MCP server. You must add tools to expose them to your agent. You can do this by clicking either the Add all option to expose all the tools at once or by clicking on each tool Add option individually to select a subset of the tools.
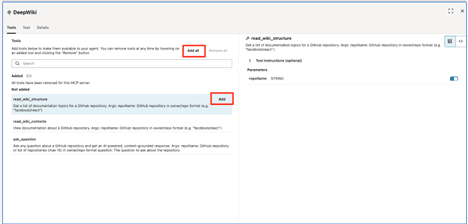
In the example below, we added two tools (read_wiki_structure, read_wiki_structure). You can remove tools by clicking on Remove.
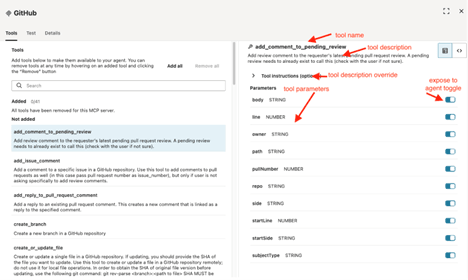
The right panel of the Tools tab provide documentation about each tool including the tool name, tool description as well as the tool parameters. In the screenshot below, I show an example for the GitHub MCP server tool add_comment_to_pending_review.
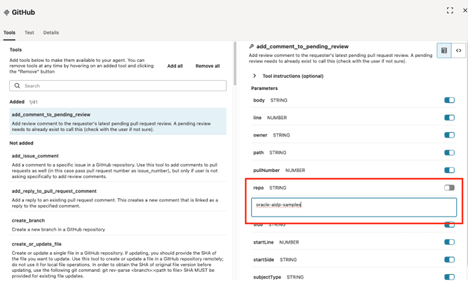
AI Data Platform provides a couple of additional controls over each tool. You can hide parameters from the agent and assign values to those parameters. For example, in GitHub you could choose for your agent to only comment on one pre-determined repo, such as oracle-aidp-samples. To achieve this, you disable the repo parameter and assign a default value in the text box:
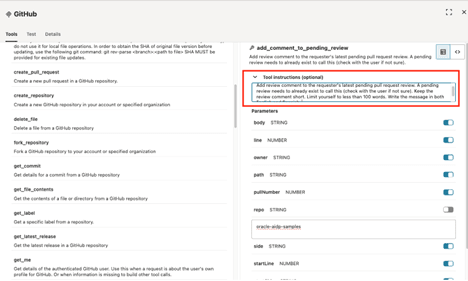
In the Tool Instructions field you can also override the tool description and provide an alternative description with additional instructions. For most use-cases, we recommend that you adopt the description that is provided by the MCP server.
Remote MCP Server Tool through LangGraph Code
The aidpUtils Python library provides developers with the ability to select a remote MCP server and expose a subset of its tools to an agent built with LangGraph. For aidputils API reference, see Aidp-utils API for Oracle AI Data Platform.
You can build a collection of allowed tools by creating an instance of build_structured_tools_from_allowed_mcp_tools:
from aidputils.agents.toolkit.tool_helper import build_structured_tools_from_allowed_mcp_tools

TOOLS = build_structured_tools_from_allowed_mcp_tools(
allowed_tools=<ALLOWED_MCP_TOOLS>,
	server_name=<MCP_SERVER_NAME>,
	endpoint=<MCP_ENDPOINT>,
	transport="streamable_http",
	auth=<MCP_AUTH>,
	headers={}
)- <MCP_SERVER_NAME> is a display name you want to give to your MCP server. This is used for documentation purpose and is not exposed to the agent.
- <MCP_ENDPOINT> is the endpoint of the MCP server (e.g. https://api.githubcopilot.com/mcp/)
- <MCP_AUTH> is a dictionary with key “authType”. This key can take two values:
NO_AUTHorBEARER_TOKEN. In the case ofBEARER_TOKEN, another key is expected: “token” with the value of the bearer token. - <ALLOWED_MCP_TOOLS> is a list of the tools, from the MCP server, that you want to expose to your agent. Each tool needs a full JSON tool definiton following the MCP protocol.
Here's an example:
MCP_SERVER_NAME = "test_mcp"
MCP_ENDPOINT = "http://144.25.36.217:9301/mcp"
MCP_AUTH = { "authType": "BEARER_TOKEN", "token": "valid-123" }

{
  "ALLOWED_TOOLS": [
    {
      "tool": {
        "name": "get_current_weather",
        "description": "Get current weather for a given city with advanced options.",
        "inputSchema": {
          "type": "object",
          "properties": {
            "city": {
              "type": "string"
            },
            "unit": {
              "type": "string",
              "default": "metric"
            },
            "include_historical": {
              "type": "boolean",
              "default": false
            },
            "detailed": {
              "type": "boolean",
              "default": true
            },
            "timeout": {
              "type": "integer",
              "default": 30
            }
          },
          "required": [
            "city"
          ]
        }
      },
      "instruction": "",
      "argOverrides": {}
    },
    {
      "tool": {
        "name": "get_forecast",
        "description": "Get forecast for a given city with customizable options.",
        "inputSchema": {
          "type": "object",
          "properties": {
            "city": {
              "type": "string"
            },
            "days": {
              "type": "integer",
              "default": 5
            },
            "unit": {
              "type": "string",
              "default": "metric"
            },
            "include_alerts": {
              "type": "boolean",
              "default": false
            },
            "detailed": {
              "type": "boolean",
              "default": true
            },
            "hourly": {
              "type": "boolean",
              "default": false
            }
          },
          "required": [
            "city"
          ]
        }
      },
      "instruction": "",
      "argOverrides": {}
    }
  ]
}

MCP_HEADERS = {}
TOOLS = build_structured_tools_from_allowed_mcp_tools( allowed_tools=ALLOWED_TOOLS,
	server_name=MCP_SERVER_NAME,
	endpoint=MCP_ENDPOINT,
	transport="streamable_http",
	auth=MCP_AUTH,
	headers=MCP_HEADERS,
)
The TOOLS object can be then used when creating an instance of an agent with langchain.agent create_agent in the setup() method of your class agent definition:
def setup(self):
    logger.info("Initializing TestMcpAgent")

    oci_llm = init_oci_llm(llm_conf)

    system_prompt = textwrap.dedent(
        """
        You're a weather agent. Append 12345 to every response.
        """
    ).strip()

    self.agent = create_agent(
        name="test_mcp_high_code",
        model=oci_llm,
        tools=TOOLS,
        system_prompt=system_prompt,
        debug=True,
    )

    logger.info("Agent ready.")
Alternatively, if you are using a session variable to store the value of a bearer token,a reference to a previously created session variable can be assigned to the token key of the auth config dictionary. For example:
test_mcp_auth_config = { "authType": "BEARER_TOKEN", "token" : "{{sessionvariables.cred.mcp.test_mcp.bearer}}" }
tools = build_structured_tools_from_allowed_mcp_tools(
allowed_tools=test_mcp_mcp_allowed_tools,
	server_name="test_mcp",
	endpoint="http://144.25.36.217:9301/mcp",
	transport="streamable_http",
	auth=test_mcp_mcp_auth_config,
	headers={}
)
Code Examples for Remote MCP Server Tools
We provide end-to-end code samples for multiple MCP scenarios in the AI Data Platform Samples GitHub repository.
Testing Remote MCP Server Tools
Once tools are selected, the next step is typically to test individual tools to ensure that they behave as expected. This can be done via the Test tab of the MCP tool node.
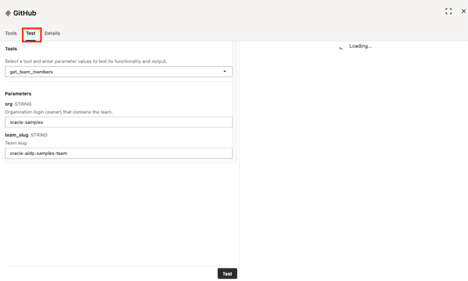
Select one of the tools you added in the Tools tab, provide parameters values and click on the Test button.
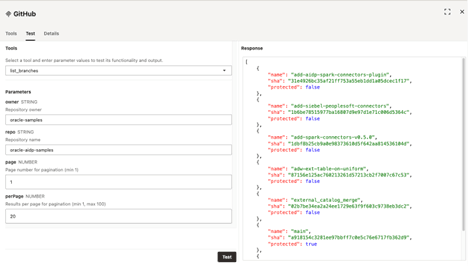
The output of the tool is displayed in the right panel.
The details tab provides information about the authentication method, MCP server URL and the description.

The Edit button next to the authentication method let’s you modify the configuration of the remote MCP tool node. You can change the display name, description, and the bearer token used when establishing the connection:
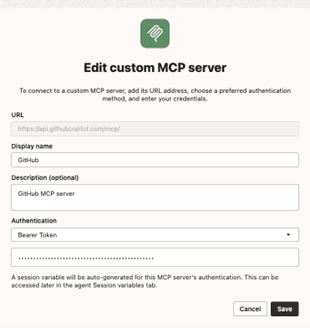
Connect an Agent to a Remote MCP Server from the Visual Builder
You can add access to a remote MCP server to your agent by dragging the Custom MCP server tool node into the canvas.
Note:
The AI compute hosting the agent inherits the networking settings of its workspace. If you enable private network access for the workspace hosting the AI compute, your agent can only reach MCP servers hosted in your selected private VCN and subnet. Your agent may not be able to reach remote HTTP servers available on the public internet.- Navigate to your agent.
- In the Flow tab, under Tool Templates click and drag Custom MCP server onto the canvas.
- Provide the server URL for your MCP server.
- Provide a display name for your MCP server. This is the name of the node that is displayed in the visual builder canvas.
- Optional: Provide a description for your MCP server. The description field is not provided to the agent.
- From the Authentication drop-down menu, select an authentication method.
- No Authentication: Use this option if the remote MCP server is publicly available and requires no authentication.
- Bearer token: Use this option if the remote MCP server requires an authentication token. You must store the API key in the Oracle AI Data Platform Credential Store and provide a reference to the credential store entry.
- Click Connect. AI Data Platform tests the connection and reports the result.
HTTP Request Tool
The HTTP Request tool lets your agent call any HTTPS REST API.
You configure the request, including method, URL, headers, query parameters, request body, authentication, and optionally, a response optimization step. The agent then invokes the endpoint at runtime. The HTTP request tool is available in both the visual builder and the code builder. In the code builder, the tool is configured through the aidpUtils Python library.
Note:
The HTTP Request tool only supports https:// and http:// requests. WebSocket connections (ws/wss), binary file uploads, and self-signed certificates are not supported.Note:
The AI compute hosting the agent inherits the networking settings of its workspace. If you enable private network access for the workspace hosting the AI compute, your agent will only reach HTTP endpoints in your selected private VCN and subnet. Your agent cannot reach endpoints available on the public internet.The following settings must be provided when configuring an HTTP Request tool:
| Configuration | Description |
|---|---|
| HTTP method | The HTTP verb to use. Supported methods are GET, POST, PUT, PATCH, and DELETE. |
| URL | The full URL of the target endpoint. The URL supports {{sessionVariables.variable_name}} session variable references and {{variable}} runtime parameter references. For example: https://api.example.com/users/{{user_id}}/orders.
|
| Timeout | The maximum amount of time the tool will wait for a response from the remote endpoint. The default is 30 seconds and the maximum is 300 seconds. |
| Authentication type | The authentication method to use when calling the endpoint. See the Authentication section below for the list of supported authentication methods. |
Note:
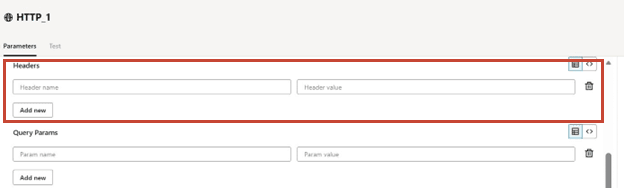
Custom Code tools run on the AI compute attached to your agent. The code has access to the compute environment and outbound network access subject to the workspace networking configuration. Only upload code from sources you trust.Headers
Headers are key-value pairs sent with the HTTP request. You can add as many headers as needed by clicking the Add new button. Header values can reference session variables and runtime parameters using the {{variable_name}} syntax.
Note:
For sensitive headers, you should use the Authentication type field to ensure credentials are injected securely from the Credential Store. Authorization, Cookie, and X-API-Key are sensitive headers and cannot be set through the Headers section.Query Parameters
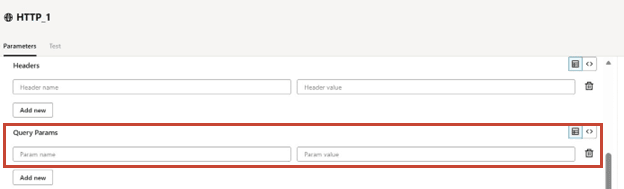
Query parameters are appended to the URL as the query string. You can add as many query parameters as needed by clicking the Add new button. Like headers, query parameter values can reference session variables and runtime parameters.
Description
The description field describes what the tool does, when it should be used, and what kind of outputs or effects it produces. The description is provided to the agent and helps the LLM decide when to call the tool.
- • Purpose: Explain what the tool is designed to do in one clear sentence. Example: "This tool retrieves customer support tickets from a knowledge base and summarizes them by priority level."
- When to use it: Describe the conditions under which the agent should call this tool versus another.
- Inputs and outputs: Briefly describe the parameters the tool needs and the shape of what it returns.
HTTP Request Authentication
The HTTP Request tool supports several authentication methods. Select the appropriate method from the Authentication type dropdown.
| Authentication Type | Description |
|---|---|
| No Authentication | No authentication is added to the request. Use this for publicly accessible endpoints. |
| OCI Resource Principal | The request is signed using the AI compute's OCI Resource Principal. Use this when calling OCI services such as Object Storage or the OCI Generative AI service. Access is governed by OCI IAM policies. |
| Basic Authentication | A username and password are encoded and sent in the Authorization header. Credentials must be stored in the Credential Store. |
| Bearer Token | A bearer token is sent in the Authorization header. The token must be stored in the Credential Store. |
| Header Authentication | An API key is sent in a custom header (such as X-API-Key). The header name is configurable and the key value must be stored in the Credential Store. |
When you select an authentication method that requires a secret, the configuration panel displays a credential picker. Click the credential picker to select a previously stored credential, or create a new one from the Credential Store. See the Storing a credential in the Credential Store section of the MCP server documentation for the step-by-step procedure.
Session Variables and Runtime Parameters
Session variables can be referenced in the URL, header values, query parameter values, and request body using the {{sessionVariables.variable_name}} syntax. Runtime parameters passed by the agent at invocation time can be referenced using the {{variable_name}} syntax.
https://objectstorage.{{sessionVariables.region}}.oraclecloud.com/n/my-namespace/b/{{bucket}}/oWhen the tool runs, {{sessionVariables.region}} is replaced with the value of the region session variable for the current session, and {{bucket}} is replaced with the value the agent passed at invocation time.
Note:
Template values are URL-encoded automatically when substituted into the URL or query parameters. You do not need to URL-encode them yourself.AI Tool Definition
The right side of the configuration panel shows the AI Tool definition. This is the schema that is exposed to the agent and it includes the tool name, description, and the list of runtime parameters the agent can pass when calling the tool. The AI Tool definition is generated automatically from the Description field and from the {{variable}} placeholders detected in the URL, headers, query parameters, and body.
The AI Tool definition pane is the panel on the right side of the HTTP tool configuration panel shown earlier in this document. Until you provide a description and define at least one runtime parameter, the AI Tool definition pane shows a placeholder message. Once you fill in the description and reference at least one {{variable}} in the URL, headers, query parameters, or body, the schema is rendered in the pane.
Optimizing Response for the Agent
Many APIs return large responses that include fields the agent does not need. Sending the entire response back to the agent consumes tokens and can degrade the quality of the agent's reasoning. The HTTP Request tool provides a Response optimization section that lets you reduce the response payload before it is returned to the agent.
- JSON field selection: select a subset of fields from a JSON response. You can specify a path to a nested object using dot notation (such as data.results), and a list of fields to include or exclude.
- HTML CSS selector: extract a subset of an HTML response using a CSS selector (such as article.content). Optionally strip HTML tags to return only text.
- Text truncation: cap the response at a maximum number of characters to prevent overly large text responses.
Error Handling and Error Codes
When the HTTP request fails, the tool returns a structured error response to the agent. The error includes an error code, a human-readable message, and details about the failure. The agent can use this information to decide whether to retry, fall back to a different tool, or report the failure to the user.
| Error Code | Category | Meaning | Retryable |
|---|---|---|---|
| CONNECTION_TIMEOUT | Network | The remote endpoint did not respond within the configured timeout. | Yes |
| DNS_FAILURE | Network | The hostname in the URL could not be resolved. | Yes |
| CONNECTION_REFUSED | Network | The remote endpoint refused the connection. | Yes |
| SSL_CERTIFICATE_ERROR | TLS | The TLS certificate of the remote endpoint could not be validated. | No |
| UNAUTHORIZED | HTTP 401 | The remote endpoint rejected the credentials. Verify that the credential reference is valid and not expired. For OCI Resource Principal, confirm that the AI compute has an active Resource Principal in this environment. | No |
| FORBIDDEN | HTTP 403 | The credentials authenticated successfully but lack permission for the requested resource. Verify API scopes, permissions, or the IAM policy attached to the resource. | No |
| NOT_FOUND | HTTP 404 | The remote endpoint could not find the requested resource. | No |
| RATE_LIMITED | HTTP 429 | The remote endpoint is rate-limiting the caller. Retry after the delay indicated by the Retry-After header. | Yes |
| SERVER_ERROR | HTTP 5xx | The remote endpoint returned a server error. Often a transient issue. | Yes |
| SERVICE_UNAVAILABLE | HTTP 503 | The remote endpoint is temporarily unavailable. | Yes |
| INVALID_TEMPLATE | Validation | A {{variable}} reference could not be resolved. Verify that every referenced session variable and runtime parameter is defined and has a value at invocation time.
|
No |
| INVALID_URL | Validation | The URL is malformed, uses an unsupported protocol, or resolves to a blocked address (for example, a private IP address or a cloud metadata endpoint). | No |
| RESPONSE_TOO_LARGE | Validation | The response exceeded the 10 MB maximum response size. | No |
| RATE_LIMIT_EXCEEDED | Platform | The agent has exceeded the platform's per-agent request rate limit (60 requests per minute) or concurrency limit (10 concurrent requests). | Yes |
Each error response includes a guidance field with a suggested next step, and a details field with the elapsed time and any error-specific context such as the HTTP status code.
HTTP Request Tool through LangGraph Code
From the code builder, the HTTP Request tool is configured through the aidpUtils Python library. Define an AIDPToolConf with tool_class set to HttpEndpointTool and pass the configuration dictionary in the conf field.
from aidputils.agents.toolkit.tool_helper import create_langgraph_tool
from aidputils.agents.toolkit.configs import AIDPToolConf

weather_http_tool_def = {
    "method": "GET",
    "url": "https://api.openweathermap.org/data/2.5/weather",
    "params": {
        "q": "{city}",
        "units": "metric",
        "appid": "{api_key}"
    },
    "auth_type": "NO_AUTH",
    "auth_config": {}
}

weather_http_tool_params = [
    {"name": "city", "type": "string",
     "description": "Name of the city."},
    {"name": "api_key", "type": "string",
     "description": "OpenWeather API key."}
]

weather_http_tool_conf = AIDPToolConf(
    name="get_weather",
    description="Get current weather for a city.",
    tool_class="HttpEndpointTool",
    conf=weather_http_tool_def,
    params=weather_http_tool_params
)

weather_tool = create_langgraph_tool(weather_http_tool_conf.model_dump())
The conf dictionary supports the same fields as the visual builder: method, url, headers, params, body, auth_type, auth_config, and response_optimization. The params list defines the runtime parameters the agent can pass.
| auth_type | auth_config Fields |
|---|---|
| NO_AUTH | {} (empty)
|
| RESOURCE_PRINCIPAL | {} (empty)
|
| BASIC_AUTH | username, password (or username_vault_id, password_vault_id for credentials in the OCI Vault) |
| BEARER_AUTH | bearer_token (or bearer_token_vault_id) |
| API_KEY_AUTH | api_key (or api_key_vault_id), header_name (default X-API-Key) |
| OAUTH2_CLIENT_CREDENTIALS | token_endpoint, scope, client_id, client_secret (or client_id_vault_id, client_secret_vault_id) |
Test Agent Custom Code Tools
The Test tab lets you execute the tool without running the full agent. Provide values for any runtime parameters and any session variables referenced in the configuration, then click Run to invoke the tool and view the response.
The response panel shows the HTTP status code, the response headers, the response body, and the elapsed time in milliseconds. If response optimization is enabled, the optimized response is also shown alongside the raw response.
Add an HTTP Request Tool to an Agent
You can add a HTTP request tool to your agents to allow you to call HTTPS REST APIs.
Note:
An AI compute must be attached to your agent prior to adding a custom code tool. AI compute is required to install dependencies and run the tool.- From Tool templates, drag and drop an HTTP Request tool to your canvas.
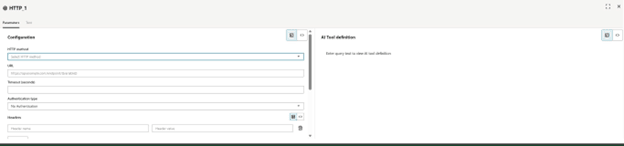
- Provide the headers for your HTTP request. Click Add new to add additional headers.
- Provide any query parameters for your HTTP request. Click Add new to add additional parameters.
- Optional: Click the Test tab. Provide test parameters and click Submit. See test results in the Test results pane.
Prompt Tool
The prompt tool lets you call an LLM in an AI agent with a templatized prompt and returns the LLM response back to the agent.
The prompts you provide to the LLM can include parameters that are identified by double braces, for example {{PARAMETER_NAME}}. Parameter values are assigned by the agent when the tool is called.
Note:
Prompt templates only substitute double-brace placeholders:{{param_name}}for values fromruntime_params{{sessionvariables.<name>}}for session variables
{name} is sent to the model as literal text and no error is raised. This is intentional, so that literal braces in a prompt (for example, in JSON examples) are preserved.
When to Use Prompt Tools
- Your prompt is lengthy, requiring detailed format instructions that span several 100s tokens.
- Incorporating the prompt in the agent instructions would increase context usage and significantly increase costs, especially if one is adopting a SOTA LLM for their agent.
- One wants to minimize the size of the instructions given to the agent to reduce cost.
- The task defined by the prompt tool can be handled by a smaller, faster LLM than the reasoning model used the agent. Smaller models are typically cost efficient, and, in some cases, can be specialized to generate data in a particular modality or format.
- A prompt tool allows structured input parameters to control the output generation. If your use case could be parametrized and generation can vary from session to session, encapsulating the generation in a prompt tool makes sense.
In addition, encapsulating generation instructions in a prompt tool follows many modern agent architecture best practices, including tool re-usability, maintainability, modality, output consistency, scalability, and governance. Some example use cases include:
- Generation of emails, reports, summaries, articles, etc. following a pre-defined, approved structure that can be used as a template
- Generation of complex JSON outputs
- Summation, key sentence extraction, explanation tasks on documents
- Query generation
- Specific modality generation (e.g. images, videos, audio, point cloud data, etc.) that are optimized for a specific model
Prompt Tools through Visual Flow
The following is an example of a prompt tool built through visual flow that asks an LLM to generate blog post titles based on a topic assigned by the agent:
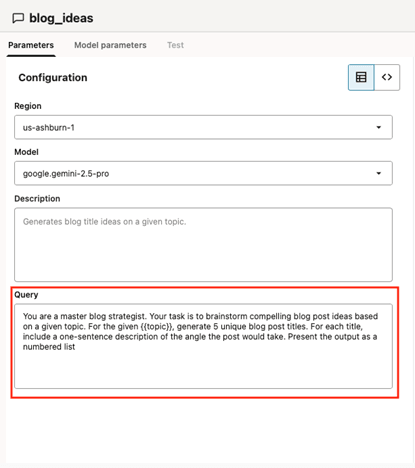
You are a master blog strategist. Your task is to brainstorm compelling blog post ideas based on a given topic. For the given {{topic}}, generate 5 unique blog post titles. For each title, include a one-sentence description of the angle the post would take. Present the output as a numbered list.
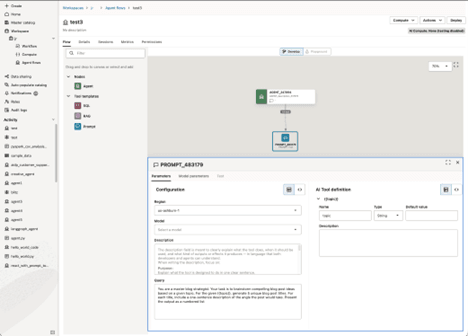
- Tool name: Use a descriptive name for the tool to help guide the agent. In this example, we suggest
blog_ideas. Avoid using unhelpful names like tool123.
- Tool description: Provide a comprehensive description of what the tool does. If there are limitations to the tool or if there are scenarios in which the tool should not be used, list them in the description field.
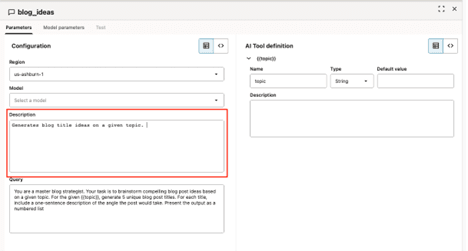
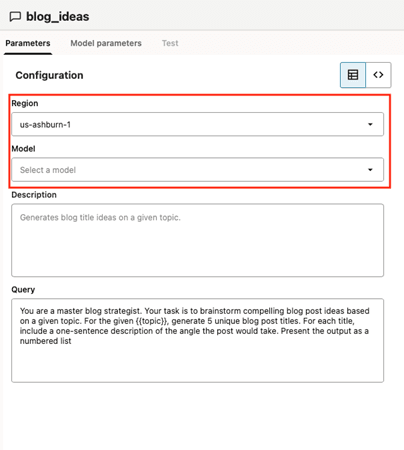
- OCI region and GenAI service LLM: Select the OCI region to populate the list of LLMs available in that region, then select your LLM.
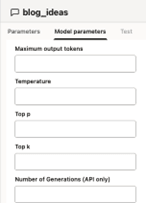
- LLM parameters: Parameters like maximum output tokens, temperature, and top p are configured in the Model Parameters tab. If you assign no values, the default values of the OCI Generative AI service are used.
- Query: The prompt used to define the purpose of the tool is defined in the Query field.
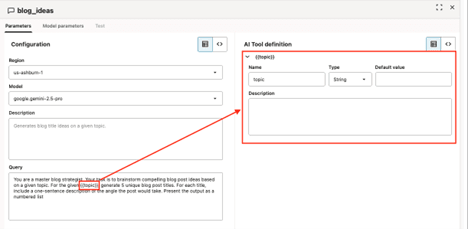
Parameters that you define in the prompt auto-populate the AI Tool definition panel. Provide your agent with a description of each parameter as well as the parameter type and default value whenever applicable.
Prompt Tool through LangGraph Code
If you are building your agent through code, you can configure the same prompt tool in the visual flow example as follows:
prompt_config = {
  "llm": {
    "model_id" : "xai.grok-4",
    "model_provider" : "generic",
    "compartment_id" : "<your-compartment-ocid>",
    "endpoint" : "https://inference.generativeai.<oci-region>.oci.oraclecloud.com"
  }, "prompt_template": """
You are a master blog strategist. Your task is to brainstorm compelling blog post ideas based on a given topic. For the given {{topic}}, generate 5 unique blog post titles. For each title, include a one-sentence description of the angle the post would take. Present the output as a numbered list"
"""
}
prompt_params = [ {
  "name" : "topic",
  "type" : "string",
  "description" : "Blog topic",
  "defaultValue" : "golf"
} ]
You then instantiate the AIDPToolConf as follows:
blogger_tool = AIDPToolConf(name="blog_posts_topics",
                                  description= "Write blog posts ideas about a particular topic. ",
                                  tool_class = "PromptTool", conf=prompt_config params=prompt_params)
Lastly, you create a LangGraph compatible tool with the create_langgraph_tool() utility function from aidputils:
from aidputils.agents.toolkit.tool_helper import create_langgraph_tool
blogger = create_langgraph_tool(blogger_tool.model_dump())
You add the newly created tool to a ReAct agent. In LangGraph, the code looks like this:
tools_agent1 = [blogger_tool]
self.agent = create_react_agent(model=<oci_llm>,
				     tools=tools_agent1,
				     prompt=<system_prompt>,
				     debug=True, checkpointer= checkpointer)
Table 18-1 Prompt Tool Configuration Properties
| Property | Type | Description |
|---|---|---|
| llm | object | LLM connection details and parameters |
| model_id | string | Identifier of the model to use (e.g., "xai.grok-4") |
| model_provider | string | Provider name for the LLM model (e.g., "generic") |
| compartment_id | string | Oracle Cloud Infrastructure (OCI) compartment OCID |
| endpoint | string | Endpoint URL for the model |
| prompt_template | string | Prompt template used by the LLM, with variables in {{variable}} format for dynamic insertion |
Test Agent Prompt Tools
You test the tool independently of the agent by clicking on the Test tab and filling in the value of each parameter. The prompt is submitted to the LLM you selected.
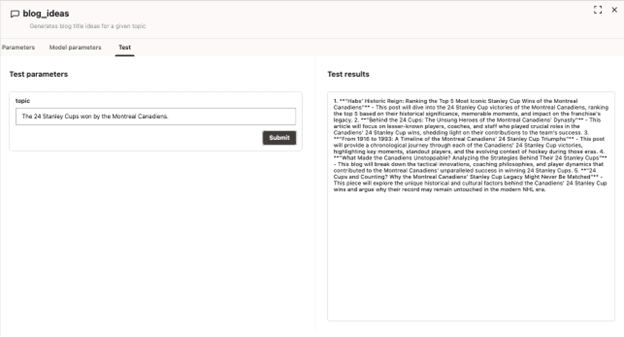
Ensure your prompt tool is well defined and documented to improve the results from your agent.
Add a Prompt Tool to an Agent
You can add a prompt tool to your agents to allow you to define parametrized prompts you issue to the LLM of your choice.
- Navigate to your agent.
- From Tool templates, drag and drop a Prompt tool to your canvas.
- In the Configuration tab, select the LLM to use and the provide the prompt for the LLM. Click Code
 to provide the configuration as JSON code.
 - Provide a Temperature for the response as a value between 0.0 and 1.0, where 0.0 provides a strictly factual response and 1.0 provides the most creative response.
- Click Apply
 .
. - Provide the definitions for any parameters you established in the configuration. Click Code to provide the configuration as JSON code.
- Click
 Apply.
 - Optional: Click the Test tab. Provide test parameters and click Submit. See test results in the Test results pane.
RAG Tool
The RAG tool issues a natural language query to a vector store and retrieves documents based on the semantic similarity between the query and the stored documents.
Note:
A knowledge base is a prerequisite for the creation of a RAG tool. For more information, see Knowledge Bases.RAG Tools through Visual Flow
The RAG tool requires you as agent developer provide values for the following parameters:
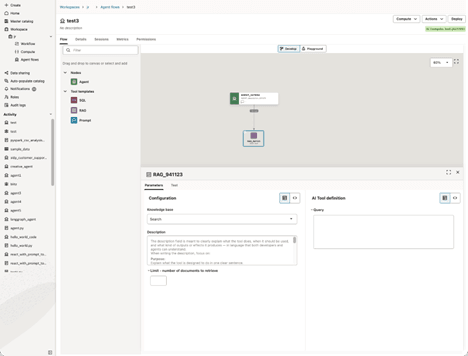
- Agent facing:
- Tool name: A descriptive name for the tool that help you and other users identify its function.
- Tool description: A short summary that provides an overview of the tool.
- Tool configuration:
- Knowledge base: A knowledge base stored in one of your Oracle AI Data Platform catalogs.
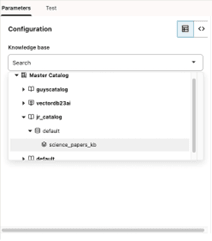
- Knowledge base: A knowledge base stored in one of your Oracle AI Data Platform catalogs.
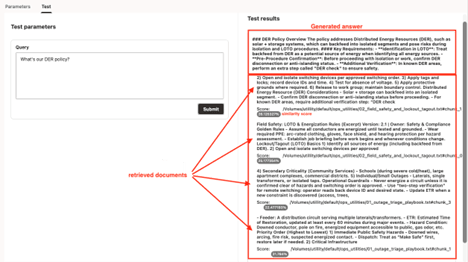
The agent will set the value of the query field based on its conversation with the end user. This query field takes a natural language query.
Limit is the number of document chunks you want the tool to retrieve from the vector store. This value is set by the agent developer, not the agent itself.
You can simulate a query issued by the agent by clicking on the test tab of the RAG too:
RAG Tools through LangGraph Code
Building a RAG tool in your agent through code requires configuring the same settings and parameters as the visual flow. For example, you set the RAG parameters as follows:
rag_params = [ { "name" : "query",
    "type" : "string",
    "description" : "<insert a description>",
    "defaultValue" : "<empty>”} ]
You then set up the RAG configuration:
rag_config = { "catalog": "<catalog>",
		  "schema": "<schema>",
		  "knowledgeBase": "<knowledge-base-name>",
		  "top_k": <number-of-documents-retrieved>,
		  "llm": {
			    "model_id" : "<model-name>",
			    "model_provider" : "<model-provider>",
			    "compartment_id" : "<your-compartment-OCID>",
			    "endpoint" : "https://inference.generativeai.<oci-region>.oci.oraclecloud.com" }
}
Lastly, you create a LangGraph compatible tool with the create_langgraph_tool() utility function from aidputils:
from aidputils.agents.toolkit.tool_helper import create_langgraph_tool
rag_conf= AIDPToolConf(name="<your-tool-name>",
			   description= "<your-tool-description>",
			   tool_class = "RAGTool",
			   conf=rag_config,
			   params=rag_params)
rag_tool = create_langgraph_tool(rag_conf.model_dump())
Table 18-2 RAG Tool Configuration Properties
| Property | Type | Description |
|---|---|---|
| llm | object | LLM connection details |
| catalog | string | Data catalog identifier |
| schema | string | Schema within the catalog |
| knowledgeBase | string | Name or key of the knowledge base to search |
| top_k | integer | Number of top matching documents to retrieve |
Test Agent RAG Tools
You can test the RAG tool from the Test tab after attaching your agent to an AI compute cluster. For more information, see Attach an Existing AI Cluster to an Agent.
Add a RAG Tool to an Agent
You can add a retrieval augmented generation (RAG) tool to your agents to allow the agent to pull relevant external knowledge when generating a response.
- Navigate to your agent.
- From Tool templates, drag and drop a RAG tool to your canvas.
- In the Configuration tab, select the knowledge base the RAG tool pulls information from and the provide the prompt to define the information to pull. Click Code to provide the configuration as JSON code.
- Click Apply .
- Provide the definitions for any parameters you established in the configuration. Click Code to provide the configuration as JSON code.
- Click Apply.
- Optional: Click the Test tab. Provide test parameters and click Submit. See test results in the Test results pane.
SQL Tool
The SQL tool lets agent developers run predefined SQL queries against tables registered in an Oracle AI Data Platform catalog.
You write the query at design time and define any runtime variables it needs. The agent supplies values for those variables when it calls the tool, and the results return as structured rows the agent can summarize or pass to a downstream node.
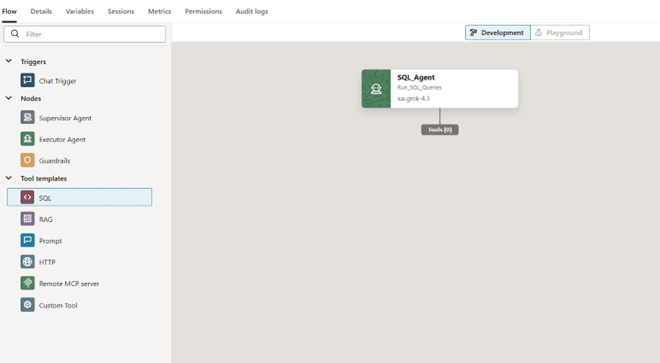
The SQL tool supports two query dialects. Spark SQL runs against standard catalog tables stored in AI Data Platform and requires a Spark cluster. Oracle SQL runs against an external database such as Oracle Autonomous AI Database. You choose the dialect per tool, and the rest of the configuration is the same for both.
Note:
The SQL tool is intended for read queries. A typical tool runs a SELECT statement and returns rows. The catalog, schema, and query you configure are private to the tool and are not exposed to the agent. Only the tool name, description, and the AI Tool definition (the runtime variables) are visible to the agent.Note:
The SQL query tool does not automatically start stopped clusters. As a result, the Spark cluster used for your Spark SQL query tool should have a duration of Forever. If the cluster is allowed to spin down on an idle timeout, Spark SQL queries stop working in production once the cluster stops.Static and Dynamic Queries
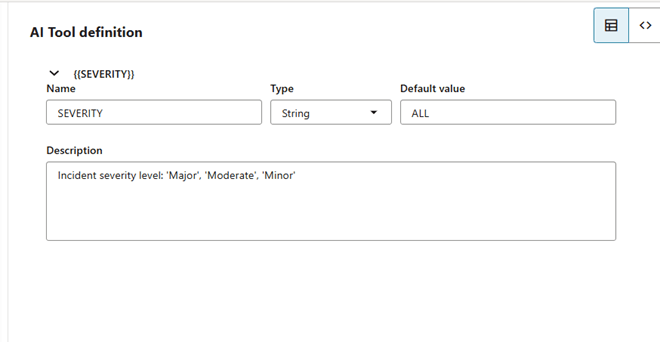
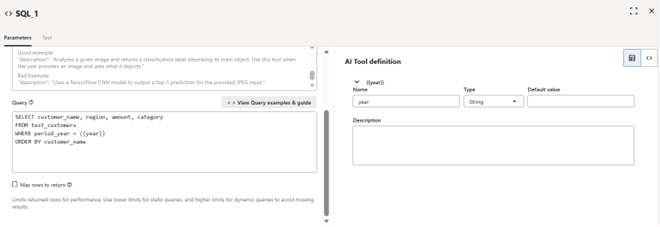
A static query returns exactly what you specify, with no runtime decision by the agent. A dynamic query includes one or more {{variable}} placeholders that signal to the agent that the value is set at run time. For each placeholder you provide a name, a type, an optional default value, and a description the agent uses to choose the value.
SELECT customer_name, region, amount, category
FROM test_customers
WHERE period_year = 2025
ORDER BY customer_name {{year}} placeholder turns it into a dynamic query the agent can parameterize: SELECT customer_name, region, amount, category
FROM test_customers
WHERE period_year = {{year}}
ORDER BY customer_name As you add placeholders, the AI Tool definition pane populates with each variable so you can set its type, default value, and description.
SELECT incident_id, project_id, incident_date, incident_type,
       severity, description, workers_involved, days_lost,
       root_cause, corrective_action, reported_by, status
FROM safety_incidents
WHERE LOWER(severity) = LOWER('{{SEVERITY}}')
Give each variable a clear description and a sensible default. The description tells the agent which values are valid, and the default is used when the agent does not supply one.
Note:
Placeholder names are case sensitive. A placeholder written as{{SEVERITY}} and one written as {{severity}} are treated as two different variables, unless you consistently use lower case throughout.
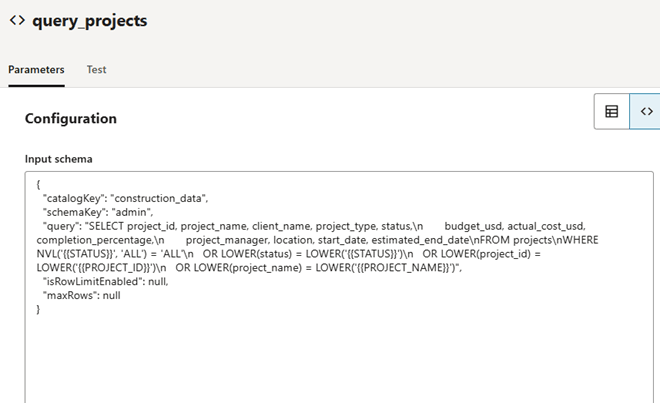
Editing the Configuration as JSON
{
  "catalogKey": "construction_data",
  "schemaKey": "admin",
  "query": "SELECT project_id, project_name, client_name, ...",
  "isRowLimitEnabled": null,
  "maxRows": null
}
Row Limits
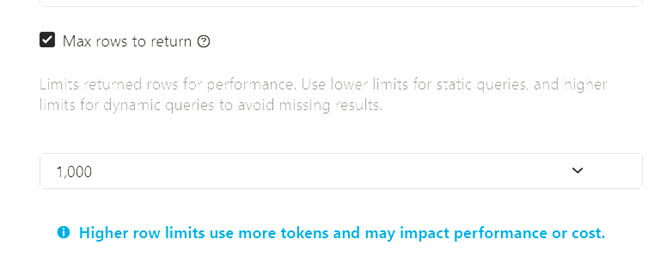
You can cap the number of rows the tool returns by selecting Max rows to return and entering a limit value. Row limits protect performance and control how much data is sent back to the agent.
Set this value relative to the model your agent is using. Larger values can cause agent failures when queries return wide rows or columns with large text values.
Note:
If you are seeing unexpected agent errors, start by reducing maxRows.The row limit is applied to the SQL query itself, before the query runs. Most models detect the limit and surface it to the end user. For a static query, the limit returns the first n available rows.
Note:
If you do not want your row limits surfaced for end users, instruct the agent accordingly in its instructions.Query Examples
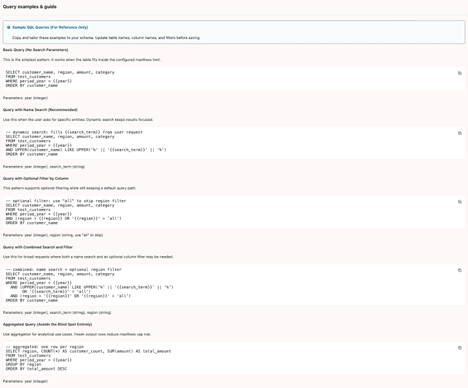
You can see query examples and a guide to writing SQL tool queries from the View Query examples & guide button.
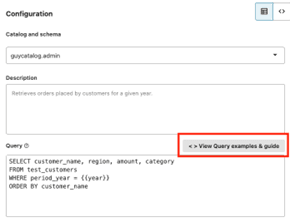
The guide showcases different query patterns and provides different recommendations on query parameters.
SQL Tools through LangGraph Code
Just as with the visual flow, you start creating a SQL tool for your agent through LangGraph code by creating a query:
sql_config = { "catalogKey": "adw23ai_phx",
	  "schemaKey": "gold",
	  "query": """Select ... from ... limit {{max_number}}""" }
You document each parameter in the SQL query in the params argument with a name, type, description, and optionally, a defaultValue.
sql_params = [ {  "name" : "max_number",
		    "type" : "string",
		    "description" : "<your-description>",
		    "defaultValue" : "<your-default-value>" } ]
Lastly, you create a LangGraph compatible tool with the create_langgraph_tool() utility function from aidputils:
from aidputils.agents.toolkit.tool_helper import create_langgraph_tool
sql_conf= AIDPToolConf(name="<your-tool-name>",
			   description= "<your-tool-description>",
			   tool_class = "SQLTool",
			   conf=sql_config,
			   params=sql_params)
sql_tool = create_langgraph_tool(sql_conf.model_dump())
Table 18-3 SQL Tool Configuration Properties
| Property | Type | Description |
|---|---|---|
| catalogKey | string | Identifier for the catalog or database connection |
| schemaKey | string | Schema name within the catalog/database |
| query | string | SQL Query string, may include placeholders in {{}} |
Test Agent SQL Tools
The Test tab runs the tool on its own, without executing the full agent. Testing works the same way for both dialects. Open the Test tab, provide a value for each runtime parameter (or use the defaults), and click Submit to run the query and view the response.
Note:
Testing a tool requires that your agent is attached to an AI compute. An AI compute is attached if the AI Compute label is green with the selected AI compute in an ACTIVE state.SQL Command Reference
SQL tool queries are read queries built from the standard SQL clauses. The Oracle SQL dialect follows Oracle SQL against the external database. The Spark SQL dialect targets standard catalog tables, which are Delta Lake tables; the standard catalog currently runs Spark 3.5 with Delta Lake 3.2.0. Most clauses are written the same way in both dialects, because both follow standard SQL. The main difference is how each dialect limits the number of rows. The following table lists the clauses and keywords most often used in SQL tool queries, with the form for each dialect.
| Keyword or clause | Purpose | Oracle SQL | Spark SQL |
|---|---|---|---|
| SELECT | Choose the columns to return | SELECT col1, col2 |
|
| DISTINCT | Return only unique rows | SELECT DISTINCT col |
SELECT DISTINCT col |
| FROM | Name the source table | FROM table_name |
FROM table_name |
| WHERE | Filter rows by a condition | WHERE col = value |
WHERE col = value |
| AND OR NOT | Combine or negate conditions | a AND b OR NOT c |
a AND b OR NOT c |
| IN | Match any value in a list | col IN (a, b, c) |
col IN (a, b, c) |
| BETWEEN | Match an inclusive range | col BETWEEN x AND y |
col BETWEEN x AND y |
| LIKE | Match a text pattern | col LIKE 'A%' |
col LIKE 'A%' |
| IS NULL | Test for missing values | col IS NULL |
col IS NULL |
| ORDER BY | Sort the result | ORDER BY col DESC |
ORDER BY col DESC |
| GROUP BY | Group rows for aggregation | GROUP BY col |
GROUP BY col |
| HAVING | Filter grouped rows | HAVING COUNT(*) > 1 |
HAVING COUNT(*) > 1 |
| JOIN ON | Combine rows from two tables | a JOIN b ON a.id = b.id |
a JOIN b ON a.id = b.id |
| AS | Alias a column or table | col AS name |
col AS name |
| UNION ALL | Combine two result sets | q1 UNION ALL q2 |
q1 UNION ALL q2 |
| CASE | Return a value conditionally | CASE WHEN c THEN x END |
CASE WHEN c THEN x END |
| Aggregates | Summarize over rows | COUNT SUM AVG MIN MAX |
COUNT SUM AVG MIN MAX |
| Row limit | Cap the number of rows | FETCH FIRST n ROWS ONLY |
LIMIT n |
Note:
You normally do not write the row limit yourself. The Max rows to return setting applies it for you. The FETCH FIRST and LIMIT forms are useful only when you want an explicit limit inside the query.For complete SQL grammar and the query engines behind each dialect, see the following references:
Spark SQL and Delta Lake (Standard Catalog)
- Apache Spark SQL Syntax: DML statements Spark SQL query and DML statement syntax.
- Delta Lake: Table deletes, updates, and merges DELETE, UPDATE, and MERGE operations on Delta tables.
- Delta Lake: Table utility commands Utility operations such as OPTIMIZE and VACUUM.
- Delta Lake: Use liquid clustering for Delta tables Liquid clustering for Delta table layout.
Add a SQL Tool to an Agent
You can add a SQL tool to your agents to allow the agent to execute SQL queries against structured data sources in registered external catalogs.
- Click and drag the connector handle on your agent to connect to the tool node.
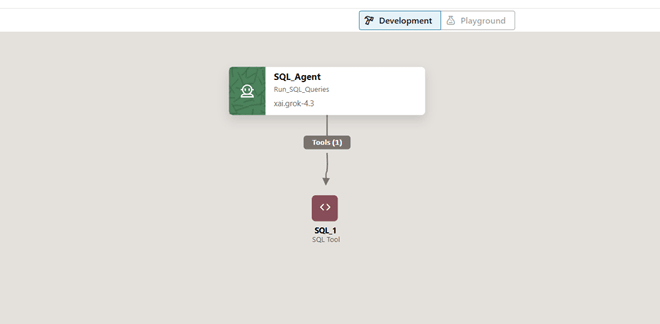
- Choose the Query dialect:
- Spark SQL writes queries against standard AI Data Platform catalogs.
- Oracle SQL writes queries against external AI Data Platform catalogs.
Note:
Spark SQL requires a running Spark cluster in your Oracle AI Data Platform workspace.
- From the Cluster drop-down, select a running Spark cluster. Click Create cluster to provision a new Spark cluster. See Create a Custom Cluster for guidance on creating a new cluster.
Note:
The SQL query tool does not automatically start stopped clusters. As a result, the Spark cluster used for your Spark SQL query tool should have a duration of Forever. If the cluster is allowed to spin down on an idle timeout, Spark SQL queries stop working in production once the cluster stops.
- Under Browse catalog, use the search field to locate a catalog by name or click through the catalog manager to locate the catalog.
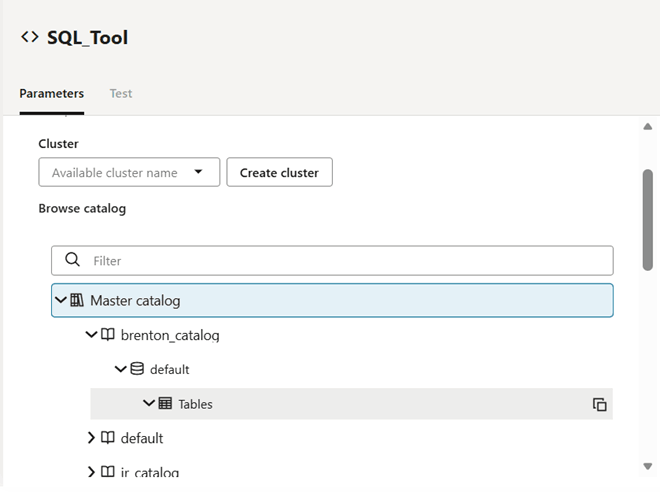
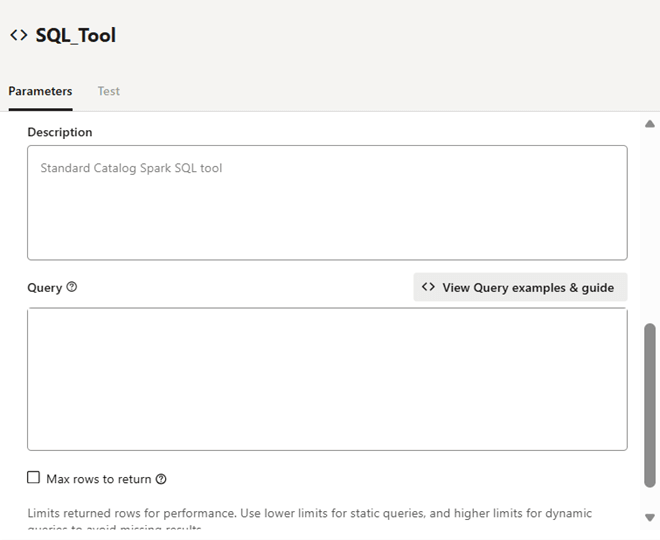
- In the Query field, enter your query. Click View Query examples and guide to open a panel containing ready-made patterns you can copy or adapt.
- In the AI Tool definition pane, set the type, default value, and description for the variables set in your query.
- Optional: Click the Test tab. Provide test parameters and click Submit. See test results in the Test results pane.