Common Tasks for Visual Applications
As you work with a visual application (and the web apps it contains), learn how you can complete some common tasks at the visual application level.
Manage Visual Application Settings
Because a visual application is a container for your web apps, you can manage things at the visual application level, meaning settings at this level will apply to all the web apps within the visual application.
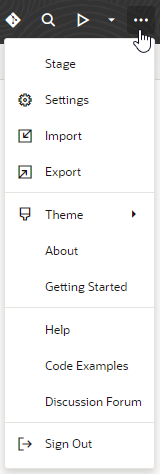
To configure settings for a visual application in the Settings editor, locate the application whose settings you want to change on the Visual Builder Home page, then click Menu in the upper-right corner and select Settings:
Description of the illustration toolbar-settings-menu.png
| Tab | Description |
|---|---|
| Application | Manage general and runtime dependency settings: |
| Application Display Name | (Read-only) Application's display name, which you can see in the Designer's header as well as all pages used to manage the application. |
| Application Name | (Read-only) Application's internal name, which becomes part of the browser URL used to access the application as well as in the Developer's console. |
| Application ID | (Read-only) Application's unique ID based on the application name and version, both of which become part of the browser URL used to access the application. |
| Vanity URL | Custom domain that you can use to shield customers from the details of your server’s host and domain name. See Specify a Custom URL for Your App. |
| Description | Optional description of the application. |
| Runtime Dependency | Client-side libraries that, along with the accompanying version of Oracle JET, determine features and enhancements available to your visual application. See Manage Runtime Dependencies for Visual Applications. |
| Troubleshooting | Option to clear the resource cache. See How Do I Clear My App's Resource Cache? |
| Translations | Download the strings that appear in the user interface of your visual application's web apps to import into a third-party translation tool for translation. You then upload the translated strings from the translation tool to use for those apps that support different languages. See Work With Translations. |
| Application Profiles | Deploy your app with different settings depending on the environment. For example, you won’t want to use a production REST service with access to live customer data when developing an app. Instead, you’ll use a development or test instance of the service. Once you complete development and your app is deployed to production, you’ll want it to connect to the production REST service. Application profiles help manage the switch between the different instances of the REST service.
Application profiles can be associated with your application's backends and service connections, as well as user roles. They can also be mapped to environment-specific schema when you bring your own database schema for business objects. Note: Application profiles belonging to visual applications created on Visual Builder Studio and deployed to a Visual Builder instance may at times be marked as disabled on your instance. While you won't be able to readily remove disabled profiles, you can't duplicate, rename, or change their configuration either. |
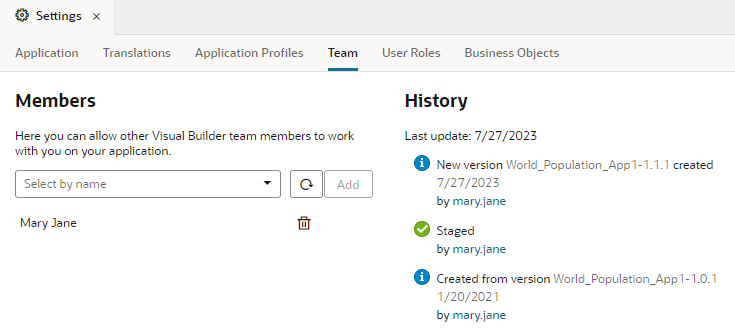
| Team | Collaborate with others on the visual application. Only users who have been added to the app as team members can edit an app or perform lifecycle operations. See Add Team Members. |
| User Roles | Control access to business objects and data in your apps based on a person’s user role. See Authentication Roles Versus User Roles. |
| Business Objects | Retrieve the API for the catalog of endpoints exposed by business objects in your visual application. Other settings in this tab configure client’s access to this API. You can configure anonymous access, basic authentication, or get an access token that a client can use. See Allow External Access to Your Business Objects and Get an Access Token for Authentication. |
Add Team Members
Add team members to an application to enable other developers in the identity domain to contribute to developing the application.
To add a team member to an application:
Export and Import Application Resources
You can import and export a visual application's resources to share source files and to move applications between instances.
Export Application Resources
You might want to export an application’s resources when you want to import them into another application or share them with a team member. Exporting an application downloads its resources as a ZIP archive to your local file system.
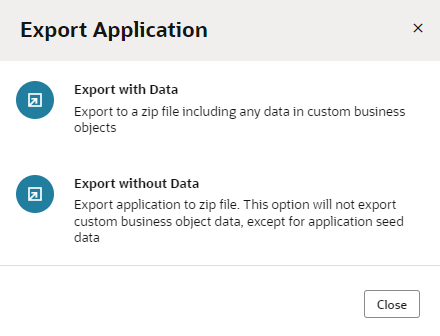
To export an application’s resources:
If you exported the application with data, the archive will include a JSON file (entity.json) and a spreadsheet (entity-data.csv) for each business object. The JSON file describes the business object and the spreadsheet contains the business object data. If you chose to export the application without data, the archive will only contain the JSON file describing the business objects.
The archive will always include the data for any business objects that are identified as containing Application Setup Data.
If user roles are defined for the application, the role-mapping definition (which maps user roles to IDCS groups) will be copied to a JSON file (role-mapping.json) and included in the exported application archive.

