Deploy Integration Endpoints to Oracle Cloud Infrastructure API Gateway
You can deploy individual integration endpoints as routes to Oracle Cloud Infrastructure API Gateway. An Oracle Cloud Infrastructure API Gateway instance supports a maximum of 20 deployments. Each deployment can contain up to 50 routes (each routing to individual endpoints). This provides you with a capacity of 1000 integration endpoints to which to deploy.
- Restrictions
- Create a Dynamic Group and Policy to Grant Gateway Access
- Create a Virtual Cloud Network
- Create a Subnet, Gateway, Routing Rules, and Security Rules for the Virtual Cloud Network
- Create an Oracle Cloud Infrastructure API Gateway and Deployment in the Oracle Cloud Console
- Deploy an Integration to the API Gateway
Watch a video to learn more:
Note:
To perform tasks in the Oracle Cloud Console, you must have the ServiceAdministrator role.Restrictions
- Deployment to Oracle Cloud Infrastructure API Gateway only works in identity domain-enabled environments.
- Only integrations in a project can be deployed to Oracle Cloud Infrastructure API Gateway. The integration must be publicly available. That is, the Available to other projects check box must be selected for this integration.
- The integration must be activated.
- You can only deploy a REST Adapter trigger-based integration.
- REST Adapter trigger connections that expose multiple entry points to a single integration are not supported. See Receive Requests for Multiple Resources in a Single REST Adapter Trigger with a Pick Action.
See API Limits.
Create a Dynamic Group and Policy to Grant Gateway Access
- Create a dynamic group.
- Create a policy to grant access to Oracle Cloud Infrastructure API Gateway.
You create the required dynamic group and assign a policy to that group to allow your Oracle Integration instance to access Oracle Cloud Infrastructure API Gateway. The policy defines the permissions for the dynamic group and determines which operations the dynamic group can perform in the Oracle Cloud Infrastructure API Gateway. You must first obtain the client ID of the OAuth application for the Oracle Integration instance.
- Log in to the Oracle Cloud Console.
- In the navigation pane, select Identity & Security.
- Under Identity, select Domains.
- In the upper right corner, click the Profile icon, then select the identity domain.
- In the menu bar, click Oracle cloud services.

- In the Name column, click your service instance.
- Click OAuth configuration.
- Scroll down to the General Information section and copy the client ID value to use to create your dynamic group.
- Scroll to the breadcrumbs at the top and click Oracle cloud
services to return to the main page for the identity domain.

- In the menu bar, click Dynamic groups.

- Click Create dynamic group.
- Enter the following details:
- In the Name and Description fields, enter values. These fields are required.
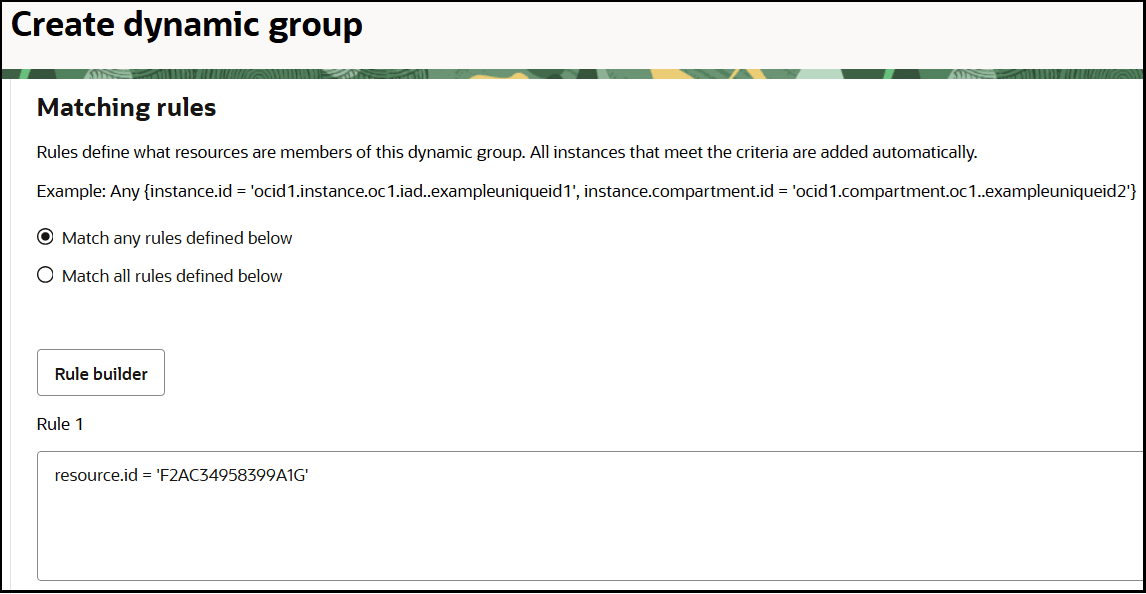
- In the Matching rules section, enter the
required rule, then click Create. The resource ID you specify
must match the client ID of the OAuth application of your Oracle Integration
instance. Ensure that you enclose the value in single quotes. For
example:
resource.id = 'client_ID'
- In the left navigation pane, click Policies.
- Click Create Policy.
- Select the compartment in which to create the policy.
- Enter the following details:
- In the Name and
Description fields, enter values. These fields are
required.
The Compartment field shows the compartment you previously selected.
- In the Policy Builder section, click
Show manual editor to build the required policy for the
dynamic group. For
example:
allow dynamic-group dynamic_group to manage api-gateway-family in compartment compartment_nameWhere:dynamic_group: Is the dynamic group name you created.compartment_name: Is the compartment in which your Oracle Integration instance is located.
This enables the Oracle Integration instance associated with the dynamic group to call Oracle Cloud Infrastructure API Gateway in this particular compartment.
- In the Name and
Description fields, enter values. These fields are
required.
- Click Create.
Create a Virtual Cloud Network
You must create a virtual cloud network before you can create an Oracle Cloud Infrastructure API Gateway.
These steps describe how to manually create the virtual cloud network. For additional instructions, see Creating a VCN.
- In the navigation menu, go to Networking.
- Click Virtual cloud networks.
- Click Create VCN.
While not shown here, you can also select a wizard from the Actions menu to create a virtual cloud network. See Create and Configure a Virtual Cloud Network for a tutorial and videos.
- Enter the following information, then click Create
VCN.
Element Description Name Enter a virtual cloud network name. Create in Compartment Displays the compartment you previously selected. IPv4 CIDR Blocks Assign up to five IPv4 CIDR blocks to a VCN. At least one is required. See VCN and Subnet Management. Use DNS hostnames in this VCN If you plan to use VCN DNS or a third-party DNS, this is required for instance hostname assignment. This selection cannot be changed after the VCN is created. See DNS in Your Virtual Cloud Network DNS Label This value is generated from the virtual cloud network name if not specified. DNS Domain Name This value is generated from the virtual cloud network name if not specified. IPv6 Prefixes Assign a single Oracle-allocated IPv6 /56 prefix to this VCN, or a BYOIPv6 prefix or ULA prefix to the VCN. BYOIPv6 Prefix Add BYOIPv6 prefixes. See IPv6 Addresses. Tags Add tags to organize your resources. The details page for the virtual cloud network is displayed.
Create a Subnet, Gateway, Routing Rules, and Security Rules for the Virtual Cloud Network
You must create a subnet, internet gateway, routing rules, and security rules for the virtual cloud network.
- In the menu bar, click Subnets.

You now create a subnet in the VCN. A subnet is a logical subdivision of the VCN. Each subnet consists of a contiguous range of IP addresses that don't overlap with other subnets in the VCN. For additional instructions, see Creating a Subnet.
- Click Create Subnet.
- Enter the following information, then click Create
Subnet.
Element Description Name Enter a subnet name. Create in Compartment Displays the compartment you previously selected. Subnet Type Select a subnet type: - Regional (Recommended): Instances in the subnet can be created in any availability domain in the region. This is useful for high availability.
- Availability Domain-specific: Instances in the subnet can only be created in one availability domain in the region.
IPv4 CIDR Block Enter the IPv4 CIDR block. IPv6 Prefixes If you want to assign IPv6 prefixes, click Assign an Oracle allocated IPv6 /64 prefix and enter the values. Route Table compartment Select the route table compartment. Route Table Select the route table. See VCN Route Tables. Subnet Access Select an access type: - Private Subnet: Prohibit public IP addresses for instances in this subnet.
- Public Subnet: Allow public IP addresses for instances in this subnet.
Use DNS hostnames in this Subnet If you plan to use VCN DNS or a third-party DNS, this is required for instance hostname assignment. This selection cannot be changed after the VCN is created. DNS Label This value is generated from the virtual cloud network name if not specified. DNS Domain Name Enter the DNS domain name in the format shown in the field. Dhcp Options compartment Select the default DHCP compartment. Dhcp Options Select the DHCP options. See DHCP Options. Security List compartment Select the security list compartment. Security List Select the security list. You can associate up to five network security lists with the subnet. See Security Lists. Resource Logging Select to enable resource logging to allow resource tracking, troubleshooting, and data insights. Tags Add tags to organize your resources. - Click the subnet breadcrumb at the top, then select
Gateways.

- Scroll down and click Create Internet Gateway.
An internet gateway is an optional gateway you can add to a virtual cloud network to enable direct connectivity to the internet. The gateway supports connections from within the virtual cloud network (egress) and connections from the internet (ingress).
- Enter the following information, then click Create Internet
Gateway. For additional information, see Creating an Internet Gateway.
Element Description Name Enter an internet gateway name. Create in Compartment Displays the compartment you previously selected. Advanced options Click if you want to associate a route table with the gateway. You can modify the rules in the current route table or replace it with another route table. See VCN Route Tables. - In the menu bar at the top, select Security.

Security rules control traffic. For additional information, see Security Rules.
- In the Name column, click the default security list.
- Click the Security rules tab.
- Click Add Ingress Rules.
- Specify the CIDR source type and IP protocol.
- Leave the Source Port Range field blank.
- Enter
443in the Destination Port Range field. - Click Add Ingress Rules.
- Return to the details page for the virtual cloud network you created.
- In the menu bar at the top, click Routing.
A virtual cloud network uses route tables to send out traffic (for example, to the internet, an on-premises network, or a peered virtual cloud network). For additional information, see VCN Route Tables and Working with VCN Route Tables and Route Rules.

- In the Name column, click the default route rule.
- Click the Route Rules tab.
- Enter the following information, then click Add Route
Rules.
Element Description Protocol Version Select the protocol version to use. - IPv4
- IPv6
Target Type Select Internet Gateway. Destination CIDR Block Enter the destination CIDR block. Target Internet Gateway compartment Select the target internet gateway compartment. Target Internet Gateway Select the API gateway. Description Enter an optional description. - In the menu bar at the top, click Security.

- Scroll down to Network Security Groups, and click Create Network Security Group. For additional instructions, see Creating a Network Security Group.
- Enter the following information, then click
Create.
Element Description Name Enter a name. Create in Compartment Leave the compartment as is. Tags Add tags to organize your resources. - Scroll down to Add Security Rules and expand Rule.
- Enter the following information, then click
Create.
Element Description Direction Select Ingress. Source Type Select CIDR. Source CIDR Add an IP address or a range of IP addresses. IP Protocol Select TCP. Source Port Range Specify All.Source CIDR Specify the value. Destination Port Range Specify 443. - In the breadcrumbs at the top of the page, click the link for the virtual cloud network that you created.
- In the menu bar, click Security.
If egress rules do not exist, you must define them.
- Click Create Security List.
- Scroll down to the Allow Rules for Egress section and add egress rules.
Create an Oracle Cloud Infrastructure API Gateway and Deployment in the Oracle Cloud Console
You must create an Oracle Cloud Infrastructure API Gateway. Each gateway instance supports a maximum of 20 deployments. Each deployment can handle up to 50 routes. This means that one gateway instance can protect up to 1000 APIs. You can select an existing deployment, enabling a new route to be created in that deployment. You can also create a new deployment.
- In the navigation menu, go to Developer Services.
- Under API Management, select Gateways.
- Select the compartment to use for deployment.
- Click Create Gateway.
- Enter the following information, then click
Create Gateway.
Element Description Name Enter a gateway name. Type Select Public. Compartment Displays the compartment you previously selected. Network Select the following networking details: - Virtual cloud network: Select a virtual cloud network.
- Subnet: Select a VCN with at least one regional subnet added.
See Networking Overview.
Enable network security groups Select the check box, then select a compartment with at least one network security group. Certificate Select an SSL/TLS certificate that has been added to Oracle Cloud for use with a custom DNS configuration or use the default certificate provided by the gateway. See Setting Up Custom Domains and TLS Certificates. The new gateway is displayed in the Name column on the Gateways page.

- Click the gateway name.
- Under Resources in the left navigation pane, click Deployments.
- Click Create
deployment.
The Create deployment wizard is displayed.
You can create deployments based on categories appropriate to your business environment. For example, you may want to create separate deployments for applications, functional areas within an application, client requirements (for example, all APIs for a client-facing portal), and so on. You then deploy the integration endpoints to the appropriate deployment category.
- Enter the following information, then click
Next.
Element Description Name Enter a deployment name. For this example, NetSuiteis entered.Path prefix Enter a prefix. For this example, /netsuiteis entered.Compartment Displays the compartment you previously selected. API request policies Select API request policies as required for your environment: - Mutual-TLS: Select to enable mTLS.
- CORS: Configure CORS access.
- Rate limiting: Configure rate limiting.
- Usage plans: Configure usage plans.
API logging policies Select a logging level. Tags (under Show advanced options) Add tags to organize your resources. - Select an Authentication
method, and specify additional details, then click Next
- No Authentication: Any client that has network access to the gateway can make requests to all routes in this deployment.
- Single Authentication: Configure integration with
a single identity provider. You can optionally limit access for all routes to
authenticated clients only.
If you select this option, authentication, validation, and other security fields are displayed for configuration.
- Multi-Authentication: Configure integration with
one or more identity providers. You can optionally limit access for all routes to
authenticated clients only.
If you select this option, additional authentication fields are displayed for configuration.
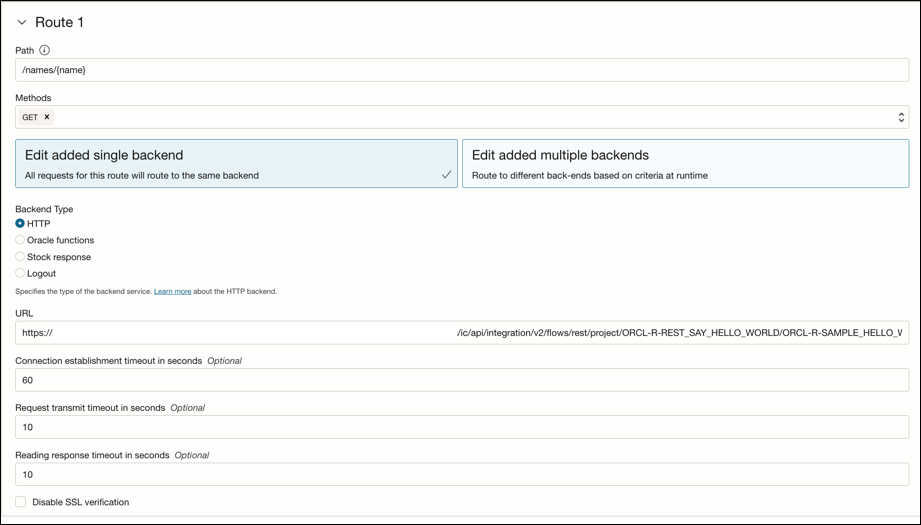
Route 1 is displayed.
Individual integration endpoints are deployed as routes to an Oracle Cloud Infrastructure API Gateway deployment.
- Enter the following information, then click
Next.
Element Description Path Enter a path (for example, /order).Methods Select one or more methods based upon your requirements (for example, GET, POST, PUT, or others). Backend Type This option enables all requests for this route to be sent to the same backend. Select a backend type. Each selection causes additional fields to be displayed for you to configure. - HTTP
- Oracle functions
- Stock response
- Logout
Add multiple backends Route to different backends based on criteria at runtime. To configure your route to support multiple backends, first define the request context element to use as the selector. The gateway uses the selector at runtime to choose the backend based on a matching rule defined for the backend.
Selector: Select the request context table. Some selections cause additional fields to be displayed for you to configure.- Auth
- Headers
- Host
- Path
- Query parameters
- Subdomain
- Usage plan ocid
Backends: Add one or more backends for your route. Each backend needs a matching expression that the gateway uses to match based on the request context in the selector at runtime.
Define backend Click to define a backend. You can also expand and specify polices as required for your environment. - Show route request policies
- Show route response policies
- Show response caching policies
- Show route logging policies
- Review your selections on the Deployment
page, then click Create.
Route 1 is configured.
- Follow Step 8 through Step 12 to create any additional deployments and routes. For this
example, a deployment (Oracle Rest Say Hello World) is created that
includes a single route:

When complete, the deployments are listed on the details page for the gateway.
You are now ready to deploy individual integration endpoints as routes to Oracle Cloud Infrastructure API Gateway.
Deploy an Integration to the API Gateway
After completing all prerequisites and gateway and deployment configuration tasks in the Oracle Cloud Console, you can deploy individual integration endpoints as routes from a project to Oracle Cloud Infrastructure API Gateway. You perform deployment from Oracle Integration.
- In the navigation pane, click Projects.
- Click the project name or click
 .
.
- In the Integrations section, find the already-activated integration to publish. Only active REST Adapter, triggered-based integrations can be deployed.
- Click Actions
 , and select Publish to API
Gateway.
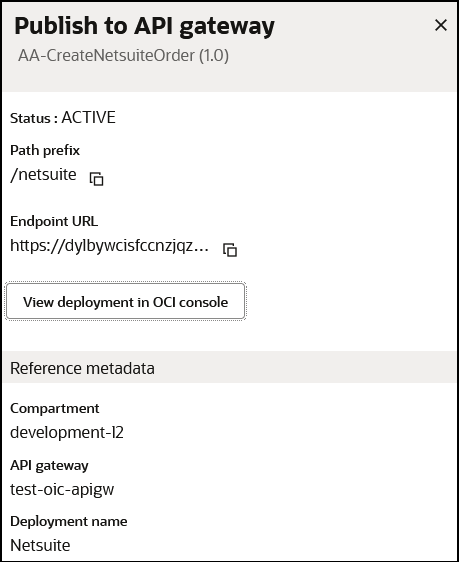
The Publish to API gateway panel opens.
- Enter the following information:
Element Description REST endpoint Displays the endpoint of the integration. This endpoint cannot be deselected. Search or select compartment Select the compartment created in the Oracle Cloud Console that includes Oracle Cloud Infrastructure API Gateway. Search or select API gateway Select the Oracle Cloud Infrastructure API Gateway instance created in that compartment. Select or create API gateway deployment Select a deployment inside the gateway instance. You can also create a gateway from this field. For this example, the test-oic-apigw gateway and NetSuite deployment created in Create an Oracle Cloud Infrastructure API Gateway and Deployment in the Oracle Cloud Console are selected.

- Click Publish.
The deployment is visible in Oracle Cloud Infrastructure API Gateway. Use the Observe tab in the project to check if the API calls are being reached when invoked by the Oracle Cloud Infrastructure API Gateway deployment URL.
- If you want to unpublish your API gateway deployment, click Undo publish.