Manage Lookups
A lookup associates values used by one application for a specific field with the values used by other applications for the same field. This capability enables you to map values across vocabularies or systems. For example, you can map country codes, city codes, currency codes, and so on.
Topics:
Note:
Specifying a lookup value that includes a special character of # is not supported.Clone a Lookup
You can clone a copy of an existing lookup in Oracle Integration. Cloning provides a quick way to create a new lookup with similar information. Lookups with adapters and domain names can be cloned.
Delete a Lookup
You can delete lookups in Oracle Integration that are not currently in use by integrations. Attempting to delete a lookup in use would invalidate the integration and cause an active integration to stop running. You must first remove the lookup from the integration and then delete the lookup.
Update Lookups in Active Integrations
Lookups are not deployed as part of integration activation. Therefore, changes that you make to lookups already used in active integrations typically take effect immediately. There is no need to re-activate integrations using a changed lookup for the new lookup value to take effect.
There can be instances in which updates to the runtime environment are slow because it is not in real-time and queuing can occur at runtime. For those cases, updates can occur in a couple of minutes.
Export a Lookup
Once you create a lookup, you can export that lookup for use in other Oracle Integration environments.
Import a Lookup
You can import lookups that were previously exported from Oracle Integration.
table_name is the name of
the table as you want it to appear in Oracle Integration. This name cannot contain
spaces.DVM,table_nameCreate an AI-Powered Lookup Description
You can use AI to generate a new description or replace an existing description of a lookup with a single click.
Create the lookupValue Function
You can create the parameter values for the lookupValue
function with the Map Lookup Value Wizard. This wizard enables you to define the
lookup table, source column, target column, and default value to use in the
function. For these parameter values to be selectable in the wizard, you must have
already created a lookup on the Lookups page.
Access the Build Lookup Function Wizard
The Map Lookup Value Wizard for creating the lookupValue
function parameter values is accessible from the mapper or the Expression Builder in actions
that support functions in Oracle Integration.
Note:
You must already have created lookups to use this wizard.From the Mapper
- In the upper right corner, click Toggle functions
 to launch the Components panel.
- Type
lookupValuein the Search field, and click Search. - Drag the function onto the target element node.
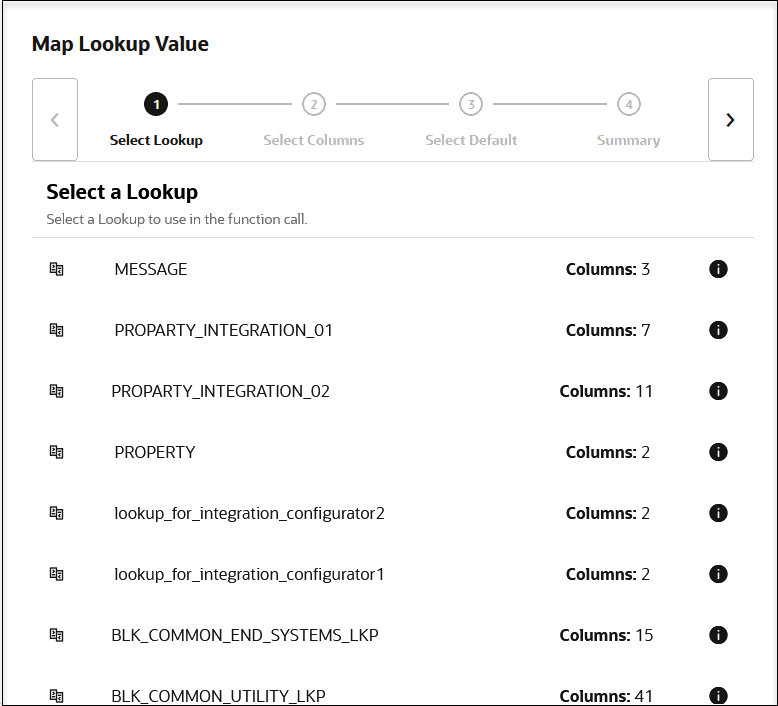
The Map Lookup Value Wizard is displayed.

From the Expression Builder in an Action that Supports Functions
You can access the Map Lookup Value Wizard in the Expression Builder in an action that supports functions, such as a switch, stitch, or others.
-
Open an integration for editing.
-
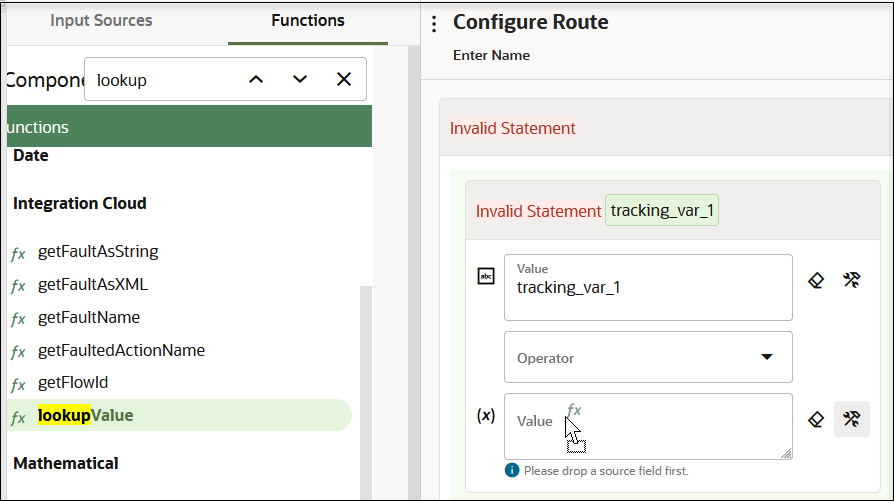
Open an action that supports functions in the integration (for this example, a switch action is shown, but other actions such as a stitch can be used).
The Configure route panel opens.
- Manually enter a value, select a value from the drop-down list, or drag a value from the Sources tree to the first Value field. For this example, tracking_var_1 is selected.
- Select an operator in the Operator field.
-
Click Functions, and browse or search for
lookupValue. - Click
lookupValue. - View the description after the function for information about the
supported parameters. You define values for these parameters in the Map Lookup
Value Wizard.
-
dvm-location -
src-column -
src-value -
target-column -
default-value
-
- Click Switch to Developer View
 in the second Value field.
-
Drag the
lookupValuefunction into the second Value field.
The Map Lookup Value Wizard is displayed.

Create the
lookupValuefunction parameter values.
Select the Lookup
You can select the lookup to use in the lookupValue
function. You must already have created a lookup. Otherwise, no lookups are
displayed for selection.
-
Select the lookup to use in the function. You can view the lookup description by clicking the information icon in the row. This can guide you in selecting the required lookup. The number of columns defined in the lookup is also displayed.
- Click Next >.
Select the Source and Target Columns
You can select the source and target columns to use in the
lookupValue function. The lookupValue function
requires one source column and one target column. When you select the source and target
columns, the values available with the columns are displayed.
- Select the source and target columns to use in the
lookupValuefunction.Element Description Select Source
Click the source column header to select from a list of available columns for this lookup table. The data included with the selected column is displayed. Both adapter and domain name columns are displayed.
Select Target
Click the target column header to select from a list of available columns for this lookup table. The data included with the selected column is displayed. Both adapter and domain name columns are displayed.
- Click Next >.
Specify the Default Value
You must specify a default value to use.
- Enter the default value to use in the
lookupValuefunction if no match is found. If there is no match that satisfies all the search values, the lookup fails and the default value is returned (for example, an actual default value to use or an error message such asNo Value Found). - Click Next >.
Review Your Lookup Table Selections
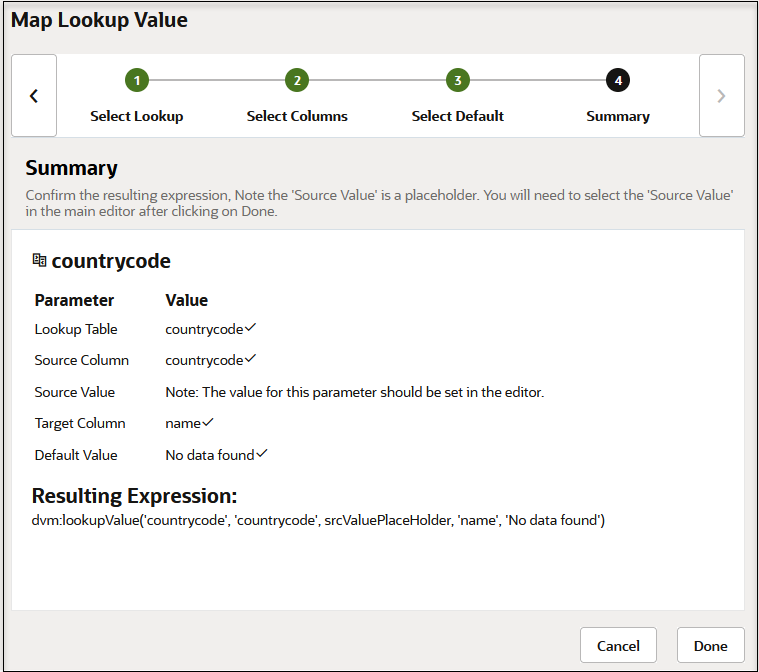
You can review the lookup table values to use in the lookupValue function on the Summary page.
- Review the lookup table values. The Summary page is the final wizard
page after you complete your configuration.
Element Description Parameter and Value Table
Displays a summary of the parameters and values you defined on previous pages of the wizard.
To return to a previous page to update any values, click the appropriate tab in the left panel or click Back
 .
.
Resulting Expression
Displays the expression you defined on the previous pages of the wizard. The
lookupValuefunction takes the following format:lookupValue(dvm-location, src-column, src-value, target-column, default-value)Where:
-
Lookup Table: The lookup table selected on the Select lookup page.
-
Source Column: The source column selected on the Select columns page.
-
Source Value: The source value you enter in the mapper or Expression Builder after completing this wizard. Complete this wizard, then define the
srcValueparameter value. -
Target Column: The target column selected on the Select columns page.
-
Default Value: The default value entered on the Default value page.
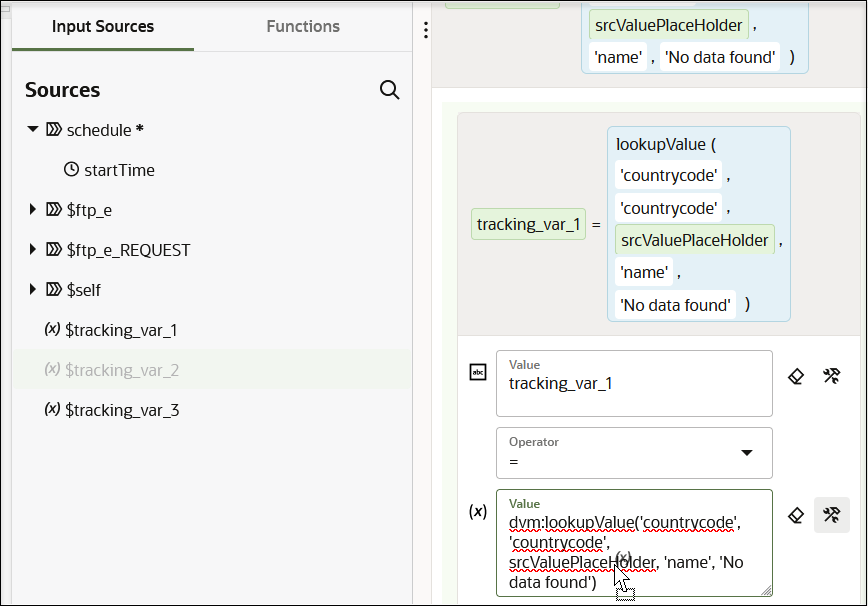
For example, a definedlookupValuefunction after you have completed the wizard and defined thesrcValueparameter value in the Expression Builder can look as follows:dvm:lookupValue('countrycode', 'countrycode', srcValuePlaceHolder, 'name', 'No data found')For example:

-
- Click Done.
- In the Sources tree, drag a value to replace
srcValuePlaceHolder in the Value field.

- Click Save.
You can use the configured function in the mapper. See Add Functions, Operators, and XSLT Statements in Using the Oracle Mapper with Oracle Integration 3.

