Invoke External Procedures as SQL Functions
Shows the steps to invoke external procedures using PL/SQL within your database.
External Procedures Overview
External procedures are functions written in a third-generation language and callable from within PL/SQL or SQL as if they were a PL/SQL routine or function.
External procedures promote reusability, efficiency, and modularity. Existing dynamic link libraries (DLLs) written in other languages can be called from PL/SQL programs. The DLLs are loaded only when needed and they can be enhanced without affecting the calling programs.
Using external procedures also enhances performance, because third-generation languages perform certain tasks more efficiently than PL/SQL, which is better suited for SQL transaction processing.
External procedures are useful when:
-
Solving scientific and engineering problems
-
Analyzing data
-
Controlling real-time devices and processes
See What Is an External Procedure? for more information.
About Using External Procedures in Autonomous AI Database
You can invoke and use external procedures in your Autonomous AI Database with user defined functions.
You do not install external procedures on an Autonomous AI Database instance. To use an external procedure, the procedure is hosted remotely on a VM running in an Oracle Cloud Infrastructure Virtual Cloud Network (VCN).
External procedures are only supported when your Autonomous AI Database is on a private endpoint. The EXTPROC agent instance is hosted on a private subnet and the Autonomous AI Database access the EXTPROC agent through a Reverse Connection Endpoint (RCE).
Note: Autonomous AI Database only supports C language external procedures.
External procedures are deployed by using:
-
An Oracle provided container image with
EXTPROCagent installed and configured as a part of the Oracle Cloud Infrastructure (OCI) Marketplace stack.The
EXTPROCagent instance is hosted remotely on a VM running in an Oracle Cloud Infrastructure Virtual Cloud Network (VCN). The secure communication between your Autonomous AI Database and theEXTPROCagent instance is ensured by setting Network Security Group (NSG) rules such that the traffic is allowed from your Autonomous AI Database instance running on a private endpoint to theEXTPROCagent instance.The
EXTPROCagent image is pre-configured to host and execute external procedures on port 16000. -
PL/SQL procedures to create a library and to register and invoke external functions and procedures.
See DBMS_CLOUD_FUNCTION Package for more information.
Follow these steps to invoke an external procedure on Autonomous AI Database:
-
Define the C procedure. See Define the C Procedure.
-
Create a shared object (
.sofile) library. See Create a Shared Library (.so) File. -
Launch the Autonomous AI Database
EXTPROCstack application. See Get the OCI Marketplace EXTPROC Stack Application. -
Provision and configure Oracle Autonomous AI Database
EXTPROCagent. See Create Stack for EXTPROC Agent Application for more information. -
Configure your Autonomous AI Database to connect to the
EXTPROCagent instance. See Upload Wallet to Create Secure Connection to the EXTPROC Agent Instance for more information. -
Create a remote library using
DBMS_CLOUD_FUNCTION.CREATE_CATALOG. See Steps to Invoke an External Procedure as a SQL Function for more information. -
Use the user defined function you created in the previous step. See Steps to Invoke an External Procedure as a SQL Function for more information.
Define the C Procedure
Define the C procedure using one of these prototypes.
-
Kernighan & Ritchie style prototypes. For example:
void UpdateSalary(x) float x; ... -
ISO/ANSI prototypes other than numeric data types that are less than full width (such as
float,short,char). For example:void UpdateSalary(double x) ... -
Other data types that do not change size under default argument promotions.
This example changes size under default argument promotions:
void UpdateSalary(float x)
...
Create a Shared Library (.so) File
Create a shared object (.so file) library. The shared object library contains the C procedure (external procedure) which was defined in the previous step.
You generate a shared object library using the following command:
gcc -I/u01/app/oracle/extproc_libs/ -shared -fPIC -o extproc.so UpdateSalary.cThis creates the shared object (.so), extproc.so library. The UpdateSalary procedure, defined in the previous step, is contained in the extproc.so library. The shared object (.so) libraries are dynamically loaded at run time.
Get the OCI Marketplace EXTPROC Stack Application
Shows the steps to get the OCI Marketplace EXTPROC Stack Application.
Perform the following steps:
-
Sign in to the OCI Console at http://cloud.oracle.com. See Sign in to the Oracle Cloud Infrastructure Console for more information.
-
From the Oracle Cloud Infrastructure left navigation menu click Marketplace and then, under Marketplace click All Applications. This takes you to the Marketplace All Applications dashboard.
-
Enter
EXTPROCin the search field and click search. -
Click the
EXTPROCwidget of Type: Stack.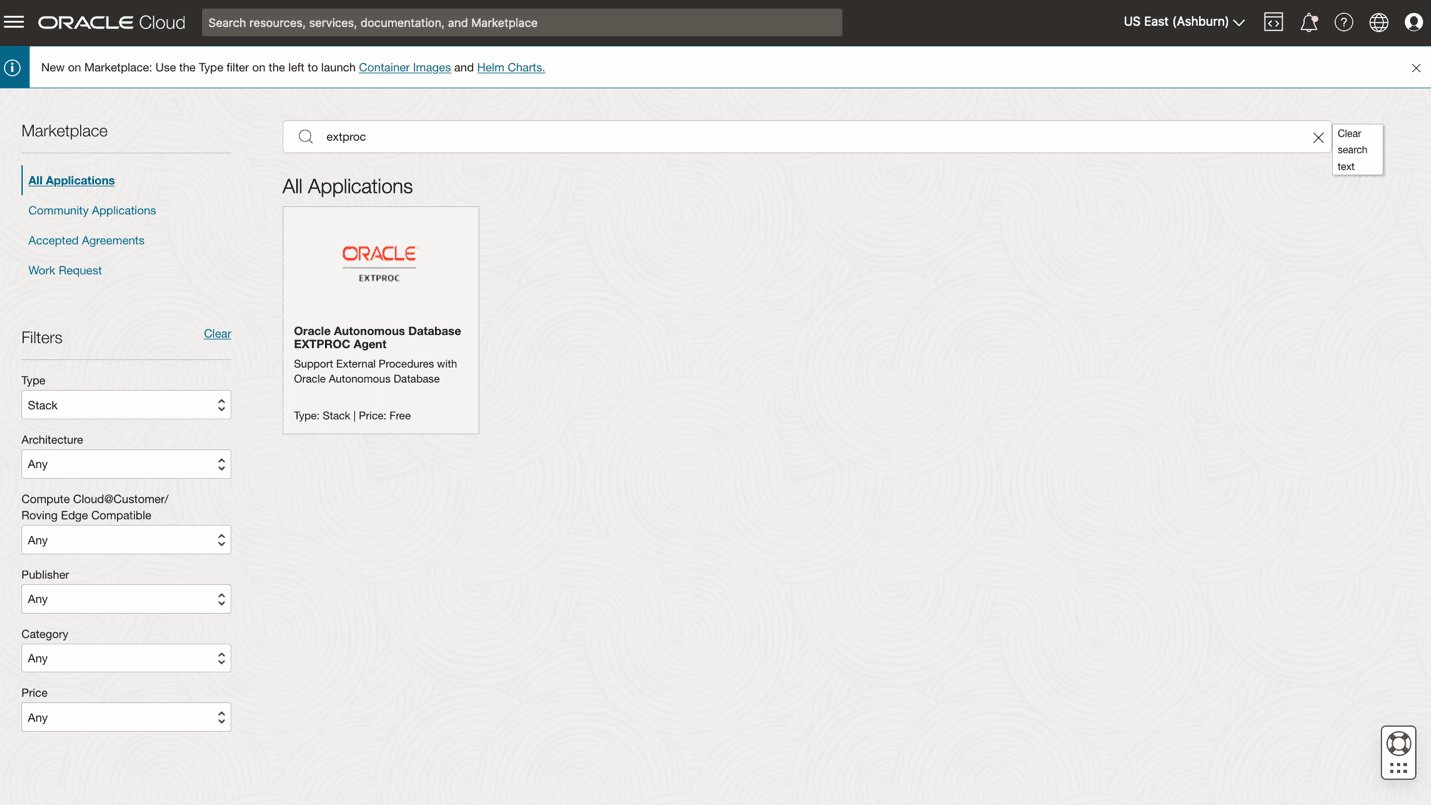
Description of the illustration adbs_extproc_application.png
This takes you to the Oracle Autonomous AI Database EXTPROC Agent details page.
Launch EXTPROC Stack Application
Launch the EXTPROC Stack Application from the EXTPROC Application Details page.
-
On the Oracle Autonomous AI Database
EXTPROCAgent page, under Type Stack, perform the following:-
From the Version drop-down list, select the package version of the stack. By default, the menu displays the latest version.
-
From the Compartment drop-down list, select the name of the compartment where you want to launch the instance.
Note: If you don’t have permission to launch the instance in the selected compartment, the instance is launched in the root compartment.
-
Select the I have reviewed and accept the Oracle Standard Terms and Restrictions checkbox.
-
-
Click Launch Stack.
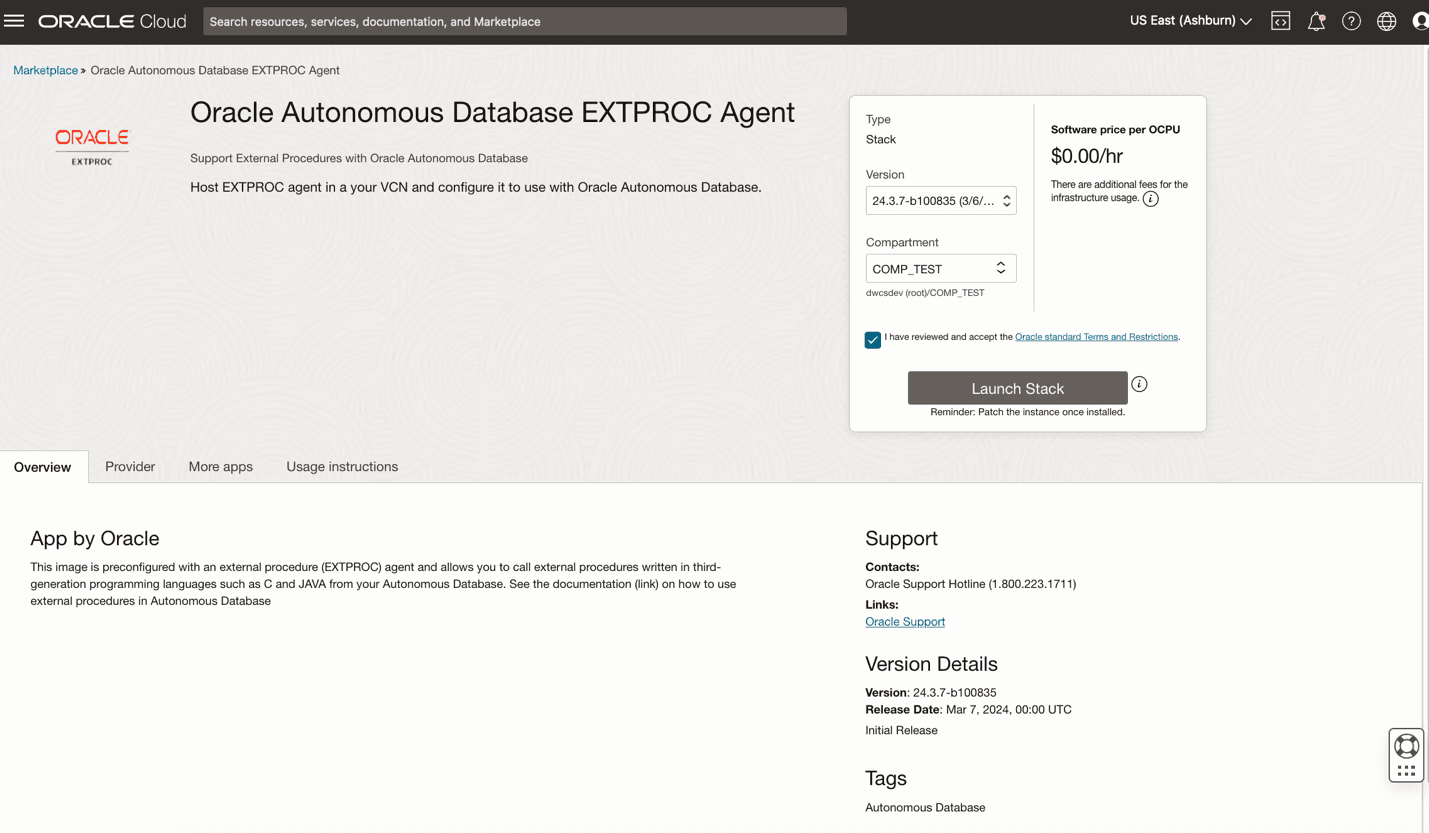
This takes you to the Create stack page that allows you to create stack for the EXTPROC agent.
Create Stack for EXTPROC Agent Application
Shows the steps to create Stack for EXTPROC instance.
In the Create stack wizard, perform the following steps:
-
On the Stack information page, review and edit the following information as necessary:
-
Stack information
-
Custom providers
-
Name (Optional): You can edit the default stack name. Avoid entering confidential information.
-
Description (Optional): You can edit the default stack description. Avoid entering confidential information.
-
Create in compartment
-
Terraform version
-
Tags: Provide the following to assign tags to the stack.
-
Tag namespace: To add a defined tag, select an existing namespace. To add a free-from tag, leave the value blank.
-
Tag key: To add a defined tag, select an existing tag key. To add a free-form tag, type the key name that you want.
-
Tag value: Type the tag value that you want.
Add tag: Click to add another tag.
See Resource Tags for more information on tagging.
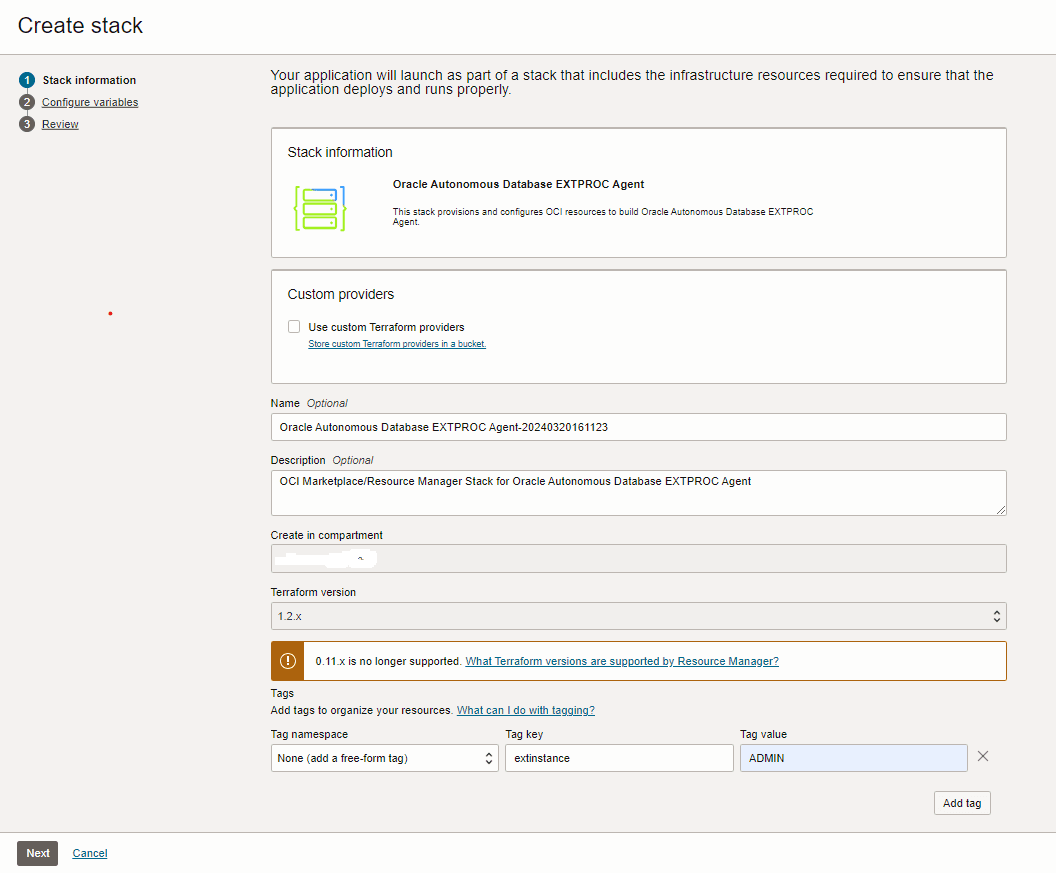
Description of the illustration adbs_extproc_createstack_updated.png
-
-
-
Click Next.
This takes you to the Configure variables page which enables you to configure variables for the infrastructure resources that the stack creates when you run the apply job for this execution plan.
-
On the Configure variables page enter the information in the areas: Configure the EXTPROC Agent, Network Configuration, and Compute configuration.
-
Provide information in the Configure the EXTPROC Agent area.
-
External Libraries: Provide a list of libraries, separated by comma (,), which you want to allow to be invoked from your Autonomous AI Database. For example,
extproc.so,extproc1.so.After you create the stack, you must copy the libraries to the
/u01/app/oracle/extproc_libsdirectory on theEXTPROCagent VM. -
Wallet Password: Provide the wallet password.
The wallet and a self-signed certificate is generated for mutual TLS authentication between the Autonomous AI Database and the
EXTPROCagent VM. The wallet is created in the/u01/app/oracle/extproc_walletdirectory.Note: After the wallet is created, the wallet password cannot be changed.
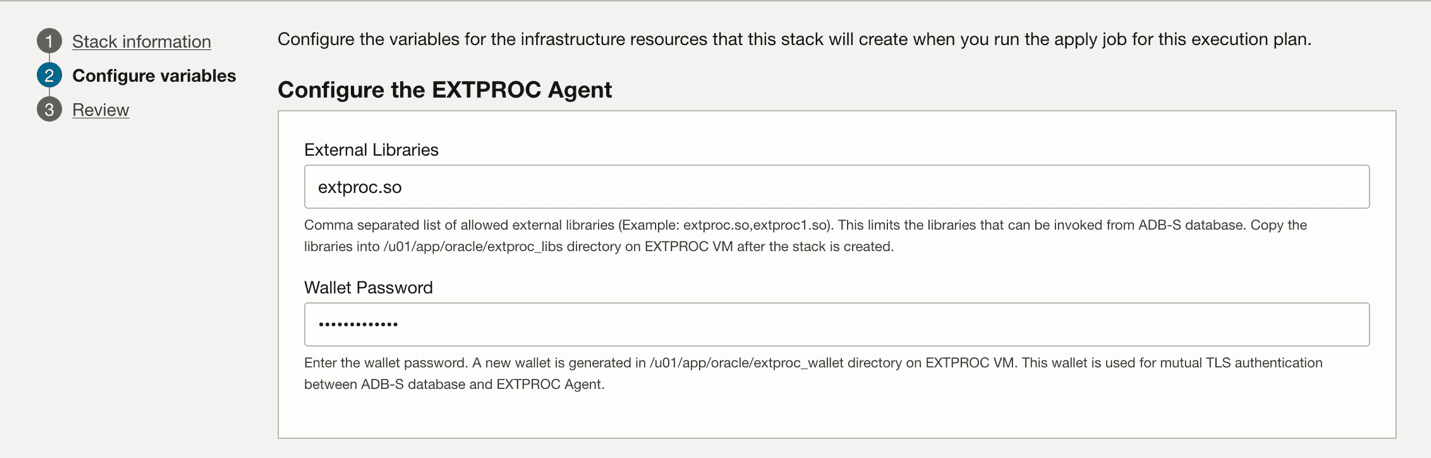
Description of the illustration adbs_configure_var_extproc_agent.png
-
-
Provide information in the Network Configuration area.
-
Compartment: From the drop-down list, choose the compartment where you want to place the configuration.
-
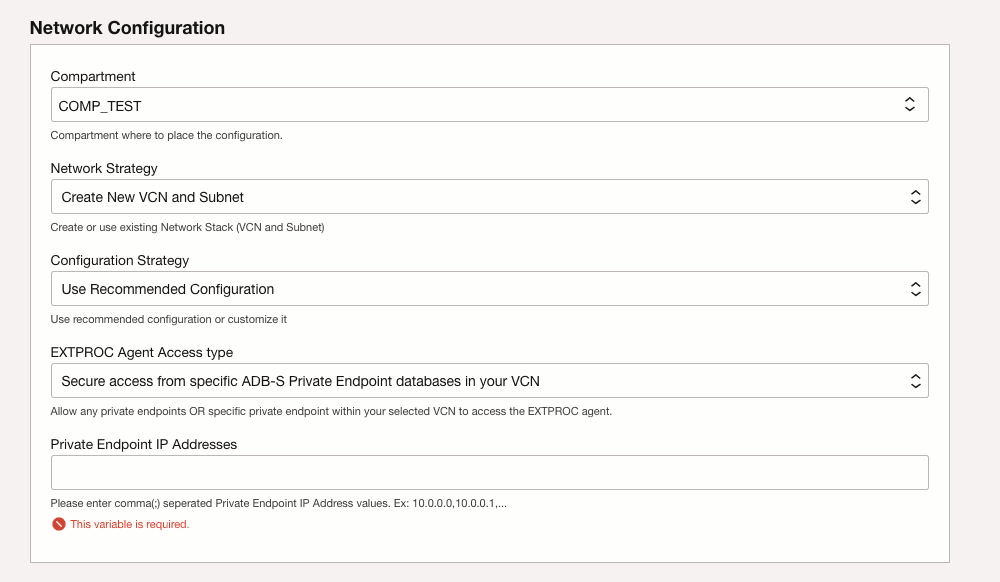
Network Strategy: Choose one of the options from the drop-down list, Create New VCN and Subnet or Use Existing VCN and Subnet.
-
Create New VCN and Subnet: Choose this option if a private endpoint is not configured for your Autonomous AI Database. This creates a new VCN with public and private subnet that are preconfigured with security rules.
If you select this option the page also shows the Configuration Strategy drop-down list:
Choose Use Recommended Configuration from the Configuration Strategy drop-down list.
Description of the illustration adb_extproc_network_config.png
-
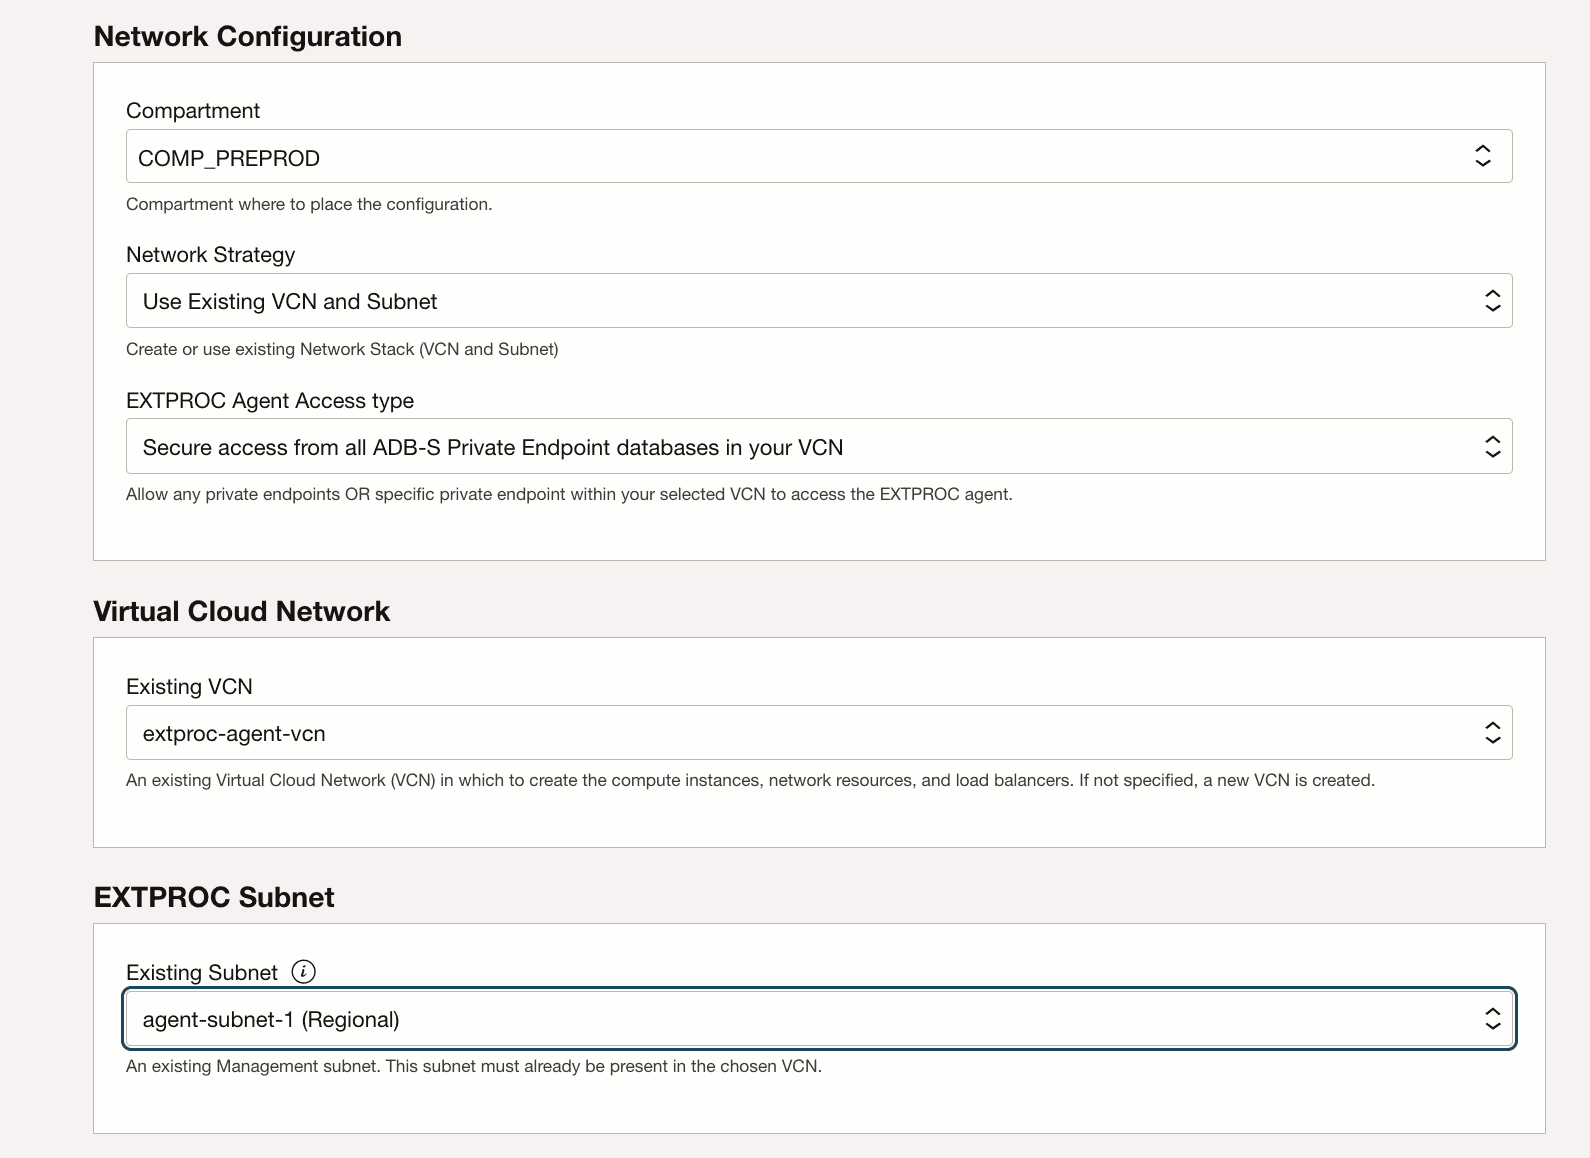
Use Existing VCN and Subnet: Select this option to create the EXTPROC agent using an existing VCN. This creates the EXTPROC agent instance in the provided subnet.
When you select this option, provide the following information for the existing VCN and Subnet:
-
Under Virtual Cloud Network:
From the Existing VCN drop-down list choose an existing VCN. If the specified VCN does not exist, a new VCN is created.
-
Under EXTPROC Subnet:
From the Existing Subnet drop-down list choose an existing subnet.
When you choose to use an existing VCN and subnet, add an ingress rule for the
EXTPROCagent instance's port16000. You also add an egress rule on public subnet.See Configuring Network Access with Private Endpoints for more information.
Description of the illustration adbs_extproc_network_configuration_existing_vcn.png
-
-
-
EXTPROC Agent Access type: Choose one of the following options from the drop-down list.
-
Secure access from specific ADB-S Private Endpoint databases in your VCN: Choose this option to allow only specified private endpoint IPs inside your Virtual Cloud Network (VCN) to connect to your
EXTPROCagent.When this option is chosen, you provide a list of allowed private endpoint IP Addresses in the next step.
-
Secure access from all ADB-S Private Endpoint databases in your VCN: Choose this option to allow any private endpoint inside your Virtual Cloud Network (VCN) to connect to your
EXTPROCagent.
-
-
Private Endpoint IP Addresses
Provide a list of private endpoint IP addresses separated by comma (,) for the Private Endpoint IP Addresses variable. For example,
10.0.0.0,10.0.0.1.Note: This field only shows when you select Secure access from specific ADB-S Private Endpoint databases in your VCN for the EXTPROC Agent Access type.
-
-
Provide the Compute configuration information.
-
Compartment: Select the compartment where you want to create the stack.
-
Shape: Select a shape based on the workload requirements of the
EXTPROCagent instance. The shape determines the resources allocated to theEXTPROCagent instance. -
Number of OCPUs: Choose the number of OCPUs that you want to allocate to the
EXTPROCagent instance. -
Memory size (GBs): Choose the amount of memory in Gigabytes (GB) that you want to allocate to the
EXTPROCagent instance. -
Add SSH keys: Upload an SSH public key or paste the public key. Select one of the following options:
-
Choose SSH key file: Upload the public key portion of your key pair. Either browse to the key file that you want to upload, or drag and drop the file into the box.
-
Paste SSH key: Paste the public key portion of your key pair in the box.
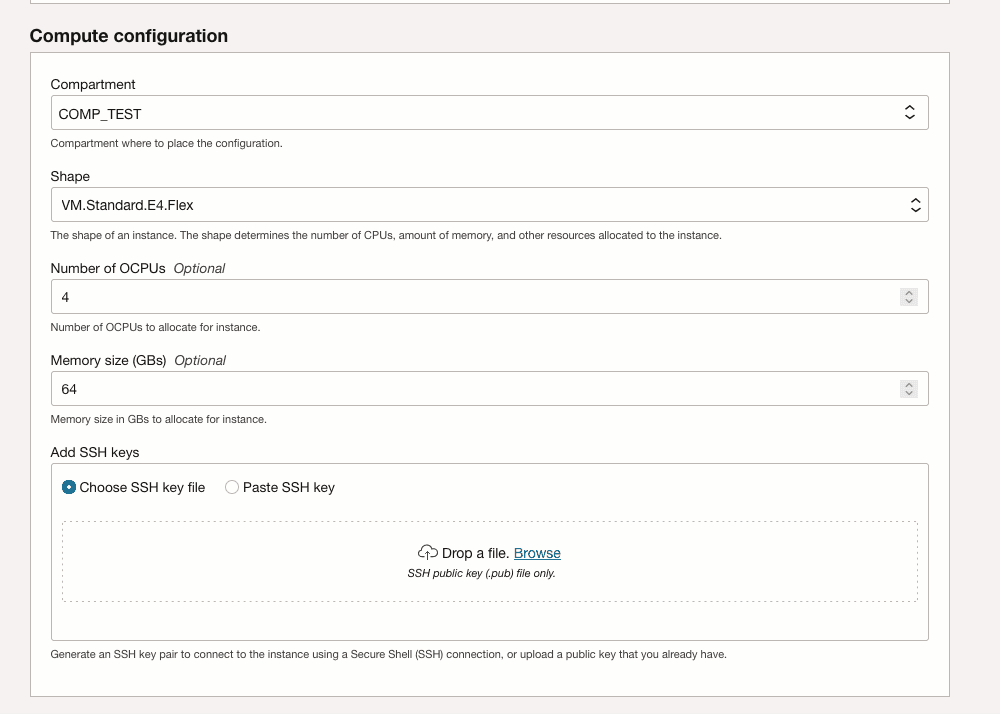
Description of the illustration adbs_extproc_compute_config.png
-
-
-
-
Click Next.
This takes you to the Review page.
-
On the Review page perform the following steps:
-
Verify the configuration variables.
-
Select the Run apply checkbox under Run apply on the created stack?
-
Click Create.
Note: This area does not show variables that have default values or variables that you have not changed.
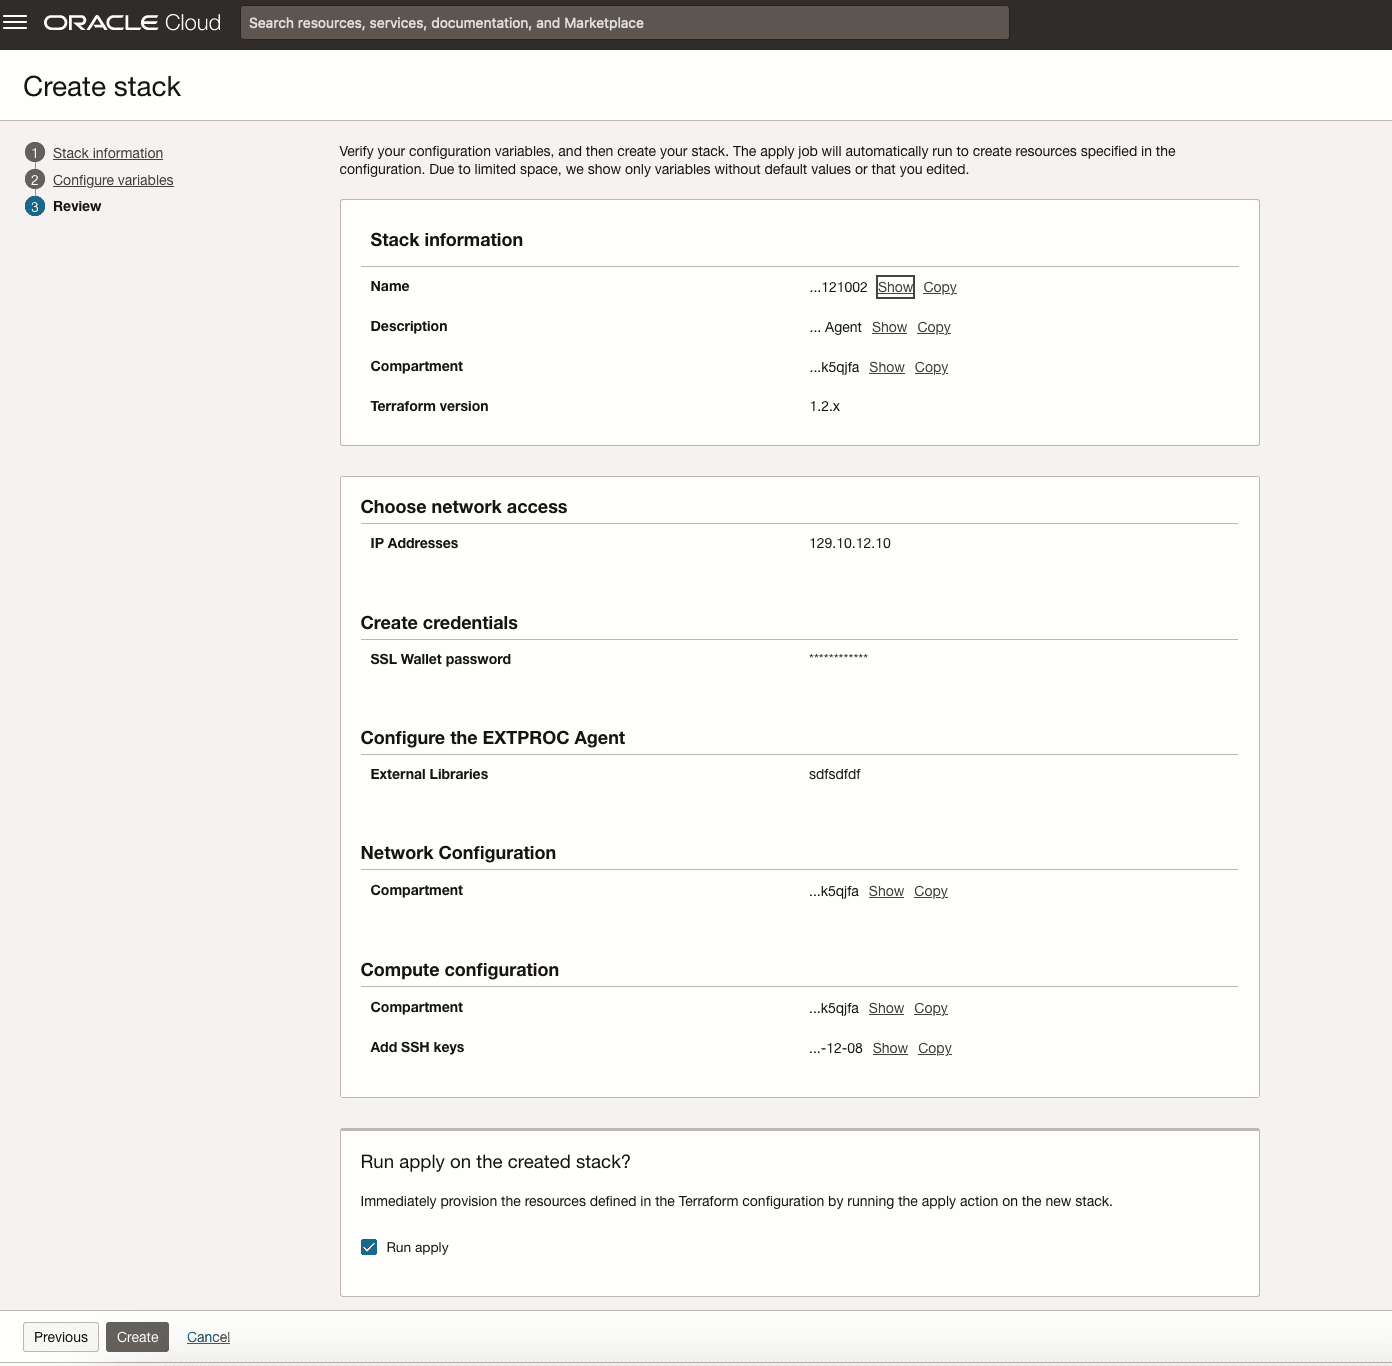
Description of the illustration adbs_extproc_review.png
Resource Manager runs the apply job to create stack resources accordingly. This takes you to the Job details page and the job state is Accepted. When the apply job starts the status is updated to In Progress.

Description of the illustration adbs_extproc_job_details.png
-
Note: The information you need to connect to the instance created as part of the stack is available in the Application Information tab.
Upload Wallet to Create Secure Connection to the EXTPROC Agent Instance
A self-signed wallet is created as part of the EXTPROC agent application creation. This wallet allows you to access the Extrpoc agent instance.
To execute remote procedures at the EXTPROC agent instance, the Autonomous AI Database and the EXTPROC agent connect using Mutual Transport Layer Security (mTLS). When using Mutual Transport Layer Security (mTLS), clients connect through a TCPS (Secure TCP) database connection using standard TLS
1.2 with a trusted client certificate authority (CA) certificate. See About Connecting to an Autonomous AI Database Instance for more information.
Note: You can also obtain and use a public certificate issued by a Certificate Authority (CA).
As a prerequisite, you must export the wallet to Object Storage from the/u01/app/oracle/extproc_wallet directory on the VM where EXTPROC runs.
Follow these steps to upload the wallet to your Autonomous AI Database:
-
Import the wallet,
cwallet.sso, containing the certificates for theEXTPROCagent instance from Object Storage in your Autonomous AI Database. Note the following for the wallet file:-
The wallet file, along with the Database user ID and password provide access to the
EXTPROCagent instance. Store wallet files in a secure location and share them only with authorized users. -
Do not rename the wallet file. The wallet file in Object Storage must be named
cwallet.sso.
-
-
Create credentials to access your Object Storage where you store the wallet file
cwallet.sso. See CREATE_CREDENTIAL Procedure for information about the username and password parameters for different object storage services.Creating a credential to access Oracle Cloud Infrastructure Object Store is not required if you enable resource principal credentials. See About Using Resource Principal to Access Oracle Cloud Infrastructure Resources for more information.
-
Create a directory on Autonomous AI Database for the wallet file
cwallet.sso.CREATE DIRECTORY WALLET_DIR AS 'directory_location';See Create Directory in Autonomous AI Database for more information creating directories.
-
Use
DBMS_CLOUD.GET_OBJECTto upload the wallet. For example:BEGIN DBMS_CLOUD.GET_OBJECT ( credential_name => 'DEF_CRED_NAME', object_uri => 'https://objectstorage.us-phoenix-1.oraclecloud.com/n/namespace-string/b/bucketname/o/cwallet.sso', directory_name => 'WALLET_DIR' ); END; /In this example,
namespace-stringis the Oracle Cloud Infrastructure Object Storage namespace andbucketnameis the bucket name. See Object Storage Namespaces for more information.The wallet is copied to the directory created in the previous step, WALLET_DIR. The wallet that allows you to connect to the
EXTPROCagent instance is now available on your Autonomous AI Database instance.
Steps to Invoke an External Procedure as a SQL Function
Shows the steps to invoke an external Procedure as a SQL function.
After you launch the OCI Marketplace EXTPROC stack application and configure it to run external procedures, you create a library of SQL wrapper functions that reference and call their respective external procedures.
As a prerequisite, the whitelisted libraries must be copied into the /u01/app/oracle/extproc_libs directory on the EXTPROC VM.
Follow these steps to create a library in your Autonomous AI Database and register C routines as an external procedure in the library:
-
Create a library.
An external procedure is a C language routine stored in a library. To invoke external procedures with Autonomous AI Database, you create a library.
Run
DBMS_CLOUD_FUNCTION.CREATE_CATALOGto create a library. For example:BEGIN DBMS_CLOUD_FUNCTION.CREATE_CATALOG ( library_name => 'demolib', library_listener_url => '*remote_extproc_hostname*:16000', library_wallet_dir_name => 'wallet_dir', library_ssl_server_cert_dn => 'CN=*VM Hostname*', library_remote_path => '/u01/app/oracle/extproc_libs/*library name*' ); END; /This creates the
demoliblibrary in your Autonomous AI Database and registers the dynamic link library in your database. TheEXTPROCagent instance is pre-configured to host external procedures on port 16000.See CREATE_CATALOG Procedure for more information.
QueryDBA_CLOUD_FUNCTION_CATALOG View andUSER_CLOUD_FUNCTION_CATALOG View views to retrieve the list of all the catalogs and libraries in your database.
Query theUSER_CLOUD_FUNCTION_ERRORS View view to list any errors generated during the connection validation to the remote library location.
-
Create the function.
For example:
CREATE OR REPLACE FUNCTION ftest( x VARCHAR2, y VARCHAR2) RETURN VARCHAR2 AS LANGUAGE C LIBRARY demolib NAME "demolibfunction" PARAMETERS( x STRING, y STRING); / -
You can drop an existing library using
DROP_CATALOGprocedure. For example:BEGIN DBMS_CLOUD_FUNCTION.DROP_CATALOG ( LIBRARY_NAME => 'demolib' ); END; /This drops the
DEMOLIBlibrary.See DROP_CATALOG Procedure for more information.