15 Get to Know the Business Assets Page

Your Assets view is where you manage all the business documents and content items. The features available on the Assets page differ depending on whether you are viewing a business asset repository or a digital asset repository. Digital asset repositories support publishing and translation. This topic describes the Assets page for a business asset repository.
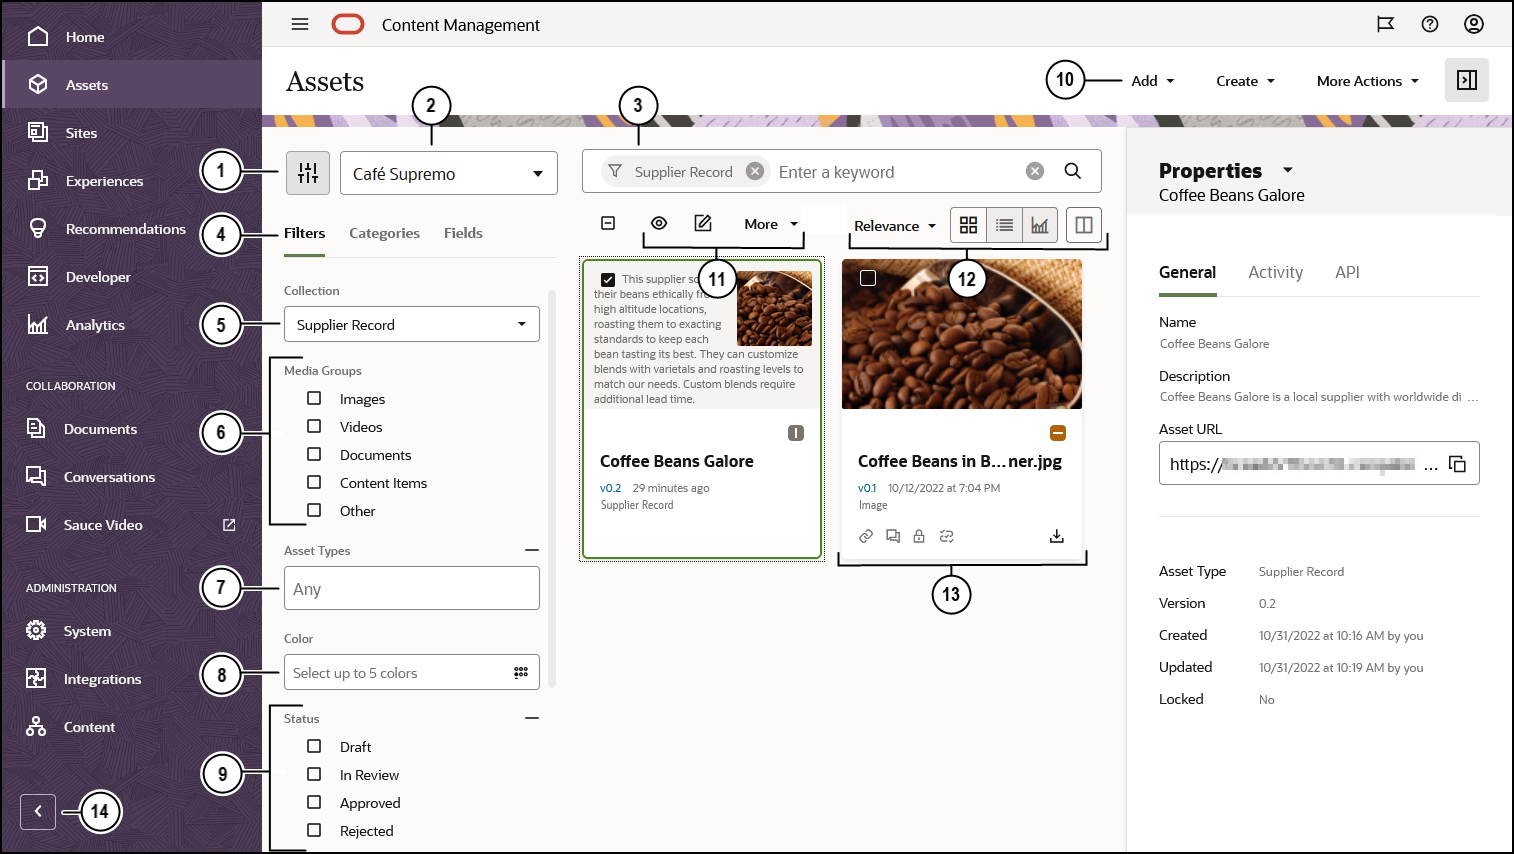
graphic with numbered areas corresponding to text below

To get started, click Assets in the left navigation menu.

Callout Description
1 Click the filter icon to hide or show the filter panel. Hiding the panel gives you more room for viewing assets in the content area.
2 Select the repository to use from the drop-down list next to the filter icon.
3 Search for assets using tags or keywords. If smart content is enabled on the repository, after you enter a search term, you'll see recommended keywords under the search box. Click a keyword to add it to your search.
4 By default, you see filters for filtering the assets in the repository by collection, media group, asset type, and status. You might see additional filter tabs:
  • Categories—If a taxonomy is associated with the selected repository, you can filter by categories on the Categories tab. Taxonomies provide a hierarchical, folder-like structure of categories.
  • Fields—You can search for standard property values (for example, created by or description) or attribute values from custom asset types on the Fields tab.
5 Filter by collection. If you choose a specific collection, you will see only those content items and business documents that are in that collection. If you leave this option set to All, you’ll see all the assets in the repository you chose to use.
6 Filter by media group, for example, images, documents, or content items.
7 Filter by the type of asset. You see all the asset types available in the selected repository.
8 Filter by color. If smart content is enabled on the repository, you can filter images by color, selecting up to five colors.
9 Filter by status. You can filter by the following status types: approval, workflow, lock, or collection.
10 The menu at the top of the page lists the actions you can take in the repository:
  • Add: You can add files into the repository from your computer or files that are already stored in your Documents cloud account or, if your administrator has enabled cloud storage integration, from a third-party cloud storage provider.
  • Create: You can also create a content item by clicking Create and then selecting a content type to use from the list.
  • More Actions: Click More Actions to see additional views of the repository: Collections, Archive Assets, and Workflow Tasks (if workflows are associated with the asset repository you're viewing).
  • the additional properties pane: The sidebar panel is described below as it shows asset-specific information after selecting an asset. To view the sidebar panel, which includes categories, tags and collections, properties, and workflows, click the additional properties pane.
11 After you select at least one asset, the actions bar above the assets shows the actions you can take on the selected assets. Depending on what you select, different actions will be available. If you don't see all the actions, click More.
  • View icon (View)—View the selected asset.
  • Edit icon (Edit)—Edit the selected asset. For image or Video Plus assets, you can edit the media or the attributes. For video assets, you can also view subtitles.
  • Upload new version icon (Upload New Version)—Upload a new version of the selected business document.
  • Download icon (Download)—Download a selected asset and store it for use on your local computer.
  • Copy icon (Copy)—Copy the selected content items.
  • Copy to another repository icon (Copy To)—Copy the selected assets to another repository.
  • Check for updates icon (Check for Updates)—Check if the business document has updates in the linked Documents file.
  • Lock/UnlockLock or unlock the selected assets and, optionally, their dependents.
  • Workflow—You can review assets with basic out-of-the-box approve/reject workflow, or, if configured, you might be able to take advantage of workflow from Oracle Integration.
  • Find—Find visually similar assets to selected digital assets, or find assets categorized similarly to selected assets.
  • ConvertConvert a business document from an out-of-the-box digital asset type (Image, Video, or File) to a custom digital asset type.
  • Sidebar or the additional properties pane—Open the sidebar to view additional information about the selected assets:
  • Archive icon (Archive)—Archive the selected assets.
  • Delete icon (Delete)—Delete the selected assets.
12 You can sort the assets in your view by relevance, name, or by the last date they were updated. You can also toggle between grid view (Grid view icon) and table view (Table view icon). In table view, you can select which columns you'd like to see by clicking Columns icon.
13 Each asset tile shows details about the asset. You see the following information:
  • A preview of the asset.
  • The asset status:
    • Approved status icon Approved
    • Rejected status icon Rejected
    • Draft status icon Draft
    • Not ready for use icon Not ready for use (asset includes required fields that haven't been completed)
    • In review status icon In Review
  • The asset name. Click the name to view the asset.
  • The asset version. Click the version to see the asset's activity history.
  • The asset type associated with the asset.
  • If a business document has been added from Documents, you see Linked icon.
  • If the asset has an associated conversation, you see Conversation icon. Click the icon to view the conversation.
  • If the asset is locked, you see Lock icon.
  • If the asset is in workflow, you see Workflow icon.
  • An icon to download the business document (Download icon, not shown for content items).
14 Click the arrow to expand navigation to show text for the menu options in the navigation menu or collapse it to show an icon-only navigation menu. Collapsing the menu gives you more room for viewing assets in the content area.