Add Connections to the Integration

Next, let’s add connections, which you created earlier, to the integration. In this learning path, the integration will be invoked when your Visual Builder application requests for weather information. The integration connection will send request to the weather API connection to obtain weather forecasts. Let’s first add the integration connection as the trigger, or source, connection. Then, add the weather API connection as the target, or invoke, connection.

Add the Trigger Connection

When your Visual Builder application will invoke the integration, the integration will request the weather API for weather information by using two request query parameters, q and weatherkey. Also, the response payload that the integration will return to Visual Builder will comprise JSON input parameters. Let’s use these details to add the integration connection as the trigger connection to the integration.
  1. On the GetWeather integration canvas, in the Triggers pane, click REST if the REST adapters are not listed already.
  2. Drag the GetCurrentWeather integration connection to the plus icon below START on the canvas.

    This displays the Configure REST Endpoint configuration wizard.

  3. On the Basic Info page of the wizard, specify the following information:
    Field Enter/Select
    What do you want to call your endpoint? GetWeather
    What is the endpoint’s relative resource URI? /weather
    What action do you want to perform on the endpoint? GET
    Add and review parameters for this endpoint Select the check box
    Configure this endpoint to receive the response Select the check box
  4. Click Next.
  5. On the Request Parameters page, add the request query parameters for the endpoint of your integration.

    Click Add Add icon to add a parameter. The following table lists the parameters and their data type that you need to add for the trigger endpoint.

    Name Data Type
    q

    (Represents the location, whether it is a zip code, city, or state, for which you want to retrieve weather information.)

    String
    weatherkey

    (Represents the security key issued by the weather API to enable you to invoke the API. You will define this parameter again when you create your Visual Builder application.)

    String
  6. Click Next.
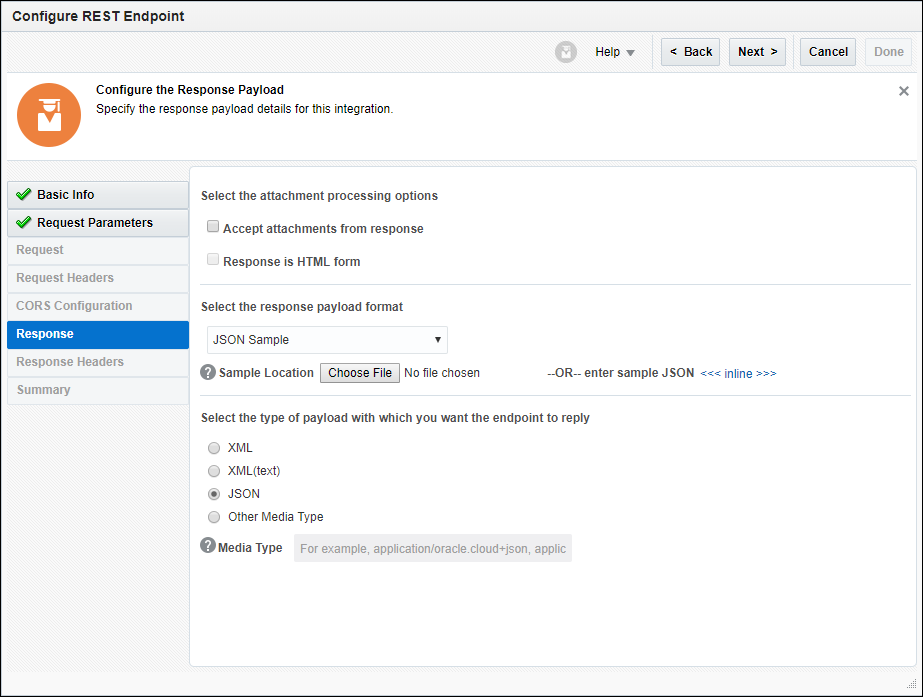
  7. On the Response page, select the type of payload the endpoint will return.
    1. In the Select the type of payload with which you want the endpoint to reply section, select JSON. When you select JSON, response is returned based on the specified JSON input parameters.
    2. From the drop-down list in the Select the response payload format section, select JSON Sample as the payload format.
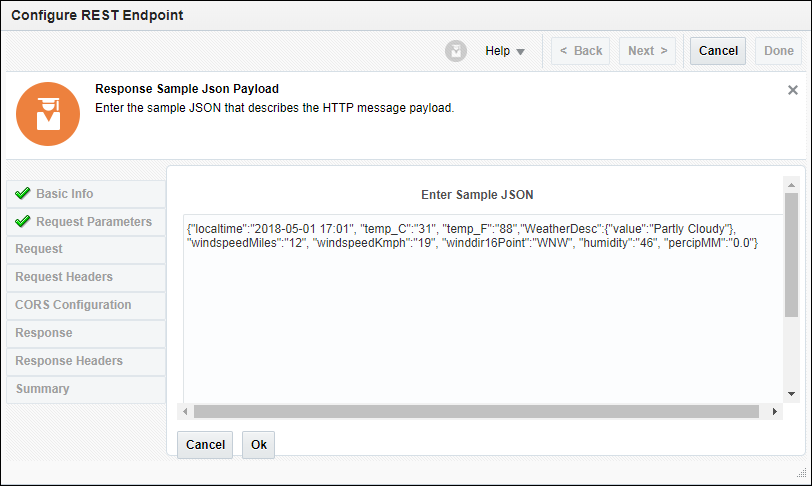
    3. Click the <<<inline>>> link to specify JSON payload input parameters that the integration will return as a response to your Visual Builder application.
    4. Copy the following sample entries and paste them in the Enter Sample JSON area in the Response Sample Json Payload page:
      {"localtime":"2018-05-01 17:01", "temp_C":"31", "temp_F":"88","WeatherDesc":{"value":"Partly Cloudy"}, "windspeedMiles":"12", "windspeedKmph":"19", "winddir16Point":"WNW", "humidity":"46", "percipMM":"0.0"}

      Description of trigger_endpoint_response_sample.png follows
      Description of the illustration trigger_endpoint_response_sample.png

    5. Click Ok.

      If the JSON entries are valid, the wizard shows the Response page.

  8. Click Next.
  9. On the Summary page, verify the endpoint details, including the REST Service URI, query parameters, the method, and the response media type. Click Done.

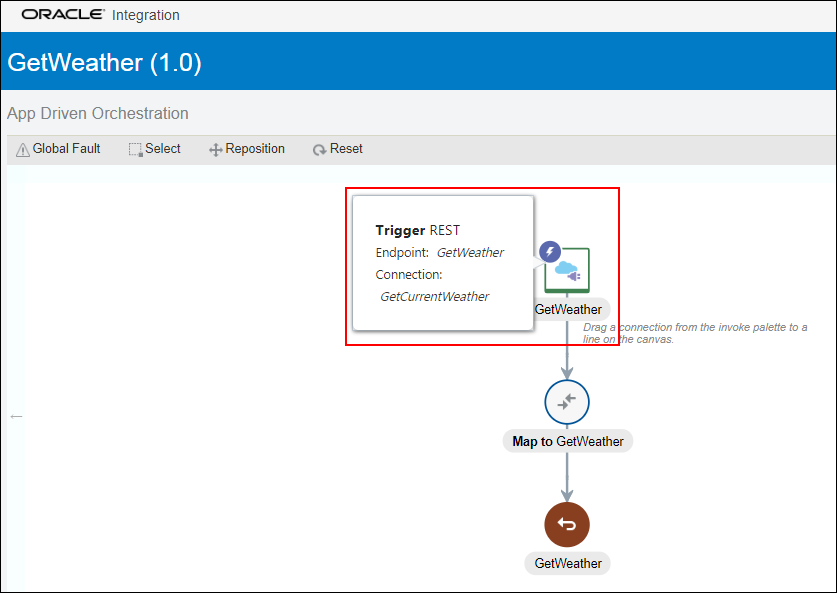
    The GetWeather trigger endpoint, configured to use the GetCurrentWeather trigger connection, is displayed on the canvas. Also, a mapper named Map to GetWeather is automatically created and displayed on the canvas.

    Description of int_trigger_endpoint.png follows
    Description of the illustration int_trigger_endpoint.png
  10. Click Save.

Add the Invoke Connection

Similarly, add an invoke connection named APIXUWeather to the integration and configure it to define query parameters and response type. In your integration, the GetWeather trigger connection you just added will send requests to the APIXUWeather invoke connection to get information from the weather API. Keep your API key ready.
  1. On the GetWeather integration canvas page, click the Invokes tab.
  2. Click REST to list all the REST adapters, if not already listed.
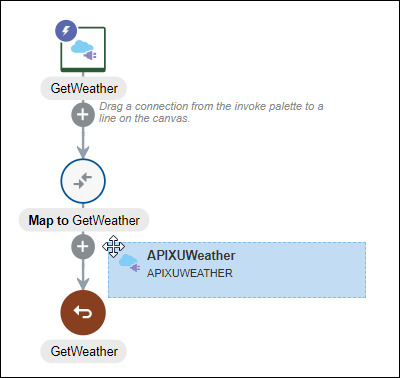
  3. To make invocation to the weather API, drag the APIXUWeather connection to the canvas and drop it on the plus icon below the mapper Map to GetWeather.

    Description of int_invoke_drop.png follows
    Description of the illustration int_invoke_drop.png

    This displays the Configure REST Endpoint configuration wizard.

  4. On the Basic Info page of the wizard, specify the following information:
    Field Enter/Select

    What do you want to call your endpoint?

    invokeWeather

    What is the endpoint’s relative resource URI?

    /current.json

    (You obtain this URI from the APIXU weather API.)

    What action do you want to perform on the endpoint?

    GET

    Add and review parameters for this endpoint

    Select the check box

    Configure this endpoint to receive the response

    Select the check box

  5. Click Next.
  6. On the Request Parameters page, add the request query parameters for the endpoint.

    Click Add Add icon to add a parameter. The following table lists the parameters and their data type that you need to add for the endpoint. The parameter names are defined by the weather API, and you shouldn’t modify their definition.

    Name Data Type

    q

    (Represents the location, whether it is a zip code, city, or state, for which you want to retrieve weather information.)

    String

    key

    (Represents the security key issued by the weather API to enable you to invoke the API.)

    String

  7. Click Next.
  8. On the Response page, select the type of payload the API endpoint will return.
    1. In the Select the type of payload with which you want the endpoint to reply section, select JSON.
    2. From the drop-down list in the Select the response payload format section, select JSON Sample as the payload format.
    3. Click the <<<inline>>> link to specify JSON payload input parameters that you want the API to return as a response to the integration.
    4. To obtain the JSON payload, open another tab in your browser and enter the API URL in the following format:
      http://api.apixu.com/v1/current.json?key=application_key&q=location

      Where:

      application_key refers to the key that you obtained from the weather API, and location refers to the location for which you want to retrieve weather information. For example:

      http://api.apixu.com/v1/current.json?key=492798775zj456794&q=34772

      This displays the JSON payload, including the fields and types of value.

    5. Copy the JSON message payload.
    6. Return to the Configure REST Endpoint configuration wizard. On the Response Sample Json Payload page, paste the JSON message payload in the Enter Sample JSON area and click Ok.

      Description of invoke_endpoint_response_sample.png follows
      Description of the illustration invoke_endpoint_response_sample.png

      If the JSON entries are valid, the wizard shows the Response page.

  9. Click Next.
  10. On the Summary page, verify the REST Service URI, the method, query parameters, and the response media type. Click Done.

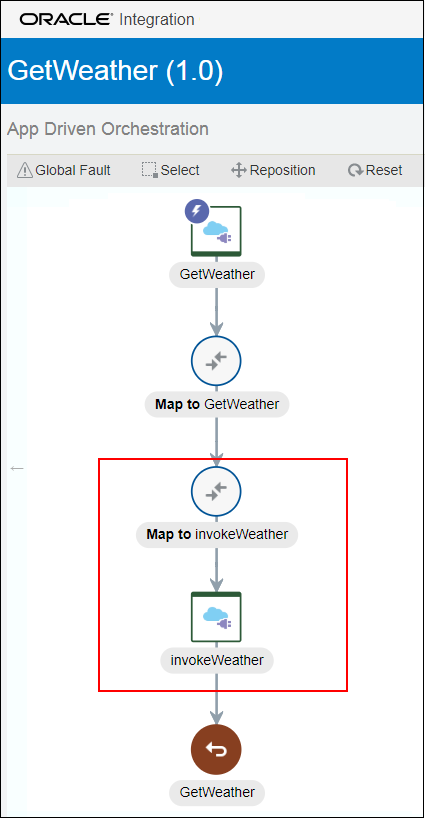
    The endpoint invokeWeather, configured to use the APIXUWeather invoke connection, appears on the canvas. Also an invoke mapper named Map to invokeWeather is automatically created and displayed on the canvas.

    Your integration now has two mappers, Map to invokeWeather and Map to GetWeather. We don’t need two mappers, so let’s delete Map to GetWeather.

    Description of int_invoke_endpoint.png follows
    Description of the illustration int_invoke_endpoint.png

  11. Delete the Map to GetWeather map action that was automatically generated for the trigger endpoint.
    1. Click Map to GetWeather.
    2. Click More Actions More Actions icon, then click Delete.
    3. Click Delete again to confirm.
  12. Click Save.