Map the Data Between Connections

Applications generally use different data structures. To enable information exchange, you need to map their parameters. Let’s map the request parameters and then the response parameters between the trigger and invoke connections.

Map Request Parameters Between Connections

Map the parameters that you defined in the integration (trigger connection) with the parameters required by the APIXU weather API (invoke connection).

The visual mapper enables you to map parameters between applications by dragging the trigger parameters onto the invoke parameters. The maps you create are called transformation maps.
  1. On the GetWeather integration canvas, click Map to invokeWeather, then click Edit Edit icon.

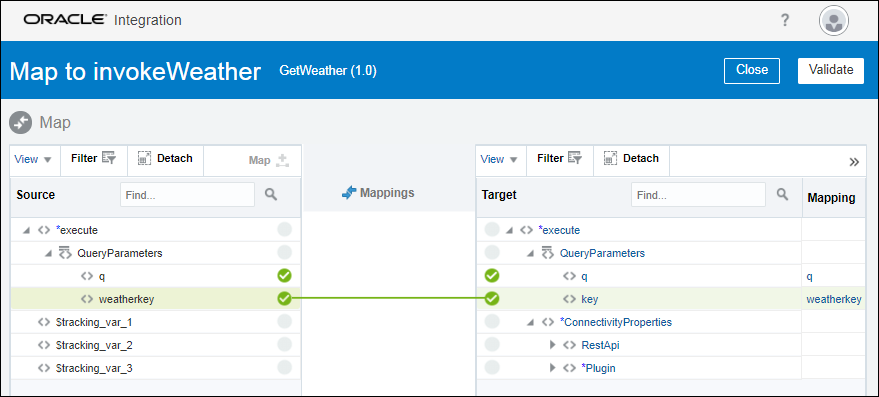
    In the mapper, data structures are automatically populated with information pulled from the trigger and invoke connections. The Source pane displays parameters you defined in the integration connection (GetCurrentWeather), and the Target pane displays parameters that you defined in the weather API connection (APIXUWeather).

  2. In the Source pane, under QueryParameters, drag the q parameter onto the q parameter in the Target pane. A green check mark icon appears next to both the parameters, indicating they are mapped.
  3. Similarly, from the Source pane, drag the weatherkey parameter onto the key parameter in the Target pane. The green connecting line is displayed between the most recently mapped parameters.
  4. Click Validate to verify that the mappings are valid.

    If the mapping is valid, you’ll get the following message: Mapping is valid and ready to use.

  5. Click Close.

Map the Response Data Between Connections

The APIXU weather API can return a whole lot of parameters. In our integration, we want only a subset of the available parameters returned by the API. Let’s add a transformation to map the parameters that we want in our integration to the parameters returned by the weather API.
  1. On the GetWeather integration canvas, click the Actions tab.
  2. In the Actions pane, from the Data section, drag the Map action and drop it on the plus icon below the invokeWeather object on the canvas.
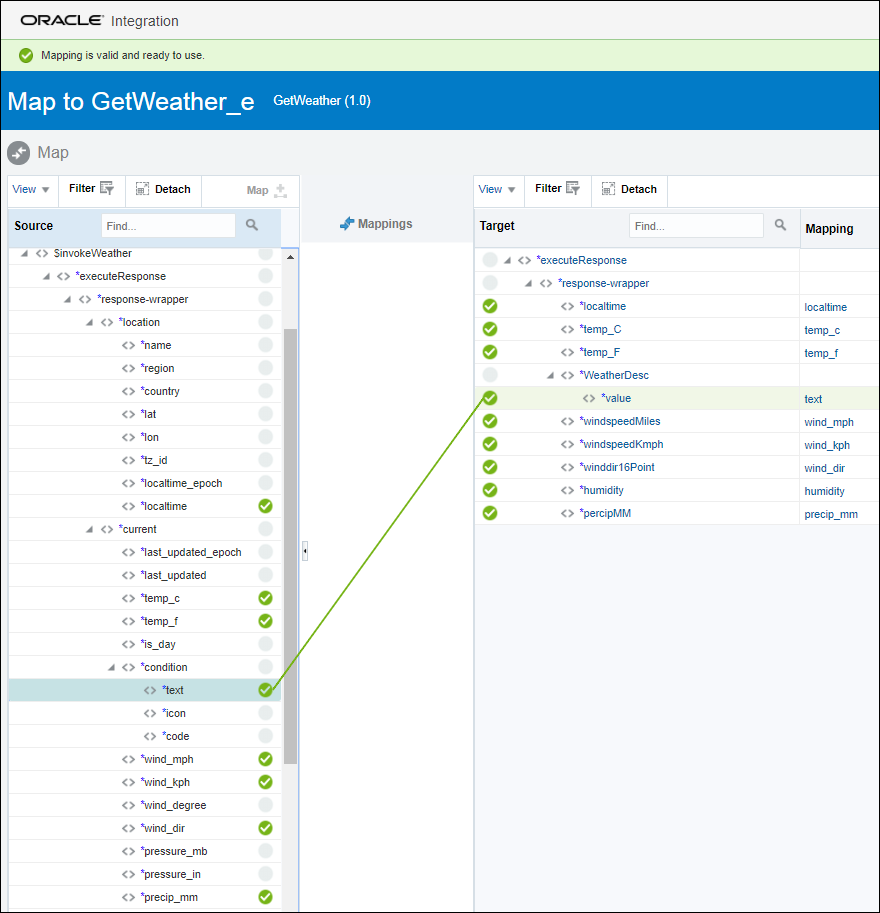
    The Map to GetWeather dialog is displayed. The Source pane displays all the parameters that the weather API can return. The Target pane shows all the parameters that you want the API to return as a response when your integration is invoked. You’ll now map the source parameters to the target parameters.
  3. In the Source pane, under $invokeWeather, expand executeResponse, then response-wrapper, then location.
  4. In the Target pane, under executeResponse, expand response-wrapper, if not already expanded.
  5. From the Source pane, drag the localtime parameter onto the localtime parameter in the Target pane.
  6. In the Source pane, under response-wrapper, expand current. Map the source parameters to the target parameters as listed in the following table:
    Source Parameter (Weather API) Target Parameter (Integrations)
    temp_c temp_C
    temp_f temp_F
    wind_mph windspeedMiles
    wind_kph windspeedKmph
    wind_dir winddir16Point
    precip_mm precipMM
    humidity humidity
  7. In the Source pane, under current, expand condition.
  8. In the Target pane, expand WeatherDesc.
  9. From the Source pane, drag the text parameter onto the value parameter under WeatherDesc in the Target pane.
  10. Click Validate to verify that the parameters are mapped correctly. If the mapping is valid, the following message is displayed: Mapping is valid and ready to use.
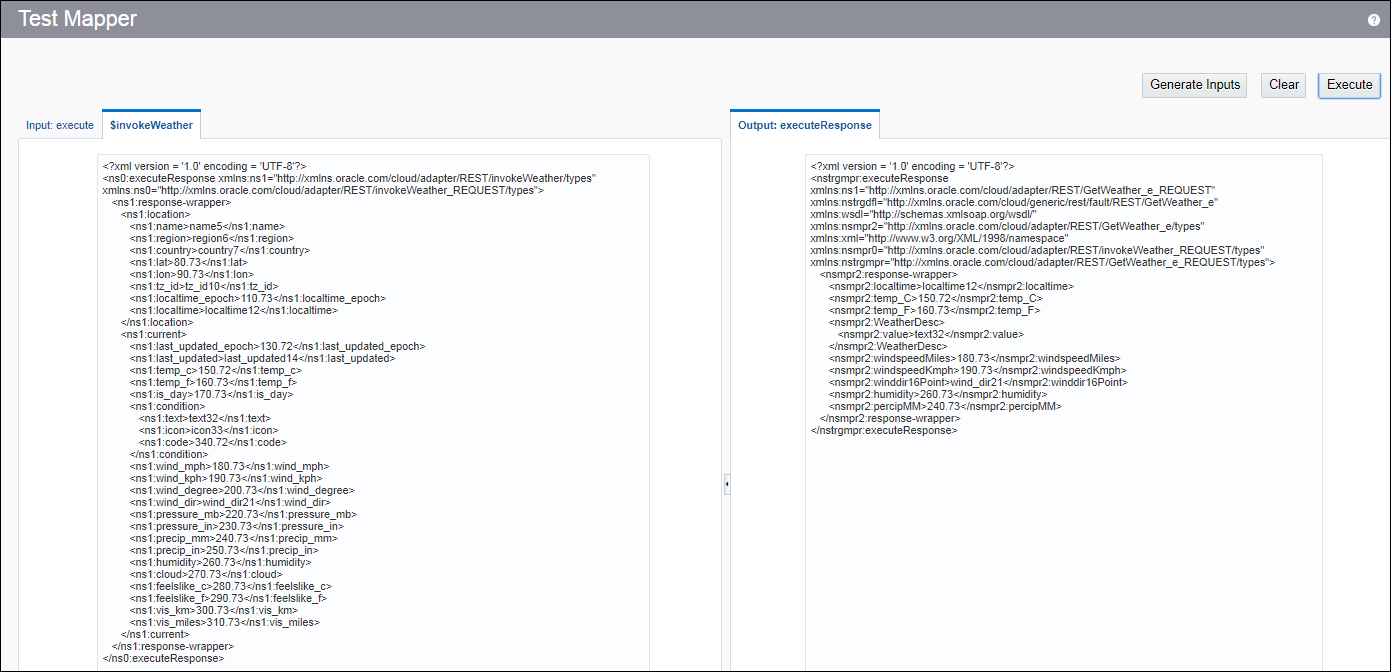
  11. Test your mapper.
    1. In the Target pane, click Test.
    2. In the Test Mapper dialog, click the invokeWeather tab, then click Generate Inputs to generate the payload.
      The invokeWeather tab displays all the input parameters that the API can return.
    3. Click Execute.

      The Output: executeResponse tab shows only those parameters that the API will return when your integration is invoked.

      Description of test_mapper.png follows
      Description of the illustration test_mapper.png

    4. Click Close to close the Test Mapper dialog.
  12. Click Close to close the Map to GetWeather dialog.
  13. Click Save to save the integration.