Create a Structured Process

A structured process contains a start event, an end event, and possibly other flow elements. You can start your process from scratch (that is, with an empty start event), with a form, or when a message is received. Alternatively, you can select a pre-defined process pattern to begin creating a new process.

Pre-defined process patterns provide a simplified version of the most commonly-created processes. Because it’s easier to edit rather than to create, a pre-defined process supplies you with a shortcut to creating processes, and a way to test other features in Process that require a complete process.

Note:

If you create an application based on a QuickStart App, then a submit and approve structured process is automatically created. You can use this process to either play and activate to a test environment to learn more about the functionality of the design-time environment, or you can use it as a starting point to build your own processes.
To create a structured process:
  1. On the Application Home tab, click Processes in the Components pane.
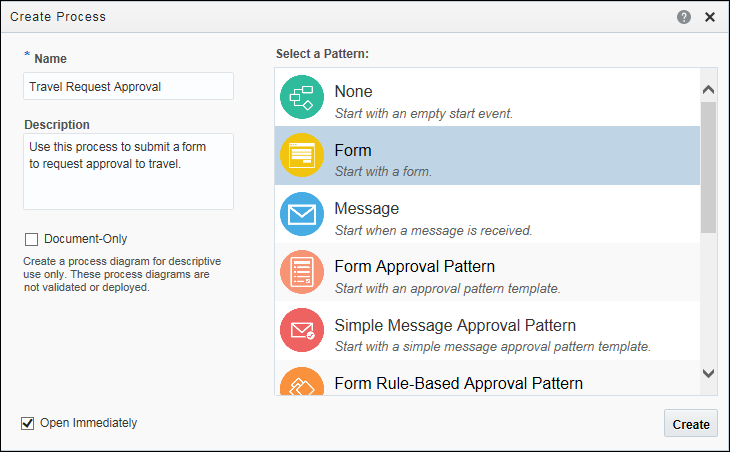
  2. Click Create a Structured Process, and then click any option (for example: Start with a form) from the list that displays to open the Create Process dialog box.

    Optionally, click Create and select New Process to open the Create Process dialog box.

    Description of create-process.png follows
    Description of the illustration create-process.png
  3. Enter a name for the process.
    The field is populated with a default name, such as Process, Process1, and so on. You can use this name or change it later.

    Note:

    To rename an existing process, open the process, click Restore Pane restore pane, click Business Properties, select the General tab, and then update the process name.
  4. Select a pattern from the list. You can start with None (empty start event), Form, Message, or a pre-defined process pattern.
    • If you start your process with a Form, the form isn’t created at this point. Instead, you’re only setting up the process to expect a form that must be built and associated with the form start event.

    • If you start your process using a pre-defined process pattern, you must still add the implementation details for every flow element that has been automatically added.

    • If you want to start your process with a document or folder, select None. You then need to manually adjust the process by replacing the none start event with the Document Start or Folder Start event. See Create a Document- or Folder-Initiated Process.

  5. Review the optional settings and make your changes, if any.
    • In the Description field, enter helpful information about this process, what it’s all about, and why you would use it.

    • If this process is for descriptive use only, select the Document-Only check box.

      Business processes often include details that are necessary for the process to run, which can complicate the picture for someone who only wants to understand what the process does at a high-level. A document-only process provides a simplified process diagram for descriptive use. Document-only processes aren’t validated and can coexist with deployable processes in applications.

    • If you want to create the process but not edit it right now, deselect the Open Immediately check box to return to the Application Home tab. For example, you may want to create several processes at once before you edit any of them. You can select and edit your process at any time.

  6. Click Create.

Delete a Structured Process

You can delete one or more structured processes from your application at any time.

Before you delete a process, make sure the process isn’t referenced elsewhere in your application. For example, if the process you want to delete is invoked from another process through a message throw event, then you’ll need to re-configure the invoking process to refer to a different process.

An error is displayed during validation if any remaining references to the deleted process exist.

To delete a process:
  1. Go to the Process Applications page and open an application.
  2. Click Processes.
  3. Find the process you want to delete and click Delete Delete icon.
  4. Click OK to confirm you want to delete the process from the application.

Import a Process Created Externally

In Process, you can import external process models created in other programs.

Process supports importing and converting process models in the following formats:

  • Visio (vdx)

  • XPDL 2.x (xpdl)

It may be necessary for you to modify Visio and XPDL processes before conversion to make sure they’re converted accurately.

Note:

If the original file contains properties and artifacts that aren’t supported, the unsupported elements aren’t converted and are omitted from the final process.
To import a process model:
  1. On the Application Home tab, select import model icon Import Model from the Main menu main menu icon to open the Process Model Converter wizard.
  2. Click Next.
  3. Highlight the format type of the file you want to import and then click Browse to find the file.
  4. Select one of the following choices if you’re importing a Visio or XPDL file:
    • Create a separate model from each pool
    • Merge pools into a single model
    This dialog box opens even if the original file doesn’t contain multiple pools.
  5. Click Finish.

Clone a Structured Process

You can clone a structured process to create an exact copy of the process. This is helpful when you need to quickly create and use a replica of an existing process.

When you clone a structured process, the cloned process will have all activities and properties that were configured in the original process. All underlying artifacts (such as forms, business objects, integrations) used by the original process will also be used by the cloned process. Note that the artifacts itself are not cloned; but are just used by both the original and the cloned process.

The cloned process will be a standalone process that can be executed and activated independently. You can also modify and customize the cloned process to meet your business needs.
To clone a structured process:
  1. Click the Clone Clone Process icon in the process.
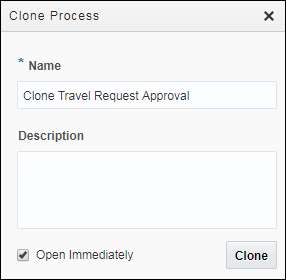
  2. In the Clone Process dialog, enter a name in the Name field, and a suitable description in the Description field.
    Description of clone-sp-dialog.png follows
    Description of the illustration clone-sp-dialog.png

    Note that by default the name of the cloned process will be Clone <original process name>. For example, Clone Travel Request Approval. This helps you identify that the process is a clone of the Travel Request Approval process.

  3. Click Clone.