About Structured Processes
A structured process is a sequence of tasks that, after performed, results in a well-defined outcome. A process usually represents work that is performed within the context of a company or organization.
Although applications are higher level wrappers that contain all the resources of a business application, the processes within the application determine how the business application works. Within a structured process, Business Process Model and Notation (BPMN) flow elements define the flow and behavior.
Note:
BPMN is an industry standard notation for defining business processes. Process supports BPMN 2.0.Business processes are generally created by process analysts who determine the business requirements that must be addressed and define the corresponding process flow.
By default, new structured processes are synchronous. After creating a new process, you can change the type by editing the process.
| Process Type | Description |
|---|---|
| Synchronous Service | Is invoked from another process or service synchronously. In a synchronous service, the calling process waits until the process completes before continuing. |
| Asynchronous Service | Is invoked from another process or service asynchronously. In an asynchronous service, the calling process doesn’t wait until the process completes before continuing. |
| Manual Process | Require user interaction. Manual processes can begin with a form, a message, a document, or an empty (none) start event. |
| Reusable Process (Reusable Subprocess) | Can be called by a BPMN process. In BPMN terminology, reusable processes are often called reusable subprocesses. Use the call activity to call reusable subprocesses within your structured process. |
Process Instances
A process instance refers to a specific instance of a process. For example, the Loan Process process example shows the overall definition, or model, of a structured process, including the roles of the process participants who are responsible for performing the work. It defines how a loan application is submitted and approved, and defines the types of people responsible for performing that work. In contrast, a process instance refers to a specific loan application and the specific people responsible for approving it.
The distinction between a process and a process instance is important because Process enables you to model processes, convert them into running business applications, and manage the process instances created within those applications.
Process Tokens
Process token is an abstract concept in BPMN. It refers to the current point of execution within a process. A process can have multiple tokens that indicate that the process is running in multiple paths. For example, gateways are often used to split the path of a process. Splitting a process path creates multiple process tokens.
Flow Elements
Flow elements are the BPMN components that represent the work performed within a structured process.
| Flow Element Types | Description |
|---|---|
|
Tasks |
Represent the work performed by a structured process. |
|
Events |
Define something that happens during a structured process. |
|
Gateways |
Determine the flow of your structured process. |
|
Sequence Flows |
Connect flow elements. |
Data Objects
While flow elements are used to define the behavior of a structured process, data objects are used to define and store the information used by a process. Data objects are variables that are defined during the modeling and implementation of a process. A process instance uses these variables to store specific information. At runtime, the process instance generates and stores specific values for these variables.
Example of a Loan Application Process
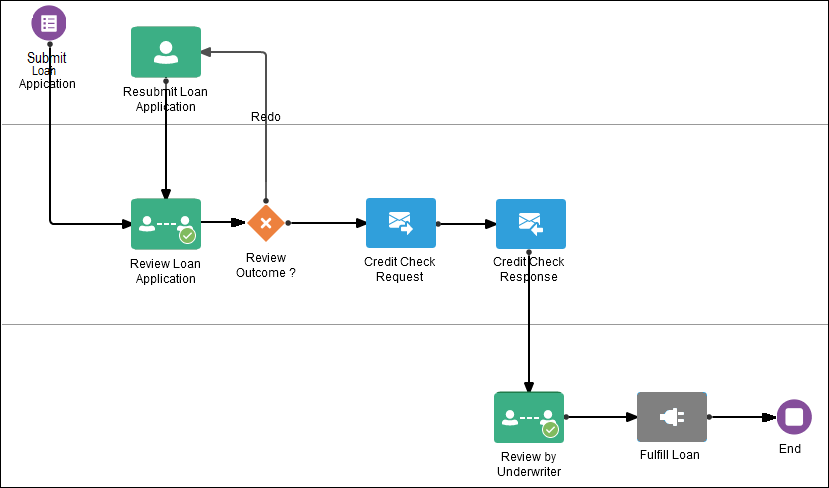
Let’s look at a sample loan application process. It provides a real-world example of many Process features.
Description of the illustration loan-process.png
This sample process can be broken down into the following high-level tasks:
-
Submit Loan Application
-
Determine Application Review
-
Check Credit Rating
-
Approvals Outcome
The initial form start event is used to trigger a process instance when a user submits a form.

The Submit Loan Application portion performs the following tasks:
-
Defines the start point form start event.
-
Initiates the process instance when a user submits a form.
The form is specified in the implementation for the form start event.
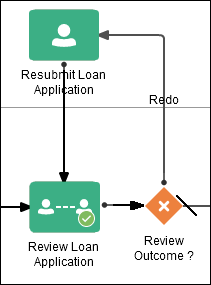
The next set of flow elements determine if the loan application is complete. After the user enters information, the process flow passes the outgoing sequence flow to the approval human task. If the loan application is approved, then the flow passes to the check credit rating service element. If the loan application is rejected, then the flow passes to the re-submit human task for more information from the submitter.
Description of the illustration review-loan-app.png
Determining the application review:
-
Determine approval flow (approve task).
This stage begins with an Approve task, which lets you display a form that the user must review and then perform a certain action. The user might approve or reject the application.
-
Check approval flow (exclusive gateway).
-
If Reject, resubmit loan application (submit task).
-
If Approve, proceed directly to the check credit rating stage.
-
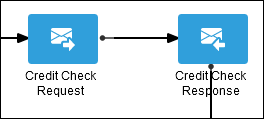
The send task is paired with the Receive task to invoke a process and receive a response in return.
Description of the illustration credit-check.png
In this example, a message is sent to a process outside of the current process. After this message is sent, the task is complete and the running of the process continues. In contrast to the send task, the receive task waits for a message from the process, which is outside the current process. After this message is received, the task is complete and the running of the process continues to the approvals outcome stage.
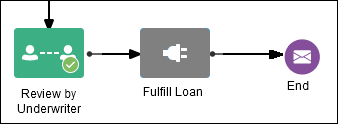
Approvals OutcomeThe approvals outcome stage represents the final stage of the loan application process. It begins with a review by the underwriter. If the loan is approved, then the process proceeds to the final process flow, which proceeds to the end event.
What You Can Do Using the Process Editor
The process editor provides tools for you to easily create and edit business processes.
The process editor opens as a tab and therefore, the toolbar is visible. The options on the toolbar apply to the application as a whole and are available when you’re editing a process.
The process editor is divided into three areas: Toolbar, Canvas, and Elements Palette.
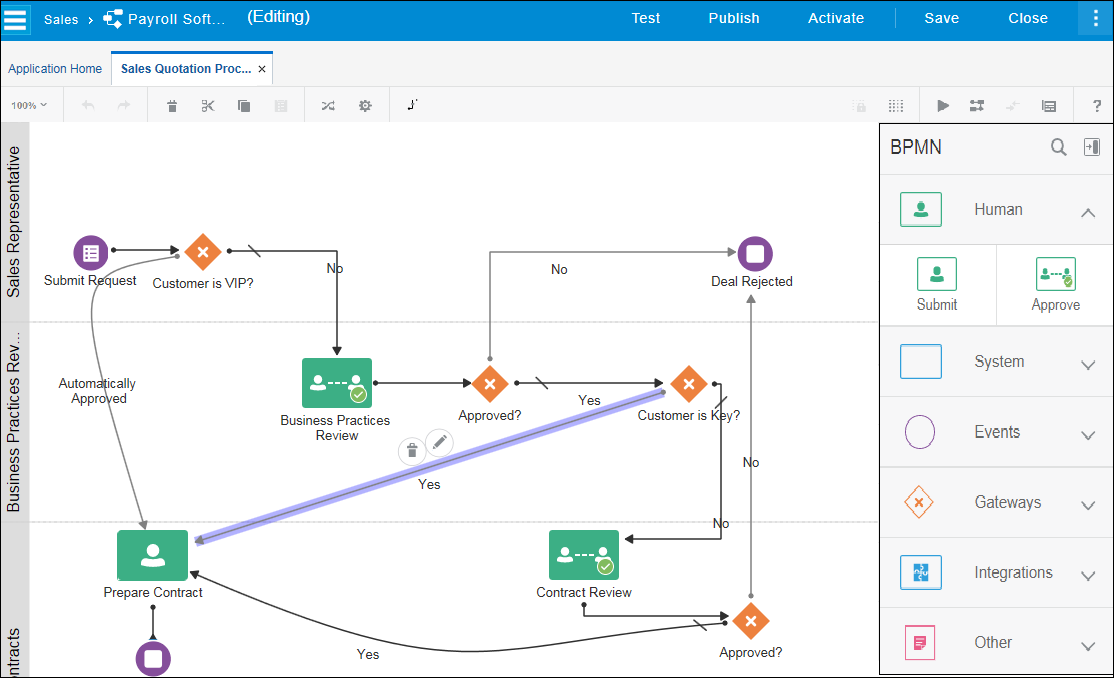
Description of the illustration process-editor_1.png
Process Editor Toolbar
The process editor toolbar provides quick access to controls related to process design.
![]()
| Toolbar Icon | Name | Keyboard Shortcut | Description |
|---|---|---|---|
|
|
|
Not available |
Print your process using the printer setup of your browser. |
|
|
Set View |
Not available |
Set the view size. |
|
|
Zoom In |
Shift + + |
Change to a more close-up view of the process flow. |
|
|
Zoom Out |
Shift + - |
Change to a more distant view of the process flow. |
|
|
Undo |
Ctrl + Z |
Revert to the last change made to your process. |
|
|
Redo |
Ctrl + Y |
Reverse the last undo action you performed. |
|
|
Delete |
Delete key |
Delete the selected items from your process. When you delete a flow element that contains an incoming and outgoing sequence flow, the incoming sequence flow is automatically connected to the outgoing sequence flow. However, you may need to manually re-configure the surrounding flow elements. When you delete a sequence flow from a business process, any implementation details you may have configured for that sequence flow are lost. |
|
|
Cut |
Ctrl + X |
Cut the selected items and copy them to the clipboard. When you cut a flow element that contains an incoming and outgoing sequence flow, the incoming sequence flow is automatically connected to the outgoing sequence flow. However, you may need to manually re-configure the surrounding flow elements. |
|
|
Copy |
Ctrl + C |
Copy the selected items to the clipboard. Note: When you copy a human task, the associated form is not copied. |
|
|
Paste |
Ctrl + V |
Paste the items currently in the clipboard. |
|
|
Show/hide Grid |
G |
Toggle the display of a grid in the process editor window. |
|
|
Snap to Grid |
S |
Center the flow elements in your process on the closest grid axis. Existing flow elements are automatically centered and new flow elements are automatically centered when they’re added. Snap to Grid is active only when the grid is shown. |
|
|
Find Usages |
Not available |
Display which other processes within the current application calls your process. |
|
|
Play Process |
Not available |
Test the process using the application player. |
|
|
Correlations |
Not available |
Create correlation keys and properties, and then associate one or more properties with each key. Use the correlations to enable business processes to communicate with each other. |
|
|
Change Icon |
Not available |
Change the icon of the selected item. You can also click it to return to the default. Change Icon is available only when a valid flow element is selected. |
|
|
Change Type |
Not available |
Change the type of the selected item. Change Type is available only when a valid flow element is selected. |
|
|
Change Sequence Flow Type |
Not available |
Change the type of the selected sequence flow. For example, you can change the sequence flow from a straight line to a curved line. Change Sequence Flow Type is available only when a sequence flow element is selected. |
|
|
Open Data Objects |
D |
Define your data. You can create new data objects based on the business types that are defined for your application. |
|
|
Open Data Associations |
A |
Link data to the activity inputs and outputs. |
Process Editor Canvas
The process editor canvas is the central area of the process editor window. Use the canvas to draw a diagram that represents your business process using the elements available in the Elements Palette.
The horizontal lines that run across the canvas are swimlanes. Click New Swimlane ![]() to add a new swimlane. See Work with Process Roles and Swimlanes.
to add a new swimlane. See Work with Process Roles and Swimlanes.
Elements Palette
Use the Elements Palette to add flow elements and sequence flows to your business process by dragging and dropping elements to the process editor canvas.
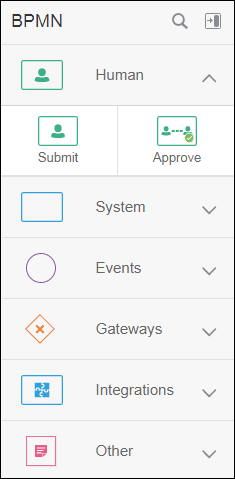
Description of the illustration component-palette_1.png
Click Expand ![]() to expand a specific type of palette item and see all the elements available for that type. Click the icon again to collapse. Click Show/Hide Palette
to expand a specific type of palette item and see all the elements available for that type. Click the icon again to collapse. Click Show/Hide Palette ![]() to close and open the palette. See Work with Elements.
to close and open the palette. See Work with Elements.
Typical Workflow for Creating a Structured Process
Use this typical workflow to create a structured process.
| Task | Description |
|---|---|
|
Create a process |
Create new business processes from the Application Home tab. |
|
Assign roles to the process |
Assign roles to swimlanes and determine which members of your business organization are responsible for completing the tasks and activities within the structured process. |
|
Design the flow |
Drag and drop elements, such as human tasks, system activities, and other events, onto the canvas. |
|
Configure flow element properties |
Select a flow element in your process diagram, click Menu |
|
Define the data |
Define the data the activity uses. |
|
Associate the data |
Link data to the activity inputs and outputs. |
