Define Custom Data Types
If built-in data types aren’t suitable for an input variable in your decision model, you can create a custom data type.
A custom data type can be a new complex data type or an alias of a built-in data type. Further, to create a complex data type, you can use a combination of built-in data types or other complex data types.
Define Custom Data Types in Graph View
- Select the input data element on the canvas for which you intend to define and use a variable of custom data type.
- Click Open Properties
 .
.
- In the properties pane:
- Select the Mode as Other Type.
- Now, click the Define New Type link that appears in the pane.
A new type definition is created with a default name and the Add Type Definition panel opens for editing.
- In the type definition panel:
- Edit the definition's name if necessary.
- Select the Mode (that is, the data type) for the definition. You can select one of the built-in data types to create aliases or choose to define a complex data type.
- To identify the data type as a list, select the isList? check box.
- If you select the mode as Text, Number, or Date and Time, you can optionally define allowed values to restrict the data type definition to enumerated values or ranges.
- If you select the mode as Complex, define attributes within the type definition.
- Click Add Component
 to add a new attribute. An attribute is created with a default name and the Add Component panel opens for editing.
- In the panel, edit the attribute's name, select the mode, and enter allowed values or a range for the attribute.
- Select the isList? check box to identify the attribute as a list.
- Click Close
 to return to the Add Type Definition panel, and repeat steps i-iii to add another attribute to the complex type definition.
- Use Edit or Delete buttons to modify the attributes.
- Click Add Component
- Click Close
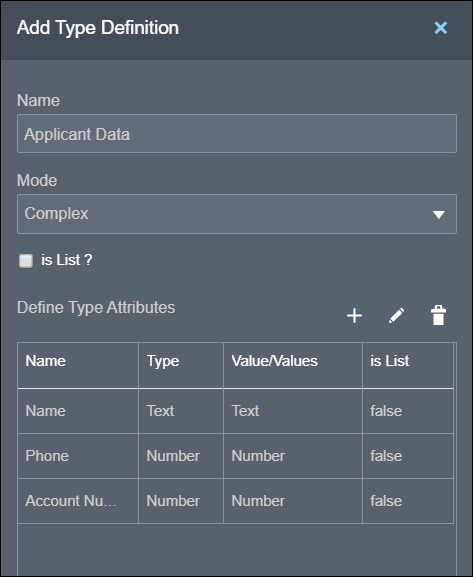
 to save and close the type definition panel. The following image shows an example definition:
- In the Input Data Properties pane, choose the type definition you just defined in the Other Types field to associate it with your input data variable. You can edit or delete the type definition using the buttons next to the field.
You can also use this new type definition to create variables in other input data elements within the model.
Define Custom Data Types in List View
- In the Type Definition section of the Input Data pane, click Add new item definition
 . A new type definition is created with a default name and the Add Type Definition panel opens for editing.
- Edit the type definition's name if necessary.
- Select the Mode (that is, the data type) for the definition. You can select one of the built-in data types to create aliases or choose to define a complex data type.
- To identify the data type as a list, select the isList? check box.
- If you select the mode as Text, Number, or Date and Time, you can optionally define allowed values to restrict the data type definition to enumerated values or ranges.
- If you select the mode as Complex, define attributes within the type definition.
- Click Add Component
 to add a new attribute. An attribute is created with a default name and the Add Component panel opens for editing.
- In the panel, edit the attribute's name, select the mode, and enter allowed values or a range for the attribute.
- Select the isList? check box to identify the attribute as a list.
- Click Close to return to the Add Type Definition panel, and repeat steps a-c to add another attribute to the Complex type definition.
- Use Edit or Delete buttons to modify the attributes.
- Click Add Component
- Click Close to save the data type definition. You can edit or delete a type definition using the Menu
 .
.
