Personalize and Promote QuickStart Apps to the Gallery

Do you encounter situations at your company where several departments use a business process that is similar, but has slight variations? For example, is the hiring process slightly different for the sales, development, and manufacturing organizations? Or perhaps a travel approval process varies from one department to another.

Why not put the power into the hands of department managers (and others) to easily customize the process to fit their business requirements? As a developer, you can take any existing application and convert it to a QuickStart Master. From there, you decide what settings and details in the process users can customize. With a single click, you promote the application to the QuickStart gallery. Users can then create a new application from the QuickStart App and customize the process for their needs.

Convert an Application to a QuickStart Master

Your first step in promoting a QuickStart App to the gallery is to convert an existing application to a QuickStart Master.

To convert an application to a QuickStart Master:
  1. Go to the Home page, and click Processes.
  2. Use the different icons to distinguish QuickStart Apps, Applications, and QuickStart Masters from each other.
  3. Open the application you want to convert.
  4. Click Main menu Main menu icon and select Convert to QuickStart Master.

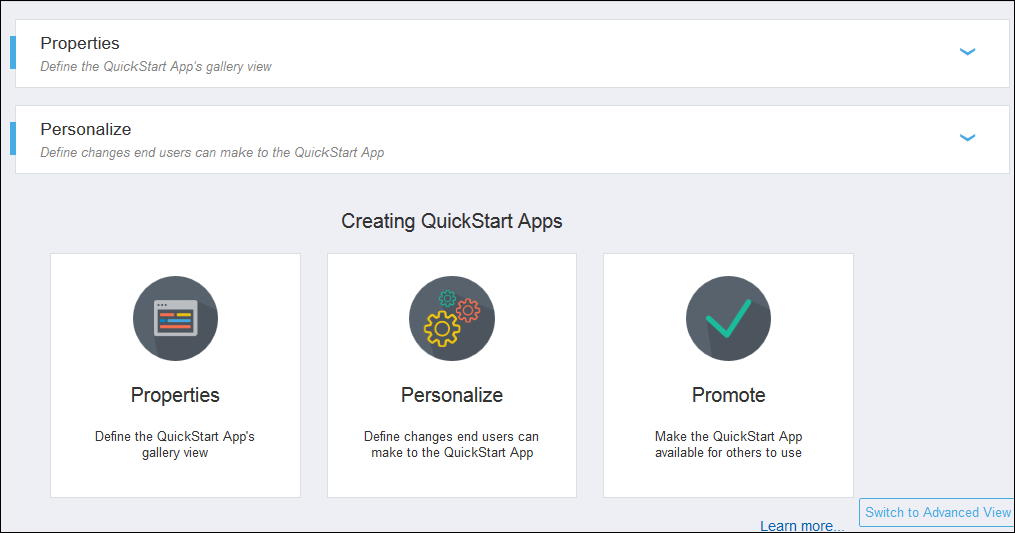
At this point, you’re working in what is called customization view. From here, you can define how the application looks in the gallery, configure what items users can personalize, and promote the application to the gallery.

Be sure to notice the Switch to Advanced View link. If you need to make changes to the process modeling, you can switch to the advanced view to access all application features, components, and elements. You can toggle back and forth between the two views at any time.

Configure How the QuickStart App Looks in the Gallery

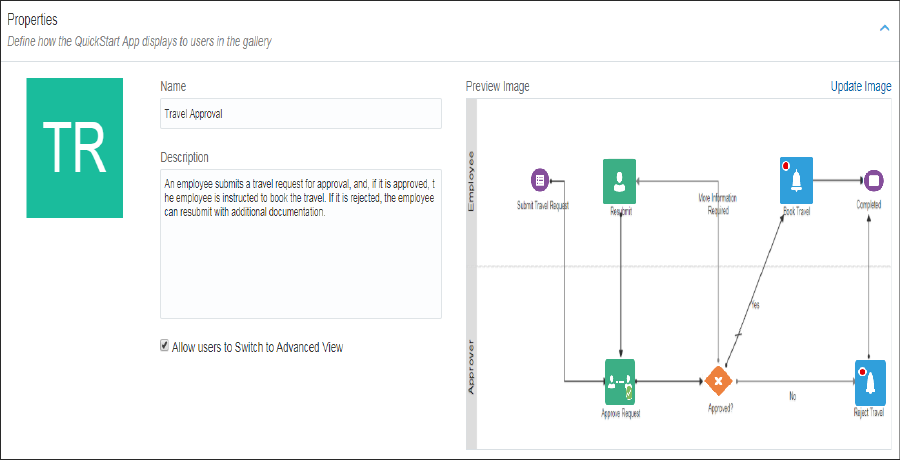
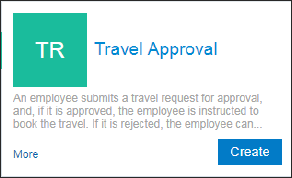
Start by setting the title and description for the application. Users will see this information on the QuickStart App card in the gallery when they go to create their own application.
  1. Click Properties to expand the pane.
  2. Update the name and description. Be sure to enter meaningful and helpful information.

    Also, remember that over time your gallery might grow quite large with hundreds of available applications. Users can search by title so that’s one more reason to enter a good one.

  3. Click Update Image to change the image.

    You can use any graphic, illustration, or photo. For example, you might want to include a visual representation of the process but use a more interpretative image instead of the traditional flow diagram. Users will see the image when they click the More link on the QuickStart App card in the gallery.

  4. Decide whether to allow users to switch back and forth between customization view and advanced view. Advanced view gives users access to the Application Home tab.
  5. Click Collapse Collapse icon to close the Properties pane.

Decide What Settings Users Can Customize

Your next step in creating a QuickStart App is to decide what items and properties in the process you’ll allow the user to change.

To configure the settings:
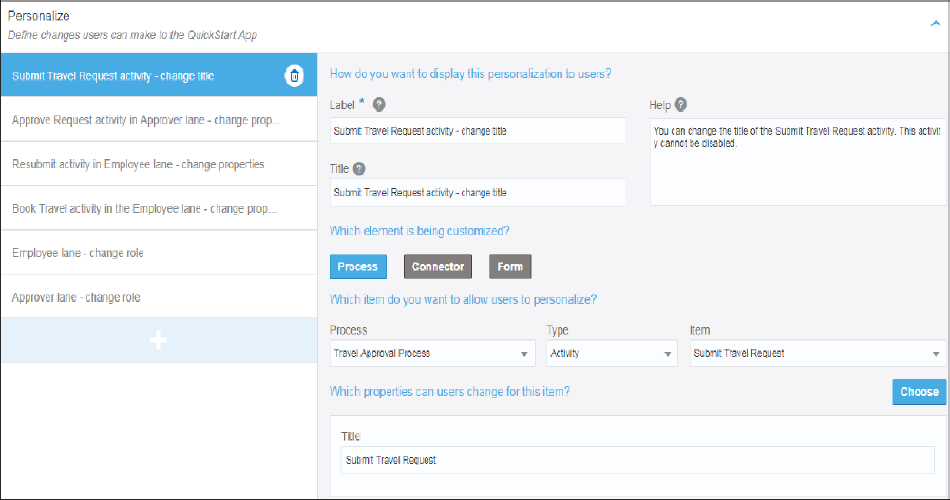
  1. Click Personalize.
  2. Take a minute to review the page.
    • The left pane lists items that are defined in the process flow, items that use a form to interact with end users, and the connectors defined within the application. An item may be any of the following:
      • A human task activity or stage in case of a dynamic processes.

      • A swimlane or an activity (such as submit, approve, or notify tasks) in case of a structured process.

      • A human task activity or start form event in case of a form.

      • A REST service, web service, or ICS connector.

    • The right pane lists the elements and properties that you can configure.

  3. Select an existing item in the left pane to modify.
    1. Change the label to be concise and informative. It will appear in the left column. Users will use the label for navigation when customizing the application.
    2. In the Title field, enter a description that gives the user more information about what the task or activity is about. Users will see this title at the top of the page
    3. If it’s not clear from the label and title what properties the user can change or why, add instructions in the Help field. When customizing their QuickStart App, users can click Help Help icon to view the information.
    4. Choose the element that you want to customize within this item. The options available are Process, Connector and Form.
    5. Click Process to select the properties that the user can change for an item within a particular process. Specify the process and the item using the following drop-down fields.

      All structured and dynamic processes defined within the application are available in the Process drop-down field.

      For a dynamic process, the Type drop-down field contains all stages and human task activities within the process. For a structured process, this field contains all lanes and activities available in the process.

    6. Click Connector to select the properties that the user can change with respect to a particular connector. Specify the connector in the following drop-down field.

      All REST service, web service, or ICS connectors defined within the application appear in the drop-down field.

    7. Click Form to select the form and the presentation that the user can use with respect to a human activity or a start form event. Specify the form and the presentation to display in the Form and Presentation drop-down fields.

      All forms and associated presentations defined within the application are available in the Form and Presentation drop-down fields. You can see the selected form in preview mode.

    8. After you select an element (either a process item or a connector), click Choose to select the properties that the user can change. All properties applicable to that element are displayed; each element has a unique set of properties that can be modified. Don’t forget to select the preferred value for each property. Users will see this default value when creating their application, but can change it if they want.

      For example, properties for an approve human task within a structured process include name of the task, who can approve the task, how much time they have to approve, what priority is the task, and how often to send reminders about the task deadline.

      Similar properties are available for a human task activity in a dynamic process. For a REST or web service connector, you can make the following properties available to users: address, read time out, connection time out, and security type.

      Notice that for some properties such as Title you can choose either to give a simple string or an expression. Some other properties such as Due Date also has an option to set the time interval. These options are available in a drop-down select field.

      • simple string icon — Click this to define a simple string.

      • expression icon — Click this to open a simple expression editor to set the value.

      • time interval icon — Click this to set the time interval.

  4. Add an item to the QuickStart Master that you want to let users customize when they create their own application.
    1. Click Add Add icon.
    2. Skip the Label, Title, and Help Hint fields for the moment. It’s easier to enter this information after you know what item you’re adding.
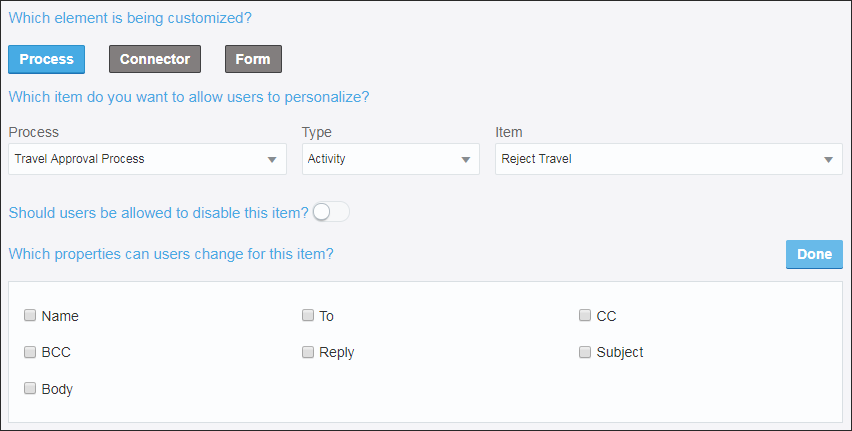
    3. Click the Process, Connector or Form button to choose an element. Here, let’s select Process to choose an item from a structured process.
    4. Use the Process, Type, and Item fields to select the item. For example, an activity in which the approver rejects the travel request might be to send an email to the employee stating the reason why the travel request is rejected. You may want to let users modify parts of the email, such as the To, CC, and Subject fields.
    5. Use the check boxes and drop-down list to select the properties the user will be able to change.
    6. Don’t forget to go back to the Label and Title fields and change the default message text.
  5. Delete an item that you don’t want the user to be able to change.
    1. Scroll through the items in the left pane.
    2. Select the item you want to remove.
    3. Click Delete Delete icon. Don’t worry if you inadvertently delete an item. You can always add it back at any time.
  6. Publish your changes.

Promote the Application as QuickStart App to the Gallery

At this point, you have converted an application to a QuickStart Master and defined how users can customize the application. Now you just need to promote the application as a QuickStart App to the gallery.

You’re promoting a version of your QuickStart App, not the master. You can modify the master at any time and then promote the updated version to the gallery.

To promote the application to the gallery:

  1. Test your application.

    Even though you converted an existing application, you probably made numerous changes. It’s always a good idea to test before promoting an application for others to use.

  2. Click Promote.

    Description of qs-master-promote.png follows
    Description of the illustration qs-master-promote.png

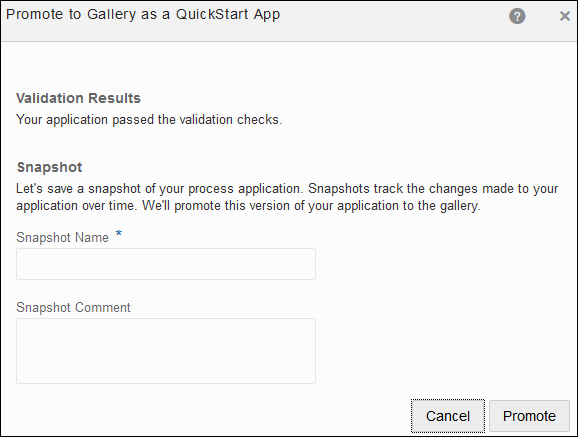
    The system validates your application. Be sure to fix any errors before continuing. You can view the validation errors under Validation Results in the Promote to Gallery as a QuickStart App dialog box.

  3. Enter a name for this snapshot in the Snapshot Name field.

    Note that this name doesn’t appear in the gallery. Instead, the gallery displays the application name you specified in the Properties pane.

    You can enter a comment for this snapshot in the Snapshot Comment field.

  4. Click Promote again. You get a confirmation that a snapshot of your application was saved and the application has been promoted as a QuickStart App to the gallery.
  5. Click Close.

Your QuickStart App is now available in the gallery. Go to the Process Application page, and then select Start with a QuickStart. Scan or search the gallery for your QuickStart App. Any user can use your QuickStart App to configure, test, and activate their own application.

You can remove a QuickStart App from the gallery at any time. Users will no longer be able to select the QuickStart App to create an application. However, the source application is still available in the list of applications. You can promote it back into the gallery at any time.