7 Campaigns
Campaigns put your analytics insights to work with targeted messages that increase app engagement and build client relationships.
How Can I Engage with My Users?
Analytics gives marketers more useful data than ever before, giving insight into every step of the customer journey. With Campaigns, marketers can quickly act on insights to outpace competitors to deliver relevant messages at just the right time for the greatest ROI.
-
What percentage of users open discount promos vs free shipping promos?
-
In what zip code did the campaign result in the most checkouts or signups?
-
Do users open weekly messages more frequently than monthly messages?
-
What user demographic is most likely to open a promo?
Use Campaigns to build those customer relationships that increase loyalty and your brand’s value to help you reach your goals.
What Kinds of Things Can I Do With Campaigns?
-
Engage with targeted customers, but also reach out to potential customers.
-
Send out promos to re-engage inactive users.
-
Set a schedule for messages to automate campaign launches on a future date.
-
Troubleshoot by sending a campaign to one or more test users before launching it to customers.
-
Pull together data insights, message launches, and your team’s created segments and favorited reports all in one tool.
-
Relaunch a campaign to include new users since the initial launch.
Campaigns: Try This First
Campaigns use segments to create targeted messages you can send right away, or on a schedule. To create a campaign:
-
Click the Application menu and choose the Easy Shopping app.
-
From the side menu, click Campaigns.
-
Click Create Campaign.
-
In the Name field, add a name for your campaign.
-
In the Send Notifications When field, click Launched. When you choose this option, the notification is sent immediately when you click the Launch button in step 8.
-
Click Add Segment, choose a segment from the list, then click Apply.
-
In the Message field, type a welcome message offering a discount on the first purchase.
If this were a real campaign, you’d want to click Test to send a trial message to a test user before sending it to customers. For now, let’s finish this task without the test.
-
Click the Launch button.
Campaigns help you connect by sending messages to any segment you’ve saved from user, funnel, and retention reports, or from segments you’ve created with the Segments category. In addition to launching right away, campaigns can also launch on a schedule so you can regularly stay in contact with your users. We’ll dive into these details next.
Example: Creating a Campaign from the Campaigns Category
When you create a campaign, you’ll send messages to user segments you want to target. Be sure you’ve saved a segment from user, funnel, or retention reports, or created one from the Segments category before working through this example.
Let’s take a look at how you might use Campaigns to increase the engagement rate of users of your Easy Shopping app. Suppose you’d like to target non-active users to see if you can interest them with a coupon via a push notification offering 50 percent off any item. With all the new products you’ve launched, you’re sure they’ll be back once they’ve seen the new additions.
To create the campaign:
-
From the applications menu, choose an application.
-
Click Campaigns on the side menu.
-
Click Create Campaign.
-
In the Name field, give the campaign a name.
-
In the Description field, add a description of the campaign.
-
In the Send Notifications When field, click Scheduled.
-
Choose a date and time from the calendar.
- Click Add Segment, choose a segment from the list, then click Apply.
-
In the Message field, type “Come see our latest products. Enjoy 30% off any item!”
-
Click Launch. The campaign will launch on the scheduled date and time.
Note:
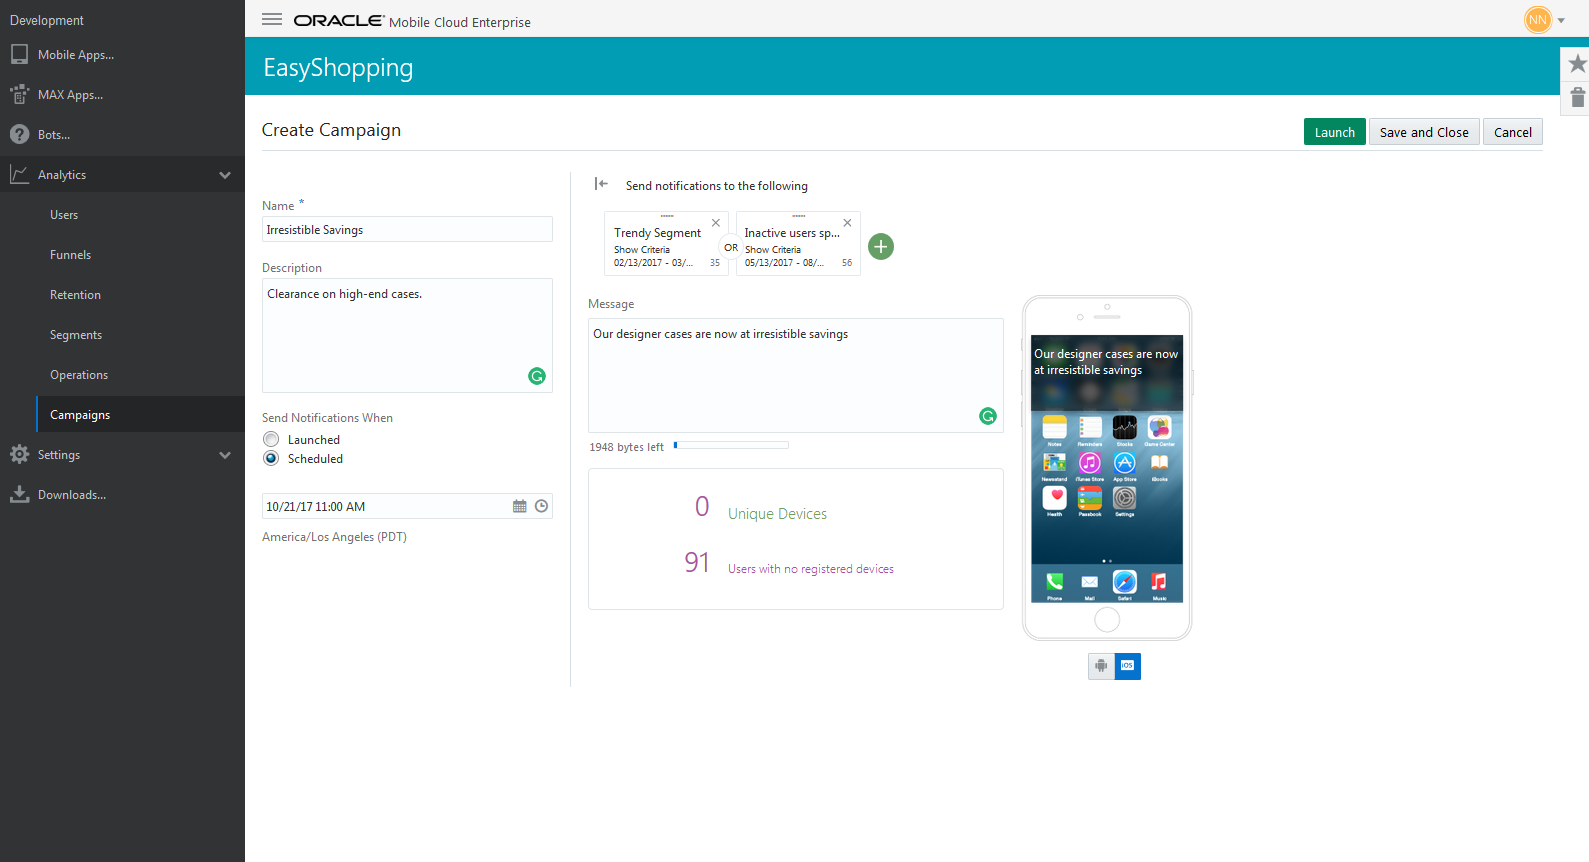
Usually, you should send a test message before launching a campaign. In order to test push notifications, the device of the person getting the test message must be registered. Your app developer can help with this set up. In order to see the test button for messages, you may need to save your campaign, then choose edit from the actions menu on the bottom of the tile to reopen it. The Test button should now be visible.As you create your campaign, it should look something like this:

Description of the illustration campaign-setup.png
-
Once you’ve launched or scheduled your campaign, you see the Campaigns landing page and one or more tiles, each representing a created campaign.
-
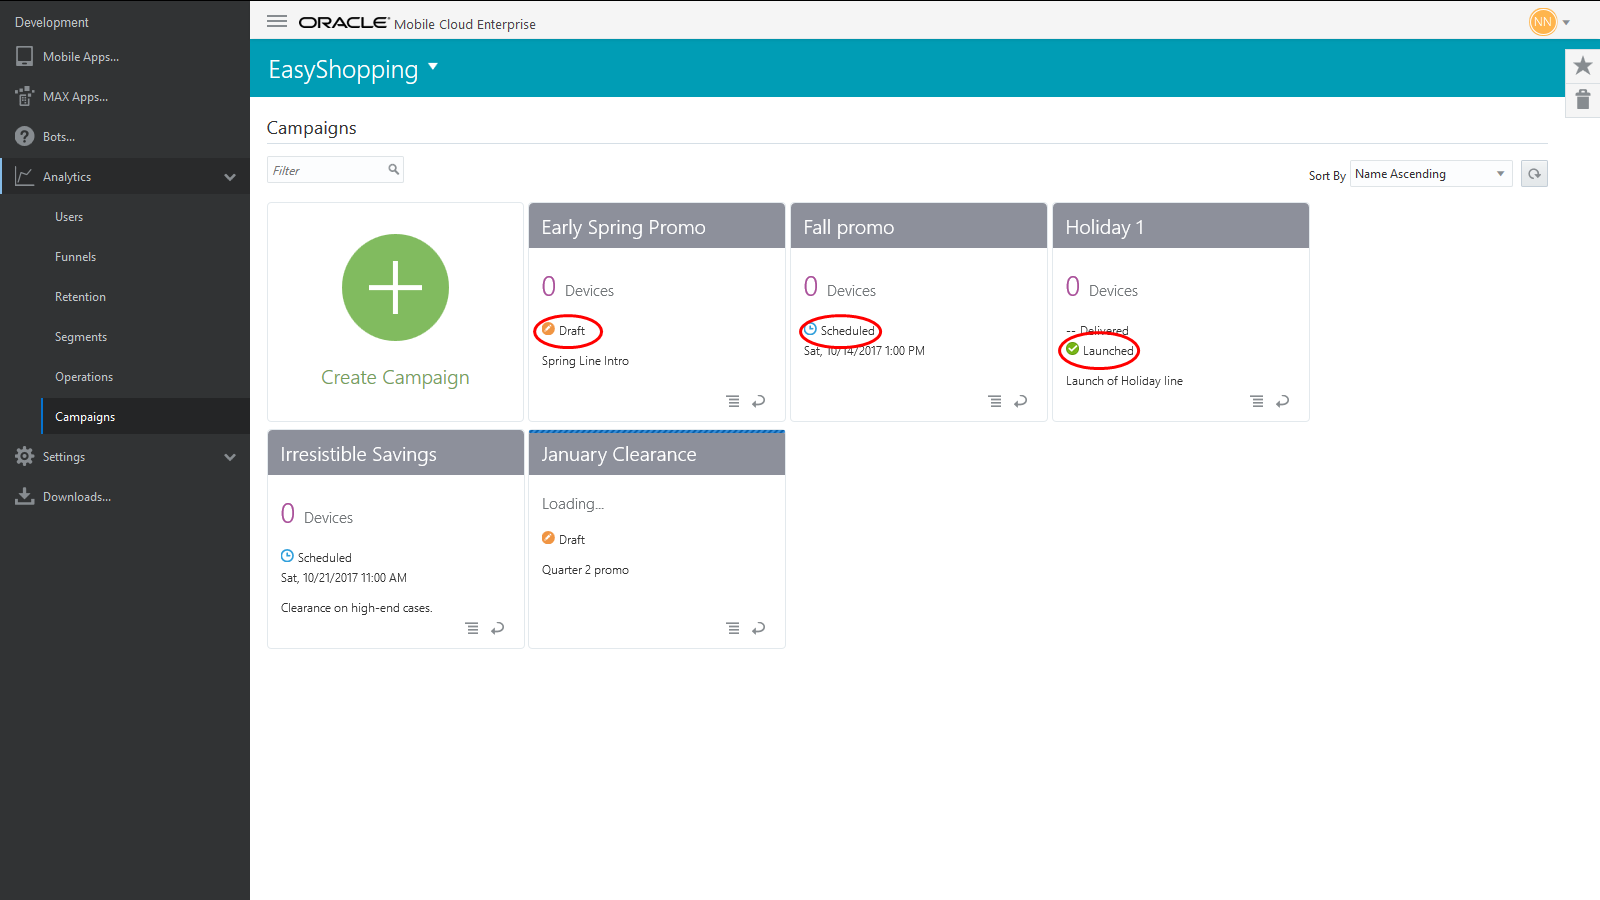
Minimized tiles show a summary of campaign data results, including whether the campaign successfully launched. “Launched” is one of the states a campaign can be in.

Description of the illustration campaign-states.png
Here’s what each state means:
| State | Meaning |
|---|---|
|
Launched |
The campaign has been activated and the notifications have been sent to one or more members of the segment(s). |
|
Scheduled |
The campaign is scheduled to launch a single time at a future date and time. A scheduled campaign can be edited or cancelled before it launches. |
|
Launching |
The campaign is in the process of launching. A launching campaign cannot be edited or cancelled. |
|
Draft |
The campaign was saved and closed. Set-up of the campaign is incomplete. A draft can be edited or cancelled. |
|
Failed |
The campaign has failed to launch to any members of the segment(s). The campaign can be relaunched to the original segment, and new members of the segment are included since the first attempted launch. A failed campaign can still be edited, saved as a draft, or relaunched. |
-
The summary also shows the percentage of the notifications that have been delivered. Because of certain restrictions in device software, this percentage is an estimate and not a precise number. The campaign can also be relaunched to the percentage of the segment who failed to get the notification. See Relaunching a Campaign That Failed to Launch.
-
Tiles also show data on message count. This result is gathered from the number of devices registered to the targeted segment members.
-
Click the flip icon to see a campaign’s latest history, like who created the campaign, and when the campaign last launched.
Looking at Campaign Details
-
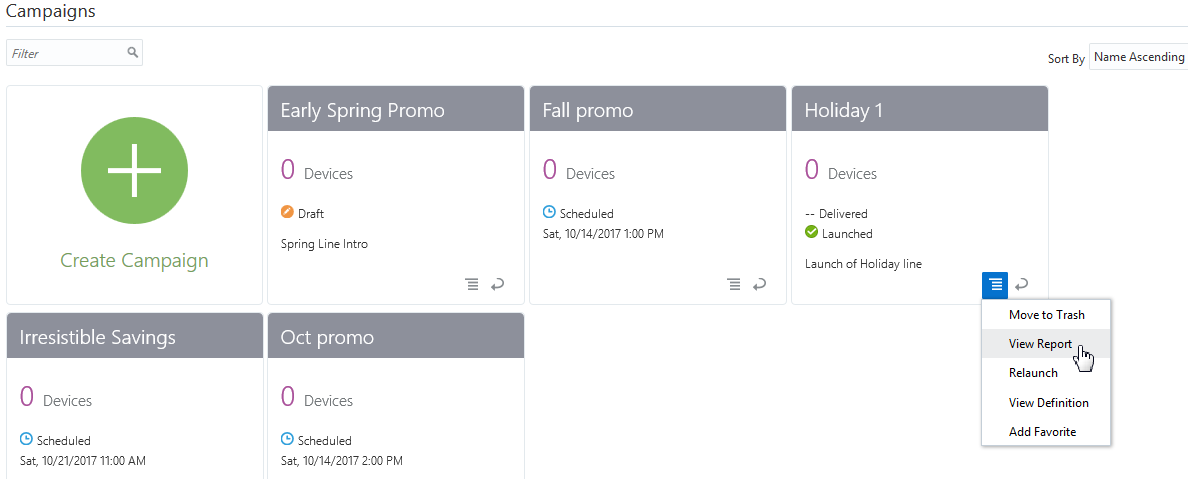
To see detailed data about the campaign, click the Report menu, then click View Report. Note that View Report is only available for campaigns that have launched.

-
View Report gives you a closer look at campaign data. An important data point not shown when a report is minimized is the number and percentage of users in the segment who opened the notification. Depending on how you set up your campaign, you might also see the figures for Campaign Results Events, like promos or sign-ups that targeted users took advantage of. Low numbers in either of these two data points could indicate your campaign needs some tweaking to appeal to a larger number of users. However, since this campaign has already launched, you’re not able to edit it. Instead, you’ll need to create a new campaign.
-
If you want to see the criteria used for a launched campaign, click on the Report menu, then click View Definition. From here, you can see what segments and events were used for the campaign. Note that this view is also read-only.
Moving Launched Campaigns to the Trash
You can move any campaign to the trash but if you do, you’ll lose access to the report results. If you’ve moved a campaign to the trash and you want to recover it, click the trash can icon and the report you want to restore, then click the report icon next to the report and chose Restore.
Editing a Campaign
As new data comes in or other decisions are made, you may decide to edit a campaign that’s in the works.
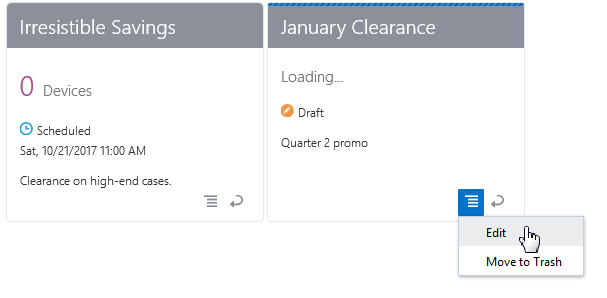
You can easily change any campaign that you saved, a campaign on a schedule that has not yet launched, or a campaign that failed to launch. Look for the Draft or Failed label on the front of the tile to see which campaigns can be edited. Then click the Report menu and Edit.

Once you’re in Edit mode, you can add or remove segments, set a new launch date, or anything else you’d like to change. Choose Save and Close if you want to keep the campaign and work on it later. Or, choose Launched to send the campaign immediately, or Scheduled to set a future launch date.
Setting Up Real-time and Scheduled Campaigns
When creating a campaign, you have the option to send push notifications immediately on launch, or to set a schedule for a single launch on a future date and time by using the calendar.
To cancel a scheduled campaign, click the Report menu and choose Cancel Schedule. This option puts the campaign in a draft state. Alternatively, you can click Edit, then edit the schedule, or delete the campaign entirely. Any segments used in the campaign still exist and can be used in future campaigns.
Relaunching a Campaign That Failed to Launch
At times, a campaign may fail to launch to any members of the segment. This will be indicated by the Failed label on the front of the tile. Note that if the campaign is sent to even one member of the segment, the campaign tile will show a Launched label.
To re-send a campaign that failed to launch, click the Report menu and choose Launch. This will immediately relaunch the campaign to the members of the segment, as well as any new members who are now a part of the segment since the first attempted launch. For example, if you’re targeting members who signed up for a loyalty club, all members of that segment are included in the campaign, whether they signed up when you first launched the campaign or at a later date.
You can also choose Edit to relaunch a campaign. Once you’re in Edit mode, you can click Launch to send the campaign immediately, schedule it for later, or make any other changes you’d like.
Relaunching Campaigns to Include New Segment Members
Once a campaign has successfully launched, you may decide you want to include new members of the targeted segment since the campaign first launched. Relaunching always results in a merge of new data with data from the previous launches.
In order to include these new segment members in the campaign, click the Report menu, then click Relaunch.
The Relaunch menu is similar to the Edit menu, with a few important differences:
-
You can’t add, remove, or change the segments used in the campaign.
-
You can’t save the relaunch once you’ve begun the process and come back to it later. Saving and closing is disabled because this would put the relaunch back into a draft state. A draft doesn’t have data associated with it, but a relaunch does.
-
If the campaign was scheduled, you’ll need to set a new schedule in order to send the campaign to the new segment members, since the first scheduled date has passed. However, you can choose Launched to send the notification immediately.
Relaunching a Campaign: Understanding Segment Error Messages
Campaigns use references to segments you’ve saved or created, not copies of them. Because of this, you should take care when editing or deleting segments. If you change or delete a segment that’s used in a campaign, you’ll get an error message telling you the segment has changed, or it cannot be found. If you’ve deleted a segment, you must first remove the name of the segment from the campaign in order to continue editing or launching the campaign.