10 Channels
To introduce your bot to the users of these services, you need to configure a channel.
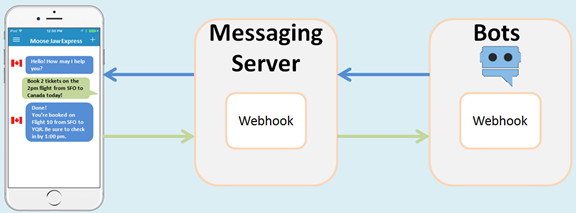
We provide a channel for Facebook Messenger and a generic channel called Webhook that you can use for other messaging services. Your bots are limited to messaging services; using one of our SDKs, you can integrate them in web pages, or the Android and iOS messaging platforms.
Tip:
Check out the Developer Resources to find out about configuring other channels and setting up different types of chat clients and the sample chat server.Running Your Bot on Facebook Messenger
-
A Facebook Page
-
A Facebook App
-
A Page Access Token
-
An App Secret ID
-
The webhook URL
-
A Verify Token
Note:
You also need a Facebook Developer account.To run your bot on Facebook Messenger, you need to set up a Facebook page and a Facebook App. You can find out more about this from the Facebook Messaging Platform documentation, but in a nutshell, the Facebook page hosts your bot. Users chat with your bot through this page when they use chat window in a desktop browser. When they use a mobile device, users interact with your bot directly through Facebook Messenger itself. In this scenario, the Facebook App allows your bot to get the messages that are handled by Facebook Messenger.
To create a Facebook Messenger channel, you need artifacts that are generated by both Bots and by Facebook Messenger. From Bots, you’ll need the webhook URL that connects your bot to Facebook messenger and the Verify Token that enables Facebook Messenger to identify the bot. From Facebook Messenger, you’ll need the Page Access Token and the App Secret ID. Because you need transfer these artifacts between Bots and Facebook Messenger, you’ll need to switch between these two platforms as you configure the channel.
Step 1: Set Up Facebook Messenger
Start off by generating the App Secret and the Page Access token in Facebook Messenger.
-
Log into your Facebook developer’s account.
-
Create a Facebook page that hosts your bot. The description, images, and cover page you add to the page will identify your bot to its users.
-
Next, create the Facebook app that you’ll link to this page. Because this is a Messenger app, choose Apps for Messenger and then click Create App ID.
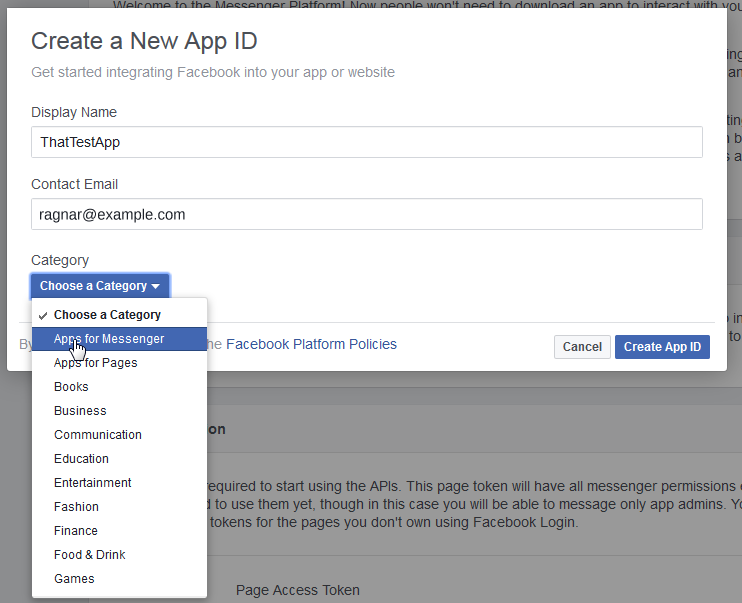
If you didn't choose the Apps for Messenger option in this dialog (for example, if you’re creating a test app), then click Add Product in the left navbar, choose Messenger from the Product Setup page, and then click Get Started.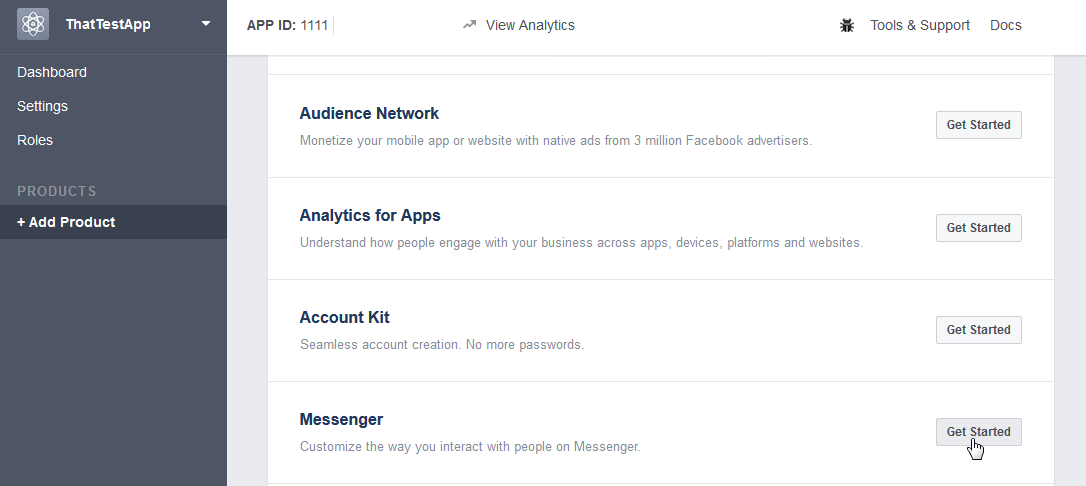
Note:
You’ll need the App Secret to complete your Facebook channel configuration in the Bot Builder.
-
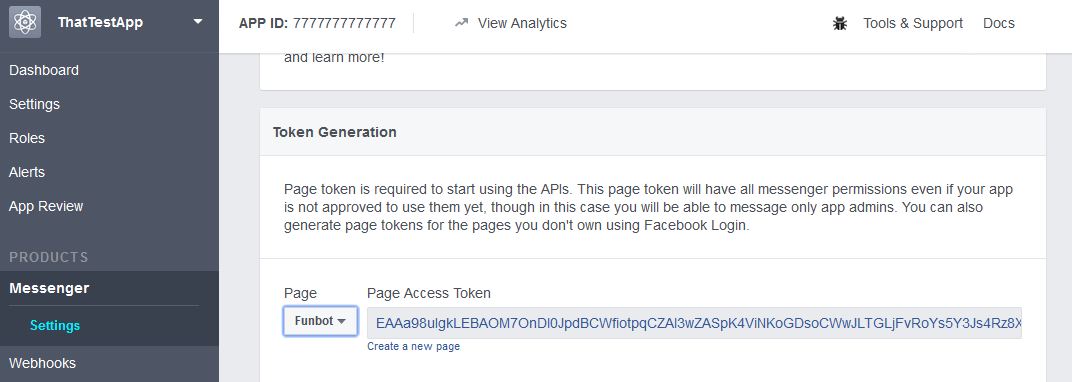
In the Dashboard for your app, generate the Page Access Token by selecting your Facebook page. You’ll use this token, which gives your Facebook App access to Facebook’s Messaging API, to complete your channel definition.
Step 2: Add the Facebook Keys
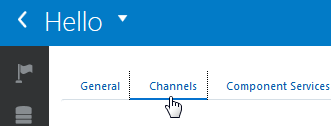
- In Bots, click Settings (
 ) in the left navbar and then choose the Channels tab.
-
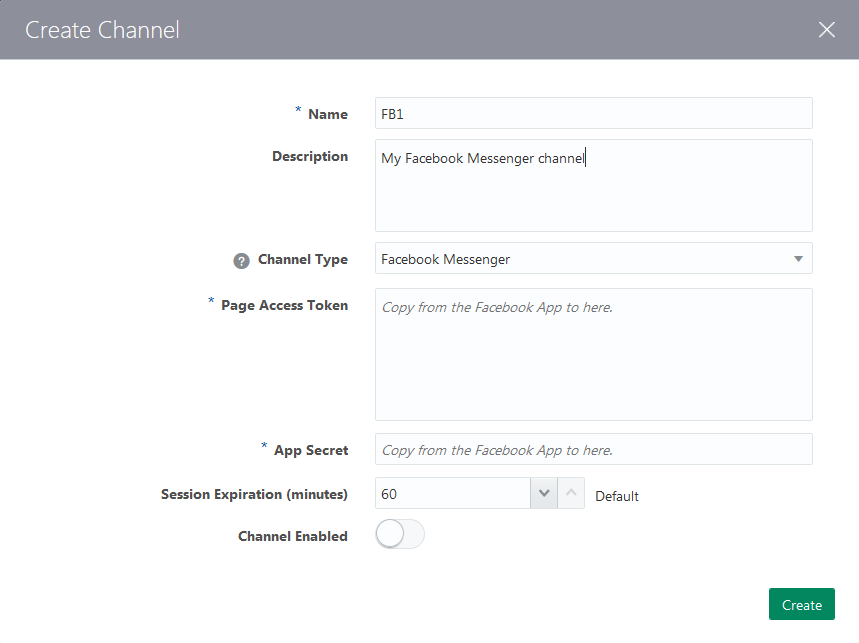
Next, click Add Channel to open the Create Channel dialog.
-
Give your channel a name.
-
Choose Facebook Messenger as the channel type.
-
Copy and the Page Access Token from Facebook and paste it into the Page Access Token field in the Create Channel Dialog. You can find this key in the Facebook Messenger Platform settings page.

-
Copy the App Secret —You can find this in the Facebook Messenger Platform dashboard for your Facebook App.

-
Click Create.
-
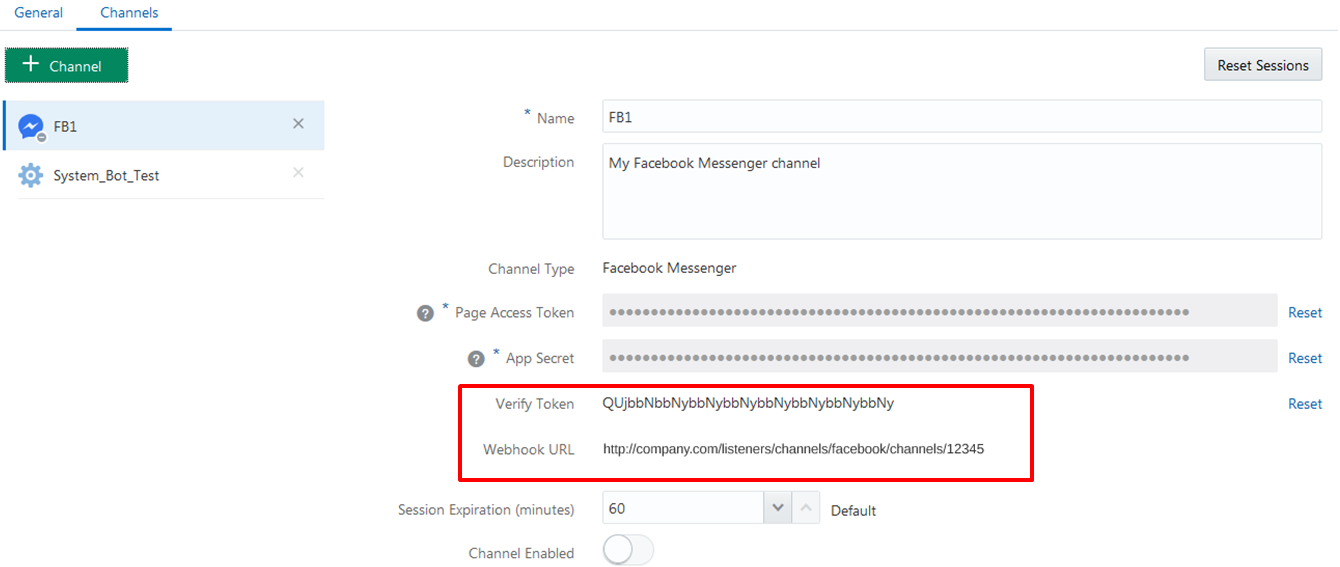
In the Channels page, note the Verify Token and WebHook URL. You’ll need these to configure the Facebook webhook.
Step 3: Configure the Facebook Messenger Webhook
-
In Facebook Messenger, be sure that you’ve selected the project that you initially created for the webhook.
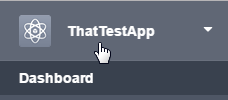
-
Click Messenger and then choose Settings .
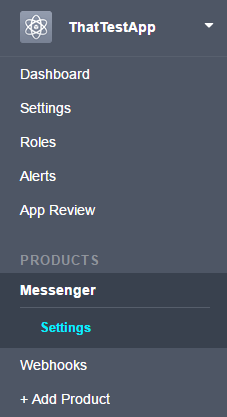
-
Click Setup Webhooks to open the New Page Subscription dialog.
-
Copy the Webhook URL from the Bots Channels page and paste it in the CallBack URL field in the New Page Subscription dialog.
-
Copy the Verify Token generated by Bots and paste it into the Verify Token field.
-
Subscribe to only the messages and messaging_postbacks callback events. The
messagesevent is triggered whenever someone sends a message to your Facebook page.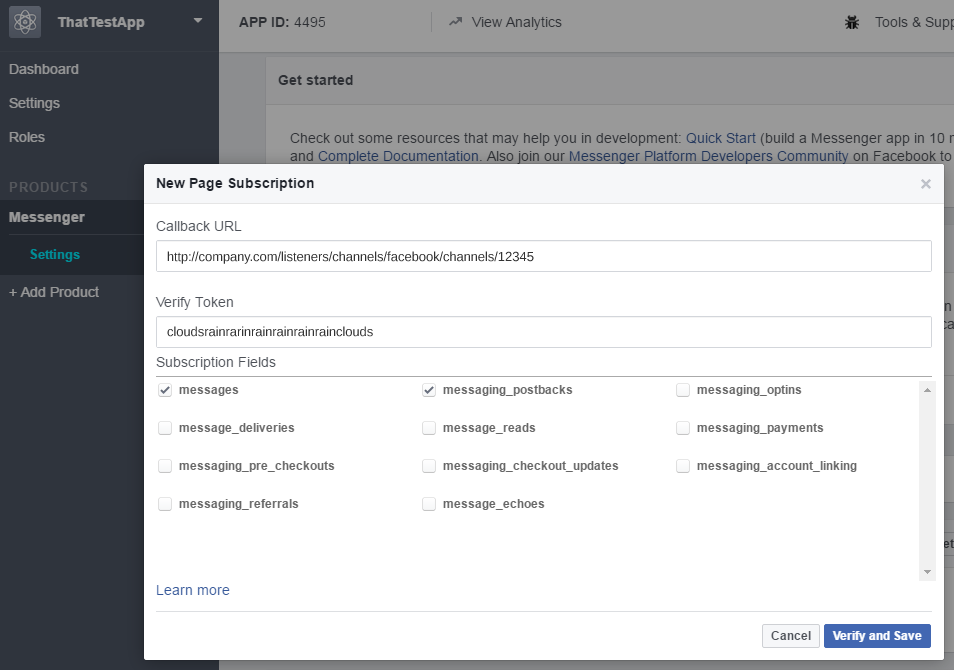
-
Subscribe to the page:
-
Choose your bot’s Facebook page.
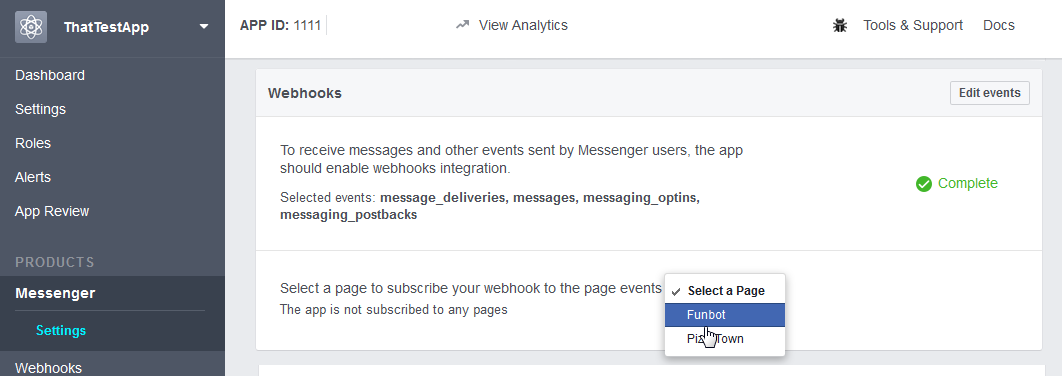
-
Click Subscribe.

Tip:
You might need to bounce your webhook by first clicking Unsubscribe then Subscribe.
-
Step 4: Enable the Facebook Channel
With the configuration complete, you’re ready to activate the Facebook channel by switching on Channel Enabled in Bots. You can now test out your bot.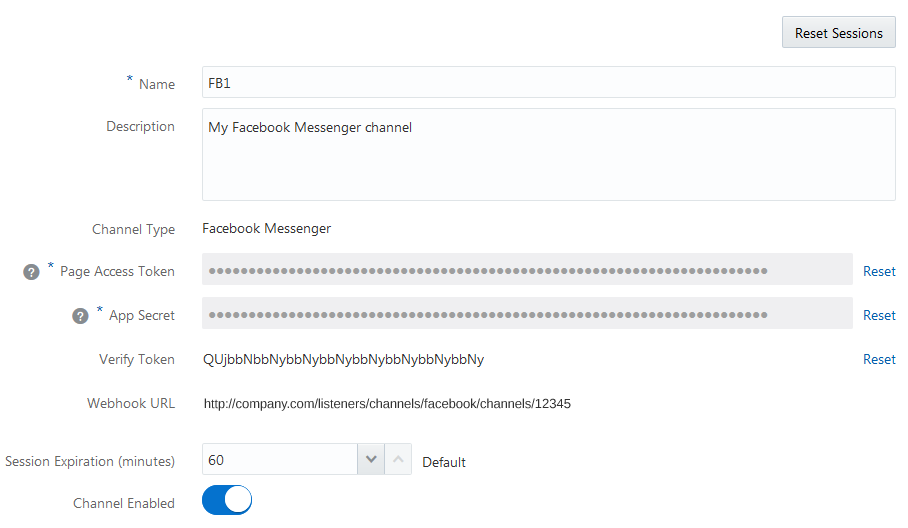
Step 5: Testing Your Bot on Facebook Messenger
With the Facebook Channel and messaging configuration complete, you can test your simultaneously using your Facebook page, Facebook Messenger (https://www.messenger.com/) and the Facebook Messenger app on your phone (![]() ). Once you locate your bot in the search, you’re ready to start chatting with it. You can see the changes that you make to the dialog flow in real time.
). Once you locate your bot in the search, you’re ready to start chatting with it. You can see the changes that you make to the dialog flow in real time.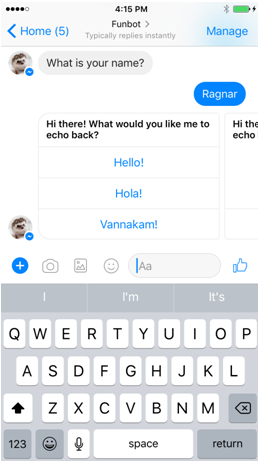
Running Your Bot on Other Messaging Services
To allow your bot to talk to users who aren’t subscribed to Facebook Messenger, you need to configure the Webhook channel.
-
A publicly accessible HTTP messaging server that relays messages between the user device and your bot using a webhook.
You implement this webhook with:
-
A POST call that enables the server to receive messages from your bot.
-
A POST call that enables the server to send messages to your bot.
-
-
Because your bot needs to know where to send its message, you need the URI of the webhook call that receives your bot’s messages.
-
Likewise, the message server needs to know how to find your bot, so you need the Webhook URL that’s generated for your bot after you complete the Create Channel dialog.
-
Set up the server.
-
To receive messages from your bot, publish the POST call on the server.
-
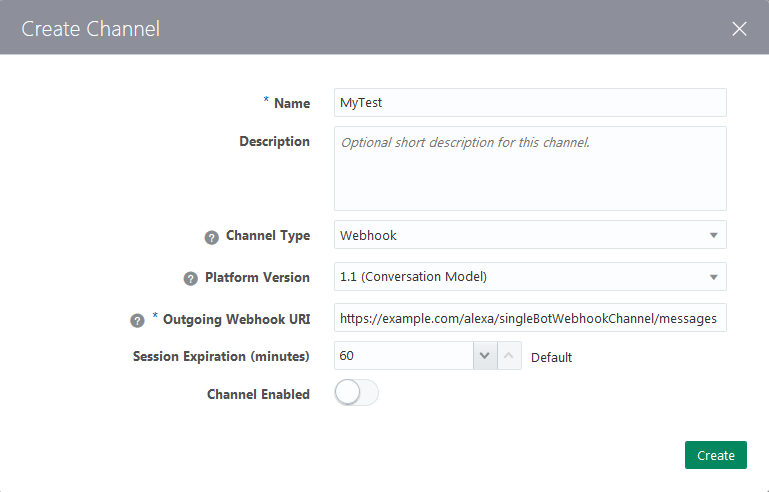
In the Create Channel dialog, enter a name and then:
-
Choose Webhook as the channel type.
-
Set Platform Version to 1.1 (Conversation Model).
-
Register the server as the recipient of your bot’s messages by entering the URI to this POST call in the Outgoing Webhook URI field.
-
If needed, enter the session expiry and switch on Channel Enabled.
-
-
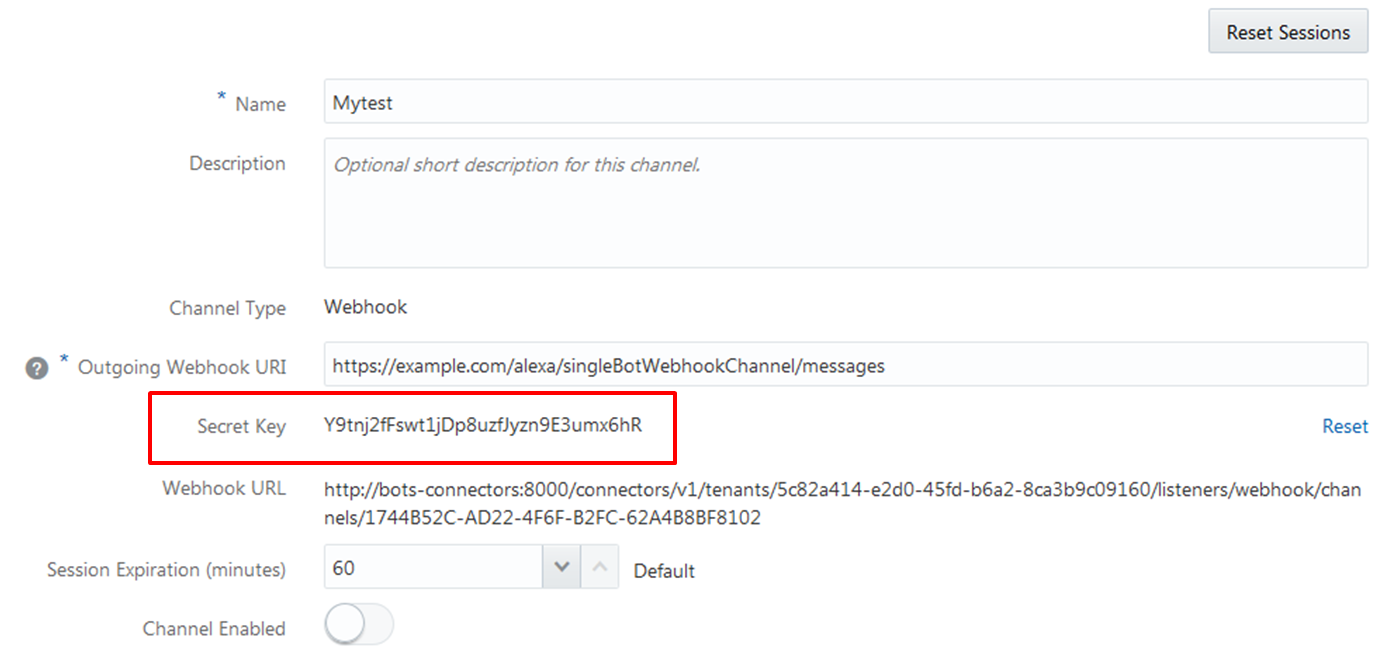
After you click Create, Bots generates the webhook URL for your bot and its Secret Key for encrypting messages. Keep the webhook URL handy, because it’s the pointer that your messaging server needs to send messages back to your bot.
-
On your server, publish the second POST API, one that sends messages to your bot using the webhook URL.
-
Switch the Channel Enabled option on.
Outbound Messages
You need to publish the calls in the JSON format that Bots expects, along with the authorization header.
-
An
X-Hub-Signatureheader containing the SHA256 value of the payload, calculated using the Secret Key as the key.Note:
Bots uses theX-Hub-Signatureheader to allow the recipient to authenticate your bot as the sender and validate the integrity of the payload. -
A JSON payload containing the
userID, a unique identifier that’s specified by the inbound message, thetype, which can betext,attachment, andcard. As shown in the following examples, both thetextandcardresponse types can have associated actions. Any of the response types can also include global actions.Response Type Example Payload text{ "userId":"22343248763458761287 "messagePayload": { "type": "text", "text": "Hello, how are you?" } }The following snippet show atextresponse with actions:{ "userId":"22343248763458761287 "messagePayload": { "type": "text", "text": "What do you want to do?", "actions": [ { "type": "postback", "label": "Order Pizza", "postback": { "state": "askAction", "action": "orderPizza" } }, { "type": "postback", "label": "Cancel A Previous Order", "postback": { "state": "askAction", "action": "cancelOrder" } ] } }card... { "type": "card", "layout": "horiztonal", "cards": [ { "title": "Hawaiian Pizza", "description": "Ham and pineapple on thin crust", "actions": [ { "type": "postback", "label": "Order Small", "postback": { "state": "GetOrder", "variables": { "pizzaType": "hawaiian", "pizzaCrust": "thin", "pizzaSize": "small" } } }, { "type": "postback", "label": "Order Large", "postback": { "state": "GetOrder", "variables": { "pizzaType": "hawaiian", "pizzaCrust": "thin", "pizzaSize": "large" } } } ] }, { "title": "Cheese Pizza", "description": "Cheese pizza (i.e. pizza with NO toppings) on thick crust", "actions": [ { "type": "postback", "label": "Order Small", "postback": { "state": "GetOrder", "variables": { "pizzaType": "cheese", "pizzaCrust": "thick", "pizzaSize": "small" } } }, { "type": "postback", "label": "Order Large", "postback": { "state": "GetOrder", "variables": { "pizzaType": "cheese", "pizzaCrust": "thick", "pizzaSize": "large" } } } ] } ], "globalActions": [ { "type": "call", "label": "Call for Help", "phoneNumber": "123456789" } ] }attachmentThe attachment response type can an image, audio file, or a video: ... { "type": "attachment", "attachment": { "type": "video", "url": "https://www.youtube.com/watch?v=CMNry4PE93Y" } }
Inbound Messages
-
An
X-Hub-Signatureheader containing the SHA256 value of the payload. The call includes functions that create this hash using Secret Key as the key.const body = Buffer.from(JSON.stringify(messageToBot), 'utf8'); const headers = {}; headers['Content-Type'] = 'application/json; charset=utf-8'; headers['X-Hub-Signature'] = buildSignatureHeader(body, channelSecretKey); ... function buildSignatureHeader(buf, channelSecretKey) { return 'sha256=' + buildSignature(buf, channelSecretKey); } function buildSignature(buf, channelSecretKey) { const hmac = crypto.createHmac('sha256', Buffer.from(channelSecretKey, 'utf8')); hmac.update(buf); return hmac.digest('hex'); } -
A JSON obect with
userId,userProfile, andmessagePayloadproperties:{ "userid: "33c0bcBc8e-378c-4496-bc2a-b2b9647de2317" "userProfile": { "firstName": "Bob", "lastName": "Franklin", "age": 45 }, "messagePayload: {....} }Property Description Type Required? userIdA unique identifier for the user. This ID is specific to the caller. String Yes userProfileProperties that represent the user, like firstNameandLastName.JSON object No messagePayloadThe messagePayloadcan betext,postback,attachment, andlocation:-
text{ "type": "text", "text": hello, world!" } -
postback{ "type": "postback", "postback": { "state": "orderPizza", "action": "deliverPizza", "variables": { "pizzaSize": "Large", "pizzaCrust": "Thin", "pizzaType": "Hawaiian" } } } -
attachment{ "type": "attachment", "attachment": { "type": "image", "url": "https://image.freepik.com/free-icon/attachment-tool-ios-7-interface-symbol_318-35539.jpg" } } -
location{ "type": "location", "location": { "longitude": -122.265987 "latitude": 37.529818 } }
JSON object Yes -
Running Your Bot Within Client Messaging Apps and Web Pages
We provide SDKs that enable you to integrate your bot with iOS apps, Android apps, and web pages. For any of these integrations, you need to generate the App Id by creating a Web, iOS, or Android channel.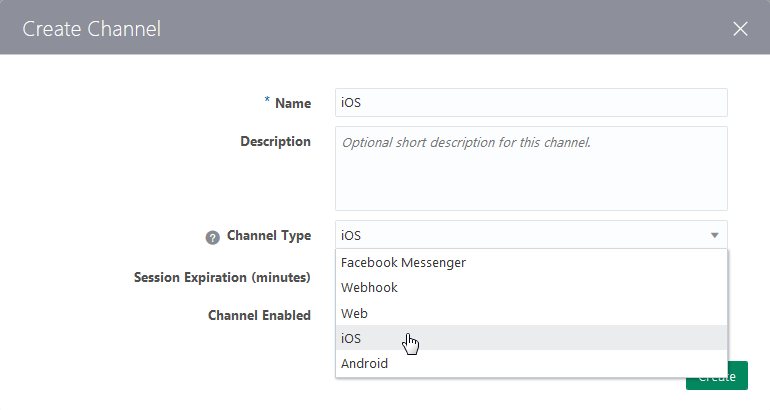
After you create the App Id, you copy and paste it into the client app code or, if you’re integrating your bot into a web page, the <script> tag.
Bots Client SDKs
Bots Client SDK for Android
Adding the Bots Client SDK for Android to Your App
The Bots Client SDK for Android library is distributed in both AAR and JAR formats. If you are using Android Studio, follow the instructions for installation of the AAR package.
Note:
Compile your app using API Level 26 (Android Oreo) or higher. Level 19 (Android 4.4, Kitkat) is the lowest version that can support the Bots client SDK for Android. If your app needs to support even earlier versions, keep in mind that we haven’t tested these and therefore can’t guarantee their compatibility.Adding the SDK and AAR Files
-
Download the Bots Client SDK for Android 18.2.3.0 module from the Oracle Technology Network’s Oracle Mobile Cloud Enterprise download page.
-
Import the core and UI files (
bots-client-sdk-android-core-v18.2.3.aarandbots-client-sdk-android-ui-v18.2.3.aarinto your Android Studio project by going to File > New > New Module > Import .JAR/.AAR Package. -
Add the following lines to the project’s
build.gradlefile:compile project(':bots-client-sdk-android-core-1.2.1') compile project(':bots-client-sdk-android-ui-1.2.1') compile 'com.google.firebase:firebase-messaging:11.0.4' compile 'com.google.firebase:firebase-core:11.0.4' compile 'com.google.code.gson:gson:2.4' compile 'com.squareup.okhttp3:okhttp:3.4.1' compile 'com.android.support:support-annotations:26.0.2' compile 'com.android.support:appcompat-v7:26.0.2' compile 'com.android.support:recyclerview-v7:26.0.2' compile 'com.nostra13.universalimageloader:universal-image-loader:1.9.5' compile 'com.davemorrissey.labs:subsampling-scale-image-view:3.5.0' compile 'com.google.android.gms:play-services-location:11.0.4'
Initialize the Bots Android SDK in Your App
Before your code can invoke the SDK’s functionality, you’ll have to initialize the library using your app’s ID.
To get this unique ID, first click Add Channel to open the Add Channel dialog. Complete the dialog by adding a channel name and then choosing Android as the channel type. After you click OK, Bots generates the App ID.
Bots.init(this, new Settings("YOUR_APP_ID"), newBotsCallback() {
     @Override
     public void run(Response response) {
          // Your code after init is complete
    }
});
Note:
Make sure to replaceYOUR_APP_ID with your app ID.
package your.package;

import android.app.Application;
import oracle.cloud.mobile.core.Bots;

public class YourApplication extends Application {
    @Override
    public void onCreate() {
        super.onCreate();
        Bots.init(this, new Settings("YOUR_APP_ID"), new BotsCallback() {
            @Override
            public void run(Response response) {
                // Your code after init is complete
            }
        });
    }
Note:
You need to declare this in theApplication class because it’s the class that’s required by Bots.init(this, new Settings("YOUR_APP_ID"). If you declare this class elsewhere (say, AppCompatActivity), then add the following snippet, which uses getApplication() as the first argument: @Override
protected void onCreate(Bundle savedInstanceState) {
super.onCreate(savedInstanceState);
Bots.init(getApplication(), new Settings("YOUR_APP_ID"), new BotsCallback() {
@Override
public void run(Response response) {
// Your code after init is complete
}
});
} <application> tag in your AndroidManifest file.<application
android:name="your.package.YourApplication">
...
</application>Note:
Remember to replaceyour.package, YourApplication, YOUR_APP_ID with the appropriate names and the App Id for the Android channel.
Displaying the Bots Android SDK User Interface
Once you’ve initialized Bots Android SDK, you’re ready to try it out.
ConversationActivity.show(getApplicationContext());Calling Other Functions
ConversationActivity class:if (Bots.getInitializationStatus() == InitializationStatus.Success) {
Log.d(TAG,"Already Initialized with App ID "+ mAppID);
User.getCurrentUser().setFirstName("John");
User.getCurrentUser().setLastName("Smith");
User.getCurrentUser().setEmail("john.smith@example.com");
User.getCurrentUser().setSignedUpAt(new Date());
final Map<String, Object> customProperties = new HashMap<>();
customProperties.put("premiumUser", true);
customProperties.put("numberOfPurchases", 20);
customProperties.put("itemsInCart", 3);
customProperties.put("couponCode", "PREM_USR");
User.getCurrentUser().addProperties(customProperties);
ConversationActivity.show(getApplicationContext(), Intent.FLAG_ACTIVITY_NEW_TASK);
}Replacing the FileProvider
If you do not have a FileProvider entry in your AndroidManifest.xml file, you can safely ignore this section. These steps will fix the Manifest merger failed : Attribute provider#android.support.v4.content.FileProvider@authorities compile error
-
Add
tools:replace="android:authorities"to the<provider>entry. -
Add the following path to your android.support.FILE_PROVIDER_PATHS resource file:
<external-path name="dcim" path="DCIM"/> -
When initializing the SDK, call
settings.setFileProviderAuthorities(authoritiesString);on the settings object.Settings settings = new Settings(appId); settings.setFileProviderAuthorities(authoritiesString); Bots.init(this, settings, myInitCallback);
Localization
Every string you see in Bots can be customized and localized. Bots provides a few languages out of the box, but adding new languages is easy to do. When localizing strings, Bots looks for values in the strings.xml in your app first then in the Bots UI bundle, enabling you to customize any strings and add support for other languages.
Adding More Languages
To enable other languages beside the provided ones, first copy the English strings.xml file from the Bots UI bundle to the corresponding values folder for that language. Then, translate the values to match that language.
Customization
Strings Customization
Bots lets you customize any strings it displays by overwriting its keys. To do this, simply add res/values-<your-language-code>/strings.xml file in your Android project and specify new values for the keys used in Bots. You can find all of the available keys by browsing to the artifacts:bots-client-sdk-android-ui-x.x.x/res/values/values.xml file in the External Libraries in Android Studio.
Dates shown in the conversation view are already localized to the user’s device.
res/values-en/strings.xml and include the following in that file:<resources>
<string name="Bots_activityConversation">Messages</string>
<string name="Bots_startOfConversation">This is the start of your conversation with the team.</string>
<string name="Bots_welcome">Feel free to leave us a message about anything that\'s on your mind.</string>
<string name="Bots_messageHint">Type a message…</string>
</resources>Note:
if you want to specify new strings for the default fallback language, you must override them in theres/values/string.xml file.
Styling the Conversation Interface
Using a colors.xml file in your res/values folder, you can change the colors used by Bots:
<resources>
<color name="Bots_accent">#9200aa</color>
<color name="Bots_accentDark">#76008a</color>
<color name="Bots_accentLight">#be7cca</color>

<color name="Bots_backgroundInput">#ffffff</color>

<color name="Bots_btnSendHollow">#c0c0c0</color>
<color name="Bots_btnSendHollowBorder">#303030</color>

<color name="Bots_header">#989898</color>

<color name="Bots_messageDate">@color/Bots_header</color>
<color name="Bots_messageShadow">#7f999999</color>

<color name="Bots_remoteMessageAuthor">@color/Bots_header</color>
<color name="Bots_remoteMessageBackground">#ffffff</color>
<color name="Bots_remoteMessageBorder">#d9d9d9</color>
<color name="Bots_remoteMessageText">#000000</color>

<color name="Bots_userMessageBackground">@color/Bots_accent</color>
<color name="Bots_userMessageBorder">@color/Bots_accentDark</color>
<color name="Bots_userMessageFailedBackground">@color/Bots_accentLight</color>
<color name="Bots_userMessageText">#ffffff</color>
</resources>bots_btn_send_normal.pngPermissions
<uses-permission android:name="android.permission.ACCESS_NETWORK_STATE"/>
<uses-permission android:name="android.permission.INTERNET"/>
<uses-permission android:name="android.permission.VIBRATE"/>
<uses-permission android:name="android.permission.WRITE_EXTERNAL_STORAGE"/>
<uses-permission android:name="android.permission.ACCESS_FINE_LOCATION"/>-
WRITE_EXTERNAL_STORAGE is used to take photos and to store downloaded pictures locally to avoid needless re-downloading.
-
ACCESS_FINE_LOCATION is used in order to access the customer’s location when requested using location request buttons.
ACCESS_FINE_LOCATION using the following override:<uses-permission android:name="android.permission.ACCESS_FINE_LOCATION" tools:node="remove" />Bots Client SDK for iOS
Adding the Bots Client SDK for iOS to Your App
-
Download the Bots Client SDK for iOS 18.2.3.0 module from the Oracle Technology Network’s Oracle Mobile Cloud Enterprise download page.
-
Unzip the file. This creates a directory called
Bots.framework(the framework). -
Add the framework to your Xcode project by selecting File > Add Files to My_Project and then selecting
Bots.frameworkin the file picker. -
In your project settings, add
Bots.frameworkto the list of Embedded Binaries in the General tab for your application target.You can now import the framework (
#import <Bots/Bots.h>) and start using it in your code.
Import the Bots Header File
Import the Bots file into the your app delegate’s .m file and any other places you plan to use it.
-
Objective-C:
#import <Bots/Bots.h> -
Swift:
import Bots
Add Required Keys in Your App’s info.plist
The Bots Client SDK for iOS may need to ask users permission to use certain features. Depending on the feature, you must provide a description in your app’s Info.plist to explain why access is required. These descriptions will be displayed the moment it prompts the user for permission.
Images
-
NSCameraUsageDescription—Describes the reason your app accesses the camera (for example: camera permission is required to send images to${PRODUCT_NAME}). For more information, see the iOS documentation aboutNSCameraUsageDescription. -
NSPhotoLibraryUsageDescription—Describes the reason your app accesses the photo library (for example: photo library permission is required to send images to${PRODUCT_NAME}). For more information, see the iOS documentation aboutNSPhotoLibraryUsageDescription.
Note:
Beginning with iOS 10, these values are required. If they are not present in your app'sInfo.plist, the option to send an image will not be displayed.
Location
-
NSLocationWhenInUseUsageDescription—Describes the reason for your app to access the user’s location information while your app is in use (for example: location services is required to send your current location to${PRODUCT_NAME}). This permission is recommended if your app does not use location services. The SDK will default to it if both keys are included. See the iOS documentation aboutNSLocationWhenInUseUsageDescription. -
NSLocationAlwaysUsageDescription—Describes the reason for your app to access the user’s location information at all times (for example: location services is required to send your current location to${PRODUCT_NAME}). See the iOS documentation aboutNSLocationAlwaysUsageDescription.
Note:
If you don't provide one of these keys, any attempt from the user to send their current location will fail.Initialize the Bots Client SDK for iOS in Your App
YOUR APP ID in the applicationDidFinishLaunchingWithOptions: method:
-
Objective-C
[Bots initWithSettings:[OMCSettings settingsWithAppId:@"YOUR_APP_ID"] completionHandler:^(NSError * _Nullable error, NSDictionary * _Nullable userInfo) { // Your code after init is complete }]; -
Swift:
Bots.initWith(OMCSettings(appId: "YOUR_APP_ID")) { (error: Error?, userInfo: [AnyHashable : Any]?) in// Your code after init is complete}
-
Objective-C:
[Bots show]; -
Swift:
Bots.show();
Calling Other Functions
// Update first name and last name
   [Bots setUserFirstName:@"John"
           lastName:@"Smith"];

// Update email address
[OMCUser currentUser].email = @"john.smith@example.com";Localization of iOS Apps
Every string you see in your bot can be customized and localized. Bots provides a few languages out of the box, but adding new languages is easy to do. When localizing strings, Bots looks for BotsLocalizable.strings in your app bundle first then in the Bots bundle, enabling you to customize any strings and add support for other languages.
Enabling Localization in Your iOS App
For Bots to display a language other than English, your app needs to first enable support for that language. You can enable a second language in your Xcode project settings: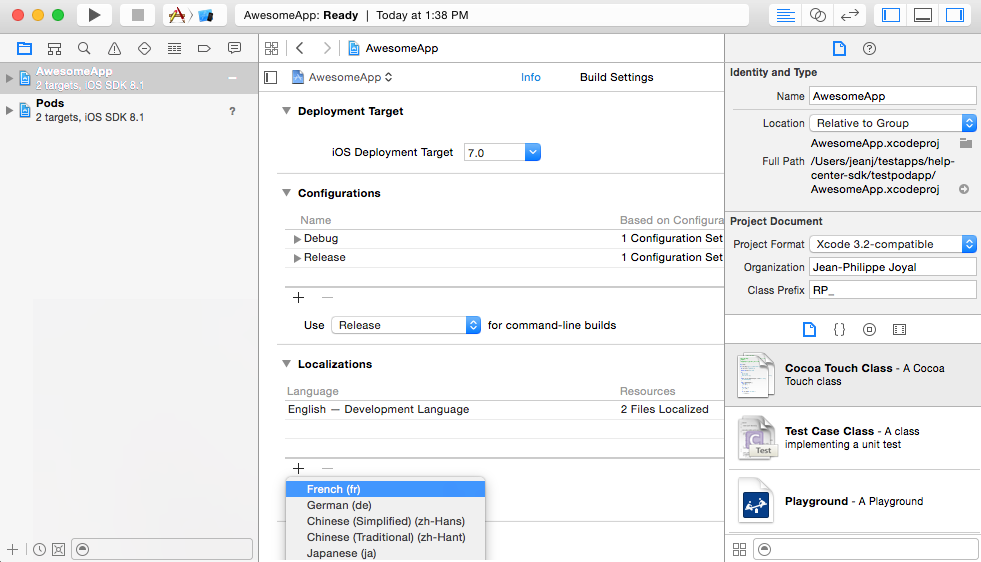
Once you have this, Bots will display itself in the device language for the supported language.
Note:
Localization is subject to caching. If you can't see your changes, cleaning your project, resetting the simulator, deleting your app from your test devices are good measures.Customization
Strings Customization
BotsLocalizable.strings in your Xcode project and specify new values for the keys you would like to override. For example, to change the “Messages” header, and the “Done” button create a file with these contents:"Messages" = "My Messages"
"Done" = "I'm Done"BotsLocalizable.strings file in Xcode.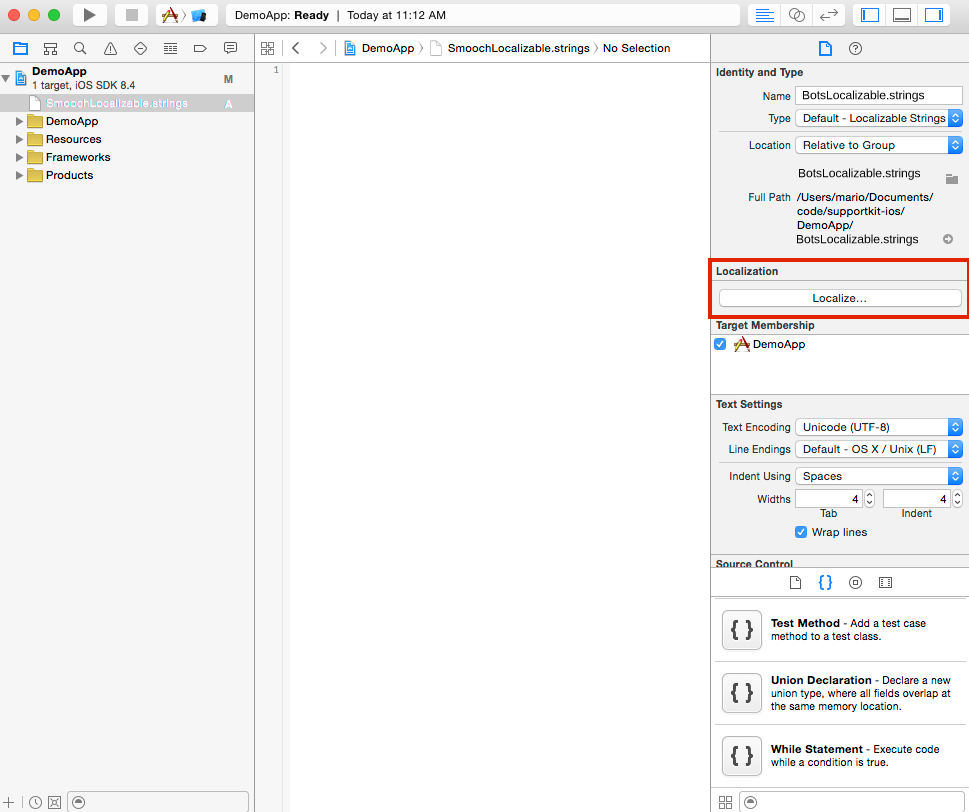
The BotsLocalizable.strings File
/* Nav bar button, action sheet cancel button */
"Cancel" = "...";

/* Conversation title */
"Messages" = "...";

/* Conversation header. Uses CFBundleDisplayName */
"This is the start of your conversation with the %@ team. We'll stay in touch to help you get the most out of your app.\nFeel free to leave us a message about anything that’s on your mind. We’ll get back to your questions, suggestions or anything else as soon as we can." = "...";

/* Conversation header when there are previous messages */
"Show more..." = "...";

/* Conversation header when fetching previous messages */
"Retrieving history..." = "...";

/* Error message shown in conversation view */
"No Internet connection" = "...";

/* Error message shown in conversation view */
"Could not connect to server" = "...";

/* Error message shown in conversation view */
"An error occurred while processing your action. Please try again." = "...";

/* Error message shown in conversation view */
"Reconnecting..." = "...";

/* Fallback used by the in app notification when no message author name is found */
"%@ Team" = "...";

/* Conversation send button */
"Send" = "...";

/* Conversation text input place holder */
"Type a message..." = "...";

/* Conversation nav bar left button */
"Done" = "...";

/* Failure text for chat messages that fail to upload */
"Message not delivered. Tap to retry." = "...";

/* Status text for chat messages */
"Sending..." = "...";

/* Status text for sent chat messages */
"Delivered" = "...";

/* Status text for chat messages seen by the appMaker */
"Seen" = "...";

/* Timestamp text for recent messages */
"Just now" = "...";

/* Timestamp text for messages in the last hour */
"%.0fm ago" = "...";

/* Timestamp text for messages in the last day */
"%.0fh ago" = "...";

/* Timestamp text for messages in the last week */
"%.0fd ago" = "...";

/* Action sheet button label */
"Take Photo" = "...";

/* Action sheet button label */
"Use Last Photo Taken" = "...";

/* Action sheet button label */
"Choose from Library" = "...";

/* Photo confirmation alert title */
"Confirm Photo" = "...";

/* Action sheet button label */
"Resend" = "...";

/* Action sheet button label */
"View Image" = "...";

/* Error displayed in message bubble if image failed to download */
"Tap to reload image" = "...";

/* Error displayed as message if location sending fails */
"Could not send location" = "...";

/* Error title when user selects "use latest photo", but no photos exist */
"No Photos Found" = "...";

/* Error description when user selects "use latest photo", but no photos exist */
"Your photo library seems to be empty." = "...";

/* Error title when user attempts to upload a photo but Photos access is denied */
"Can't Access Photos" = "...";

/* Error description when user attempts to upload a photo but Photos access is denied */
"Make sure to allow photos access for this app in your privacy settings." = "...";

/* Error title when user attempts to take a photo but camera access is denied */
"Can't Access Camera" = "...";

/* Error description when user attempts to take a photo but camera access is denied */
"Make sure to allow camera access for this app in your privacy settings." = "...";

/* Generic error title when user attempts to upload an image and it fails for an unknown reason */
"Can't Retrieve Photo" = "...";

/* Generic error description when user attempts to upload an image and it fails for an unknown reason */
"Please try again or select a new photo." = "...";

/* Error title when user attempts to send the current location but location access is denied */
"Can't Access Location" = "...";

/* Error description when user attempts to send the current location but location access is denied */
"Make sure to allow location access for this app in your privacy settings." = "...";

/* UIAlertView button title to link to Settings app */
"Settings" = "...";

/* UIAlertView button title to dismiss */
"Dismiss" = "...";

/* Title for payment button */
"Pay Now" = "...";

/* Title for message action when payment completed */
"Payment Completed" = "...";

/*
 Instructions for entering credit card info. Parameters are as follows:
 1. Amount (e.g. 50.45)
 2. Currency (e.g. USD)
 3. App name (Uses CFBundleDisplayName)
*/
"Enter your credit card to send $%@ %@ securely to %@" = "...";

/* Error text when payment fails */
"An error occurred while processing the card. Please try again or use a different card." = "...";

/* Button label for saved credit card view */
"Change Credit Card" = "...";

/*
 Information label for saved credit card view. Parameters are as follows:
 1. Amount (e.g. 50.45)
 2. Currency (e.g. USD)
 3. App name (Uses CFBundleDisplayName)
 */
"You're about to send $%@ %@ securely to %@" = "...";

/* Title for user notification action */
"Reply" = "...";

/* Date format used for message grouping headers on the conversation screen */
"MMMM d, h:mm a" = "MMMM d, h:mm a";

/* Date format used for message timestamps on the conversation screen */
"hh:mm a" = "hh:mm a";

/* Error message when the content of a webview fails to load */
"Failed to open the page" = "...";
Styling the Conversation Interface
-
Using the
UIAppearanceproxy ofUINavigationBarto style the navigation bar’s color and appearance. -
The
OMCSettingsclass provides access to the status bar and the color of the message bubbles.
UINavigationBar's appearance proxy to set up the navigation bar. Then, you’d use OMCSettings to finish styling the UI:
-
Objective C
OMCSettings* settings = [OMCSettings settingsWithAppId:@"YOUR_APP_ID"]; settings.conversationAccentColor = [UIColor redColor]; settings.conversationStatusBarStyle = UIStatusBarStyleLightContent; [[UINavigationBar appearance] setBarTintColor:[UIColor blackColor]]; [[UINavigationBar appearance] setTintColor:[UIColor redColor]]; [[UINavigationBar appearance] setTitleTextAttributes:@{ NSForegroundColorAttributeName : [UIColor redColor] }]; - Swift
var settings = OMCSettings(appId: "YOUR_APP_ID");
settings.conversationAccentColor = UIColor.red();
settings.conversationStatusBarStyle = UIStatusBarStyle.LightContent
UINavigationBar.appearance().barTintColor = UIColor.black();
UINavigationBar.appearance().tintColor = UIColor.red();
UINavigationBar.appearance().titleTextAttributes = [ NSForegroundColorAttributeName : UIColor.red()];
Bots Client SDK for JavaScript
Configuring the Library
The Bots library is composed of multiple assets that get fetched at runtime for better performance. For that reason, the public path (the URL where the static files are hosted) is hardcoded in multiple places.
./configure Setup Examples
Local Testing Setup
http://localhost:8000/static/ and you run the following script from the /home/your-name/ folder:./configure http://localhost:8000/static//home/your-name/http:__localhost:8000_static_/.
Production Setup
https://cdn.acme.org/ and you run the following script from the /home/your-name/ folder:./configure https://cdn.acme.org//home/your-name/https:__cdn.acme.org_/.
Deploying the SDK Files
-
Download the Bots Client SDK for JavaScript 18.2.3.0 module from the Oracle Technology Network’s Oracle Mobile Cloud Enterprise download page.
-
Put all of the files from the generated folder at the root of the storage within
https://placeholder.public.path/. For example if your files are hosted athttp://localhost:8000/static/, copy all the files to thestaticfolder on your local server. -
If your storage is behind a CDN (Content Delivery Network), issue a cache invalidation for
https://placeholder.public.path/loader.json. -
Make sure your server allows CORS requests.
-
Test your deployment by initializing the SDK as described in Adding Bots Client SDK for JavaScript to Your Site.
Adding Bots Client SDK for JavaScript to Your Site
You include the Bots Client SDK for JavaScript by editing the <script> tag. You need an App Id to do this, so if don’t have one already for the Web channel, start off by clicking Add Channel. In the Create Channel dialog, add a name for the channel and then choose Web as the channel type. When you click Create, Bots generates the App Id. You then substitute this value for <app-id> in the code.
Updating the Script Tag
Step 1: Include the Bots Client SDK for JavaScript in Your Web Page
head section on your page and replace <sdk-folder-url> with the URL where the SDK is hosted. <script>
!function(e,t,n,r){
function s(){
try{
var e;
if((e="string"==typeof this.response?JSON.parse(this.response):this.response).url){
var n=t.getElementsByTagName("script")[0],r=t.createElement("script");
r.async=!0,r.src=e.url,n.parentNode.insertBefore(r,n)
}
}
catch(e){}}var o,p,a,i=[],c=[];e[n]={init:function(){o=arguments;
var e={then:function(t){
return c.push({type:"t",next:t}),e
} ,catch:function(t){return c.push({type:"c",next:t}),e}};
return e},on:function(){
i.push(arguments)},render:function(){p=arguments},destroy:function(){a=arguments}
} ,e.__onWebMessengerHostReady__=function(t){
if(delete e.__onWebMessengerHostReady__,e[n]=t,o)for(var r=t.init.apply(t,o),s=0;s<c.length;s++){
var u=c[s];
r="t"===u.type?r.then(u.next):r.catch(u.next)
} p&&t.render.apply(t,p),a&&t.destroy.apply(t,a);
for(s=0;s<i.length;s++)t.on.apply(t,i[s])};
var u=new XMLHttpRequest;u.addEventListener("load",s),u.open("GET",r+"/loader.json",!0),u.responseType="json",u.send()
}
(window,document,"Bots", "<sdk-folder-url>");
</script>Step 2: Initialize the Bots Client SDK for JavaScript with Your New App ID
body section of your page. and replace <app-id> with your App Id for the Web channel found in your app settings page.<script>
Bots.init({appId:'<app-id>'});
</script>Customization
Embedded Mode
Bots.init. By doing so, you are disabling the auto-rendering mechanism and you will need to call Bots.render manually. This method accepts a DOM element which will be used as the container where the widget will be rendered.Bots.init({
appId: '<app-id>',
embedded: true
});
Bots.render(document.getElementById('chat-container'));Note:
The embedded widget will take full width and height of the container. You must give it a height, otherwise, the widget will collapse.Strings Customization
Bots lets you customize any strings it displays by overwriting its keys. Simply add the customText key in your Bots.init() call and specify new values for the keys used in Bots. You can find all available keys here. If some text is between {}, or if there is an html tag such as <a>, it needs to stay in your customized text.
Bots.init({
    appId: <'app-id'>,
    customText: {
        actionPostbackError: 'An error occurred while processing your action. Please try again.',
        clickToRetry: 'Message not delivered. Click to retry.',
        conversationTimestampHeaderFormat: 'MMMM D YYYY, h:mm A',
        fetchHistory: 'Load more',
        fetchingHistory: 'Retrieving history...',
        headerText: 'How can we help?',
        inputPlaceholder: 'Type a message...',
        invalidFileError: 'Only images are supported. Choose a file with a supported extension (jpg, jpeg, png, gif, or bmp).',
        introductionText: 'We\'re here to talk, so ask us anything!',
        locationNotSupported: 'Your browser does not support location services or it’s been disabled. Please type your location instead.',
        locationSecurityRestriction: 'This website cannot access your location. Please type your location instead.',
        locationSendingFailed: 'Could not send location',
        locationServicesDenied: 'This website cannot access your location. Allow access in your settings or type your location instead.',
        messageError: 'An error occurred while sending your message. Please try again.',
        messageIndicatorTitlePlural: '({count}) New messages',
        messageIndicatorTitleSingular: '({count}) New message',
        messageRelativeTimeDay: '{value}d ago',
        messageRelativeTimeHour: '{value}h ago',
        messageRelativeTimeJustNow: 'just now',
        messageRelativeTimeMinute: '{value}m ago',
        messageTimestampFormat: 'hh:mm A',
        messageSending: 'Sending...',
        messageDelivered: 'Delivered',
        sendButtonText: 'Send',
        settingsHeaderText: 'Settings',
        tapToRetry: 'Message not delivered. Tap to retry.',
        unsupportedMessageType: 'Unsupported message type.',
        unsupportedActionType: 'Unsupported action type.'
    }
});
Date Localization
locale at initialization time. You might also want to override the timestamp format to match your language.Bots.init({
appId: <'app-id'>,
locale: 'fr-CA',
customText: {
// ...
conversationTimestampHeaderFormat: 'Do MMMM YYYY, hh:mm',
// ...
}
});Note:
Thelocale option only affects date and time localization, not the strings.
Sound Notification
By default, a sound notification will be played when a new message comes in and the window is not in focus.
soundNotificationEnabled option to the Bots.init call, like this:Bots.init({
appId: <'app-id>',
soundNotificationEnabled: false // Add this line to your 'Bots.init' call
});
Creating a Custom User Interface with the Bots Client SDK for JavaScript
<body> and <script> elements of this snippet to enable the app to do the following:
You can see the complete code sample here. This app outputs a simple text message. You can find out how to add more complex message types and actions, see Message Types.
Note:
You need to updateSDK_FOLDER_URL with the URL where the SDK is hosted.
<!DOCTYPE html>
 <html lang="en">
 <head>
   <meta charset="UTF-8">
   <title>Document</title>
 </head>
 <body>
   <script>
     !function(e,t,n,r){
         function s(){try{var e;if((e="string"==typeof this.response?JSON.parse(this.response):this.response).url){var n=t.getElementsByTagName("script")[0],r=t.createElement("script");r.async=!0,r.src=e.url,n.parentNode.insertBefore(r,n)}}catch(e){}}var o,p,a,i=[],c=[];e[n]={init:function(){o=arguments;var e={then:function(t){return c.push({type:"t",next:t}),e},catch:function(t){return c.push({type:"c",next:t}),e}};return e},on:function(){i.push(arguments)},render:function(){p=arguments},destroy:function(){a=arguments}},e.__onWebMessengerHostReady__=function(t){if(delete e.__onWebMessengerHostReady__,e[n]=t,o)for(var r=t.init.apply(t,o),s=0;s<c.length;s++){var u=c[s];r="t"===u.type?r.then(u.next):r.catch(u.next)}p&&t.render.apply(t,p),a&&t.destroy.apply(t,a);for(s=0;s<i.length;s++)t.on.apply(t,i[s])};var u=new XMLHttpRequest;u.addEventListener("load",s),u.open("GET",r+"/loader.json",!0),u.responseType="json",u.send()
     }
(window,document,"Bots", "<SDK_FOLDER_URL>");
 </script>
 </body>
 </html>
Initialize the Bots Client SDK for JavaScript in Embedded Mode
-
Create a container that prevents the widget from displaying. In the
<body>element, define the<div>tag that hides the default widget.<div id="no-display" style="display:none;"></div> -
In the
<script>element, initialize the Bots Client SDK for JavaScript in embedded mode and render the“no-display”element:Bots.init({ appId: appId, embedded: true }); Bots.render(document.getElementById('no-display'));
Fetch the Initial Data
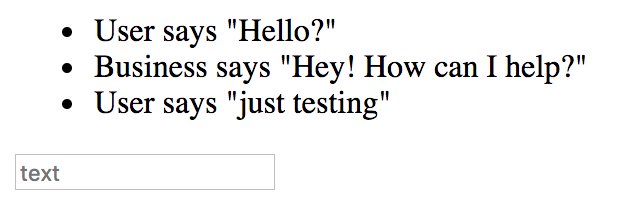
Bots.getConversation method. This method provides access to things like the unread message count and the conversation history.
-
Display the conversation by adding the following tag in the
<body>:<ul id="conversation"></ul> -
Within the
<script>tag, define a function that when called, displays a message in the custom UI.function displayMessage(message) { var conversationElement = document.getElementById('conversation'); var messageElement = document.createElement('li'); messageElement.innerText = message.name + ' says "' + message.text + '"'; conversationElement.appendChild(messageElement); } -
To display the initial conversation state after the initialization of the SDK, replace the
Bots.initcall with the following:Bots.init({ appId: appId, embedded: true }).then(function() { // displays initial messages var conversation = Bots.getConversation(); conversation.messages.forEach(displayMessage); });
Send Messages
-
Create a text input element in the
<body>that allows the widget to accept plain text messages:<input type="text" id="text-input" placeholder="text" -
In the
<script>tag, add the following element that callsBots.sendMessagefunction right after theBots.initcall. When the text input element is active, this function, which enables users to send plain text or structured messages, gets called whenever a user taps Enter:var inputElement = document.getElementById('text-input'); inputElement.onkeyup = function(e) { if (e.key === 'Enter') { Bots.sendMessage(inputElement.value) .then(function() { inputElement.value = ''; }); } }
Receive Messages
Bots.on event interface to bind the message:received event (inbound messages) and the message:sent event (outbound messages) to the displayMessage function. To call this function whenever these message events occur, add the following somewhere after the Bots.init call.Bots.on('message:sent', displayMessage);
Bots.on('message:received', displayMessage);Add Postback Actions
displayMessage function.function displayMessage(message) {
var conversationElement = document.getElementById('conversation');
var messageElement = document.createElement('li');
messageElement.innerText = message.name + ' says "' + message.text + '"';
if(message.actions && message.actions.length > 0){
var wrapperElement = document.createElement('div');
for(var i = 0; i < message.actions.length; i++){
var action = message.actions[i];
var btnElement = createButtonElement(action);
wrapperElement.appendChild(btnElement);
}
messageElement.appendChild(wrapperElement);
}
conversationElement.appendChild(messageElement);
}
function createButtonElement(action) {
var btnElement = document.createElement('button');
var btnTitle = document.createTextNode(action.text);
btnElement.appendChild(btnTitle);
btnElement.onclick = function(e){Bots.triggerPostback(action._id);};
return btnElement;
}Calling Other Functions
updateUser.Bots.updateUser({
"givenName":"John",
"surname":"Smith",
"email": "john.smith@example.com",
"properties": {
"BotsCustomVariable1":"Lord",
"BotsCustomVariable2":"Commander"
}
}).catch(function (err) {
console.error(err);
});Sample Code for the Custom UI
<!DOCTYPE html>
<html lang="en">
<head>
<meta charset="UTF-8">
<title>Document</title>
</head>
<body>
<div id="no-display" style="display:none;"></div>
<p>User ID: <span id="user-id"></span></p>
<ul id="conversation"></ul>
<input type="text" id="text-input" placeholder="text">
<script>
var appId = '<APP_ID>';
!function(e,t,n,r){
function s(){try{var e;if((e="string"==typeof this.response?JSON.parse(this.response):this.response).url){var n=t.getElementsByTagName("script")[0],r=t.createElement("script");r.async=!0,r.src=e.url,n.parentNode.insertBefore(r,n)}}catch(e){}}var o,p,a,i=[],c=[];e[n]={init:function(){o=arguments;var e={then:function(t){return c.push({type:"t",next:t}),e},catch:function(t){return c.push({type:"c",next:t}),e}};return e},on:function(){i.push(arguments)},render:function(){p=arguments},destroy:function(){a=arguments}},e.__onWebMessengerHostReady__=function(t){if(delete e.__onWebMessengerHostReady__,e[n]=t,o)for(var r=t.init.apply(t,o),s=0;s<c.length;s++){var u=c[s];r="t"===u.type?r.then(u.next):r.catch(u.next)}p&&t.render.apply(t,p),a&&t.destroy.apply(t,a);for(s=0;s<i.length;s++)t.on.apply(t,i[s])};var u=new XMLHttpRequest;u.addEventListener("load",s),u.open("GET",r+"/loader.json",!0),u.responseType="json",u.send()
}
(window,document,"Bots", "<SDK_FOLDER_URL>");
inputElement.onkeyup = function(e) {
if (e.key === 'Enter') {
Bots.sendMessage(inputElement.value)
.then(function() {
inputElement.value = '';
});
}
}
// display new messages
Bots.on('message:sent', displayMessage);
Bots.on('message:received', displayMessage);
// initialize Bots and render the UI in a hidden element
Bots.init({ appId: appId, embedded: true })
.then(function () {
// displays initial messages
var conversation = Bots.getConversation();
conversation.messages.forEach(displayMessage);
Bots.render(document.getElementById('no-display'));
function displayMessage(message) {
  var conversationElement = document.getElementById('conversation');
  var messageElement = document.createElement('li');
  messageElement.innerText = message.name + ' says "' + message.text + '"';
  conversationElement.appendChild(messageElement);
}
</script>
</body>
</html>
Message Types
Text Message
A text type message is sent with text and/or actions.
{
    /**
     * The text content of the message. Optional only if actions are provided.
     */
    text?: string,
    /**
     * Message type
     */
    type: 'text',
    /**
     * Message role can be 'appUser' or 'appMaker'
     * Added by SDK when send through the sendMessage method
     */
    role?: 'appMaker',
    /**
     * Array of action buttons.
     */
    actions?: MessageAction[],
    /**
     * Url to the avatar for this message sender
     */
    avatarUrl?: string
}
Carousel Message
Carousel messages are a horizontally scrollable set of items, each of which can contain combinations of text, images, and action buttons.
{
    /**
     * Message type
     */
    type: 'carousel',
    /**
     * Message role can be 'appUser' or 'appMaker'
     * Added by SDK when send through the sendMessage method
     */
    role?: 'appMaker',
    /**
     * Url to the avatar for this message sender
     */
    avatarUrl?: string,
    /**
    * Array of message items. The array is limited to 10 items.
    */
    items: Item[],
    /**
    * Settings to adjust the carousel layout.
    */
    displaySettings?: {
        imageAspectRatio: 'horizontal' | 'square'
    }
}
Image Message
{
    /**
     * Message type
     */
    type: 'image',
    /**
     * Message role can be 'appUser' or 'appMaker'
     * Added by SDK when send through the sendMessage method
     */
    role?: 'appMaker',
    /**
     * Url to the avatar for this message sender
     */
    avatarUrl?: string,
    /**
    * The text content of the message. Optional only if actions are provided.
    */
    text?: string,
    /**
    * The media type is defined here, for example image/jpeg. If mediaType is not specified, the media type will be resolved with the mediaUrl.
    */
    mediaType?: string;
    /**
    * The image URL used for the image message.
    */
    mediaUrl: string;
    /**
    * Array of action buttons.
    */
    actions?: MessageAction[]
}
File Message
{
    /**
     * Message type
     */
    type: 'file',
    /**
     * Message role can be 'appUser' or 'appMaker'
     * Added by SDK when send through the sendMessage method
     */
    role?: 'appMaker',
    /**
     * Url to the avatar for this message sender
     */
    avatarUrl?: string,
    /**
    * The text content of the message. Optional only if actions are provided.
    */
    text?: string,
    /**
    * The media type is defined here, for example application/pdf. If mediaType is not specified, the media type will be resolved with the mediaUrl.
    */
    mediaType?: string;
    /**
    * The URL of the file attachment.
    */
    mediaUrl: string;
}
Location Message
{
    /**
     * Message type
     */
    type: 'location',
    /**
     * Message role can be 'appUser' or 'appMaker'
     * Added by SDK when send through the sendMessage method
     */
    role?: 'appMaker',
    /**
     * Url to the avatar for this message sender
     */
    avatarUrl?: string,
    /**
    * The coordinates of the location.
    */
    coordinates?: {
        /**
        * A floating point value representing the latitude of the location
        */
        lat: number,
        /**
        * A floating point value representing the longitude of the location
        */
        long: number
    }
}
Message Actions
Postback Action
postback action posts the action payload when tapped.{
_id: string,
/**
* The button text.
*/
text: string,
/**
* Type of the action
*/
type: 'postback',
/**
* Value indicating whether the action is the default action for a message item.
*/
default: boolean,
/**
* Flat object containing any custom properties associated with the action.
*/
metadata?: any,
/**
* A string payload to help you identify the action context. You can also use metadata for more complex needs.
*/
payload: string
} Link Action
link action opens the provided URI when tapped.{
/**
* The button text.
*/
text: string,
/**
* Type of the action
*/
type: 'link',
/**
* Value indicating whether the action is the default action for a message item.
*/
default: boolean,
/**
* Flat object containing any custom properties associated with the action.
*/
metadata?: any,
/**
* The action URI. This is the link that will be used in the clients when clicking the button.
*/
uri: string
/**
* Extra options to pass directly to the channel API.
*/
extraChannelOptions?: any
} Location Request Action
location request action prompts users to share their location.{
/**
* The button text.
*/
text: string,
/**
* Type of the action
*/
type: 'locationRequest',
/**
* Value indicating whether the action is the default action for a message item.
*/
default: boolean,
/**
* Flat object containing any custom properties associated with the action.
*/
metadata?: any,
} Reply Action
reply action echoes the user’s choice as a message.
Tip:
You can also specify aniconURL which renders as an icon for each option.
{
    /**
     * The button text.
     */
    text: string,
    /**
     * Type of the action
     */
    type: 'reply',
    /**
     * Value indicating whether the action is the default action for a message item.
     */
    default: boolean,
    /**
     * Flat object containing any custom properties associated with the action.
     */
    metadata?: any,
    /**
    * A string payload to help you identify the action context. Used when posting the reply. You can also use metadata for more complex needs.
    */
    payload: string,
    /**
    * An icon to render next to the reply option
    */
    iconUrl?: string
}
Webview Action
{
    /**
     * The button text.
     */
    text: string,
    /**
     * Type of the action
     */
    type: 'webview',
    /**
     * Value indicating whether the action is the default action for a message item.
     */
    default: boolean,
    /**
     * Flat object containing any custom properties associated with the action.
     */
    metadata?: any,
    /**
    * The webview URI. This is the URI that will open in the webview when clicking the button.
    */
    uri: string,
    /**
    * The webview fallback URI. This is the link that will be opened when not support webviews.
    */
    fallback: string,
    /**
    * Controls the webview height.
    */
    size?: 'compact' | 'tall' | 'full',
    /**
    * Extra options to pass directly to the channel API.
    */
    extraChannelOptions?: any
}
Share Action
{
    /**
     * The button text.
     */
    text: string,
    /**
     * Type of the action
     */
    type: 'share',
    /**
     * Value indicating whether the action is the default action for a message item.
     */
    default: boolean,
    /**
     * Flat object containing any custom properties associated with the action.
     */
    metadata?: any
}
Message Item
{
    /**
     * The image URL to be shown in the carousel/list item.
     */
    mediaUrl?: string,
    /**
     * The text description, or subtitle.
     */
    description?: string,
    /**
     * The title of the carousel item.
     */
    title: string,
    /**
     * If a mediaUrl was specified, the media type is defined here, for example image/jpeg. If mediaType is not specified, the media type will be resolved with the mediaUrl.
     */
    mediaType: string,
    /**
     * Array of action buttons. At least 1 is required, a maximum of 3 are allowed. link and postback and share actions are supported.
     */
    actions: IBotsSDKMessageAction[],
    /**
     * The size of the image to be shown in the carousel/list item
     */
    size: 'compact' | 'large'
}
Display Style Options
Bots.init.
| Option | Description | Default Value | Required |
|---|---|---|---|
displayStyle
|
How the messenger widget appears on your website. This is defined as either a button or tab. You can style the button’s size and icon:
For example:
|
button |
No |
buttonIconUrl |
The URL that points to the button icon. The icon image must be:
|
No | |
buttonWidth |
The button width, in pixels. | 8px |
No |
buttonHeight |
The button height, in pixels. | 58px |
No |
businessName |
The business name. For example: businessName: “Oracle” |
No | |
businessIconUrl |
The URL that points to the business’ icon image. This image must be:
For example:
|
No | |
backgroundImageUrl |
The URL that points to the image that appears in the background of the conversation. This image is tiled to fit the chat window. For example:
|
No | |
integrationOrder |
An array of integration IDs. When set, only integrations from this list will be displayed. If the array is empty, then , no integrations will be displayed. Note: Listing an integration in the array doesn't guarantee that it will be displayed in the widget. |
No | |
customColors |
The colors used in the Web Messenger UI. |
The three-to-six character hexadecimal colors used for the brandColor, conversationColor, and actionColor options.
|
No |
brandColor |
The color used in the messenger header and for the button or tab in idle state | 65758e |
No |
conversationColor |
This color used for customer messages, quick replies and actions in the footer. | 0099ff |
No |
actionColor |
The color used to change the appears of selected actions inside your messages, like tapped buttons or links. This color is also used for the Send button when it is in active state. |
0099ff |
No |
