9 Components
Components give your bot the functionality that lets it interact with users and carry out their requests.
Each state within your flow calls a component to perform actions that can range from basic interactions like taking user input and outputting response text to some service-specific action like fulfilling an order or booking a flight. We provide a set of built-in components that support basic actions like setting variables, allowing OAuth, and enabling user input. If your bot calls for a specific action that’s outside of these functions, you’ll need to use a custom component. These components let your bot call REST APIs that implement business logic and channel-specific rendering.
The Custom Component Service
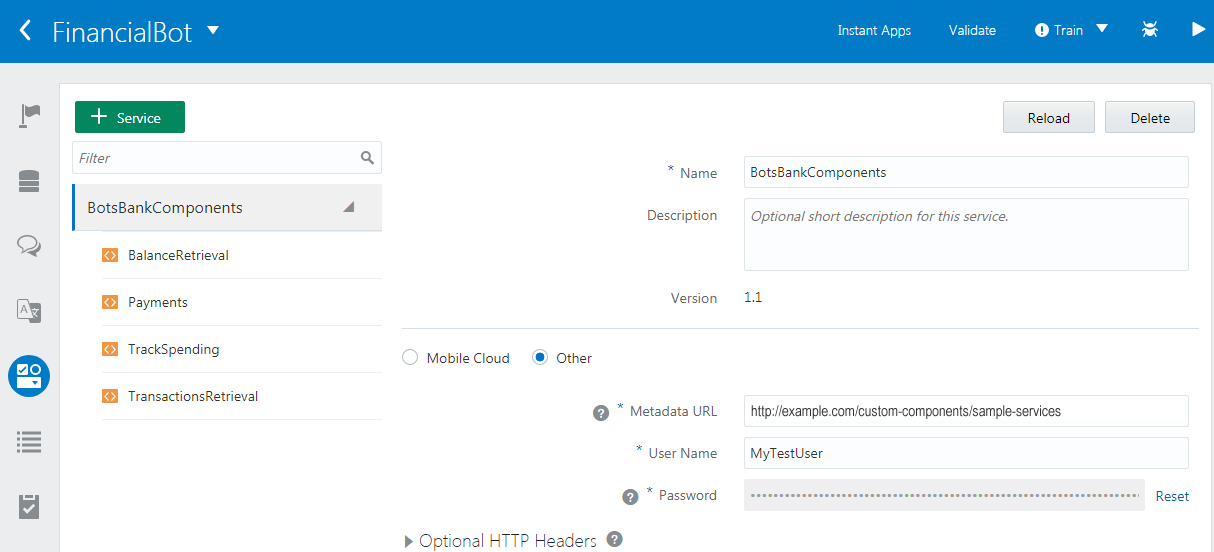
Configuring a custom component service makes custom components available to your bot’s dialog flow.
Note:
Every custom component that you’ve declared in your OBotML definition needs a corresponding custom component service configuration. In other words, your bot can’t work without this configuration, which allows Bots to call the custom code service implementation that defines the components. Refer to the components page ( ) when you define the dialog to ensure the component names and properties are correct.

Create a Service
How Do Custom Components Work?
Your bot uses custom components when it needs to return data, execute some kind of business logic, or render channel-specific UI components like the carousel in Facebook Messenger.
BalanceRetrieval in the following state node, printBalance). printBalance:
component: "BalanceRetrieval"
properties:
accountType: "${accountType.value}"
transitions:
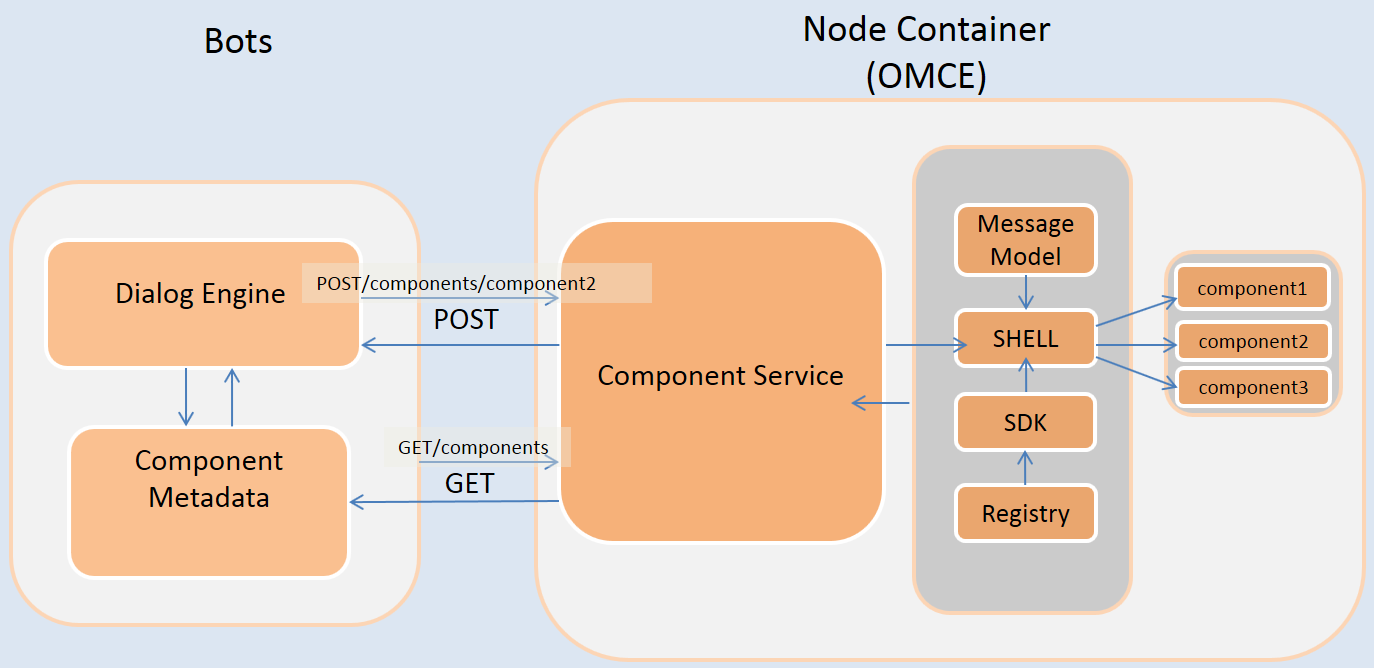
return: "printBalance"Custom components don’t reside within Bots. Their functionality is provided through backend services that are accessed through calls made to, and returned from, a REST service called the Component Service. As the Dialog Engine enters a state in the dialog flow, it assesses the component. When it encounters one of the built-in components (noted by System.), it executes one of the generic tasks described in Built-In Components: Properties, Transitions, and Usage. When the Dialog Engine discovers a custom component, however, it calls the Component Service, which hosts one or more custom components.
The Component Service is like a shim. It first finds and then invokes the custom component on behalf of the Dialog Engine. When a custom component is invoked, it can pass input parameters to a backend service and return the result. The Dialog Engine then resumes, moving on to the next sate in the dialog flow (or to the state dictated by the action described in the returned JSON payload).
The Component Service assists the bot through two methods: GET and POST. The GET method returns the metadata for all of the components hosted by the Component Service. This is a design time call, one that returns the names of the components along with their properties and actions that you include in your dialog flow definition. At runtime, the POST method invokes the component named in the state definition.
The JSON payload of the call made by the Dialog Engine includes input parameters, variable values, user-level context, and the user’s message text. When the component gets this input from the Component Service, it mutates the variable values, and then returns the call. The Dialog Engine parses the returned payload and proceeds.
The Component Service
The Component Service doesn’t reside within Bots, but is instead hosted in a separate Node container. Because the Component Service is a REST service, you can implement using any language.
Note:
You can still integrate them with remote services if you use another Node container, but keep in mind that direct REST calls can give rise to additional concerns and tasks. With no backend to manage the connection, for example, you’ll need to update the code whenever the connection changes.The Shell
The Shell routes the GET and POST requests. It produces a list of components in response to the GET call made by Bots when you register a Component Service. The Shell also invokes the component using the component name that’s appended to the POST call (POST uri/components/{ComponentName}). To respond to these requests, the Shell component references a file in the Registry component that maps the component names to their corresponding JavaScript implementation files.
The Registry
The Registry component maps each component to its implementation.
Registry.js file, a JSON object definition surfaces the components to the Shell. Each component is described by a name-value pair in which the name is the name of the component (like ‘Balance Retrieval’ in the following import statement) and the value is a return function with a reference to the JavaScript module location relative to the Registry.js file (./). In this snippet, the three components, BalanceRetrieval, TrackSpending, and Payments are custom components, each of which map to a separate JavaScript module. The require function includes these separate modules in the Registry.js file.'use strict';
module.exports = {
'BalanceRetrieval':
require('./banking/balance_retrieval'),
'TrackSpending':
require('./banking/track_spending'),
'Payments':
require('./banking/payments')}Tip:
Declare strict mode (‘use strict’) at the beginning of the Registry.js file to safeguard against the inadvertent creation of global variables from erroneous user input. The strict mode improves error checking by throwing exceptions for errors that would otherwise occur silently, like values set on a read-only property.
Shell.js component assumes that it shares the same file location as the Registry.js , the Shell.js file uses the following import statement:var registry = require('./registry'); Shell.js file. You just need to make sure that it’s in the same directory with the Registry.js module (and if you’re using , the SDK.js module as well).
Component Modules
Each component is written as JavaScript module. If you’re writing one of these modules, then you need to include two functions that mirror the GET and POST calls in the Component Service REST contract: metadata and invoke. You also need to conclude the module with the callback function,done.
metadata function provides the component descriptions that you use when you define your dialog flow. It includes a name (which must be unique), and the names and types of the input parameters that it expects. It also includes the actions supported by the component. For example:metadata: () => ({
"name": "helloWorld",
"properties": {
"properties": {
"name": {
"type": "string",
"required": false"
}
},
"supportedActions": ["nameFound", "nameNotFound"]
}),
invoke function executes the REST call. It includes two arguments: conversation, which is a reference to the SDK and done, a callback invoked by the component when it has finished processing. The done function tells the Shell to create the component’s response payload and send it back to the bot.
Important:
Always include thedone() callback at the end of each component. The component can’t send its response without it and as a result, the bot will time out.
module.exports = {
    metadata: () => (
    {
        "name": "BalanceRetrieval",                   },
        "properties": {
                "accountType": { "type": "string", "required": true }
            },
            "supportedActions": []
        }
    },
...

invoke: (conversation, done) => {
      var accountType = conversation.properties().accountType;
...

      var accounts = AccountService.account(accountType);

...
      done();

         }
};
invoke function, this code sample shows how the invoke function uses one of the SDK’s helper methods (conversation.properties) to retrieve the value of the accountType from the payload of the POST request. With the value retrieved, the custom code can use it to call connectors or other APIs running in OMCe.
Note:
Theinvoke function enables access to the OMCE platform APIs using the conversation.OracleMobile object. To find out how to instrument the custom component code to call the Analytics API (conversation.oracleMobile.analytics.postEvent), see Setting up the PizzaBot Custom Component.
The SDK
If you implement the Component Service with OMCe, you can also leverage the SDK, whose helper methods enable the components to access the context of a bot’s request messages, which can be comprised of elements that describe the variable values, the language processing results, the extracted entities, and any input parameters that have been defined for the component. The SDK also enables the components to return a response to the bot.
invoke function. To access the SDK’s methods, the invoke function uses an argument called conversation, which is automatically passed with each request along with the essential done () callback that signals the Shell when the component has completed its work. invoke: (conversation, done) => {
var listdata =
"item1, item2, item3";
conversation.variable("listDataVar", listdata);
conversation.transition();
conversation.keepturn(true);
done();The Message Model
Note:
Version 1.1 of the Bots SDK lets you leverage the Conversation Message Model (the CMM), a framework that defines various platform-agnostic templates for the messages sent between the bot and its users. Not only does the CMM allow your bot to output messages as loops of cards that have actions configured for both the images and buttons that display within each of them, it also gives your bot other capabilities as well, such displaying context- specific messages and allowing users to share locations or upload audio, video, file, or image attachments. The Bots SDK documentation describes how you integrate the CMM into the code for your custom components, the methods for different types of message formats, and how you can upgrade your custom component service to use the CMM.How Do I Implement the Component Service in OMCe?
While you can use the Shell and Registry components in any REST framework that produces a JSON object from the incoming request, you can only use the SDK’s helper methods if you implement the Component Service in OMCe. To use the SDK and get ready-made versions of the Shell and Registry, you need the Bots SDK.
Accessing the Bots SDK
You can get the Bots SDK (omce-bots-sdk-<version_number>.zip) from the Oracle Technology Network’s Oracle Mobile Cloud Enterprise download page. You can also access this page by clicking Downloads in the left navbar.
api_implementation folder. It contains the following artifacts that you modify to build your service. It includes JavaScript files for the Shell, Registry and the SDK (shell.js, registry.js, and sdk.js). It also includes the following:
-
mcebots.js—Contains the generic component logic. You copy and paste this into your own component service. -
package.json—Contains thenode.jsmodule dependencies required for the project’spackage.jsonfile. -
mcsbots.raml—A template for creating the OMCe custom API.
Creating the Component Service in OMCe
You can find out more in Custom APIs in Developing Applications with Oracle Mobile Cloud Enterprise, but the process in terms of the custom components is as follows:
-
Define the GET and POST endpoints—You can define these endpoints on your own, or use the starter RAML template (
mcebots.raml).-
In OMCe, click New API.
-
Enter the API name, a description, and a short description.
-
Drag
mcebots.ramlinto the dialog and then click Create.
-
-
If you want to enable anonymous access, click Security in the left navbar and then switch off Login Required.
-
Click Save.
-
Download the JavaScript scaffold:
-
Click Implementation in the left navabr.
-
Choose Download JavaScript Scaffold.
-
Unzip the scaffold file. This file contains the following:
-
The component service file—This file, which is named after your API, contains the REST endpoints defined for OMCe custom code APIs.
-
package.json—The project configuration file. It includes a list of module dependencies.
-
-
-
Implement the Custom Component:
-
Within the scaffold file, add a directory with the SDK, Registry, MessageModel and Shell modules.
Note:
The Shell, Registry, MessageModel and SDK components must reside within the same directory as the Component Service. -
Implement the scaffold’s JavaScript to add the custom component logic. To do this, you’re going to replace most of the contents of the component service file with those of the
mcebots.jsfile from the Bots SDK:-
Open the component service file in the JavaScript editor of your choice.
-
Note the
service.getfunction URI. It looks something like/mobile/custom/MyFirstComponentService/components. -
Delete all of the contents of the file except for the comments at the top of the file.
-
Open the
mcebots.jsfile and then copy its contents to the component service file. -
Replace the value of
const apiURL = ‘/mobile/custom/bots/components’;with the value of theservice.getfunction. For example,const apiURL = ‘//mobile/custom/MyFirstComponentService/components’;. -
Point to the
shell.jsfile. Because the component service file and the directory containing the Bots SDK artifacts (which includes theshell.jsfile) are not located in the same folder, you need to modify the Shell variable’s./shellparameter to reference the location of theshell.jsfile. For example, ifshell.jsresides in a directory calledjs, you would change the default parameter from this:
to this:var shell = require('./shell')();var shell = require('./js/shell')(); -
Save the file.
-
-
Edit the
package.jsonfile in the scaffold file with the Bot SDK dependencies in thepackage.jsonfile from the Bots SDK:-
Open the Bots SDK’s
package.jsonfile in the text editor of your choice and then copy and paste itsdependenciesdefinition to a clipboard:"dependencies": { "joi": "^9.2.0" }, -
In the scaffold’s
package.jsonfile, paste the definition on its own line, one directly after the“main”:attribute.
-
-
-
Create the custom component module by creating a JavaScript file. This file includes the
metadataandinvokefunctions described in Component Modules. The scaffold for the file looks like this:
Use the functions exposed by the SDK to allow interactions with the bot’s request payload. See The SDK Helper Methods."use strict"; module.exports = { metadata: () => ( { "name": "sample.hello", "properties": { "name": { "type": "string", "required": true } }, "supportedActions": [] } ), invoke: (conversation, done) => { const name = conversation.properties().name ? conversation.properties().name : ''; conversation.reply({ text: 'Hello ' + name }); conversation.transition(); done(); } };Important:
All custom component files must reside within the same directory. Also, make sure that all of your component files all have the.jsextension. -
Edit the
registry.jsfile with the name and location the component file. -
Install the node modules.
-
Package the scaffold and upload the node project to OMCe.
-
Associating APIs with a Backend in Developing Applications with Oracle Mobile Cloud Enterprise and then test your API.
-
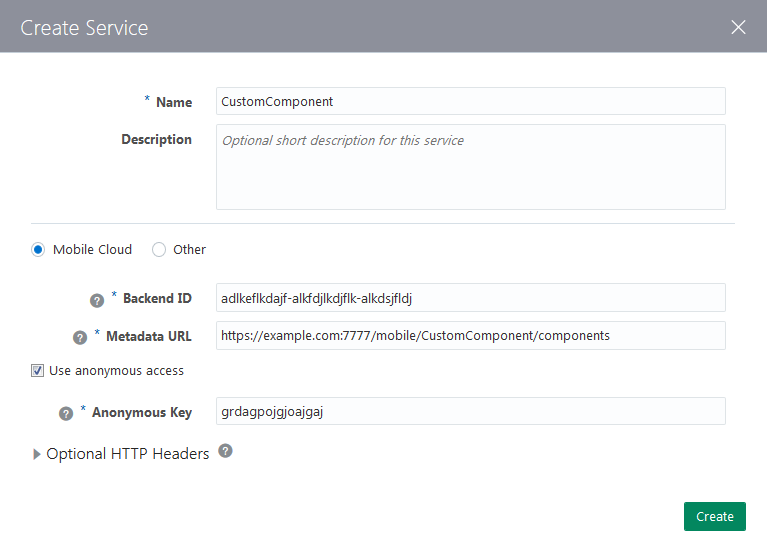
Register the component service with Bots so that it can be discovered by the Dialog Engine. To do this first click Components (
 ) in the left navbar and then Add Service. Complete the dialog by adding a name, selecting Mobile Cloud, and then by providing the following:
-
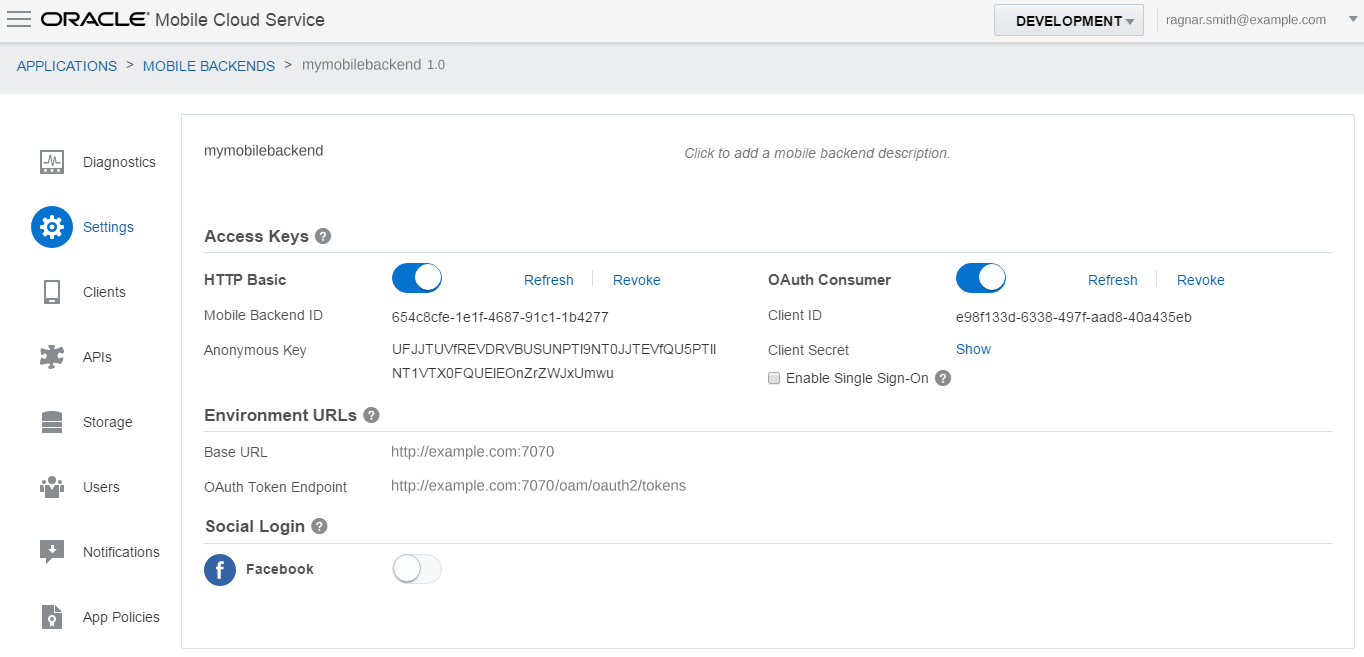
Backend ID—This value is generated when you create a mobile backend. It’s listed on the Settings page.
-
Metadata URL—The is custom API URL, which is displayed in the Overview panel of the API Designer when you click the GET method in the
Important:
Be sure to append this URL with/componentsso that it can return the component information in the Bot Builder’s Components page. -
The user name and password. If you selected Use anonymous Access, you need to provide the Anonymous Key. This value is generated when you create a backend. It’s displayed on the Settings page for the backend that manages your API.
You’re now ready to add the custom components to your OBotML definition.
-


