14 Reference
Built-In Components: Properties, Transitions, and Usage
Control Components
The control components route the flow based on whether the user input matches a predetermined value.
System.ConditionEquals
Use this component to check if the variable matches a value that has been passed in. To route the dialog according to the value, define the transitions key using equal and notequal actions.
| Properties | Description | Required? |
|---|---|---|
variable |
The first value to be compared. | No |
source |
In place of the variable property, you can name the source to be compared against the values properties. You can define this using a FreeMarker expression that compares a specific property of the system entity with the values property. For example:Using FreeMarker expressions enables you to use
System.ConditionEquals for other types of comparisons. For example: |
No |
value |
The second value to be compared. You can define this property with a FreeMarker expression: |
Yes |
How Do I Use This?
System.ConditionEquals component can fork the dialog based on the value.main: true
name: "Shoppingbot"
context:
variables:
yesnoVar: "YES_NO"
...
confirmBuy:
component: "System.ConditionEquals"
properties:
source: "${yesnoVar.value.yesno}"
value: "YES"
transitions:
actions:
equal: "deviceDone"
notequal: "cancelOrder"
deviceDone:
component: "System.Output"
properties:
text: "Your ${devices.value} is on its way."
transitions:
return: "done"
cancelOrder:
component: "System.Output"
properties:
text: "Thanks for your interest."
transitions:
return: "done"System.ConditionExists
Use this component to check for the existence of a specified variable. To route the dialog according to the value, define the transitions key using exists and notexist actions.
| Properties | Description | Required? |
|---|---|---|
variable |
The name of the variable | Yes |
value |
The value that the Dialog Engine checks for. | Yes |
main: true
name: "HelloKids"
context:
  variables:
    foo: "string"
    lastQuestion: "string"
    lastResponse: "string"
states:
  intent:
    component: "System.Intent"
    properties:
      variable: "iResult"
      confidenceThreshold: 0.4
    transitions:
      actions:
        Talk: "checkUserSetup"
        unresolvedIntent: "checkUserSetup"
  checkUserSetup:
    component: "System.ConditionExists"
    properties:
      variable: "user.lastQuestion"
      value: "unneccessary"
    transitions:
      actions:
        exists: "hellokids"
        notexists: "setupUserContext"
  setupUserContext:
    component: "System.CopyVariable"
    properties:
      from: "lastQuestion,lastResponse"
      to: "user.lastQuestion,user.lastResponse"
    transitions: {}

...
System.Switch
Use this component to switch states based on variable value.
System.ConditionEquals component, you can define the state that you want to navigate to as a variable. See System.ConditionExists| Property | Description | Required? |
|---|---|---|
variable |
The name of the variable that’s compared against the values properties. For example: |
No |
source |
In place of the variable property, you can name the source to be compared against the values properties. You can define this using a FreeMarker expression that compares a specific property of the system entity with the values property. For example: |
No |
values |
The list of values that the Dialog Engine checks for. | Yes |
Language
System.Intent
| Property | Description | Required? |
|---|---|---|
variable |
Holds the value that the Intent Engine resolves from the user input. You can define this property as variable=iResult (with iResult: "nlpresult" defined as one of the context variables). The response from the Intent Engine is stored in the iResult variable.
|
Yes |
confidenceThreshold
|
The minimum confidence level required to match an intent. When your bot’s confidence in matching any of its intents with the user message falls below this minimum value, the component triggers its unresolvedIntent action.
|
Yes |
optionsPrompt |
The title for the list of intents when the confidenceWinmargin is set. By default, this string value is Do you want to.
|
No |
confidenceWinMargin |
Sets the maximum level for the win margin, which is the delta between the respective confidence levels for the top intents that bot uses to resolve vague or compound user requests. The value that you set for this property should be greater than or equal to this delta. The intents separated by this delta are presented in a select list. To be included in the list, the intents must exceed the value set for the confidenceThreshold. The default value for the confidenceWinMargin property is 0.0.
|
No |
botName |
The name of the bot that resolves the intent. Use this property when you have a reusable bot that holds all of the intent and entity definitions. To support multiple languages, you can define this property with a variable expression that evaluates to a bot name based on the current language. | No |
sourceVariable |
The NLP engine resolves the intent using the sourceVariable as the input. You can combine this with the System.TranslateInput component and assign its value to a variable that’s used as the input to the NLP engine. See System.TranslateInput to find out how.
|
No |
translate |
You can override the boolean value of the autoTranslate context variable here. If autoTranslate is not set, or set to false, you can set this property to true to enable autotranslation for this component only. If the autotranslate context variable is set to true, you can set this property to false to exclude this component from autotranslation.
|
No |
How Do I Use This?
metadata:
  platformVersion: "1.0"
main: true
name: "FinancialBotMainFlow"
context:
 ...

states:
  intent:
    component: "System.Intent"
    properties:
      variable: "iResult"
      confidenceThreshold: 0.4
    transitions:
      actions:
        Balances: "startBalances"
        Transactions: "startTxns"
        Send Money: "startPayments"
        Track Spending: "startTrackSpending"
        Dispute: "setDate"
        unresolvedIntent: "unresolved"
...

  askPaymentAmount:
    component: "System.Text"
    properties:
      prompt: "What's the payment amount?"
      variable: "paymentAmount"
      maxPrompts: 1
    transitions:
      actions:
        cancel: "intentCheck"
...

  intentCheck:
    component: "System.Intent"
    properties:
      variable: "iResult2"
      confidenceThreshold: 0.4
    transitions:
      actions:
        Balances: "startBalances2"
        unresolvedIntent: "askPaymentAmount2"

...
The confidenceThreshold Property
When you add the confidenceThreshold property, you can steer the conversation by the confidence level of the resolved intent, which is held in the iResult variable.
If the intent’s ranking exceeds the confidenceThreshold property (which, by default is 40%), then the action defined for that intent is triggered, setting the path for the Dialog Engine. In the opposite case—when the value for the confidenceThreshold property is higher than the ranking for the resolved intent—the Dialog Engine moves to the state defined for System.Intent’s unresolvedIntent action. See The Intent Tester.
Taking the PizzaBot as an example, testing its intents with I want to order pizza resolves to 100%. When you enter the same phrase in the tester’s Bots tab, however, the bot replies with How Old Are You?, a seemingly inappropriate response. Within the context of the PizzaBot dialog flow definition, however, this is the expected response for an intent whose ranking (100%) exceeds the confidence threshold (40%). When you enter 18, the checkage state’s allow: "crust" action directs the Dialog Engine to the crust state. (Because there were no entities to extract from the initial user input, the Dialog Engine bypassed the resolveSize and resolveCrust states and ended up here after the age confirmation instead of completing the order.)
unresolvedIntent action (unresolvedIntent: "unresolved"). As a result, the bot responds with "I don't understand, what do you want to do?" unresolved:
component: "System.Output"
properties:
text: "I don't understand. What do you want to do?"
transitions:
return: "unresolved"The confidenceWinMargin Property
Adding the confidenceWinMargin property enables your bot to prompt users to pick an intent when it can’t pick one. For example, if a user asks the FinancialBot, “I want to check balance or send money,” the bot responds with a select list naming the top intents, Check Balances and Send Money.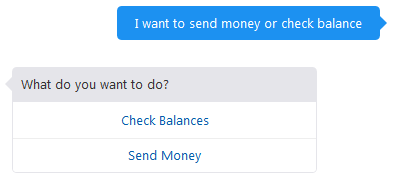
The bot offers these two intents because its confidence in them exceeds 30% (confidenceThreshold: 0.30 in the following snippet) and they’re separated by a win margin—the difference between their respective confidence levels— that’s within 15% (confidenceWinMargin: 0.15).
states:
  intent:
    component: "System.Intent"
    properties:
      variable: "iResult"
      optionsPrompt: "What do you want to do?"
      confidenceThreshold: 0.30
      confidenceWinMargin: 0.15
For example, the bot’s confidence for the Check Balances intent is 38.1%. For the Send Money intent, it’s 35.8%. The win margin is 2.3%, well within the 15% configured for the System.Intent component.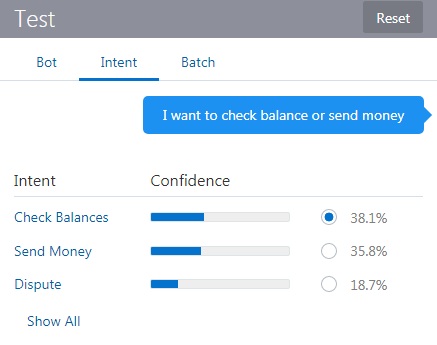
System.MatchEntity
The System.MatchEntity calls the Intent Engine to extract entity information from the text held by the sourceVariable property. If a match exists for the variable entity type, the variable is set with this entity value.
| Property | Description | Required? |
|---|---|---|
sourceVariable |
The variable that holds the input value. | Yes |
variable |
The name of the context variable. The value of this variable can be used in a subsequent System.SetVariable component to extract a specific entity using a FreeMarker expression. For example, to extract an EMAIL entity value: ${userInputEntities.value.entityMatches['EMAIL'][0]} |
Yes |
This component also has two predefined transitions, match and nomatch
| Transition | Description |
|---|---|
match |
Directs the Dialog Engine to go a state when the entities match. |
nomatch |
Defines the Dialog Engine to go to a state when the entities don’t match. |
System.MatchEntity component matches the user-provided value stored in the mailInput variable against the EMAIL entity type that’s been defined for the mailEntity variable. If the user input satisfies the entity type by being an e-mail address, then the System.MatchEntity component writes this value to the mailEntity variable that’s echoed back to the bot user ("You entered ${mailEntity.value.email}"). When the values don’t match, the Dialog Engine moves to the nomatch state.
Note:
TheSystem.MatchEntity component resolves a single value.
context:
  variables:
    iResult: "nlpresult"
    mailInput: "string"
    mailEntity: "EMAIL"
states:
  intent:
    component: "System.Intent"
    properties:
      variable: "iResult"
      confidenceThreshold: 0.4
    transitions:
      actions:
        displayMailAdresses: "askMail"
        unresolvedIntent: "dunno"
  askMail:
    component: "System.Text"
    properties:
      prompt: "Please provide a valid email address"
      variable: "mailInput"
    transitions: {}
  matchEntity:
    component: "System.MatchEntity"
    properties:
      sourceVariable: "mailInput"
      variable: "mailEntity"
    transitions:
      actions:
        match: "print"
        nomatch: "nomatch"
  print:
    component: "System.Output"
    properties:
      text: "You entered ${mailEntity.value.email}"
    transitions:
      return: "done"
  nomatch:
    component: "System.Output"
    properties:
      text: "All I wanted was a valid email address."
    transitions:
      return: "done"
  dunno:
    component: "System.Output"
    properties:
      text: "I don't know what you want"
    transitions:
      return: "done"
System.DetectLanguage
Use this component to detect the user’s language.
profile.languageTag, so, if you want to find out which language has been detected, you can use ${profile.languageTag} or ${profile.languageTag.value}. Because this is a string variable, you don’t necessarily need to add the value suffix.context:
variables:
autoTranslate: "boolean"
translated: "string"
someTranslatedText: "string"
states:
setAutoTranslate:
component: "System.SetVariable"
properties:
variable: "autoTranslate"
value: true
transitions: {}
detect:
component: "System.DetectLanguage"
properties: {}
transitions: {}
System.TranslateInput
Use this component when you’ve activated a translation service, but you want to explicitly translate user input and not rely on the autotranslate facility.
| Property | Description | Required? |
|---|---|---|
variable |
The variable that holds the translated text. | Yes. |
source |
Specifies the text values to be translated. | No |
In the following code snippet, this variable that holds the text string is called translated. It holds the English translation of the user's input, which the NLP engine uses as the source for the Intent resolution. Note that the autoTranslate: “boolean” context variable, which is required for autotranslation services, is defined.
context:
  variables:
    autoTranslate: "boolean"
    translated: "string"
...

states:
  translate:
    component: "System.TranslateInput"
    properties:
      source: "${somevar.value}" or // "Besoin de pizza"
      variable: "translated"
    transitions: {}
Using the sourceVariable Property
System.Intent’s sourceVariable property holds the value processed by the component, you can use it with the System.TranslateInput component to insert translated text. The following snippet shows assigning the translated variable value so that it can be processed by the NLP engine. translate:
component: "System.TranslateInput"
properties:
variable: "translated"
transitions: {}
intent:
component: "System.Intent"
properties:
variable: "iResult"
sourceVariable: "translated"
confidenceThreshold: 0.4
System.TranslateOutput
The System.TranslateOutput component allows you to translate text manually.
System.TranslateOutput component takes the value defined for the source property. It translates the text into the language detected by the System.DetectLanguage component and then stores it in the variable property.
| Properties | Description | Required? |
|---|---|---|
source |
The text to be translated, or a FreeMarker expression that references a variable whose value needs to be translated. | Yes |
variable |
Holds the translated text. | Yes |
source property. unresolvedTranslate:
component: "System.TranslateOutput"
properties:
source: "Sorry I don't understand"
variable: "someTranslatedText"
transitions: {}
unresolved:
component: "System.Output"
properties:
text: "${someTranslatedText}"
transitions:
return: "unresolved"Security
System.OAuthAccountLink
The System.OAuthAccountLink component enables the bot to make calls to a third-party service on behalf of the user.
| Property | Description | Required? |
|---|---|---|
prompt |
A text string that prompts the user to login. | Yes |
authorizeURL |
The login URL. See The authorizeURL Property. | Yes |
translate |
You can override the boolean value of the autoTranslate context variable here. If autoTranslate is not set, or set to false, you can set this property to true to enable autotranslation for this component only. If the autotranslate context variable is set to true, you can set this property to false to exclude this component from autotranslation.
|
No |
variable |
The name of the variable. You can declare it in the context node as a variable, a string, or another supported variable type. It can also be a user variable. | Yes |
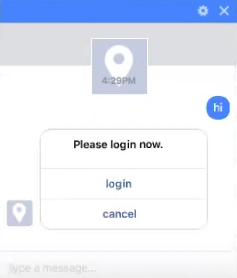
System.OAuthAccountLink component: prompt, which outputs the message, variable, which holds the returned code, and authorizeURL which defines both the provider’s OAuth URL and the redirect URL that receives the token used by the bot to access the user’s LinkedIn profile.login:
component: "System.OAuthAccountLink"
properties:
prompt: "Please login now."
authorizeURL: "https://www.linkedin.com/uas/oauth2/authorization?response_type=code&client_id=75k0vq4&scope=r_basicprofile&redirect_uri= https://myBotsinstance/connectors/v1/callback"
variable: "code"
transitions:{} Note:
The test window doesn’t render webviews, so you need to cut and paste the link text into your browser.The authorizeURL Property
https://www.linkedin.com/oauth/authorization/ in the example. Next, you need to append the following OAuth parameters to this URL:
-
response_type—Set tocodesince the bot expects an authorization code. -
client_id—An API key value that you get when you register your app with the OAuth provider. -
scope—A list of permissions to access resources on the user’s behalf. These are the permissions that you set when you register your app with the provider. They can vary by provider: for LinkedIn, these includer_basicprofile(shown in the example) andr_emailadress; for Microsoft, they’re defined usingopenid emailandopenid profile. -
redirect_uri—This is the redirect URI that you used to register your app with the OAuth provider that tells it where it needs to redirect users. This parameter, which is the Bots service host name appended withconnectors/v1/callback, is the endpoint that receives the OAuth provider’s token and then associates it with the active channel. Theredirect_uriproperty is based on the Webhook URL that’s generated when you create a channel. See ChannelsImportant:
Be sure that the value you enter for theredirect_urimatches the redirect URI that you provided when you registered your app exactly. In both instances, the URI must be appended withconnectors/v1/callback.
User Interface Components
-
System.Text—Prompts the user to enter text.
-
System.List—Prompts the user with a list option.
-
System.Output—Displays a message.
-
System.CommonResponse—Outputs content-rich messages.
-
System.Interactive—Integrates your bot with an Instant App.
System.Text
The System.Text component enables your bot to set a context or user variable by asking the user to enter some text.
System.Text state for the first time, it prompts the user to enter some text. When the user enters a value, the Dialog Engine returns to this state. The component processes the user response and if it can convert the user input to the variable type, it stores the value in the variable. The Dialog Engine moves on to another state when this variable has a value.
Note:
The Dialog Engine skips over theSystem.Text state of the variable already has a value.
| Property | Description | Required? |
|---|---|---|
prompt |
A text string that describes the input required from the user. You can dynamically add values to it using a value expression. For example: Hello ${profile.firstName}, how many pizzas do you want? |
Yes |
variable |
The name of the variable, which can be either a user variable or one of the variables declared in the context node.
|
Yes |
nlpResultVariable |
Use this property when the variable property references some type of entity (custom or built-in). If the variable property initially holds a null value but the nlpResultVariable holds an entity that matches the entity type that you’ve set for the variable property, then variable property is set with this entity value and the dialog flow will then transition to the next state. You can obtain this entity match by simply adding the nlpResultVariable property; you don’t need to create a separate SetVariable state to set the entity value.
|
No |
maxPrompts |
The number of times that component prompts the user for valid input. See Limiting the Number of User Prompts. | No |
translate |
Use this property to override the boolean value that you’ve set for the autotranslate context variable. If you haven’t set this variable, or if you set it to false, then you can set this property to true to enable autotranslation for this component only. If you set the autotranslation variable is set to true, you can set this property to false to exclude this component from autotranslation. See Autotranslation.
|
No |
See Transitions for the predefined action types that you can use with this component.
How Do I Use This?
In this example, the type variable holds the values expected by the PizzaType entity, like cheese, Veggie Lover, and Hawaiian. When this information is missing from the user input, the bot can still get it because its dialog flow transitions to the type state, whose Text component prompts them to explicitly state what they want. Keep in mind that even at this point, the user input still needs to resolve to the PizzaType entity to transition to the next state.
main: true
name: "PizzaBot"
parameters:
  age: 18
context:
  variables:
    size: "PizzaSize"
    type: "PizzaType"
    crust: "PizzaCrust"
    iResult: "nlpresult"

...

  type:
    component: "System.Text"
    properties:
      prompt: "What Type of Pizza do you want?"
      variable: "type"
    transitions: {}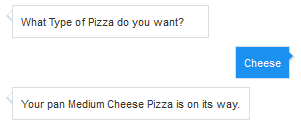
System.List
Your bot can use the System.List component to set a user or context variable or set a transition action. The mode depends on whether a value can be set for the component’s variable property (or if you configure a variable property in the first place).
System.List state for the first time, your bot displays a message containing a list of options. When the user clicks one of these options, the Dialog Engine returns to the System.List state to process the user response. If the component can convert the selected option to a user variable or one of the variables that you’ve defined in the context node, the System.List’s variable property it sets the variable property with this value. When this property can’t be set (or hasn’t been defined), the Dialog Engine triggers a transition action instead.
| Property | Description | Required? |
|---|---|---|
options |
You can specify the options using comma-separated text strings, FreeMarker value expressions, and as a list of maps.
|
Yes |
prompt |
The text string that prompts the user. | Yes |
variable |
The name of the context or user variable that’s populated when the user enters free text as a response instead of choosing a list option. When the user taps on a button rather than entering free text, the button payload determines which variable(s) are set and this property is ignored. When the Dialog Engine enters this state and the variable already has a value, then the state is skipped. | Yes (for value lists only) |
maxPrompts |
The number of times that component prompts the user for valid input. See Limiting the Number of User Prompts. | No |
nlpResultVariable |
Set this property when the variable property references an entity. If the referenced variable is null and this property has an entity match of the same type as the variable property, then the variable will be set with this entity value and the dialog flow will then transition to the next state. To get the match for this entity, add this property. You don’t need to create a separate state for the System.SetVariable component to set the entity value.
|
No |
translate |
Use this property to override the boolean value that you’ve set for the autotranslate context variable. If you haven’t set this variable, or if you set it to false, then you can set this property to true to enable autotranslation for this component only. If you set the autotranslation variable is set to true, you can set this property to false to exclude this component from autotranslation. See Autotranslation.
|
No |
Value Lists
You can use the System.List component to return a value that satisfies a context variable that’s defined as a primitive (like greeting: "string" in the dialog flow template) or as an entity, as shown in the following snippet. In this dialog flow, the options: "Thick,Thin,Stuffed,Pan" definition returns a value that matches crust variable. The options property defined for size is a value expression (${size.type.enumValues}) that returns the Large, Medium, Small, and Personal list values as options. See Accessing Variable Values with Apache FreeMarker FTL.
nlpResultVariable property’s iResult definition allows the component to set the entity values for the variable properties for the crust and size states when these values haven’t been previously set. Like the Text component, the System.List component doesn’t require any transitions ({}). main: true
name: "PizzaBot"
...
context:
variables:
size: "PizzaSize"
crust: "PizzaCrust"
iResult: "nlpresult"
...
states:
...
crust:
component: "System.List"
properties:
options: "Thick,Thin,Stuffed,Pan"
prompt: "What crust do you want for your pizza?"
variable: "crust"
main: true
name: "PizzaBot"
...
context:
variables:
size: "PizzaSize"
crust: "PizzaCrust"
iResult: "nlpresult"
...
states:
...
crust:
component: "System.List"
properties:
options: "Thick,Thin,Stuffed,Pan"
prompt: "What crust do you want for your pizza?"
variable: "crust"
nlpResultVariable: "iresult"
transitions: {}
size:
component: "System.List"
properties:
options: "${size.type.enumValues}"
prompt: "What size Pizza do you want?"
variable: "size"
nlpResultVariable: "iresult"
transitions: {}
Note:
Users aren’t limited to the options displayed in the list. They can resolve the entity by entering a word that the entity recognizes, like a synonym. Instead of choosing from among the pizza size options in the list, for example, users can instead enter big, a synonym defined for thePizzaSize entity’s Large option. See Custom Entities.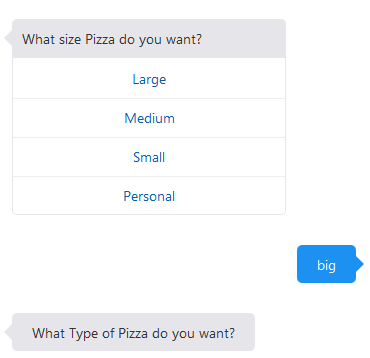
The options Property
options property using any of the following:
-
A list of maps—While you can set the options property as a text string or value expression, you can also configure the
optionsproperty as list of maps. Each one has alabelproperty, avalueproperty, and an optionalkeywordproperty. You can localize your list options when you follow this approach because, as noted by the following example, you can reference a resource bundle. See Resource Bundles to find out more about using the dot notation. When users enter a value that matches one the values specified in thekeywordproperty, the bot reacts in the same way that it would if the user tapped the list option itself.askPizzaSize: component: "System.List" properties: prompt: What size do you want?" options: - value: "small" label: "${rb.pizza_size_small}" keyword: "1" - value: "medium" label: "${rb.pizza_size_medium}" keyword: "2" - value: "large" label: "${rb.pizza_size_large}" keyword: "3" variable: "pizzaSize" -
A text string of comma-separated options, like
“small, medium, large”in the following snippet. You can’t addlabelandvalueproperties when you defineoptionsas a string.askPizzaSize: component: "System.List" properties: prompt: "What size do you want?" options: "small, medium, large" variable: "pizzaSize" -
An Apache FreeMarker value expression that loops over either a list of strings, or a list of maps, where each map must contain both the
labelandvalueproperties and optionally, akeywordproperty.askPizzaSize: component: "System.List" properties: prompt: "What size do you want?" options: "${pizzaSize.value.enumValues}" variable: "pizzaSize"
Action Lists
variable property for a System.List option when you’re configuring a list of actions. In this case, the component sets a transition action based on the option selected by the user. For example: showMenu:
component: "System.List"
properties:
prompt: "Hello, this is our menu today"
options:
- value: "pasta"
label: "Pasta"
- value: "pizza"
label: "Pizza"
transitions:
actions:
pasta: "orderPasta"
pizza: "orderPizza"Tip:
Not only can you use this approach to configure conditional navigation, you can use an action list in place of aSystem.Switch component.
System.Output
Use the System.Output component to output a message that doesn't require a user response, or doesn't require your bot to process the user's response. If you need to process the user’s message, use either the System.Text or the Systen.CommonResponse component.
System.Output component definition requires the text property. As illustrated in the following example of a confirmation message, you can add value expressions to this string.done:
component: "System.Output"
properties:
text: "Your ${size.value}, ${type.value} pizza with ${crust.value} crust is on its way. Thank you for your order."keepTurn to the System.Output component definition and set it to true to direct the Dialog Engine to the next state as defined by the transitions property. When no transition as been defined, the Dialog Engine moves to the next state in the sequence.
wait:
component: "System.Output"
properties:
text: "Please wait, we're reviewing your order"
keepTurn: true
transitions:
next: "ready"
waitmore:
component: "System.Output"
properties:
text: "Almost done..."
keepTurn: true
transitions:
next: "done"
done:
    component: "System.Output"
    properties:
      text: "Your ${size.value}, ${type.value} pizza with ${crust.value} crust is on its way. Thank you for your order."
transitions:
return: "done"Use the keepTurn option when you want output multiple statements in quick succession and without user interruptions.
Autotranslation
System.Output component’s autotranslated text on a per-component basis using the translate property. By setting it to false, as in the following snippet, the components outputs the text as is, with no translation. By setting this property to true , you can enable autotranslation when the autoTranslate variable is either set to false or not defined. See Autotranslation.
Note:
Typically, you would not set theautoTranslate variable to true if you’re translating text with resource bundles. We do not recommend this approach.
setAutoTranslate:
    component: "System.SetVariable"
    properties:
      variable: "autoTranslate"
      value: "true"
    transitions: {}
...
pizzaType:
   component: "System.Output"
   properties:
     text: "What type of pizza do you want?"
     translate: false
   transitions: {}
Defining Value Expressions for the System.Output Component
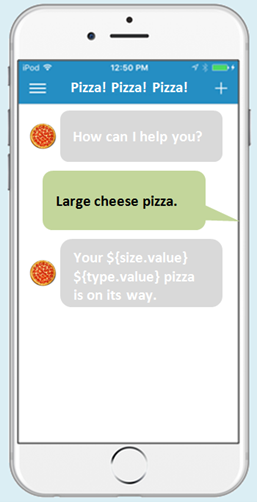
text property, as in the following snippet that uses different expressions for outputting the text for an order confirmation (pizza size and type).confirmation:
component: "System.Output"
properties:
text: "Your ${size.value} ${type.value} pizza is on its way."
transitions:
return: "done"
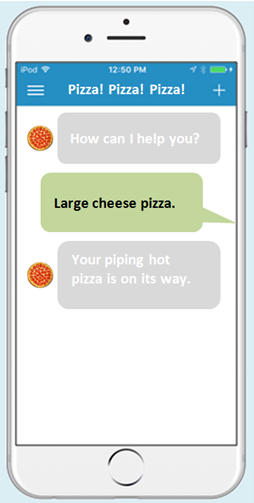
text property with multiple expressions, each one must return a value. Otherwise, your bot users will see output text like: Your ${size.value} ${type.value} is on its way.${size.value!\”piping\”} ${type.value!\”hot\”}. The double quotes indicate that the default value is a not a variable reference, but is instead the constant value that the operator expects. For example:text: "Your ${size.value!\"piping\"} ${type.value!\"hot\"} pizza is on its way."Important:
Always escape the quotation marks (\"...\") that enclose the default value when you use the Freemarker operator. Your dialog flow’s OBotML syntax won’t be valid unless you use this escape sequence whenever you define a default value operation, or set off output text with double quotes. For example, the following System.Output component definition lets bot users see You said, “Cancel this order.”confirmCancel:
component: "System.Output"
properties:
text: "You said, \"Cancel this order.\""
transitions:
return: "cancelOrder"System.CommonResponse
The System.CommonResponse component enables you to build a specialized user interface that can include text, action buttons, images, and cards without having to write custom code. Instead, you define the component’s properties and metadata.
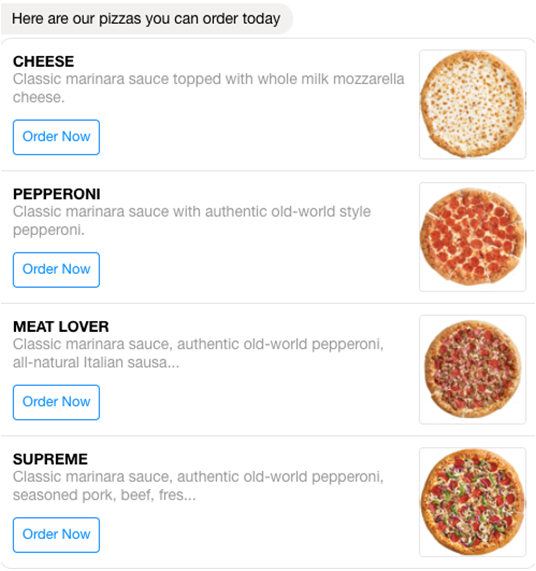
System.CommonResponse component in the CrcPizzaBot, one of the sample bots. In this spin on the PizzaBot, you can display an image-rich menu with quick action “Order Now” buttons.
Within the context of the System.CommonResponse component, the different types of messages are known as “response types” and the CrcPizzaBot shows you how, among other things, they allow the bot users to respond to prompts using action buttons and view the pizza menu as a cascade of card items.
Adding a System.CommonResponse Component to Your Dialog Flow
Use the Add Components menu to add template System.CommonResponse states for the text, card, and attachment responses to your OBotML definition. These templates include the properties that are common to all of these response types as well as the ones that particular to each one. While the Add Components menu adds separate states for each response type, you can combine one or more response types into a single state. The CrcPizzaBot shows you examples of both in its ShowMenu (text response) and OrderPizza (text and card responses) states.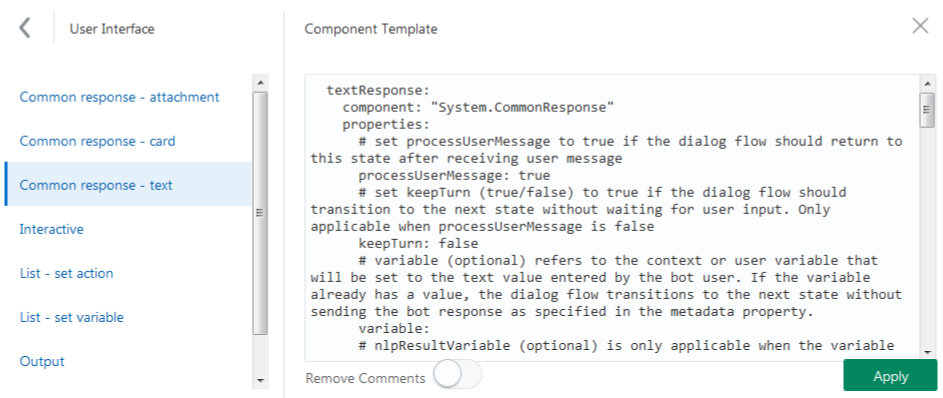
The Component Properties
System.CommonResponse component includes setting properties that direct the Dialog Engine along with metadata properties that describe not only how the component delivers messages (as text prompts, cards, or attachments), but also sets the content and behavior for the messages themselves. AskPizzaSize:
component: "System.CommonResponse"
properties:
variable: "pizzaSize"
nlpResultVariable: "iresult"
maxPrompts: 2
metadata:
responseItems:
- type: "text"
text: "<#if system.invalidUserInput == 'true'>Invalid size, please try again.\
\ </#if>What size do you want?"
name: "What size"
separateBubbles: true
actions:
- label: "${enumValue}"
type: "postback"
payload:
action: ""
variables:
pizzaSize: "${enumValue}"
name: "size"
iteratorVariable: "pizzaSize.type.enumValues"
processUserMessage: true
transitions:
actions:
cancel: "Intent"
next: "AskLocation" Tip:
Thetext property in this snippet is defined using Apache FreeMarker Template Language (FTL). To find out how to add FTL expressions and use FreeMarker built-in operations to transform variable values, see Accessing Variable Values with Apache FreeMarker FTL.
| Name | Description | Required? |
|---|---|---|
metadata |
The chat response created by this component is driven by the contents of the metadata property. See The Metadata Property.
|
Yes |
processUserMessage |
Set this property to true to direct the Dialog Engine to return to the state after the user enters text or taps a button. Set this property to false if no user input is required (or expected). When you set this property to false, the System.CommonResponse component behaves like the System.Output component.
|
Yes |
variable |
This variable holds the name of the context or user variable that gets populated when a user responds by entering free text instead of tapping a button. This property is ignored when a user taps a button, because the button’s payload determines which variables values get set. If the variable property has already been set when the Dialog Engine enters this state, then the state is skipped. | No |
nlpResultVariable |
This property only applies when you set the variable as an entity-type variable. If the variable is null and the nlpResultVariable has an entity match that’s the same type as the variable property, then the variable will be set with this entity value and the dialog flow will then transition to the next state. You can get this entity match by simply adding the nlpResultVariable property; you don’t need to create a separate System.SetVariable state to set the entity value.
|
No |
maxPrompts |
Before the System.CommonResponse component can populate the variable value that you’ve specified for the variable property from the text entered by the user, it validates the value against the variable type. This can be entity-type validation, or in the case of a primitive type, it’s a value that can be coerced to the primitive type.
When the component can’t validate the value, the Dialog Engine sends the message text and options again. (You can modify this message to reflect the validation failure.) To avoid an endless loop resulting from the user’s inability to enter a valid value, set a limit on the number of attempts given to the user with the |
No |
keepTurn |
The keepTurn property only applies when you set the processUserMessage property to false. See System.Output to find out how to set this property.
|
No |
translate |
Use this property to override the boolean value that you’ve set for the autotranslate context variable. If you haven’t set this variable, or if you set it to false, then you can set this property to true to enable autotranslation for this component only. If you set the autotranslation variable is set to true, you can set this property to false to exclude this component from autotranslation. See Autotranslation.
|
No |
The Metadata Property
You define the metadata at two levels for the System.ComponentResponse component: at the root level, where you define the output and actions specific to the component itself, and at the response item level, where you define the display and behavior particular to the text, list, card, or attachment messages that are displayed by this component.
  AskLocation:
    component: "System.CommonResponse"
    properties:
      variable: "location"
      metadata:
        responseItems:
        - text: "To which location do you want the pizza to be delivered?"
          type: "text"
          name: "What location"
          separateBubbles: true
        globalActions:
        - label: "Send Location"
          type: "location"
name: "SendLocation" | Property | Description | Required? |
|---|---|---|
responseItems |
A list of response items, each of which results in a new message sent to the chat client (or multiple messages when you set iteration for the response item using the iteratorVariable property). Define these response items using these values:
|
Yes |
globalActions |
A list of actions that are not related to the specific response item. These actions are typically displayed at the bottom of the chat window. In Facebook Messenger, for example. these options are called quick replies. | No |
| Property | Description | Required? | |
|---|---|---|---|
type |
The type of response item that determines the message format. You can set a message as text, attachment, or cards.
|
Yes | |
name |
A name for the response item that’s used for identification within the Bots platform. It’s not used at runtime. | No | |
visible |
Display properties. | No | |
| Property | Description | ||
expression |
A boolean FreeMarker expression for conditionally showing or hiding text, a card, or attachment. For example, the CrcPizzaBot’s OrderPizza state defines this property as follows: |
||
|
For include and exclude, enter a comma-separated list of channel types for which the text, card, or attachment should be shown (include) or hidden (exclude). The valid channel values are:
|
||
onInvalidUserInput |
A boolean flag that shows the text item or attachment either when the user enters valid input (value=false) or when the user enters input that’s not valid (value=true).
|
||
iteratorVariable |
Dynamically adds multiple text items to the response by iterating over the items stored in the variable that you specify for this property. Although you define the variable as a string, it holds JSON array when it’s used as an iterator variable. You can reference properties in an object of the array with an expression like |
No | |
rangeStart |
If you’ve specified an iteratorVariable, you can stamp out a subset of response items by specifying the rangeStart property in combination with the rangeSize property. You can enter a hardcoded value or use a FreeMarker expression that references a context variable that holds the range start. By using a rangeStart variable, you can then page to the next set of data by setting the rangeStart variable in the payload of the browse option. You can see an example of the rangeStart and rangeSize properties in the CrcPizzaBot’s OrderPizza state.
|
No | |
rangeSize |
The number of response items that will be displayed as specified by the iteratorVariable and rangeStart properties.
|
No | |
channelCustomProperties |
A list of properties that trigger functions that are particular to a channel. Because these functions are platform-specific, they’re outside of the System.CommonResponse component and as such, can’t be controlled by either the component’s root-level or response item-level properties. You can find an example of this property in the CrcPizzaBot’s OrderPizza state. |
No | |
The Action Metadata Properties
You can assign various actions to the response items.
| Property | Description | Required? | |
|---|---|---|---|
type |
The action type:
|
Yes | |
label |
A label for the action. To localize this label, you can use a FreeMarker expression to reference an entry in your bot’s resource bundle. | Yes | |
iteratorVariable |
Use this option to stamp out multiple actions by iterating over the items stored in the variable that you specify for this property. You can’t use this property with the share and location actions. | No | |
imageUrl |
The URL of image used for an icon that identifies and action. You can use this property to display an icon for the Facebook quick reply button (which is a global action). | No | |
channelCustomProperties |
A list of properties that some trigger channel-specific functionality that isn’t controlled by the standard action properties. You can find an example in the CrcPizzaBot’s OrderPizza state.
|
No | |
payload |
A nested payload object that has the following properties. | ||
| Payload Property | Description | ||
action |
The transition action set by the Dialog Engine when the user taps this action. You can only use this property for the postback action type. | No | |
variables |
When you set the action type to postback, the payload may have additional properties named after context variable or user variable. When the user taps this action, the variables are set to the values specified in this property.
For the |
No | |
url |
The URL of the website that opens when users tap this action. | Yes ( only for the url action type)
|
|
phoneNumber |
The phone number called when a user taps this action. | Yes (only for the call action type)
|
|
name |
A name that identifies the action on the Bots platform. This name is used internally and doesn’t display in the message. | No | |
visible |
Display properties. | No | |
| Property | Description | ||
expression |
A boolean FreeMarker expression for conditionally showing or hiding an action. | ||
|
For include and exclude, enter a comma-separated list of channel types for which the action can be shown (include) or hidden (exclude). The valid channel values are:
|
||
onInvalidUserInput |
A boolean flag that shows the action either when the user enters valid input (value=false) or when the user enters input that’s not valid (value=true).
|
||
The Text Response Item
textResponse state to your dialog flow, you can rename it and then either replace the placeholder properties with your own definitions, or delete the ones that you don’t need. The template state includes properties the following text-specific properties.
| Property | Description | Required? | |
|---|---|---|---|
text |
The text that prompts the user. | Yes | |
iteratorVariable |
Dynamically adds multiple text items to the response by iterating over the items stored in the variable that you specify for this property. Although you define the variable as a string, it holds JSON array when it’s used as an iterator variable. You can reference properties in an object of the array with an expression like ${iteratorVarName.propertyName}. For example, with an iterator variable named pizzas, the name property of a pizza can be referenced using the expression: ${pizzas.name}.
|
No | |
separateBubbles |
You can define this property if you also define the iteratorVariable property. When you set this property to true, each text item is sent as separate message, like Pizzas and Pastas in the CrcPizzaBot’s ShowMenu and OrderPizza states. If you set it to false, then a single text message is sent, one in which each text item starts on a new line.
|
No | |
visible |
Text display properties | No | |
| Property | Description | ||
expression |
A boolean FreeMarker expression for conditionally showing or hiding tex. For example, the CrcPizzaBot’s OrderPizza state defines this property as follows: |
||
|
For include and exclude, enter a comma-separated list of channel types for which the text should be shown (include) or hidden (exclude). The valid channel values are:
|
||
onInvalidUserInput |
A boolean flag that shows the text item when the user enters valid input (value=false) or when the user enters input that’s not valid (value=true).
|
||
-
Postback
-
Share
-
Call
-
URL
-
Location
showMenu state.
Because it names postback as an action, it enables the bot to handle unexpected user behavior, like selecting an item from an older message instead of selecting one from the most recent message. ShowMenu:
component: "System.CommonResponse"
properties:
metadata:
responseItems:
- type: "text"
text: "Hello ${profile.firstName}, this is our menu today:"
name: "hello"
separateBubbles: true
actions:
- label: "Pizzas"
keyword: "1"
type: "postback"
payload:
action: "pizza"
name: "Pizzas"
- label: "Pastas"
keyword: "2"
type: "postback"
payload:
action: "pasta"
name: "Pastas"
processUserMessage: trueThe Card Response Item
Like the textResponse state, you can rename the cardResponse state that’s added to your dialog flow and then update the properties with your own definitions. Specifically, you can configure a card response item by defining the following properties. You can delete the properties that you don’t need.
| Property | Description | Required? | |
|---|---|---|---|
cardLayout |
The card layout: horizontal (the default) and vertical.
|
Yes | |
title |
The card title | Yes | |
description |
The card description, which displays as a subtitle. | No | |
imageUrl |
The URL of the image that displays beneath the subtitle. | No | |
cardUrl |
The URL of a website. It displays as a hyperlink on the card that user open by tapping on it. | No | |
iteratorVariable |
Dynamically adds multiple cards to the response by iterating over the items stored in the variable that you specify for this property. Although you define the variable as a string, it holds a JSON array when it’s used as an iterator variable. You can reference properties in an object of the array with an expression like ${iteratorVarName.propertyName}. For example, with an iterator variable named pizzas, the name property of a pizza can be referenced using the expression: ${pizzas.name}.
|
No | |
visible |
Card display properties | No | |
expression |
A boolean FreeMarker expression for conditionally showing or hiding tex. For example, the CrcPizzaBot’s OrderPizza state defines this property as follows: |
||
|
For include and exclude, enter a comma-separated list of channel types for which the card should be shown (include) or hidden (exclude). The valid channel values are:
|
||
onInvalidUserInput |
A boolean flag that shows the text item when the user enters valid input (value=false) or when the user enters input that’s not valid (value=true).
|
||
rangeStart |
If you’ve specified an iteratorVariable, you can stamp out a subset of cards by specifying the rangeStart property in combination with the rangeSize property. You can enter a hardcoded value or use a FreeMarker expression that references a context variable that holds the range start. Using a rangeStart variable, you can then page to the next set of data by setting the rangeStart variable in the payload of a browse option.
|
No | |
rangeSize |
The number of cards that will be displayed as specified by the iteratorVariable and rangeStart properties.
|
No | |
You can assign a set of actions that are specific to a particular card, or a list of actions that are that are attached to the end of the card list.
OrderPizza state includes a card response item definition, as shown in the following snippet:cards:
- title: "${pizzas.name}"
description: "${pizzas.description}"
imageUrl: "${pizzas.image}"
name: "PizzaCard"
iteratorVariable: "pizzas"
rangeStart: "${cardsRangeStart}"
rangeSize: "4"
actions:
- label: "Order Now"
type: "postback"
payload:
action: "order"
variables:
orderedPizza: "${pizzas.name}"
orderedPizzaImage: "${pizzas.image}"
name: "Order"The Attachment Response Item
The attachmentResponse state includes the following properties.
| Property | Description | Required? |
|---|---|---|
attachmentType |
The type of attachment: image, audio, video, and file.
|
Yes |
attachmentURL |
The attachment’s download URL or source. | Yes |
Confirmation state uses an attachment response item to display picture of the order, one that’s different from the item pictured in the menu. Confirmation:
component: "System.CommonResponse"
properties:
metadata:
responseItems:
- text: "Thank you for your order, your ${pizzaSize} ${orderedPizza} pizza\
\ will be delivered in 30 minutes at GPS position ${location.value.latitude},${location.value.longitude}!"
type: "text"
name: "conf"
separateBubbles: true
- type: "attachment"
attachmentType: "image"
name: "image"
attachmentUrl: "${orderedPizzaImage}"
processUserMessage: falseUser Message Validation
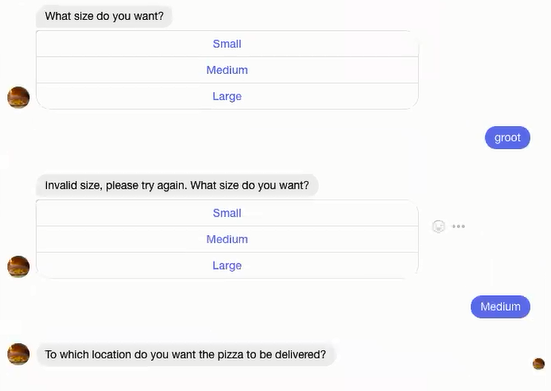
System.CommonResponse, System.Text, and System.List components validate the user-supplied free-text value that gets set for the variable property. For example, when the variable property is defined as a primitive type (string, boolean, float, double), these components try to reconcile the value to one of the primitive types. When the variable property is defined for an entity-type variable, these components call the NLP Engine to resolve the value to one of the entities. But when these components can’t validate a value, your bot can display an error message.
By referencing the system.invalidUserInput variable, you can add a conditional error message to your bot’s replies. This variable is a boolean, so you can use it as a condition with the FreeMarker if directive to display the message only when a user enters an invalid value. Otherwise, the message is hidden. The CrcPizzaBot’s AskPizzaSize state in the following snippet demonstrates this by adding this variable as condition within a FreeMarker template that’s evaluated by the if directive. Because it’s set to true, the bot adds an error message to the standard message (What size do you want?) when the user enters an invalid value.
  AskPizzaSize:
    component: "System.CommonResponse"
    properties:
      variable: "pizzaSize"
      nlpResultVariable: "iresult"
      maxPrompts: 2
      metadata:
        responseItems:
        - type: "text"
          text: "<#if system.invalidUserInput == 'true'>Invalid size, please try again.\
            \ </#if>What size do you want?"
          name: "What size"
          separateBubbles: true
System.Interactive
Instant apps are rich, interactive widgets that you can embed as web links in your dialog. Your bot can transition to an instant app when it needs to data using structured forms.
After you create one with the Instant App Builder, you can integrate it into your OBotML definition using the System.Interactive component. See Instant Apps.
interactive, which has placeholders for the following properties.
| Property | Description | Required? |
|---|---|---|
sourceVariableList |
A comma-separated list of context or user variable names. These variable names are the parameters that are that’s sent to the instant app. You can set each variable by adding a series of System.SetVariable states before the System.Interactive state. To get an idea, take a look at the setDate, setAmount, setMerchant, and SetDescription states in the FinancialBot.
|
Yes |
variable |
The name of the variable (a string value) that identifies the instant app’s callback payload. When the bot user completes the instant app, it sends a callback with a payload which is stored by this variable. At a later point in your OBotML definition, you can use this payload in a System.Output component.
|
Yes |
id |
The id of the instant app schema that gets instantiated. Enter the ID from the App Settings page of the Instant App Builder. See App Settings. |
Yes |
prompt |
A text string. By default, this component outputs “Please tap on the link to proceed.” | No |
linkLabel |
The label for the button that invokes the instant app. The default string is Link.
|
No |
cancelLabel |
The label for the Cancel button that lets users leave the state without invoking the instant app. By default, the string is Cancel.
|
No |
translate |
Use this property to override the boolean value that you’ve set for the autotranslate context variable. If you haven’t set this variable, or if you set it to false, then you can set this property to true to enable autotranslation for this component only. If you set the autotranslation variable is set to true, you can set this property to false to exclude this component from autotranslation. See Autotranslation.
|
No |
How Do I Use This?
startDispute to trigger an instant app. At runtime, when the Dialog Engine moves to the System.Interactive state called startDispute, the bot returns a link to the user. (This is the URL that’s configured for the Invite Message in the Instant App Builder. See App Settings.) The component identifies the instant app (Bank_Transaction_Interactive_With_Verify). The sourceVariableList names the variables whose values get passed to the instant app, namely date, merchant, amount, and description.
Note:
For the purposes of this reference bot, the values for these variables are populated with sample data through theSystem.SetVariable component.
inputDate, inputDescription, inputMerchant, and inputDescription. See Parameters and Using Brace Notation in Element and Parameter Values.
The snippet also shows how the bot returns the reason and dispute ID from the instant app’s return action. See Exit to Bot.
context:
  variables:
...
    dispute: "string"
    amount: "string"
    merchant: "string"
    date: "string"
    description: "string"
states:
  intent:
    component: "System.Intent"
    properties:
      variable: "iResult"
      confidenceThreshold: 0.4
    transitions:
      actions:
        Balances: "startBalances"
        Transactions: "startTxns"
        Send Money: "startPayments"
        Track Spending: "startTrackSpending"
        Dispute: "setDate"
        unresolvedIntent: "unresolved"
...

# Populate the required variables
  setDate:
    component: "System.SetVariable"
    properties:
      variable: "date"
      value: "2017-10-25T11:34:31Z"
    transitions: {}
  setAmount:
    component: "System.SetVariable"
    properties:
      variable: "amount"
      value: "$60"
    transitions: {}
  setMerchant:
    component: "System.SetVariable"
    properties:
      variable: "merchant"
      value: "PizzaUGotcha"
    transitions: {}
  setDescription:
    component: "System.SetVariable"
    properties:
      variable: "description"
      value: "restaurants"
    transitions: {}
# Call instant app
  startDispute:
    component: "System.Interactive"
    properties:
      sourceVariableList: "date, merchant, amount, description"
      variable: "dispute"
      id: "Bank_Transaction_Interactive_With_Verify"
    transitions: {}
# Use the callback payload data
  instantAppOutput:
    component: "System.Output"
    properties:
      text: "Successfully filed dispute, your reference number is '${dispute.value.disputeID}'\
        \ and reason is '${dispute.value.reason}'"
    transitions:
      return: "instantAppOutput"
Transitions
System.CommonResponse , System.List, and System.Text component use these transitions. See Message Handling for Output Components to find out how these transitions get triggered.
| Transition | Description |
|---|---|
cancel |
Set this transition when a user exceeds the allotted attempts set by the maxAttempts property.
|
textReceived |
Set this when users send text or emojis. For example: |
attachmentReceived |
Set this when a user sends an image, audio, video, or file attachment. |
locationReceived |
Set this when the user sends a location. |
unexpectedAction |
Set this to circumvent unexpected user behavior. Specifically, when a user doesn’t tap an action item in the current message, but instead taps an action belonging to an older message in the chat session. You can access the unexpected action by referencing the system.botsUnexpectedAction variable.
|
Message Handling for Output Components
-
By entering free text.
-
By sending their location.
-
Using a multi-media option to send an image, audio file, video, or file attachment.
-
Tapping one of the postback buttons displayed in the most recent message output by the bot.
-
By scrolling to a previous message in the conversation and tapping one of its buttons.
Handling Free Text
System.CommonResponse, System.List and System.Text components first validate the value. For valid values, the components trigger the textReceived transition. You don’t have to set this transition in the OBotML definition; if you don’t define this transition, then the Dialog Engine transitions to the next state, or performs the default transition.
Tip:
UsetextReceived to handle unexpected user messages when you expect the user to tap a button, send an attachment, or a location.
Handling Multimedia Messages
System.CommonResponse, System.List, and System.Text component stores the attachment information as a JSON object in the variable property that’s specified for the component. This object has the following structure:{
"type": "video",
"url": "https://www.youtube.com/watch?v=CMNry4PE93Y"
}myVideo, you can access the video using the FreeMarker expression, ${myVideo.value.url}. It also sets the transition action to attachmentReceived. You don’t have to specify this transition in your OBotML definition. If you don’t define this transition, then the Dialog Engine transitions to the next state, or performs the default transition.
Tip:
UseattachmentReceived to handle situations where users send an attachment unexpectedly.
Handling Location Messages
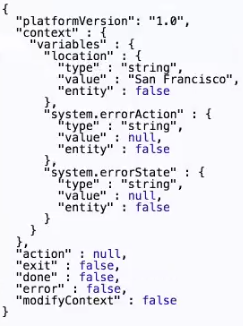
System.CommonResponse, System.List, and System.Text components store the location information as a JSON object in the variable property specified for the component. This object has the following structure:{
"title": "Oracle Headquarters",
"url": "https://www.google.com.au/maps/place/…",
"longitude": -122.265987,
"latitude": 37.529818
}${location.value.latitude}. It also triggers the locationReceived action, so you don’t have to specify this transition in your OBotML definition. If you don’t define this transition, then the Dialog Engine transitions to the next state, or performs the default transition.
Tip:
IncludelocationReceived transition to handle situations where users send a location unexpectedly, or when you want to ensure that a user sends a location at the point where it’s expected.
Handling Button Postback Actions
System.List or System.CommonResponse components receive the payload as a stringified JSON object:{
"action": "order",
"state": "OrderPizza",
"variables": {
"orderedPizza": "PEPPERONI",
"orderPizzaImage": "http://pizzasteven/pepperoni.png"
}order, and sets the orderedPizza and orderedPizzaImage variables to the value specified in the payload.
Handling Button Postback Actions for an Older Message
unexpectedAction transition is triggered and the action value is stored in the system.unexpectedAction variable. This allows you to have one generic state to handle all of the unexpected user actions and messages....
defaultTransitions:
unexpectedAction: "HandleUnexpectedAction"
states:
OrderPizza:
component: "System.CommonResponse"
properties:
metadata:
responseItems:
- type: "text"
text: "Here are our pizzas you can order today"
...
processUserMessage: true
transitions:
actions:
order: "AskPizzaSize"
more: "OrderPizza"
textReceived: "Intent"
...
HandleUnexpectedAction:
component: "System.Switch"
properties:
variable: "system.unexpectedAction"
values:
- "pizza"
- "pasta"
- "order"
transitions:
actions:
NONE: "ActionNoLongerAvailable"
pizza: "OrderPizza"
pasta: "OrderPasta"
order: "AskPizzaSize"Detecting Unexpected Actions
state property of the postback payload, they allow your bot to detect when a user does the unexpected by tapping a button from a previous message, essentially traversing backwards through the dialog flow. When a user taps this button, the name of the state is set for the postback’s state property. The bot compares the payload’s state name against the current state. When the two no longer match, the bot fires the unexpectedAction transition.
Note:
Only components that set the state property in the payload can enable the bot to respond when the user skips back in the flow. TheSystemOAuthAccountLink doesn’t set this property, so tapping the button on an older message can’t trigger the unexpectedAction transition.
Limiting the Number of User Prompts
The maxPrompts property limits the number of times that the output components can prompt the user when they can’t match the input value to any of the values defined for the entity or input type that’s referenced by the variable property. While this is an optional property, adding it can prevent your dialog from going in circles when users repeatedly enter invalid values. You can set the maximum number of prompts using an integer (like 2 in the following snippet). The dialog moves onto the next state if the user enters a valid value before reaching this limit. Otherwise, the dialog transitions to the state defined by the cancel action. In the following sample, the dialog moves to the setDefaultSize state when users run out of chances. At this point, the bot makes their choice for them, because the System.SetVariable component sets the pizza size to large.
  size:
    component: "System.List"
    properties:
      prompt: "What size Pizza do you want?"
      options: "${size.type.enumValues}"
      variable: "size"
      maxPrompts: 2
    transitions:
      actions:
        cancel: "setDefaultSize"
  setDefaultSize:
    component: "System.SetVariable"
    properties:
      variable: "size"
      value: "Large"
    transitions: {}
Note:
Setting themaxPrompts property to a negative number is same as not entering a value, or not including the property at all: the bot will continue to prompt the user until it receives a valid value.
Variable Components
System.SetVariable
The System.SetVariable component sets the value of a pre-defined variable. For example, you can set the value for an entity variable because this component can extract the entity match that's held by the iResult variable that's set for the System.Intent component.
| Property | Description | Required? |
|---|---|---|
variable |
The name of the variable that’s defined as one of the context properties. This can be a variable defined for an entity or a predetermined value, like a string.
|
Yes |
value |
The target value, which you can define as a literal or as a expression that references another variable. | Yes |
The startTxns state in the following code snippet shows how you can define the target value using an expression that references another entity variable. In this case, "${iResult.value.entityMatches['AccountType'][0]” references the iResult variable that’s resolved earlier in the flow by the System.Intent component. This variable sets the accountType variable if the AccountType entity is associated with the intent that’s resolved by the System.Intent component. For example, if a user enters, “I want to transfer money to checking,” then this expression sets the accountType variable value to “checking.” If the System.SetVariable component can’t find matches, then the Dialog Engine moves on to the next state in the dialog flow (declared by transitions: {}).
main: true
name: "FinancialBotMainFlow"
context:
  variables:
    accountType: "AccountType"
    txnType: "TransactionType"
    txnSelector: "TransactionSelector"
    toAccount: "ToAccount"
    spendingCategory: "TrackSpendingCategory"
    paymentAmount: "string"
    iResult: "nlpresult"
states:

...

  startTxns:
    component: "System.SetVariable"
    properties:
      variable: "accountType"
      value: "${iResult.value.entityMatches['AccountType'][0]}"
    transitions: {}
...setOAuthRedirectURL:
component: "System.SetVariable"
properties:
variable: "redirectURL"
value: "https://thatcompany.io/connectors/v1/tenants/5c824-45fd-b6a2-8ca/listeners/facebook/channels/78B5-BD58-8AF6-F54B141/redirect"
transitions: {}
System.ResetVariables
This component resets the values of the variables to null. This component doesn’t require any transitions (use transitions :{}).
| Property | Description | Required? |
|---|---|---|
variableList |
A comma-separated list of variable names. | Yes |
System.CopyVariables
Copies the variable values.
from and to properties as in the following snippet, where the value is copied to a user context:setupUserContext:
component: "System.CopyVariables"
properties:
from: "lastQuestion,lastResponse"
to: "user.lastQuestion,user.lastResponse"
from and to as lists of variables, you can also define from with a single variable and to as a list. If you set an additional to property, it inherits the variable value of the proceeding from property.
Apache FreeMarker Reference
Built-In String FreeMarker Operations
tester as an example. As shown in the following snippet, its value is set to "hello world " (with three trailing blank spaces):context:
variables:
tester: "string"
…
states:
setVariable:
component: "System.SetVariable"
properties:
variable: "tester"
value: "hello world "
Note:
The followingtext property definition allows the bot to output either the tester value, or, no string found if no value has been set for the variable.printVariable:
component: "System.Output"
properties:
text: "${tester.value!'no string found'}"
transitions: {} | Built-In Operation | Usage | Output |
|---|---|---|
capitalize |
${tester.value?capitalize} |
Hello World |
last_index_of |
${tester.value?last_index_of('orld')} |
7 |
left_pad |
${tester.value?left_pad(3,'_')} |
___hello world |
length |
${tester.value?length} |
14 |
lower_case |
${tester.value?lower_case} |
hello world |
upper_case |
${tester.value?upper_case} |
HELLO WORLD |
replace |
${tester.value?replace('world', 'friends')} |
hello friends |
remove_beginning |
${tester.value?remove_beginning('hello')} |
world |
trim |
${tester.value?trim} |
hello world (the trailing three spaces are removed)
|
ensure_starts_with |
${tester.value?ensure_starts_with('brave new ')} |
brave new hello world |
ensure_ends_with |
${tester.value?ensure_ends_with(' my friend')}$ |
hello world my friend |
contains |
${tester.value?contains('world')?string ('You said world', 'You did not say world')} |
You said worldThe |
ends_with |
${tester.value?ends_with('world')?string ('Ends with world', 'Doesn't end with world')} |
Ends with world |
starts_with |
${tester.value?starts_with('world')?string ('Starts with world', 'Doesn't start with world')} |
Doesn't start with world |
matches (regular expression returns true or false)
|
${tester.value?matches('^([^0-9]*)$')} |
The regular expression returns true or false depending on whether the value contains a number (in which case the boolean value is returned as false). The tester value returns true.
|
matches (regular expression returns a string)
|
${tester.value?matches('^([^0-9]*)$')?} |
Same as above, but this time, true is returned as a string. The matches('regular expression') function returns true or false as boolean types. To print true or false in a System.Output component, use ?string to perform a to-string conversion.
Note: regular expressions can’t be used in expressions that return groups. Use them in expressions that returns a single match or no match. |
Example: Improving the Confidence Level with Casing
lower_case in the following snippet. getIntent:
component: "System.Text"
properties:
prompt: "Hi, I am a the Pizza Palace bot. How can I help?"
variable: "userstring"
transitions: {}
toLowercase:
component: "System.SetVariable"
properties:
variable: "userstring"
value: "${userstring.value?lower_case}"
transitions: {}
intent:
component: "System.Intent"
properties:
variable: "iResult"
confidenceThreshold: 0.8
sourceVariable: "userstring"
transitions:
actions:
orderPizza: "orderPizza"
cancelOrder: "cancelOrder"
unresolvedIntent: "handleUnresolved"To implement this, you first ask the for the user input using the System.Text component. In this example, the System.Text component saves the user input in the userstring variable. The Sytem.SetVariable uses FTL to change the case of the user input string to lower case and saves the modified string to the same userstring variable. Finally, the userstring variable is referenced by the System.Intent component using the sourceVariable property to run the modified user string against the intent engine.
Example: Transforming Case with the System.Switch Component
Another component that can be simplified with FTL is System.Switch.
choice variable.switch:
component: "System.Switch"
properties:
variable: "choice"
values:
- "wine"
- "beer"
transitions:
actions:
wine: "serverWine"
beer: "serveBeer"
NONE: "serveWater"System.Text component may inconsistent, even within a word (WiNE). Instead of adding all possible variations to the System.Switch definition, use an FTL operation like upper_case to make the casing uniform:switch:
component: "System.Switch"
properties:
source: "${choice.value?upper_case}"
values:
- "WINE"
- "BEER"
transitions:
actions:
WINE: "serveWine"
BEER: "serverBeer"
NONE: "serveWater"Example: Concatenating FTL Expressions
normalizeFlightNumber:
  component: "System.SetVariable"
  properties:
    variable: "flight"
    value: "${flight.value?trim?lower_case?remove_beginning('ua ')
            ?remove_beginning('ua')}"
Built-In FreeMarker Number Operations
negativeValue (-2.5) and positiveValue (0.5175) context variables in the following snippet. context:
variables:
negativeValue: "float"
positiveValue: "float"
states:
setNegativeValue:
component: "System.SetVariable"
properties:
variable: "negativeValue"
value: -2.5
setPositiveValue:
component: "System.SetVariable"
properties:
variable: "positiveValue"
value: 0.5175| Operation | Example | Output |
|---|---|---|
abs |
${negativeValue.value?abs} |
2.5
The operator turns the negative numeric value into a positive value. |
string (used with a numerical value)
|
${negativeValue.value?abs?string.percent} |
250%
The operator first changes the negative value to a positive. Then it converts it into percent, implicitly multiplying the value by 100. |
string (with the decimal format value and various currencies)
Tip: Check out Charbase for other currency symbols. |
${positiveValue.value?string['###.##']} |
0.51 |
${positiveValue.value?string['###.##%']} |
51%
The operator adds adding a percentage character after multiplying the value by 100. |
|
${positiveValue.value?string['##.###\u00A4']} |
0.51 $ | |
${positiveValue.value?string['##.###\u20AC']} |
0.51 € | |
${positiveValue.value?string['##.###\u00A3']} |
0.51 £ | |
round |
${negativeValue.value?round} |
-2
The operator rounds to the nearest whole number. If the number ends with .5, then it rounds upwards. |
${positiveValue.value?round} |
1
The operator rounds to the nearest whole number. If the number ends with .5, then it rounds upwards. |
|
floor |
${positiveValue.value?floor} |
0
The operator rounds downwards. |
ceiling |
${positiveValue.value?ceiling} |
1
The operator rounds upwards. |
lower_abc |
${negativeValue.value?abs?round?lower_abc} |
c
The operator turns the negative value into a positive, then rounds it to 3. It returns c, the third letter of the alphabet. |
upper_abc |
${negativeValue.value?abs?round?upper_abc} |
C
The operator turns the negative value into a positive, then rounds it to 3. It returns C, the third letter of the alphabet. |
is_infinite |
${positiveValue.value?is_infinite?string} |
false
The operator returns false, because a float value is not infinite according to IEEE 754 (Standard for Floating-Point Arithmetic). Note: The returned value would be a boolean without |
Built-In FreeMarker Array Operations
Array (or sequence) operations enable your bot to, among other things, determine the size of an array, sort arrays, or find content within an array.
-
${iResult.value.entityMatches[‘name of entity’]}returns an array of entities found in a user string that’s passed to theSystem.Intentcomponent and stored in theiResult: nlpresultvariable. -
${iResult.value.intentMatches.summary}returns an array of intents and the confidence level for the given user input.
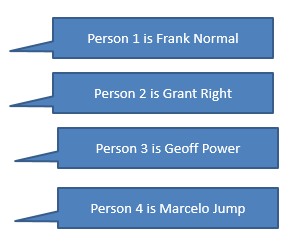
person and colors variables.context:
variables:
person: "string"
colors: "string"
...
setPerson:
component: "System.SetVariable"
properties:
variable: "person"
value:
- firstName: "Frank"
lastName: "Normal"
- firstName: "Grant"
lastName: "Right"
- firstName: "Geoff"
lastName: "Power"
- firstName: "Marcelo"
lastName: "Jump"
...
setColors:
component: "System.SetVariable"
properties:
variable: "colors"
value:
- "yellow"
- "blue"
- "red"
- "black"
- "white"
- "green"
colors and person arrays are used to illustrate the array operations and in Example: Iterating Arrays.
-
To create mock data for testing.
-
To define data structures that persist beyond user sessions.
| Operator | Example | Output |
|---|---|---|
size |
${person.value?size?number} |
4—The size (four members) of the person array
|
| array index | ${person.value[1].firstName} |
Grant—It’s the value of the second firstName property in the person array.
|
${person.value[1].firstName !'unknown'} |
Same as the above, but in this case, the bot outputs unknown if the second firstName property has no value.
|
|
first |
${person.value?first.firstName} |
Frank—The first entry of the person array. This operation doesn’t use the array index.
|
last |
${person.value?last.firstName} |
Marcelo—The final lastName value in the person array.
|
sort_by |
${person.value?sort_by('lastName') [0].firstName} |
MarceloThis operator sorts the
person array by the lastName property in ascending order. It then prints the value of the corresponding firstName property for final entry in the person array:
Note: Unless you save the sorted array in a variable using |
${person.value?sort_by('lastName')?reverse[0].firstName} |
Grant—the values are sorted in descending order:
|
|
seq_index_of |
${colors.value?seq_index_of('red')} |
2—The index value for red in the colors array.
|
seq_last_index_of |
${colors.value?seq_last_index_of('red')} |
2—The last index value for red in the
|
join |
${colors.value?join(',')} |
Returns the colors array as a comma-separated string: yellow, blue, red, black, white, green |
seq_contains |
${colors.value?seq_contains('red')? |
Returns Yes because the array contains red.
Note: |
sort |
${colors.value?sort?join(',')} |
Returns the colors array as a comma-separated string in ascending order: black, blue, green, red, white, yellow |
reverse |
${colors.value?sort?reverse?join(',')} |
Returns the colors array as a comma-separated string in descending order: yellow, blue, red, black, white, green |
Example: Iterating Arrays
person variable and then iterate over its elements so that the bot outputs something like:
    component: "System.CommonResponse"
    properties:
      metadata:
        responseItems:
        - type: "text"
          text: "${person?index+1}. ${person.firstName} ${person.lastName}"
          name: "Sorry"
          separateBubbles: true
          iteratorVariable: "person"
      processUserMessage: false
Note:
The output described in this code is not sorted (that is, nosort_by operation is used).
Built-In FreeMarker Date Operations
.now and the built-in date operator. PrintToday:
component: "System.Output"
properties:
text: "${.now?date}"
keepTurn: false| Operation(s) | Example | Output |
|---|---|---|
date |
${.now?date} |
The current date |
time |
${.now?time} |
The time of day, like 5:46:09 PM |
datetime |
${.now?datetime} |
Prints current date and time, like Jan 17, 2018 5:36:13 PM. |
long and number_to_date |
${(.now?long + 86400000)?number_to_date } |
Adds 24 hours to the current date. If the call is made on January 17, 2018, FreeMarker outputs January 18, 2018. |
string (with formatting styles)
|
${.now?string.full} |
Converts the current date to string formatted as Wednesday, January 17, 2018 6:35:12 PM UTC. |
${.now?string.long} |
Converts date to string with the following formatted output: January 17, 20186:36:47 PM UTC. | |
${.now?string.short} |
Converts date to string with the following formatted output: 1/17/18 6:37 PM | |
${.now?string.medium} |
Converts date to string with the following formatted output: Jan 17, 2018 6:38:35. | |
${.now?string.iso} |
Prints the date in the ISO 8601 standard like 2018-01-17T18:54:01.129Z. |
|
string (with specified output formats)
|
${.now?string['dd.MM.yyyy, HH:mm']} |
Prints the current date in a custom format, like 17.01.2018, 18:58. |
${.now?string['yyyy']} |
2018 |
|
datetime (with string and formatting style)
|
${date_variable?datetime?string.short} |
Converts the date to a string formatted as 1/17/18 6:37 PM.
The |
Converting the entity value to a string using
|
${dateVar.value.date?long?number_to_date?date?string.short} |
Converts the date from the entity extraction to a string formatted as 11/17/18.
The date operator tells FreeMarker that the variable only holds a date, not time information. Using this format avoids errors. |
${dateVar.value.date?long?number_to_date?string.medium} |
Converts the date that’s derived from entity extraction to a string formatted as Jan 17, 2018.
Note: All other formats like |
|
${dateVar.value.date?long?number_to_date?string['dd.MM.yyyy']} |
Prints the date in custom format. For example: 17.01.2018, 18:58. | |
${dateVar.value.date?long?number_to_date?string['yyyy']} |
Prints the date derived from entity in a custom format. |
Example: Extracting Dates from User Input
DATE, to extract tomorrow from the request. It outputs the requested date using ${(theDate.value.date?long + 86400000)?number_to_date} to add 24 hours (or 86,400,000 milliseconds) to the current date.
| OBotML Code | Output |
|---|---|
|
Example: Setting a Default Date (When No Date Value Is Set)
  conditionEquals:
    component: "System.ConditionEquals"
    properties:
      variable: "theDate"
      value: null
    transitions:
      actions:
        equal: "setDefaultDate"
        notequal: "printDateFound"
System.SetVariable component defines a default value in a variable and transform it into a string. setDefaultDate:
component: "System.SetVariable"
properties:
variable: "defaultDateInput"
value: "${.now?datetime?string.long}"System.MatchEntity component verifies that this value is a date and then sets thetheDATE variable: matchEntity:
component: "System.MatchEntity"
properties:
sourceVariable: "defaultDateInput"
variable: "theDate"
transitions:
actions:
match: "printDateFound"
nomatch: "exit"| OBotML | Output |
|---|---|
|
The SDK Helper Methods
| Function | Usage |
|---|---|
conversation.payload() |
Retrieves the payload of the current user message. The payload contains the message text and other information, like the user ID. |
conversation.text() |
Accesses the text string. |
conversation.attachment() |
Accesses an attachment message. |
conversation.location() |
Accesses a location message. |
conversation.postback() |
Accesses a postback message. |
conversation.transition(“action”) and conversation.transition() |
Directs the Dialog Engine to the next state in the dialog flow. The custom component can influence the navigation by returning an action string that you’ve mapped to state in the dialog flow.
|
conversation.channelType() |
Allows you to determine the messaging channel. |
conversation.keepTurn(boolean) |
Enables your bot to retain control of the conversation. keepTurn essentially decides who provides input or a response: the bot or its user. So before you call done, you can indicate who goes next by calling either conversation.keepTurn(true) or convesationkeepTurn(false).
|
conversation.reply({text: "..."}) |
Returns the response from the messaging client. This response can be a simple text message, or a a more complex response with a rich UI that uses the functions of the MessageModel class in the Custom Component SDK. This function enables you to build more a complex response, such as a scrolling carousel on Facebook. For this type of response, you need to structure the JSON payload appropriately.
Important: You must calldone() to send the response, regardless of the number of calls made to conversation.reply.
|
conversation.properties() |
Provides access to the component input properties (conversation.properties().accountType).
|
conversation.error |
Indicates that there was an error in the processing. |
conversation.botId() |
Returns the ID of the bot that sent the request. |
conversation.platformVersion() |
Returns the version of the message platform (such as Facebook 1.0).
|
conversation.text() |
Provides access to the NLP text message that triggered the invocation of the intent and the component. |
conversation.variable(“name”,value) |
Provides read or write access to variables defined in the current flow. This function takes the following arguments:
|
conversation.nlpResult() |
Returns an NLPResult helper object for nlpresult variables. For example, you can find the value of an entity that was extracted from the user input by calling conversation.nlpResult.entityMatches(entity name). You can use this value to update an entity type variable.
|
conversation.request() |
Accesses the JSON object body that’s sent by the bot. Use this function to parse the payload for any information that's not directly exposed by one of the SDK functions. |
conversation.response() |
Grants access to the HTTP response payload (a JSON object) that’s sent back to the bot when you call done().
|
Navigation with keepTurn and transition
keepTurn and transition functions to define how the conversation continues once the component has finished processing.invoke: (conversation, done) ==> {
...
conversation.keepTurn(true);
conversation.transition ("success");
done();
}| Use Case | Values Set for keepTurn and transition |
|---|---|
|
A custom component’s reply that doesn’t require any user interaction. |
For example, a custom component updates a context variable with a list of values that is then displayed by a
System.List component that’s defined for the next state in the dialog flow definition.Note: When component doesn’t transition to the next state, it needs to track its own state by creating a runtime variable using theconversation.variable (“name”, variable) method.
|
| A sequential user conversation in which the user provides input, the bot replies, and so on. |
For example:
|
|
The bot to passes control back to the user without navigating to the next dialog state. This allows the component to process the user input. Here are a couple of examples:
|
For example:
|
The custom component goes into a loop, which can’t be stopped by user input. For example, a component pings a remote service for the status of an order until the status is returned as accepted or when the component times out. If the accepted status is not returned after the fifth ping, then the component transitions to a failedOrder state, which is defined in the dialog flow.
|
For example:
Note: Always callkeepTurn after reply and not before, because reply implicitly sets keepTurn to false.
|
The Custom Component Payload
Taking a Look at the Metadata Retrieval
{
	"version": "1.0",
	"components": [{
			"name": "AgeChecker",
			"properties": {
				"minAge": {
					"type": "integer",
					"required": true
				}
			},
			"supportedActions": [
				"success",
				"fail"
			]
		}, {
			"name": "PizzaBaker",
			"properties": {
				"size": {
					"type": "string",
					"required": true
				},
				"crust": {
					"type": "string",
					"required": true
				},
				"type": {
					"type": "string",
					"required": true
				}
			},
			"supportedActions": [
				"pizzaReady",
				"fail"
			]
		}
	]
}{
Taking a Look at the Invocation Request and Response Payloads
For the POST, the request contains the bot’s GUID, the platform version of Bots, and a context definition for the dialog flow variables, the state’s properties, the original message, the channel that delivered it, and the tenant.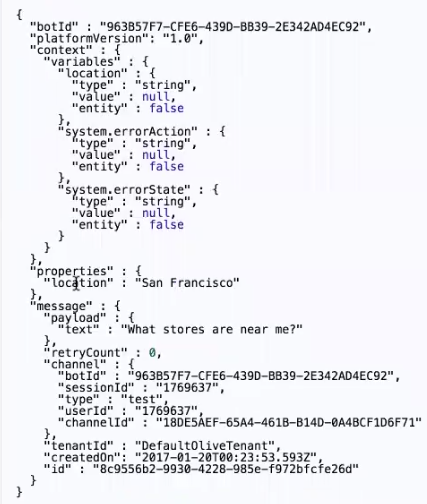
The POST response payload also includes the context definition for all of the variable values, including those that have been mutated by the component. The response payload can also control the routing through properties like exit, done, and error. You don’t have to parse the JSON if you use our SDK. Instead, you just need to set the variables. See The SDK Helper Methods. 