7 The Dialog Flow Definition
The dialog flow definition is the model for the conversation itself, one that lets you choreograph the interaction between the bot and its users.
Using the Bot Builder, you define the framework of the user-bot exchange in OBotML, Bots’ own implementation of YAML. This is a simple markup language, one that lets you describe a dialog both in terms of what your bot says and what it does.
The Dialog Flow Structure
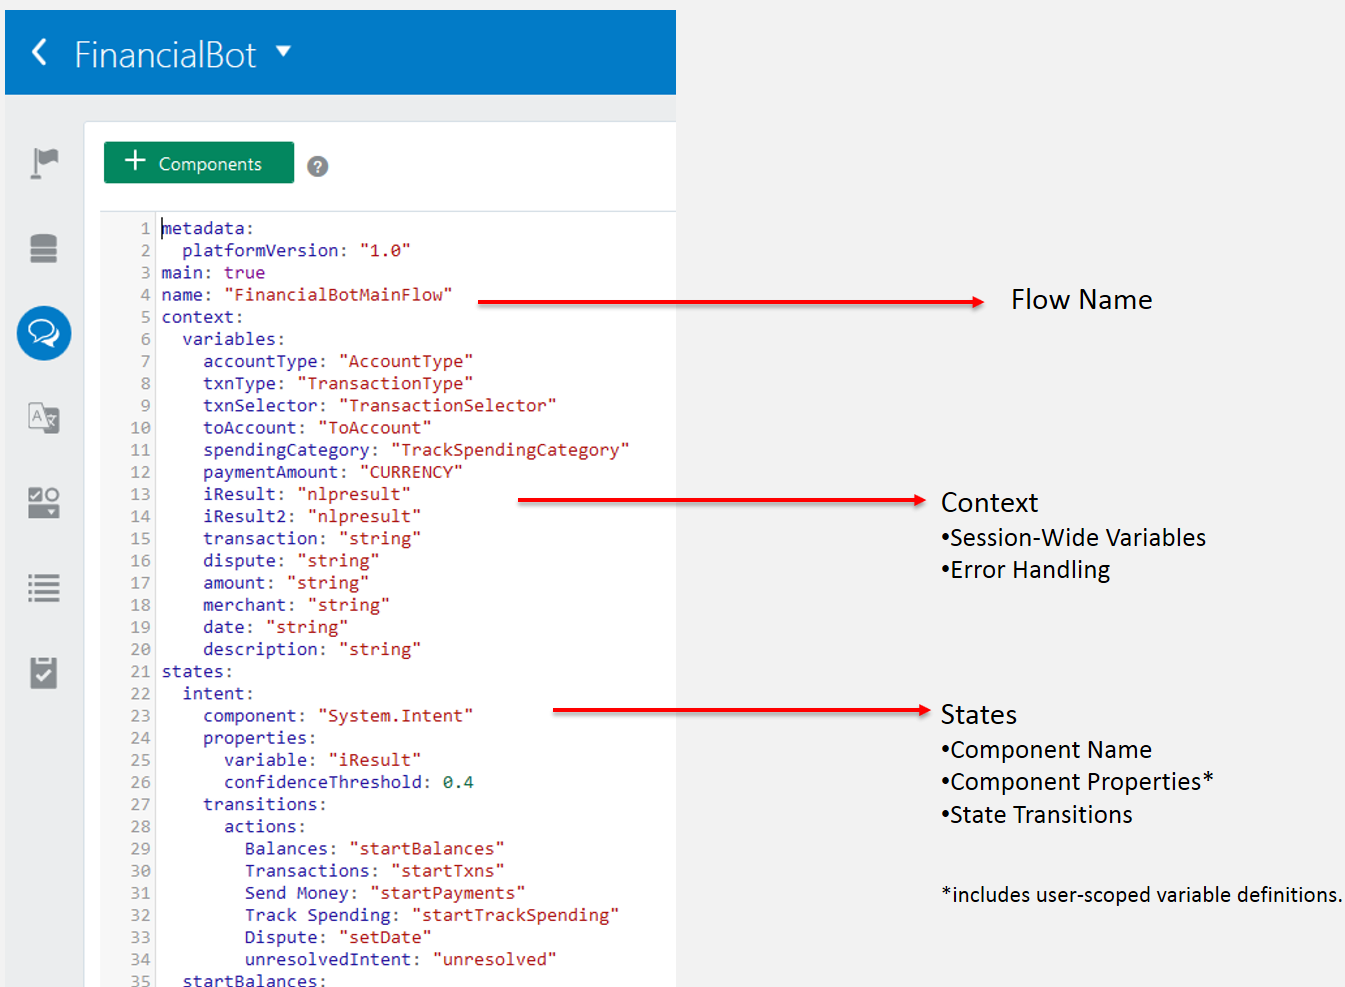
context, defaultTransitions, and states. You define the variables that are available across the session within the context node. The definition of the flow itself is described in the states section.
The dialog flow is laid out as follows:main: true
name: "HelloKids"
context:
variables:
variable1: "entity1"
variable2: "error"
...
States
state1:
component: "a custom or built-in component"
properties:
property1: "component-specific property value"
property2: "component-specific property value"
transitions:
actions:
action1: "value1"
action2: "value2"
state2:
component: "a custom or built-in component"
properties:
property1: "component-specific property value"
property2: "component-specific property value"
transitions:
actions:
action1: "value1"
action2: "value2"
...
Context
context node can be primitive types like int, string, boolean, double, or float. They can also describe error handling, or, as in the following snippet from the PizzaBot dialog flow definition, they name entities like PizzaSize and PizzaCrust. Along with built-in entities and the custom entities, you can also declare a variable for the nlpresult entity, which holds the intent that's resolved from the user input. These variables are scoped to the entire flow. How Do I Write Dialog Flows in OBotML? tells you how to assemble the different parts of the dialog flow. You can also scope user variable values to enable your bot to recognize the user and persist user preferences after the first conversation. See User-Scoped Variables.metadata:
platformVersion: "1.1"
main: true
name: "PizzaBot"
context:
variables:
size: "PizzaSize"
type: "PizzaType"
crust: "PizzaCrust"
iResult: "nlpresult"
States
state node within your OBotML definition names a component along with component–specific properties and transitions that trigger the next state. The PizzaBot includes a sequence of state nodes that verify a customer’s age. These states include components that take the user-supplied integer value, check it, and then output a text string as appropriate. To start off the process, the askage state’s component requests the user input then moves on to the checkAge state, whose AgeChecker component validates the user input. Here, the dialog is at a juncture: its transitions key defines the block or allow states. If the allow state is triggered, then the user can continue on. The subsequent state definitions will track the user input to preserve the user’s context until she completes her order. If the user input causes the AgeChecker component to trigger the block action, however, then conversation ends for the under-age user because the dialog transitions to the underage state.metadata:
platformVersion: "1.1"
main: true
name: "PizzaBot"
context:
variables:
size: "PizzaSize"
type: "PizzaType"
crust: "PizzaCrust"
cheese: "CheeseType"
iResult: "nlpresult"
...
askage:
component: "System.Output"
properties:
text: "How old are you?"
transitions: {}
checkage:
component: "AgeChecker"
properties:
minAge: 18
transitions:
actions:
allow: "crust"
block: "underage"
crust:
component: "System.List"
properties:
options: "Thick,Thin,Stuffed,Pan"
prompt: "What crust do you want for your Pizza?"
variable: "crust"
transitions: {}
...
underage:
component: "System.Output"
properties:
text: "You are too young to order a pizza"
transitions:
return: "underage"How Do I Write Dialog Flows in OBotML?
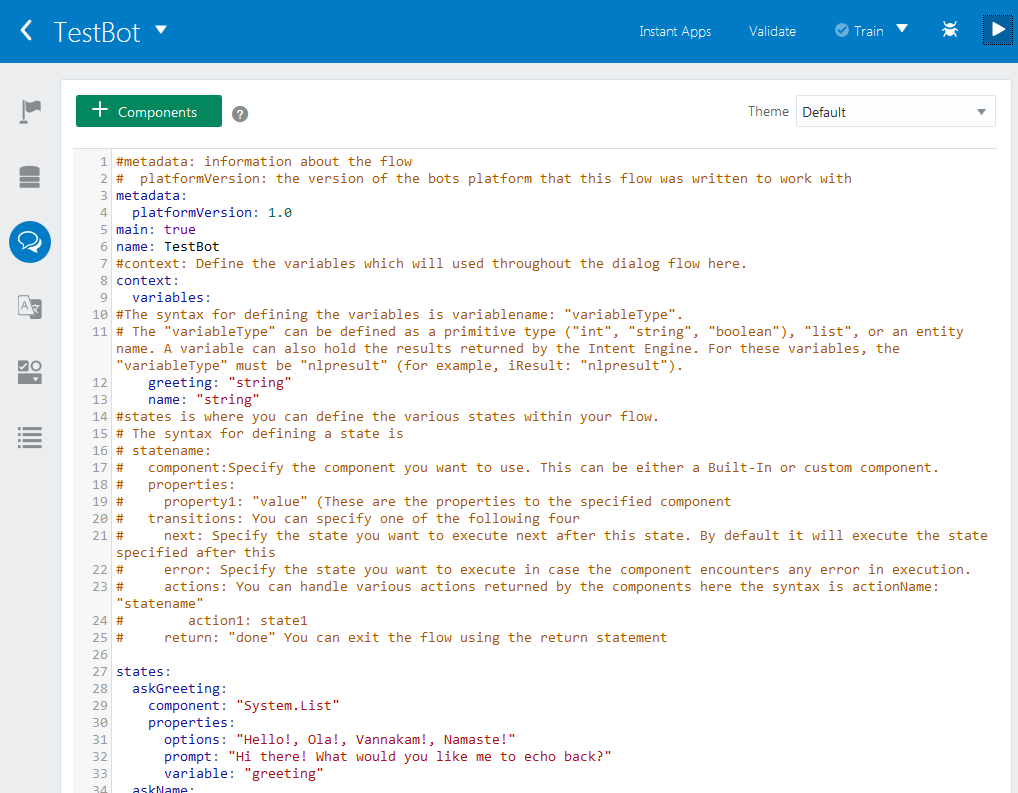
context and states nodes, so you can just delete the existing boilerplate and add your own content. To help you build state definitions that are syntactically sound, use the component templates in the Add Components menu. See Dialog Flow Syntax for tips on setting variables and defining states.
Important:
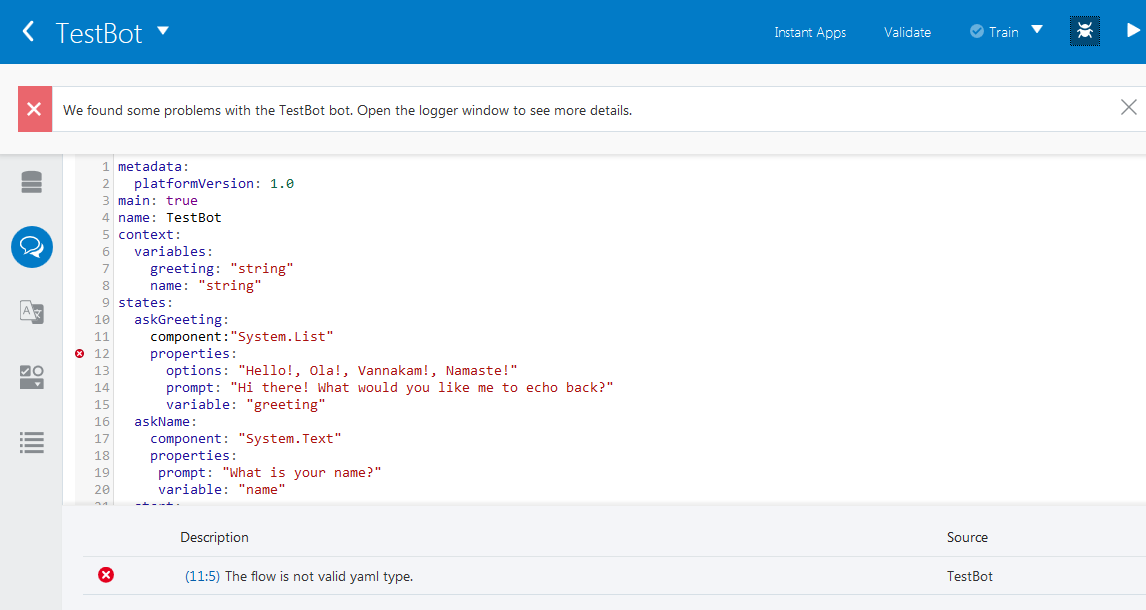
Click Validate and check the logger widow ( ) as you write your dialog flow.
Dialog Flow Syntax
| How Do I? | Use this | Example OBotML Markup |
|---|---|---|
| Set variables that persist the context across the entire dialog flow? | Within the context node, use the following syntax:
|
You can define variables as entities (like |
| Define an error handler for your bot? | Define the defaultTransitions node.
|
|
| Define a variable that holds the value for the resolved intent? | Within the context node, define a variable that names the nlpresult entity. As its name implies ("nlp" stands for Natural Language Processing), this entity extracts the intent resolved by the Intent Engine. Nearly all of the reference bots declare nlpresult variables.
|
|
| Control the dialog flow based on the user input? | Typically (though not always), you’d define an nlpresult variable property for the System.Intent component that returns the result from the Intent Engine. See System.Intent.
|
In the following snippet from the FinancialBot dialog flow, the System.Intent component instructs the Dialog Engine to proceed based on the value returned by its nlpresult variable (iResult). As described in The Dialog Flow Structure, you can declare an nlpresult variable in the flow’s context node to hold the resolved intent (iResult:”nlpresult” ). The potential outcome, defined by the states named in the actions node, is also predicated on the second property defined for this component, confidenceThreshold. You can set this optional property against the probabilistic score given by the Intent Engine. This definition for the System.Intent component tells the Dialog Engine to move on to the next state that matches a resolved intent whose accuracy rate at parsing user data is at least 40% or higher (confidenceThreshold: 0.4 ). See The confidenceThreshold Property. |
| Equip my bot to handle unresolved intents? | Define a state for the System.Intent’s unresolvedIntent action. unresolvedIntent is an intent that we provide for you to track the messages that couldn’t be resolved within the minimum confidence threshold. See Running Failure Reports to find out how to filter a quality report using this intent.
|
|
| Enable components to access variable values? | Use the .value property in your expressions (${crust.value} ). To substitute a default value, use ${variable.value!\"default value\"} . For example, thick is the default value in ${crust.value!\"thick\"}.
|
Use the Apache FreeMarker default operator ( |
| Save user values for return visits? | Within a state definition, add a variable definition with a user. prefix. See Defining User-Scoped Variables.
|
|
| Slot values? | Use the System.SetVariable , System.List , and System.Text components. When the System.SetVariable component can’t access a value, use components System.List and System.Text to prompt user input. See System.SetVariable.
|
|
| Exit a dialog flow and end the user session. |
Use a |
|
Flow Navigation
You can set the Dialog Engine on a specific path within the dialog flow by setting the transitions property for a state. Transitions describe how the dialog forks when variable values are either set or not set. They allow you to plot the typical route through the conversation (the “happy” flow) and set alternate routes that accommodate missing values or unpredictable user behavior.
| To do this... | ...Use this transition |
|---|---|
| Set a default sequence in the dialog flow. | To enable the Dialog Engine to move to the next state in the dialog, use an empty transition (transitions: {}) or omit a transitions definition altogether.
|
| Specify the next state to be executed. | Setting a next transition (next: “statename”), tells the Dialog Engine to jump to the state named by the next key.
|
| Terminate the conversation. | Defining a return transition terminates the user session at the state defined for the return key: |
| Trigger conditional actions. | Define the actions keys to trigger the navigation to a specific state or an action belonging to a custom component that’s executed by a backend service. If you don’t define any action keys, then the Dialog Engine relies on the default transition or a next transition (if one exists). See Transitions to find out about the specific actions that you can define for the user interface components.
|
| Handle component errors. | Set an error transition in case an error occurs when the component executes. The Dialog Engine will jump to the state that you define for the error key. If you don’t set an error transition, then the bot outputs the Oops! I’m encountering a spot of trouble message and terminates the session.
|
Conifguring the Dialog Flow for Unexpected Actions
| Scenario | Solution |
|---|---|
| Instead of tapping buttons, the user responds inappropriately in this situation by entering text. | To enable your bot to handle this gracefully, route to a state where the System.Intent component can resolve the text input, like textReceived: Intent in the following snippet from the CrcPizzaBot: |
| Users scroll back up to an earlier message and tap its options, even though they’re expected to tap the buttons in the current response. |
Adding an
unexpectedAction transition to all of the states that process a user message handles situations where a user taps the button belonging to an older message, because this action tells the Dialog Engine to transition to a single state that handles all of the unexpected actions, such as the HandleUnexpectedAction state in the OBotML snippet above. You can use different approaches to create this state:
Note: Depending on the factors involved in honoring the request, you may need to create a custom component to implement the routing. |
Accessing Variable Values with Apache FreeMarker FTL
${...}. You can incorporate FTL into the property definitions for various components, such as System.SetVariable and System.Output .
Note:
As illustrated by thetext and rendered metadata properties of the System.CommonResponse, you can also define the expressions using the if directive (<#if>...</#if>).
| To do this... | ...Do this |
|---|---|
| Read values from context variables. | Add the value property using dot notation:For example:
|
| Read values from context variables defined by complex entities. | Use dot notation to add an additional property:For example:
${MyMoney} in a System.Output component, you will see all the properties of the referenced currency JSON object.
|
Create a comma-delimited list of entity values that display as buttons that are specified by the options property.
|
Use this syntax:For example, for a list value entity like AccountType (whose savings, checking, and credit card values are constant and predefined for the user), you’d store these values in the
accountType variable using ${accountType.type.enumValues}:accountType variable.
|
| Use built-ins for strings, arrays (sequences), numbers, and dates. See Apache FreeMarker Reference. | Follow the value property with a question mark (?) and the operation name:
|
| Concatenate FTL expressions. | String the operations together using a question mark (?): |
User-Scoped Variables
When the conversation ends, the variable values that were set from the user input are destroyed. With these values gone, your bot users must resort to retracing their steps every time they return to your bot. You can spare your users this effort by defining user-scope variables in the dialog flow. Your bot can use these variables, which store the user input from previous sessions, to quickly step users through the conversation.
user. is treated as a user-scoped variable. As shown in the following dialog flow excerpt from the PizzaBotWithMemory dialog flow, these variables are identified by the user. prefix (such as user.lastsize in the checklastorder state). The user. variable persists the user ID. That ID is channel-specific, so while you can return to a conversation, or skip through an order using your prior entries on bots that run on the same channel, you can’t do this across different channels like Facebook Messenger and Amazon Alexa. metadata:
platformVersion: "1.0"
main: true
name: "PizzaBot"
parameters:
age: 18
context:
variables:
size: "PizzaSize"
type: "PizzaType"
crust: "PizzaCrust"
iResult: "nlpresult"
sameAsLast: "YesNo"
states:
intent:
component: "System.Intent"
properties:
variable: "iResult"
confidenceThreshold: 0.4
transitions:
actions:
OrderPizza: "checklastorder"
CancelPizza: "cancelorder"
unresolvedIntent: "unresolved"
checklastorder:
component: "System.ConditionExists"
properties:
variable: "user.lastsize"
transitions:
actions:
exists: "lastorderprompt"
notexists: "resolvesize"
lastorderprompt:
component: "System.List"
properties:
options: "Yes,No"
prompt: "Same pizza as last time?"
variable: "sameAsLast"
transitions: {}
rememberchoice:
component: "System.ConditionEquals"
properties:
variable: "sameAsLast"
value: "No"
transitions:
actions:
equal: "resolvesize"
notequal: "load"
...
load:
component: "System.CopyVariables"
properties:
from: "user.lastsize,user.lasttype,user.lastcrust"
to: "size,type,crust"
transitions: {}Defining User-Scoped Variables
As with other variable definitions in your flow, you enable the components to access the value through value expressions like “${user.age.value}”. Using these expressions with the following built-in components, can among other things, set a value to the stored user value. See Built-In Components: Properties, Transitions, and Usage.
| Component | Uses |
|---|---|
| System.SetVariable | Sets the stored user value. |
| System.ResetVariables | Resets a stored user value. |
| System.CopyVariables | Copies in the stored user value. |
| System.Output | Outputs the stored user value as text. |
| System.ConditionExists | Checks if the user-scoped variable is already in context. |
| System.ConditionEquals | Checks for the user-scoped variable. |
| System.Switch | Uses the stored value to switch from one state to another. |
Getting the User Context
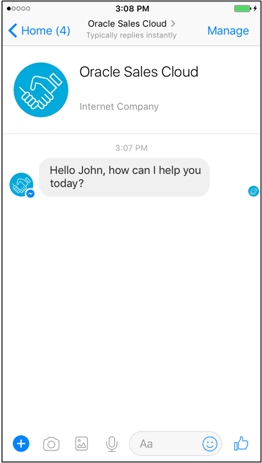
profile property enables your bot to recognize a user’s name, local, and local time. For example: Greeting:
component: System.Output
transitions:
next: Intent
properties:
text: "Hello ${profile.firstName}, how can I help you today?"
Use these pre-defined variables to output context-specific for the bot user.
| To do this... | Do this |
|---|---|
| Get the first name of the bot user. | ${profile.firstName} |
| Get the last name of the bot user. | ${profile.lastName} |
| Get the bot user’s locale. | ${profile.locale} |
| Get the user’s time zone (offset in seconds). | ${profile.timezoneOffset} |
Test the Dialog Flow
Once you have a valid dialog flow, you can test your bot as a whole. Be sure to validate the syntax before you test the bot.
-
Click Test (
 ).
).
-
Click Bot.
-
Enter an utterance and then click Send. Click
 to test an attachment response rendered by the
 System. CommonResponsecomponent.


