Using Oracle NoSQL Database Migrator
Learn about Oracle NoSQL Database Migrator and how to use it for data migration.
Oracle NoSQL Database Migrator is a tool that enables you to migrate Oracle NoSQL tables from one data source to another. This tool can operate on tables in Oracle NoSQL Database Cloud Service, Oracle NoSQL Database on-premises and AWS S3. The Migrator tool supports several different data formats and physical media types. Supported data formats are JSON, Parquet, MongoDB-formatted JSON, DynamoDB-formatted JSON, and CSV files. Supported physical media types are files, OCI Object Storage, Oracle NoSQL Database on-premises, Oracle NoSQL Database Cloud Service and AWS S3.
This article has the following topics:
Overview
Oracle NoSQL Database Migrator lets you move Oracle NoSQL tables from one data source to another, such as Oracle NoSQL Database on-premises or cloud or even a simple JSON file.
There can be many situations that require you to migrate NoSQL tables from or to an Oracle NoSQL Database. For instance, a team of developers enhancing a NoSQL Database application may want to test their updated code in the local Oracle NoSQL Database Cloud Service (NDCS) instance using cloudsim. To verify all the possible test cases, they must set up the test data similar to the actual data. To do this, they must copy the NoSQL tables from the production environment to their local NDCS instance, the cloudsim environment. In another situation, NoSQL developers may need to move their application data from on-premise to the cloud and vice-versa, either for development or testing.
In all such cases and many more, you can use Oracle NoSQL Database Migrator to move your NoSQL tables from one data source to another, such as Oracle NoSQL Database on-premise or cloud or even a simple JSON file. You can also copy NoSQL tables from a MongoDB-formatted JSON input file, DynamoDB-formatted JSON input file (either stored in AWS S3 source or from files), or a CSV file into your NoSQL Database on-premises or cloud.
As depicted in the following figure, the NoSQL Database Migrator utility acts as a connector or pipe between the data source and the target (referred to as the sink). In essence, this utility exports data from the selected source and imports that data into the sink. This tool is table-oriented, that is, you can move the data only at the table level. A single migration task operates on a single table and supports migration of table data from source to sink in various data formats.
Oracle NoSQL Database Migrator is designed such that it can support additional sources and sinks in the future. For a list of sources and sinks supported by Oracle NoSQL Database Migrator as of the current release, see Supported Sources and Sinks.

Description of the illustration migrator_overview.png
Terminology used with Oracle NoSQL Database Migrator
Learn about the different terms used in the above diagram, in detail.
-
Source: An entity from where the NoSQL tables are exported for migration. Some examples of sources are Oracle NoSQL Database on-premise or cloud, JSON file, MongoDB-formatted JSON file, DynamoDB-formatted JSON file, and CSV files.
-
Sink: An entity that imports the NoSQL tables from NoSQL Database Migrator. Some examples for sinks are Oracle NoSQL Database on-premise or cloud and JSON file.
The NoSQL Database Migrator tool supports different types of sources and sinks (that is physical media or repositories of data) and data formats (that is how the data is represented in the source or sink). Supported data formats are JSON, Parquet, MongoDB-formatted JSON, DynamoDB-formatted JSON, and CSV files. Supported source and sink types are files, OCI Object Storage, Oracle NoSQL Database on-premise, and Oracle NoSQL Database Cloud Service.
-
Migration Pipe: The data from a source will be transferred to the sink by NoSQL Database Migrator. This can be visualized as a Migration Pipe.
-
Transformations: You can add rules to modify the NoSQL table data in the migration pipe. These rules are called Transformations. Oracle NoSQL Database Migrator allows data transformations at the top-level fields or columns only. It does not let you transform the data in the nested fields. Some examples of permitted transformations are:
-
Drop or ignore one or more columns,
-
Rename one or more columns, or
-
Aggregate several columns into a single field, typically a JSON field.
-
-
Configuration File : A configuration file is where you define all the parameters required for the migration activity in a JSON format. Later, you pass this configuration file as a single parameter to the
runMigratorcommand from the CLI. A typical configuration file format looks like as shown below.{ "source": { "type" : <source type>, //source-configuration for type. }, "sink": { "type" : <sink type>, //sink-configuration for type. }, "transforms" : { //transforms configuration. }, "migratorVersion" : "<migrator version>", "abortOnError" : <true|false> }Group Parameters Mandatory (Y/N) Purpose Supported Values sourcetypeY Represents the source from which to migrate the data. The source provides data and metadata (if any) for migration. To know the typevalue for each source, see Supported Sources and Sinks.sourcesource-configuration for type Y Defines the configuration for the source. These configuration parameters are specific to the type of source selected above. See Source Configuration Templates . for the complete list of configuration parameters for each source type. sinktypeY Represents the sink to which to migrate the data. The sink is the target or destination for the migration. To know the typevalue for each source, see Supported Sources and Sinks.sinksink-configuration for type Y Defines the configuration for the sink. These configuration parameters are specific to the type of sink selected above. See Sink Configuration Templates for the complete list of configuration parameters for each sink type. transformstransforms configuration N Defines the transformations to be applied to the data in the migration pipe. See Transformation Configuration Templates for the complete list of transformations supported by the NoSQL Data Migrator. - migratorVersionN Version of the NoSQL Data Migrator - - abortOnErrorN Specifies whether to stop the migration activity in case of any error or not.
The default value is true indicating that the migration stops whenever it encounters a migration error.
If you set this value to false, the migration continues even in case of failed records or other migration errors. The failed records and migration errors will be logged as WARNINGs on the CLI terminal.true, false
Note: As JSON file is case-sensitive, all the parameters defined in the configuration file are case-sensitive unless specified otherwise.
Supported Sources and Sinks
This topic provides the list of the sources and sinks supported by the Oracle NoSQL Database Migrator.
You can use any combination of a valid source and sink from this table for the migration activity. However, you must ensure that at least one of the ends, that is, source or sink must be an Oracle NoSQL product. You can not use the NoSQL Database Migrator to move the NoSQL table data from one file to another.
| Type (value) | Format (value) | Valid Source | Valid Sink |
|---|---|---|---|
Oracle NoSQL Database (nosqldb) |
NA | Y | Y |
Oracle NoSQL Database Cloud Service (nosqldb_cloud) |
NA | Y | Y |
File system (file) |
JSON (json) |
Y | Y |
File system (file) |
MongoDB JSON (mongodb_json) |
Y | N |
File system (file) |
DynamoDB JSON (dynamodb_json) |
Y | N |
File system (file) |
Parquet (parquet) |
N | Y |
File system (file) |
CSV (csv) |
Y | N |
OCI Object Storage (object_storage_oci) |
JSON (json) |
Y | Y |
OCI Object Storage (object_storage_oci) |
MongoDB JSON (mongodb_json) |
Y | N |
OCI Object Storage (object_storage_oci) |
Parquet (parquet) |
N | Y |
OCI Object Storage (object_storage_oci) |
CSV (csv) |
Y | N |
| AWS S3 | DynamoDB JSON (dynamodb_json) |
Y | N |
Note: Many configuration parameters are common across the source and sink configuration. For ease of reference, the description for such parameters is repeated for each source and sink in the documentation sections, which explain configuration file formats for various types of sources and sinks. In all the cases, the syntax and semantics of the parameters with the same name are identical.
Source and Sink Security
Some of the source and sink types have optional or mandatory security information for authentication purposes.
All sources and sinks that use services in the Oracle Cloud Infrastructure (OCI) can use certain parameters for providing optional security information. This information can be provided using an OCI configuration file or Instance Principal.
Oracle NoSQL Database sources and sinks require mandatory security information if the installation is secure and uses an Oracle Wallet-based authentication. This information can be provided by adding a jar file to the <MIGRATOR_HOME>/lib directory.
Authenticating with Instance Principals
Instance principals is an IAM service feature that enables instances to be authorized actors (or principals) that can perform actions on service resources. Each compute instance has its own identity, and it authenticates using the certificates added to it.
Oracle NoSQL Database Migrator provides an option to connect to a NoSQL cloud and OCI Object Storage sources and sinks using instance principal authentication. It is only supported when the NoSQL Database Migrator tool is used within an OCI compute instance, for example, the NoSQL Database Migrator tool running in a VM hosted on OCI. To enable this feature use the useInstancePrincipal attribute of the NoSQL cloud source and sink configuration file. For more information on configuration parameters for different types of sources and sinks, see Source Configuration Templates and Sink Configuration Templates .
For more information on instance principals, see Calling Services from an Instance.
Authorization in Oracle NoSQL Database Cloud Service sources and sinks
Access to resources in Oracle NoSQL Database Cloud Service such as tables, tablespaces, and APIs is managed through Identity and Access Management (IAM) policies. This ensures that only users or applications with the appropriate inspect, read, use, or manage table permissions within a specific compartment can interact with these resources. For more information, see Managing Access to NDCS Tables.
When using Migrator utility to import or export data from Oracle NoSQL Database Cloud Service tables, your effective IAM permissions determine the resources you can read from or write to. If a user from a defined group attempts an action beyond their authorized privileges, the Migrator utility returns the corresponding authorization error as provided by OCI IAM.
For example, the OCI IAM denies any attempt to import data into an Oracle NoSQL Database Cloud Service table if your user group only has the “read” permission on the table. An error message similar to the following is displayed in the logs:
[INSUFFICIENT_PERMISSION] Authorization failed or requested resource not foundWorkflow for Oracle NoSQL Database Migrator
Learn about the various steps involved in using the Oracle NoSQL Database Migrator utility for migrating your NoSQL data.
The high level flow of tasks involved in using NoSQL Database Migrator is depicted in the below figure.
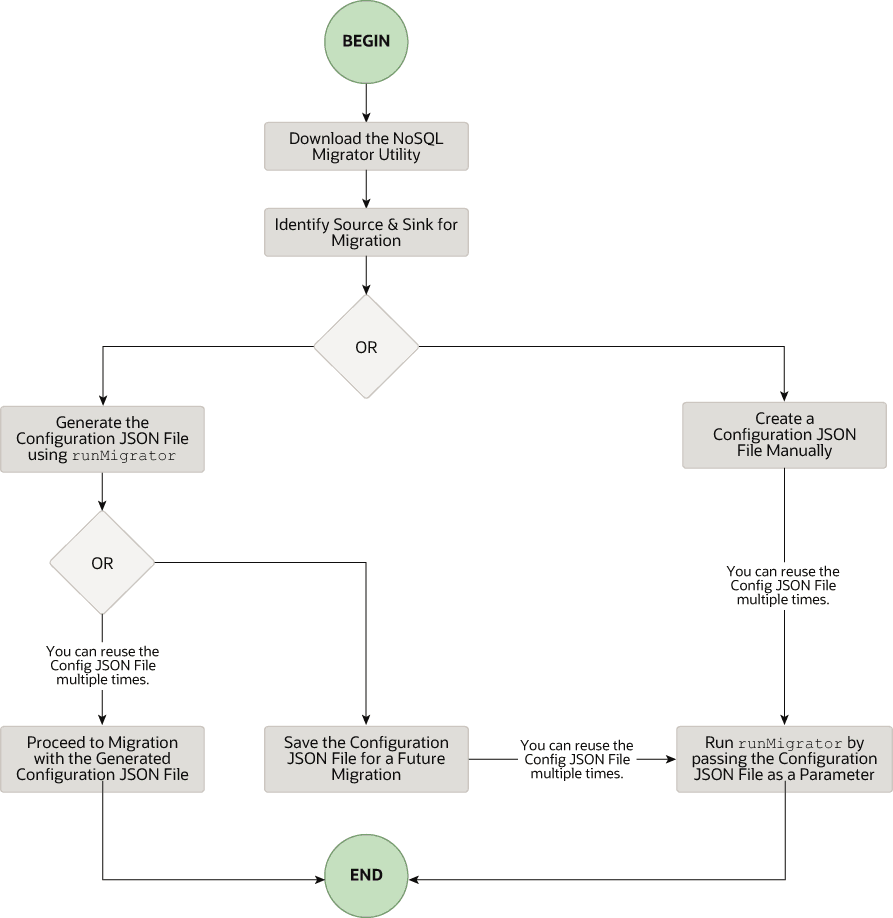
Description of the illustration migrator_flow.png
Download the NoSQL Data Migrator Utility
The Oracle NoSQL Database Migrator utility is available for download from the Oracle NoSQL Downloads page. Once you download and unzip it on your machine, you can access the runMigrator command from the command line interface.
Note: Oracle NoSQL Database Migrator utility requires Java 11 or higher versions to run.
Identify the Source and Sink
Before using the migrator, you must identify the data source and sink. For instance, if you want to migrate a NoSQL table from Oracle NoSQL Database on-premises to a JSON formatted file, your source will be Oracle NoSQL Database and sink will be JSON file. Ensure that the identified source and sink are supported by the Oracle NoSQL Database Migrator by referring to Supported Sources and Sinks. This is also an appropriate phase to decide the schema for your NoSQL table in the target or sink, and create them.
-
Identify sink table schema: If the sink is Oracle NoSQL Database on-premises or cloud, you must identify the schema for the sink table and ensure that the source data matches with the target schema. If required, use transformations to map the source data to the sink table.
-
Default Schema: NoSQL Database Migrator provides an option to create a sink table with the default schema without the need to predefine the schema for the table.
MongoDB-formatted JSON:
If the source is a MongoDB-formatted JSON file, the default schema for the table will be as follows:
CREATE TABLE IF NOT EXISTS <tablename>(id STRING, document JSON,PRIMARY KEY(SHARD(id))Where:
-
tablename = value provided for the table attribute in the configuration.
-
id = _id value from each document of the MongoDB exported JSON source file.
-
document = For each document in the MongoDB exported file, the contents excluding the
_idfield are aggregated into the document column.
Note:
- If the _id value is not provided as a string in the MongoDB-formatted JSON file, NoSQL Database Migrator converts it into a string before inserting it into the default schema.
- If the table
<tablename>already exists in Oracle NoSQL Database on-premises or cloud, and you want to migrate data to the table using thedefaultSchemaconfiguration, you must ensure that the existing table has the ID column in lower case (id) and is of the type STRING.
DynamoDB-formatted JSON:
If the source is a DynamoDB-formatted JSON file, the default schema for the table will be as follows:
CREATE TABLE IF NOT EXISTS <tablename>(DDBPartitionKey_name DDBPartitionKey_type,
[DDBSortKey_name DDBSortKey_type],DOCUMENT JSON,
PRIMARY KEY(SHARD(DDBPartitionKey_name),[DDBSortKey_name]))
Where:
-
tablename = value provided for the sink table in the configuration
-
DDBPartitionKey_name = value provided for the partition key in the configuration
-
DDBPartitionKey_type = value provided for the data type of the partition key in the configuration
-
DDBSortKey_name = value provided for the sort key in the configuration if any
-
DDBSortKey_type = value provided for the data type of the sort key in the configuration if any
-
DOCUMENT = All attributes except the partition and sort key of a DynamoDB table item aggregated into a NoSQL JSON column
If the source format is a CSV file, a default schema is not supported for the target table. You can create a schema file with a table definition containing the same number of columns and data types as the source CSV file. For more details on the Schema file creation, see Providing Table Schema.
Other valid sources:
For all the other sources, the default schema will be as follows:
CREATE TABLE IF NOT EXISTS <tablename> (id LONG GENERATED ALWAYS AS IDENTITY, document JSON, PRIMARY KEY(id))Where:
-
tablename = value provided for the table attribute in the configuration.
-
id = An auto-generated LONG value.
-
document = The JSON record provided by the source is aggregated into the document column.
-
-
-
Providing Table Schema: NoSQL Database Migrator allows the source to provide schema definitions for the table data using schemaInfo attribute. The schemaInfo attribute is available in all the data sources that do not have an implicit schema already defined. Sink data stores can choose any one of the following options.
-
Use the default schema defined by the NoSQL Database Migrator.
-
Use the source-provided schema.
-
Override the source-provided schema by defining its own schema. For example, if you want to transform the data from the source schema to another schema, you need to override the source-provided schema and use the transformation capability of the NoSQL Database Migrator tool.
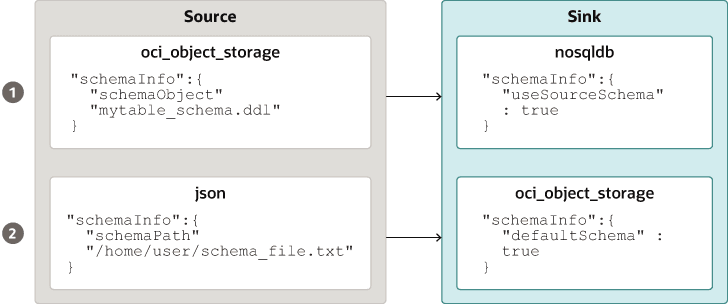
Description of the illustration source_sink_schema_example.png
The table schema file, for example,
mytable_schema.ddlcan include table DDL statements. The NoSQL Database Migrator tool executes this table schema file before starting the migration. The migrator tool supports no more than one DDL statement per line in the schema file. For example,CREATE TABLE IF NOT EXISTS(id INTEGER, name STRING, age INTEGER, PRIMARY KEY(SHARD(ID))) -
Note: Migration will fail if the table is present at the sink and the DDL in the schemaPath is different than the table.
- Create Sink Table: Once you identify the sink table schema, create the sink table either through the Admin CLI or using the
schemaInfoattribute of the sink configuration file. See Sink Configuration Templates .
Note: If the source is a CSV file, create a file with the DDL commands for the schema of the target table. Provide the file path in schemaInfo.schemaPath parameter of the sink configuration file.
Run the runMigrator command
The runMigrator executable file is available in the extracted NoSQL Database Migrator files. You must install Java 11 or higher version and bash on your system to successfully run the runMigrator command.
You can run the runMigrator command in two ways:
-
By creating the configuration file using the runtime options of the
runMigratorcommand as shown below.[~]$ ./runMigrator configuration file is not provided. Do you want to generate configuration? (y/n) [n]: y ... ...-
When you invoke the
runMigratorutility, it provides a series of run time options and creates the configuration file based on your choices for each option. -
After the utility creates the configuration file, you have a choice to either proceed with the migration activity in the same run or save the configuration file for a future migration.
-
Irrespective of your decision to proceed or defer the migration activity with the generated configuration file, the file will be available for edits or customization to meet your future requirements. You can use the customized configuration file for migration later.
-
-
By passing a manually created configuration file (in the JSON format) as a runtime parameter using the
-cor--configoption. You must create the configuration file manually before running therunMigratorcommand with the-cor--configoption. For any help with the source and sink configuration parameters, see Oracle NoSQL Database Migrator Reference.[~]$ ./runMigrator -c </path/to/the/configuration/json/file>
Note: NoSQL Database Migrator consumes read units while performing data export from Oracle NoSQL Cloud Service table to any valid sink.
Logging Migrator Progress
NoSQL Database Migrator tool provides options, which enables trace, debugging, and progress messages to be printed to standard output or to a file. This option can be useful in tracking the progress of migration operation, particularly for very large tables or data sets.
-
Log Levels
To control the logging behavior through the NoSQL Database Migrator tool, pass the –log-level or -l run time parameter to the
runMigratorcommand. You can specify the amount of log information to write by passing the appropriate log level value.$./runMigrator --log-level <loglevel>Example:
$./runMigrator --log-level debugTable - Supported Log Levels for NoSQL Database Migrator
Log Level Description warning Prints errors and warnings. info (default) Prints the progress status of data migration such as validating source, validating sink, creating tables, and count of number of data records migrated. debug Prints additional debug information. all Prints everything. This level turns on all levels of logging. -
Log File:
You can specify the name of the log file using –log-file or -f parameter. If –log-file is passed as run time parameter to the
runMigratorcommand, the NoSQL Database Migrator writes all the log messages to the file else to the standard output.$./runMigrator --log-file <log file name>Example:
$./runMigrator --log-file nosql_migrator.log
Limitation
Oracle NoSQL Database Migrator does not lock the database during backup and block other users. Therefore, it is highly recommended not to perform the following activities when a migration task is running:
-
Any DML/DDL operations on the source table.
-
Any topology-related modification on the data store.
Migrating TTL Metadata for Table Rows
Learn how to migrate TTL data from source to the sink.
Time to Live (TTL) is a mechanism that allows you to automatically expire table rows. TTL is expressed as the amount of time, data is allowed to live in the store. Data that has reached its expiration timeout value can no longer be retrieved, and will not appear in any store statistics.
You can choose to include the TTL metadata for table rows along with the actual data when performing migration of Oracle NoSQL Database tables. The NoSQL Database Migrator provides configuration parameters to support the export and import of table row TTL metadata for the following source types:
Table - Migrating TTL metadata
| Source types | Source configuration parameter | Sink configuration parameter |
|---|---|---|
| Oracle NoSQL Database | includeTTL |
includeTTL |
| Oracle NoSQL Database Cloud Service | includeTTL |
includeTTL |
| DynamoDB-Formatted JSON File | ttlAttributeName |
includeTTL |
| DynamoDB-Formatted JSON File stored in AWS S3 | ttlAttributeName |
includeTTL |
Exporting TTL metadata in Oracle NoSQL Database and Oracle NoSQL Database Cloud Service
NoSQL Database Migrator provides the includeTTL configuration parameter to support the export of table row’s TTL metadata.
When a table is exported, the TTL data is exported for the table rows that have a valid expiration time. If a row does not expire, then the _metadata JSON object is not included explicitly in the exported data because its expiration value is always
- The NoSQL Database Migrator exports the expiration time for each row as the number of milliseconds since the UNIX epoch (Jan 1st, 1970). For example,
//Row 1
{
    "id" : 1,
    "name" : "xyz",
    "age" : 45,
    "_metadata" : {
        "expiration" : 1629709200000   //Row Expiration time in milliseconds
    }
}

//Row 2
{
    "id" : 2,
    "name" : "abc",
    "age" : 52,
    "_metadata" : {
        "expiration" : 1629709400000   //Row Expiration time in milliseconds
    }
}

//Row 3 No Metadata for below row as it will not expire
{
    "id" : 3,
    "name" : "def",
    "age" : 15
}
Importing TTL metadata
You can optionally import TTL metadata using the includeTTL configuration parameter in the sink configuration template.
The default reference time of import operation is the current time in milliseconds, obtained from System.currentTimeMillis(), of the machine where the NoSQL Database Migrator tool is running. However, you can also set a custom reference time using the ttlRelativeDate configuration parameter if you want to extend the expiration time and import rows that would otherwise expire immediately. The extension is calculated as follows and added to the expiration time.
Extended time = expiration time - reference timeThe import operation handles the following use cases when migrating table rows containing TTL metadata. These use cases are applicable only when the includeTTL configuration parameter is set to true.
-
Use-case 1: No TTL metadata information is present in the importing table row.
If the row you want to import does not contain TTL information, then the NoSQL Database Migrator sets the TTL=0 for the row.
-
Use-case 2: TTL value of the source table row is expired relative to the reference time when the table row gets imported.
The expired table row is ignored and not written into the store.
-
Use-case 3: TTL value of the source table row is not expired relative to the reference time when the table row gets imported.
The table row gets imported with a TTL value. However, the imported TTL value may not match the original exported TTL value because of the integer hour and day window constraints in the TimeToLive class. For example,
Consider an exported table row:
{
  "id" : 8,
  "name" : "xyz",
  "_metadata" : {
  "expiration" : 1734566400000 //Thursday, December 19, 2024 12:00:00 AM in UTC
  }
}
The reference time while importing is 1734480000000, which is Wednesday, December 18, 2024 12:00:00 AM.
Imported table row
{
  "id" : 8,
  "name" : "xyz",
  "_metadata" : {
    "ttl" :  1734739200000 //Saturday, December 21, 2024 12:00:00 AM
  }
}
Importing TTL Metadata in DynamoDB-Formatted JSON File and DynamoDB-Formatted JSON File stored in AWS S3
NoSQL Database Migrator provides an additional configuration parameter, ttlAttributeName to support the import of TTL metadata from the DynamoDB-formatted JSON file items.
DynamoDB exported JSON files include a specific attribute in each item to store the TTL expiration timestamp. To optionally import the TTL values from DynamoDB exported JSON files, you must supply the specific attribute’s name as a value to the ttlAttributeName configuration parameter in the DynamoDB-Formatted JSON File or DynamoDB-Formatted JSON File stored in AWS S3 source configuration files. Also, you must set the includeTTL configuration parameter in the sink configuration template. The valid sinks are Oracle NoSQL Database and Oracle NoSQL Database Cloud Service. NoSQL Database Migrator stores TTL information in the _metadata JSON object for the imported item.
The import operation manages the following use cases when migrating table items of the DynamoDB exported JSON files:
-
Use case 1: The ttlAttributeName configuration parameter value is set to the TTL attribute name specified in the DynamoDB exported JSON file.
NoSQL Database Migrator imports the expiration time for this item as the number of milliseconds since the UNIX epoch (Jan 1st, 1970).
For example, consider an item in the DynamoDB exported JSON file:
{
    "Item": {
        "DeptId": {
            "N": "1"
        },
        "DeptName": {
            "S": "Engineering"
        },
        "ttl": {
            "N": "1734616800"
        }
    }
}
Here, the attribute
ttlspecifies the time-to-live value for the item. If you set the ttlAttributeName configuration parameter asttlin the DynamoDB-formatted JSON file or DynamoDB-formatted JSON file stored in AWS S3 source configuration file, NoSQL Database Migrator imports the expiration time for the item as follows:{ "DeptId": 1, "document": { "DeptName": "Engineering" } "_metadata": { "expiration": 1734616800000 } }
Note: You can supply the ttlRelativeDate configuration parameter in the sink configuration template as the reference time for calculating the expiration time.
-
Use case 2: The ttlAttributeName configuration parameter value is set, however, the value does not exist as an attribute in the item of the DynamoDB exported JSON file.
NoSQL Database Migrator does not import the TTL metadata information for the given item.
-
Use case 3: The ttlAttributeName configuration parameter value does not match the attribute name in the item of DynamoDB exported JSON file. NoSQL Database Migrator handles the import in one of the following ways based on the sink configuration:
-
Copies the attribute as a normal field if configured to import using the default schema.
-
Skips the attribute if configured to import using a user-defined schema.
-
Importing data to a sink with an IDENTITY column
Learn how to import data to a sink that includes an IDENTITY column.
You can import the data from a valid source to a sink table (On-premises/Cloud Services) with an IDENTITY column. You create the IDENTITY column as either GENERATED ALWAYS AS IDENTITY or GENERATED BY DEFAULT AS IDENTITY. For more information on table creation with an IDENTITY column, see Creating Tables With an IDENTITY Column in the SQL Reference Guide.
Before importing the data, make sure that the Oracle NoSQL Database table at the sink is empty if it exists. If there is pre-existing data in the sink table, migration can lead to issues such as overwriting existing data in the sink table or skipping source data during the import.
Sink table with IDENTITY column as GENERATED ALWAYS AS IDENTITY
Consider a sink table with the IDENTITY column created as GENERATED ALWAYS AS IDENTITY. The data import is dependent on whether or not the source supplies the values to the IDENTITY column and ignoreFields transformation parameter in the configuration file.
For example, you want to import data from a JSON file source to the Oracle NoSQL Database table as the sink. The schema of the sink table is:
CREATE TABLE IF NOT EXISTS migrateID(ID INTEGER GENERATED ALWAYS AS IDENTITY, name STRING, course STRING, PRIMARY KEY
      (ID))
The Migrator utility handles the data migration as described in the following cases:
| Source condition | User action | Migration outcome |
|---|---|---|
|
CASE 1: Source data does not supply a value for the IDENTITY field of the sink table. Example: JSON source file |
Create/generate the configuration file. |
Data migration is successful. IDENTITY column values are auto-generated. Migrated data in Oracle NoSQL Database sink table |
|
CASE 2: Source data supplies values for the IDENTITY field of the sink table. Example: JSON source file |
Create/generate the configuration file. You provide an ignoreFields transformation for the ID column in the sink configuration template.
|
Data migration is successful. The supplied ID values are skipped and the IDENTITY column values are auto-generated. Migrated data in Oracle NoSQL Database sink table |
|
You create/generate the configuration file without the ignoreFields transformation for the IDENTITY column. |
Data migration fails with the following error message:
|
For more details on the transformation configuration parameters, see the topic Transformation Configuration Templates.
Sink table with IDENTITY column as GENERATED BY DEFAULT AS IDENTITY
Consider a sink table with the IDENTITY column created as GENERATED BY DEFAULT AS IDENTITY. The data import is dependent on whether or not the source supplies the values to the IDENTITY column and ignoreFields transformation parameter.
For example, you want to import data from a JSON file source to the Oracle NoSQL Database table as the sink. The schema of the sink table is:
CREATE TABLE IF NOT EXISTS migrateID(ID INTEGER GENERATED BY DEFAULT AS IDENTITY, name STRING, course STRING, PRIMARY KEY
      (ID))
The Migrator utility handles the data migration as described in the following cases:
| Source condition | User action | Migration outcome |
|---|---|---|
|
CASE 1: Source data does not supply a value for the IDENTITY field of the sink table. Example: JSON source file |
Create/generate the configuration file. |
Data migration is successful. IDENTITY column values are auto-generated. Migrated data in Oracle NoSQL Database sink table |
|
CASE 2: Source data supplies values for the IDENTITY field of the sink table and it is a Primary Key field. Example: JSON source file |
Create/generate the configuration file. You provide an ignoreFields transformation for the ID column in the sink configuration template (Recommended).
|
Data migration is successful. The supplied ID values are skipped and the IDENTITY column values are auto-generated. Migrated data in Oracle NoSQL Database sink table |
|
You create/generate the configuration file without the ignoreFields transformation for the IDENTITY column. |
Data migration is successful. The supplied When you try to insert an additional row to the table without supplying an ID value, the sequence generator tries to auto-generate the ID value. The sequence generator's starting value is 1. As a result, the generated ID value can potentially duplicate one of the existing ID values in the sink table. Since this is a violation of the primary key constraint, an error is returned and the row does not get inserted. See Sequence Generator for additional information. To avoid the primary key constraint violation, the sequence generator must start the sequence with a value that does not conflict with existing ID values in the sink table. To use the START WITH attribute to make this modification, see the example below: Example: Migrated data in Oracle NoSQL Database sink table To find the appropriate value for the sequence generator to insert in the ID column, fetch the maximum value of the Output: The maximum value of the This will start the sequence at 4. Now when you insert rows to the sink table without supplying the ID values, the sequence generator auto-generates the ID values from 4 onwards averting the duplication of the IDs. |
For more details on the transformation configuration parameters, see the topic Transformation Configuration Templates.
Filtering Data Using Query Predicates
Learn how to specify query predicates to export only the table rows that match the filter criteria.
Query Predicate
NoSQL Database Migrator provides an option to filter out data during export by specifying a query predicate. The query predicate specifies conditions that must be met for a row to be exported. The Migrator utility translates the query predicate into a SQL WHERE clause and applies it on the given table to provide a filter condition to only export the rows matching the specified condition. You can use built-in functions (modification_time(), expiration_time(), creation_time()) in the query predicate to create advanced filter options.
You can use query predicates only on Oracle NoSQL Database and Oracle NoSQL Database Cloud Service sources for all the supported sinks. For further details, see Oracle NoSQL Database and Oracle NoSQL Database Cloud Service.
For a use case demonstration, see Migrate from Oracle NoSQL Database Cloud Service to a JSON file.
Dump filter
The Migrator utility provides an option to echo the SQL query that is executed on the backend. This feature helps you verify the generated query and if required, refine your filter before running the migration task.
You can run the Migrator utility with the dump filter option as follows:
[~/nosqlMigrator]$./runMigrator --dump-filter|df [optional-config-file]-
With the configuration file: The Migrator utility displays the supplied configuration file and the generated query as shown in the following example:
[~/nosqlMigrator]./runMigrator --dump-filter migrator-config.json[INFO] Configuration for migration: { "source" : { "type" : "nosqldb", "storeName" : "kvstore", "helperHosts" : ["<hostname>:5000"], "table" : "users", "queryFilter" : "$row.address.city='Houston'", "includeTTL" : true, "requestTimeoutMs" : 5000 }, "sink" : { "type" : "file", "format" : "json", "useMultiFiles" : false, "schemaPath" : "<complete/path/to/the/JSON/file/with/DDL/commands/for/the/schema/definition>", "pretty" : true, "dataPath" : "<complete/path/to/directory>" }, "abortOnError" : true, "migratorVersion" : "1.8.0" } [INFO] Query for the migration: 'select $row, expiration_time($row) from users $row where $row.address.city='Houston'' -
Without the configuration file: The Migrator utility interactively collects all the inputs required to generate the configuration file including the query predicate. It then displays the generated configuration file and query.
Note:
The dump filter option only displays the configuration file and query. It does not initiate the data migration. After review, to execute the migration, run the Migrator utility with your configuration file using
--cor--configoption as follows:$./runMigrator --config <complete/path/to/the/JSON/config/file>
Use Case Demonstrations for Oracle NoSQL Database Migrator
Learn how to perform data migration using the Oracle NoSQL Database Migrator for specific use cases. You can find detailed systematic instructions with code examples to perform migration in each of the use cases.
This article has the following topics:
Migrate from Oracle NoSQL Database Cloud Service to a JSON file
This example shows how to use the Oracle NoSQL Database Migrator to copy data and the schema definition of a NoSQL table from Oracle NoSQL Database Cloud Service (NDCS) to a JSON file.
Use Case
An organization decides to train a model using the Oracle NoSQL Database Cloud Service (NDCS) data to predict future behaviors and provide personalized recommendations. They can take a periodic copy of the NDCS tables’ data to a JSON file and apply it to the analytic engine to analyze and train the model. Doing this helps them separate the analytical queries from the low-latency critical paths.
Example
For the demonstration, let us look at how to migrate the data and schema definition of a NoSQL table called myTable from NDCS to a JSON file.
Prerequisites
-
Identify the source and sink for the migration.
-
Source: Oracle NoSQL Database Cloud Service
-
Sink: JSON file
-
-
Identify your OCI cloud credentials and capture them in the OCI config file. Save the config file in
/home/.oci/config. See Acquiring Credentials.[DEFAULT] tenancy=ocid1.tenancy.oc1.... user=ocid1.user.oc1.... fingerprint= 43:d1:.... key_file=</fully/qualified/path/to/the/private/key/> pass_phrase=<passphrase> -
Identify the region endpoint and compartment name for your Oracle NoSQL Database Cloud Service.
-
endpoint:
us-ashburn-1 -
compartment:
ocid1.compartment.oc1..aa..rhsmq
-
Procedure
To migrate the data and schema definition of your table from Oracle NoSQL Database Cloud Service to a JSON file, you can use one of the following options:
-
Open the command prompt and navigate to the directory where you extracted the NoSQL Database Migrator utility.
-
To generate the configuration file using the NoSQL Database Migrator, run the
runMigratorcommand without any runtime parameters.[~/nosqlMigrator]$./runMigrator -
As you did not provide the configuration file as a runtime parameter, the utility prompts if you want to generate the configuration now. Type
**y**.Configuration file is not provided. Do you want to generate configuration? (y/n) [n]: y Generating a configuration file interactively. -
Based on the prompts from the utility, choose your options for the Source configuration.
Enter a location for your config [./migrator-config.json]: /home/<user>/nosqlMigrator/NDCS2JSON Select the source: 1) nosqldb 2) nosqldb_cloud 3) file 4) object_storage_oci 5) aws_s3 #? 2 Configuration for source type=nosqldb_cloud Enter endpoint URL or region ID of the Oracle NoSQL Database Cloud: us-phoenix-1 Select the authentication type: 1) credentials_file 2) instance_principal 3) delegation_token 4) session_token 5) oke_workload_identity #? 1 Enter path to the file containing OCI credentials [/home/<user>/.oci/config]: Enter the profile name in OCI credentials file [DEFAULT]: Enter the compartment name or id of the table []: developers Enter table name: myTable Include TTL data? If you select 'yes' TTL of rows will also be included in the exported data.(y/n) [n]: Enter percentage of table read units to be used for migration operation. (1-100) [90]: Enter store operation timeout in milliseconds. (1-30000) [5000]: -
Based on the prompts from the utility, choose your options for the Sink configuration.
Select the sink: 1) nosqldb 2) nosqldb_cloud 3) file #? 3 Configuration for sink type=file Enter path to a directory to store JSON data: /home/<user>/nosqlMigrator would you like to export data to multiple files for each source?(y/n) [y]: n Would you like to store JSON in pretty format? (y/n) [n]: y Would you like to migrate the table schema also? (y/n) [y]: y Enter path to a file to store table schema: /home/<user>/nosqlMigrator/myTableSchema -
Based on the prompts from the utility, choose your options for the source data transformations. The default value is
n.Would you like to add transformations to source data? (y/n) [n]: -
Enter your choice to determine whether to proceed with the migration in case any record fails to migrate.
Would you like to continue migration in case of any record/row is failed to migrate?: (y/n) [n]: -
The utility displays the generated configuration on the screen.
generated configuration is: { "source": { "type": "nosqldb_cloud", "endpoint": "us-ashburn-1", "table": "myTable", "compartment": "ocid1.compartment.oc1..aa..rhsmq", "credentials": "/home/<user>/.oci/config", "credentialsProfile": "DEFAULT", "readUnitsPercent": 90, "requestTimeoutMs": 5000 }, "sink": { "type": "file", "format": "json", "useMultiFiles" : false, "schemaPath": "/home/<user>/nosqlMigrator/myTableSchema", "pretty": true, "dataPath": "/home/<user>/nosqlMigrator" }, "abortOnError": true, "migratorVersion": "1.8.0" } -
The utility prompts for your choice to decide whether to proceed with the migration with the generated configuration file or not. The default option is
y.Note: If you select
n, you can use the generated configuration file to run the migration using the./runMigrator -cor the./runMigrator --configoption.Would you like to run the migration with above configuration? If you select no, you can use the generated configuration file to run the migration using: ./runMigrator --config /home/<user>/nosqlMigrator/NDCS2JSON (y/n) [y]: -
The NoSQL Database Migrator migrates your data and schema from NDCS to the JSON file.
Records provided by source=10,Records written to sink=10,Records failed=0,Records skipped=0.
Elapsed time: 0min 1sec 277ms
Migration completed.
Validation
To validate the migration, you can navigate to the specified sink directory and view the schema and data.
-- Exported myTable Data. JSON files are created in the supplied data path

[~/nosqlMigrator]$cat myTable_1_5.json
{
  "id" : 10,
  "document" : {
    "course" : "Computer Science",
    "name" : "Neena",
    "studentid" : 105
  }
}
{
  "id" : 3,
  "document" : {
  "course" : "Computer Science",
    "name" : "John",
    "studentid" : 107
  }
}
{
  "id" : 4,
  "document" : {
    "course" : "Computer Science",
    "name" : "Ruby",
    "studentid" : 100
  }
}
{
  "id" : 6,
  "document" : {
    "course" : "Bio-Technology",
    "name" : "Rekha",
    "studentid" : 104
  }
}
{
  "id" : 7,
  "document" : {
    "course" : "Computer Science",
    "name" : "Ruby",
    "studentid" : 100
  }
}
{
  "id" : 5,
  "document" : {
    "course" : "Journalism",
    "name" : "Rani",
    "studentid" : 106
  }
}
{
  "id" : 8,
  "document" : {
    "course" : "Computer Science",
    "name" : "Tom",
    "studentid" : 103
  }
}
{
  "id" : 9,
  "document" : {
    "course" : "Computer Science",
    "name" : "Peter",
    "studentid" : 109
  }
}
{
  "id" : 1,
  "document" : {
    "course" : "Journalism",
    "name" : "Tracy",
    "studentid" : 110
  }
}
{
  "id" : 2,
  "document" : {
    "course" : "Bio-Technology",
    "name" : "Raja",
    "studentid" : 108
  }
}
-- Exported myTable Schema
[~/nosqlMigrator]$cat myTableSchema
CREATE TABLE IF NOT EXISTS myTable (id INTEGER, document JSON, PRIMARY KEY(SHARD(id)))-
Prepare the configuration file (in JSON format) with Oracle NoSQL Database Cloud Service (NDCS) source and JSON sink details. See Source Configuration Templates and Sink Configuration Templates .
A
userstable is used with the following data in this example:{"id":10,"firstName":"John","lastName":"Smith","age":22,"income":45000,"address":{"city":"Santa Cruz","number":101,"phones":[{"area":408,"kind":"work","number":4538955},{"area":831,"kind":"home","number":7533341},{"area":831,"kind":"mobile","number":7533382}],"state":"CA","street":"Pacific Ave","zip":95008}} {"id":20,"firstName":"Jane","lastName":"Smith","age":22,"income":55000,"address":{"city":"San Jose","number":201,"phones":[{"area":608,"kind":"work","number":6538955},{"area":931,"kind":"home","number":9533341},{"area":931,"kind":"mobile","number":9533382}],"state":"CA","street":"Atlantic Ave","zip":95005}} {"id":30,"firstName":"Adam","lastName":"Smith","age":45,"income":75000,"address":{"city":"Houston","number":301,"phones":[{"area":618,"kind":"work","number":6618955},{"area":951,"kind":"home","number":9613341},{"area":981,"kind":"mobile","number":9613382}],"state":"TX","street":"Indian Ave","zip":95075}} {"id":40,"firstName":"Joanna","lastName":"Smith","age":null,"income":75000,"address":{"city":"Houston","number":401,"phones":[{"area":null,"kind":"work","number":1618955},{"area":451,"kind":"home","number":4613341},{"area":481,"kind":"mobile","number":4613382}],"state":"TX","street":"Tex Ave","zip":95085}}Ensure that you include the
queryFilterparameter with appropriate query predicate in the source configuration template to export only the required rows from your table. For details on how to create query predicates, see the Sample Query Predicates table in the NoSQL Database Cloud Service Source topic.In this example, the query predicate exports rows with the
cityfield inaddressJSON column = ‘Houston’ from theuserstable.{ "source" : { "type" : "nosqldb_cloud", "endpoint" : "us-ashburn-1", "table" : "users", "queryFilter" : "$row.address.city='Houston'", "compartment" : "ocid1.compartment.oc1..aa..rhsmq", "credentials" : "/home/<user>/.oci/config", "credentialsProfile" : "DEFAULT", "readUnitsPercent" : 90, "includeTTL" : true, "requestTimeoutMs" : 5000 }, "sink" : { "type" : "file", "format" : "json", "useMultiFiles" : true, "chunkSize" : 32, "schemaPath" : "/scratch/<user>/nosqlMigrator/tableschema.ddl", "pretty" : false, "dataPath" : "/scratch/<user>/nosqlMigrator" }, "abortOnError" : true, "migratorVersion" : "1.8.0" } -
Open the command prompt and navigate to the directory where you extracted the NoSQL Database Migrator utility.
-
Run the
runMigratorcommand by passing the configuration file. Use the--configor-coption.[~/nosqlMigrator]$./runMigrator --config <complete/path/to/the/JSON/config/file>Note:
You can also run the command with the
option to view and verify the generated query before running the migration task as follows. For more details, see
.
[~/nosqlMigrator]$./runMigrator --dump-filter <complete/path/to/the/JSON/config/file>The utility proceeds with the data migration as follows:
[INFO] creating source from given configuration:
[INFO] [cloud source] : query = 'SELECT $row,expiration_time_millis($row) AS expiration FROM users $row where $row.address.city='Houston''
[INFO] source creation completed
[INFO] creating sink from given configuration:
[INFO] sink creation completed
[INFO] creating migrator pipeline
[INFO] [json file sink] : writing table schema to /scratch/raumesh/nosqlMigrator/tableschema.ddl
[INFO] migration started
[INFO] Migration success for source users. read=2,written=2,failed=0
[INFO] Migration is successful for all the sources.
[INFO] migration completed.
Records provided by source=2, Records written to sink=2, Records failed=0,Records skipped=0.
Elapsed time: 0min 0sec 182ms
Migration completed.
Verification
To verify the migration, you can navigate to the specified sink directory and view the schema and data. Only the rows in address JSON column with city field value ‘Houston’ are exported.
-- Exported users data. Schema and JSON files are created in the supplied data paths.

[~/nosqlMigrator]: cat tableschema.ddl

CREATE TABLE IF NOT EXISTS users (id INTEGER, firstName STRING, lastName STRING, age INTEGER, income INTEGER, address JSON, PRIMARY KEY(SHARD(id)))
[~/nosqlMigrator]: cat users_6_10.json
{"id":30,"firstName":"Adam","lastName":"Smith","age":45,"income":75000,"address":{"city":"Houston","number":301,"phones":[{"area":618,"kind":"work","number":6618955},{"area":951,"kind":"home","number":9613341},{"area":981,"kind":"mobile","number":9613382}],"state":"TX","street":"Indian Ave","zip":95075}}
{"id":40,"firstName":"Joanna","lastName":"Smith","age":null,"income":75000,"address":{"city":"Houston","number":401,"phones":[{"area":null,"kind":"work","number":1618955},{"area":451,"kind":"home","number":4613341},{"area":481,"kind":"mobile","number":4613382}],"state":"TX","street":"Tex Ave","zip":95085}}
bash-4.4$Migrate from Oracle NoSQL Database On-Premise to Oracle NoSQL Database Cloud Service
This example shows how to use the Oracle NoSQL Database Migrator to copy data and the schema definition of a NoSQL table from Oracle NoSQL Database to Oracle NoSQL Database Cloud Service (NDCS).
Use Case
As a developer, you are exploring options to avoid the overhead of managing the resources, clusters, and garbage collection for your existing NoSQL Database KVStore workloads. As a solution, you decide to migrate your existing on-premise KVStore workloads to Oracle NoSQL Database Cloud Service because NDCS manages them automatically.
Example
For the demonstration, let us look at how to migrate the data and schema definition of a NoSQL table called myTable from the NoSQL Database KVStore to NDCS. We will also use this use case to show how to run the runMigrator utility by passing a precreated configuration file.
Prerequisites
-
Identify the source and sink for the migration.
-
Source: Oracle NoSQL Database
-
Sink: Oracle NoSQL Database Cloud Service
-
-
Identify your OCI cloud credentials and capture them in the OCI config file. Save the config file in
/home/.oci/config. See Acquiring Credentials in Using Oracle NoSQL Database Cloud Service.[DEFAULT] tenancy=ocid1.tenancy.oc1.... user=ocid1.user.oc1.... fingerprint= 43:d1:.... key_file=</fully/qualified/path/to/the/private/key/> pass_phrase=<passphrase> -
Identify the region endpoint and compartment name for your Oracle NoSQL Database Cloud Service.
-
endpoint:
us-phoenix-1 -
compartment:
developers
-
-
Identify the following details for the on-premise KVStore:
-
storeName:
kvstore -
helperHosts:
<hostname>:5000 -
table:
myTable
-
Procedure
To migrate the data and schema definition of myTable from NoSQL Database KVStore to NDCS:
-
Prepare the configuration file (in JSON format) with the identified Source and Sink details. See Source Configuration Templates and Sink Configuration Templates .
{ "source" : { "type" : "nosqldb", "storeName" : "kvstore", "helperHosts" : ["<hostname>:5000"], "table" : "myTable", "requestTimeoutMs" : 5000 }, "sink" : { "type" : "nosqldb_cloud", "endpoint" : "us-phoenix-1", "table" : "myTable", "compartment" : "developers", "schemaInfo" : { "schemaPath" : "<complete/path/to/the/JSON/file/with/DDL/commands/for/the/schema/definition>", "readUnits" : 100, "writeUnits" : 100, "storageSize" : 1 }, "credentials" : "<complete/path/to/oci/config/file>", "credentialsProfile" : "DEFAULT", "writeUnitsPercent" : 90, "requestTimeoutMs" : 5000 }, "abortOnError" : true, "migratorVersion" : "1.8.0" } -
Open the command prompt and navigate to the directory where you extracted the NoSQL Database Migrator utility.
-
Run the
runMigratorcommand by passing the configuration file using the--configor-coption.[~/nosqlMigrator/nosql-migrator-1.8.0]$./runMigrator --config <complete/path/to/the/JSON/config/file> -
The utility proceeds with the data migration, as shown below.
Records provided by source=10, Records written to sink=10, Records failed=0.
Elapsed time: 0min 10sec 426ms
Migration completed.
Validation
To validate the migration, you can login to your NDCS console and verify that myTable is created with the source data.
Migrate from JSON file source to Oracle NoSQL Database Cloud Service
This example shows the usage of Oracle NoSQL Database Migrator to copy data from a JSON file source to Oracle NoSQL Database Cloud Service.
After evaluating multiple options, an organization finalizes Oracle NoSQL Database Cloud Service as its NoSQL Database platform. As its source contents are in JSON file format, they are looking for a way to migrate them to Oracle NoSQL Database Cloud Service.
In this example, you will learn to migrate the data from a JSON file called SampleData.json. You run the runMigrator utility by passing a pre-created configuration file. If the configuration file is not provided as a run time parameter, the runMigrator utility prompts you to generate the configuration through an interactive procedure.
Prerequisites
-
Identify the source and sink for the migration.
-
Source: JSON source file.
SampleData.jsonis the source file. It contains multiple JSON documents with one document per line, delimited by a new line character.{"id":6,"val_json":{"array":["q","r","s"],"date":"2023-02-04T02:38:57.520Z","nestarray":[[1,2,3],[10,20,30]],"nested":{"arrayofobjects":[{"datefield":"2023-03-04T02:38:57.520Z","numfield":30,"strfield":"foo54"},{"datefield":"2023-02-04T02:38:57.520Z","numfield":56,"strfield":"bar23"}],"nestNum":10,"nestString":"bar"},"num":1,"string":"foo"}} {"id":3,"val_json":{"array":["g","h","i"],"date":"2023-02-02T02:38:57.520Z","nestarray":[[1,2,3],[10,20,30]],"nested":{"arrayofobjects":[{"datefield":"2023-02-02T02:38:57.520Z","numfield":28,"strfield":"foo3"},{"datefield":"2023-02-02T02:38:57.520Z","numfield":38,"strfield":"bar"}],"nestNum":10,"nestString":"bar"},"num":1,"string":"foo"}} {"id":7,"val_json":{"array":["a","b","c"],"date":"2023-02-20T02:38:57.520Z","nestarray":[[1,2,3],[10,20,30]],"nested":{"arrayofobjects":[{"datefield":"2023-01-20T02:38:57.520Z","numfield":28,"strfield":"foo"},{"datefield":"2023-01-22T02:38:57.520Z","numfield":38,"strfield":"bar"}],"nestNum":10,"nestString":"bar"},"num":1,"string":"foo"}} {"id":4,"val_json":{"array":["j","k","l"],"date":"2023-02-03T02:38:57.520Z","nestarray":[[1,2,3],[10,20,30]],"nested":{"arrayofobjects":[{"datefield":"2023-02-03T02:38:57.520Z","numfield":28,"strfield":"foo"},{"datefield":"2023-02-03T02:38:57.520Z","numfield":38,"strfield":"bar"}],"nestNum":10,"nestString":"bar"},"num":1,"string":"foo"}} -
Sink: Oracle NoSQL Database Cloud Service.
-
-
Identify your OCI cloud credentials and capture them in the OCI config file. Save the config file in
/home/<user>/.oci/configdirectory. For more details, see Acquiring Credentials in Using Oracle NoSQL Database Cloud Service.[DEFAULT] tenancy=ocid1.tenancy.oc1.... user=ocid1.user.oc1.... fingerprint= 43:d1:.... region=us-ashburn-1 key_file=</fully/qualified/path/to/the/private/key/> pass_phrase=<passphrase> -
Identify the region endpoint and compartment name for your Oracle NoSQL Database Cloud Service.
-
endpoint:
us-ashburn-1 -
compartment:
Training-NoSQL
-
-
Identify the following details for the JSON source file:
-
schemaPath:
<absolute path to the schema definition file containing DDL statements for the NoSQL table at the sink>.In this example, the DDL file is
schema_json.ddl.create table Migrate_JSON (id INTEGER, val_json JSON, PRIMARY KEY(id));The Oracle NoSQL Database Migrator provides an option to create a table with the default schema if the
schemaPathis not provided. For more details, see Identify the Source and Sink topic in the Workflow for Oracle NoSQL Database Migrator. -
Datapath:
<absolute path to a file or directory containing the JSON data for migration>.
-
Procedure
To migrate the JSON source file from SampleData.json to Oracle NoSQL Database Cloud Service, perform the following:
-
Prepare the configuration file (in JSON format) with the identified source and sink details. See Source Configuration Templates and Sink Configuration Templates .
{ "source" : { "type" : "file", "format" : "json", "schemaInfo" : { "schemaPath" : "[~/nosql-migrator-1.8.0]/schema_json.ddl" }, "dataPath" : "[~/nosql-migrator-1.8.0]/SampleData.json" }, "sink" : { "type" : "nosqldb_cloud", "endpoint" : "us-ashburn-1", "table" : "Migrate_JSON", "compartment" : "Training-NoSQL", "includeTTL" : false, "schemaInfo" : { "readUnits" : 100, "writeUnits" : 60, "storageSize" : 1, "useSourceSchema" : true }, "credentials" : "/home/<user>/.oci/config", "credentialsProfile" : "DEFAULT", "writeUnitsPercent" : 90, "overwrite" : true, "requestTimeoutMs" : 5000 }, "abortOnError" : true, "migratorVersion" : "1.8.0" } -
Open the command prompt and navigate to the directory where you extracted the Oracle NoSQL Database Migrator utility.
-
Run the
runMigratorcommand by passing the configuration file using the--configor-coption.[~/nosql-migrator-1.8.0]$./runMigrator --config <complete/path/to/the/config/file> -
The utility proceeds with the data migration, as shown below. The
Migrate_JSONtable is created at the sink with the schema provided in theschemaPath.creating source from given configuration: source creation completed creating sink from given configuration: sink creation completed creating migrator pipeline migration started [cloud sink] : start loading DDLs [cloud sink] : executing DDL: create table Migrate_JSON (id INTEGER, val_json JSON, PRIMARY KEY(id)),limits: [100, 60, 1] [cloud sink] : completed loading DDLs [cloud sink] : start loading records [json file source] : start parsing JSON records from file: SampleData.json [INFO] migration completed. Records provided by source=4, Records written to sink=4, Records failed=0, Records skipped=0. Elapsed time: 0min 5sec 778ms Migration completed.
Validation
To validate the migration, you can log in to your Oracle NoSQL Database Cloud Service console and verify that the Migrate_JSON table is created with the source data. For the procedure to access the console, see Accessing the Service from the Infrastructure Console article in the Oracle NoSQL Database Cloud Service document.
Figure - Oracle NoSQL Database Cloud Service Console Tables
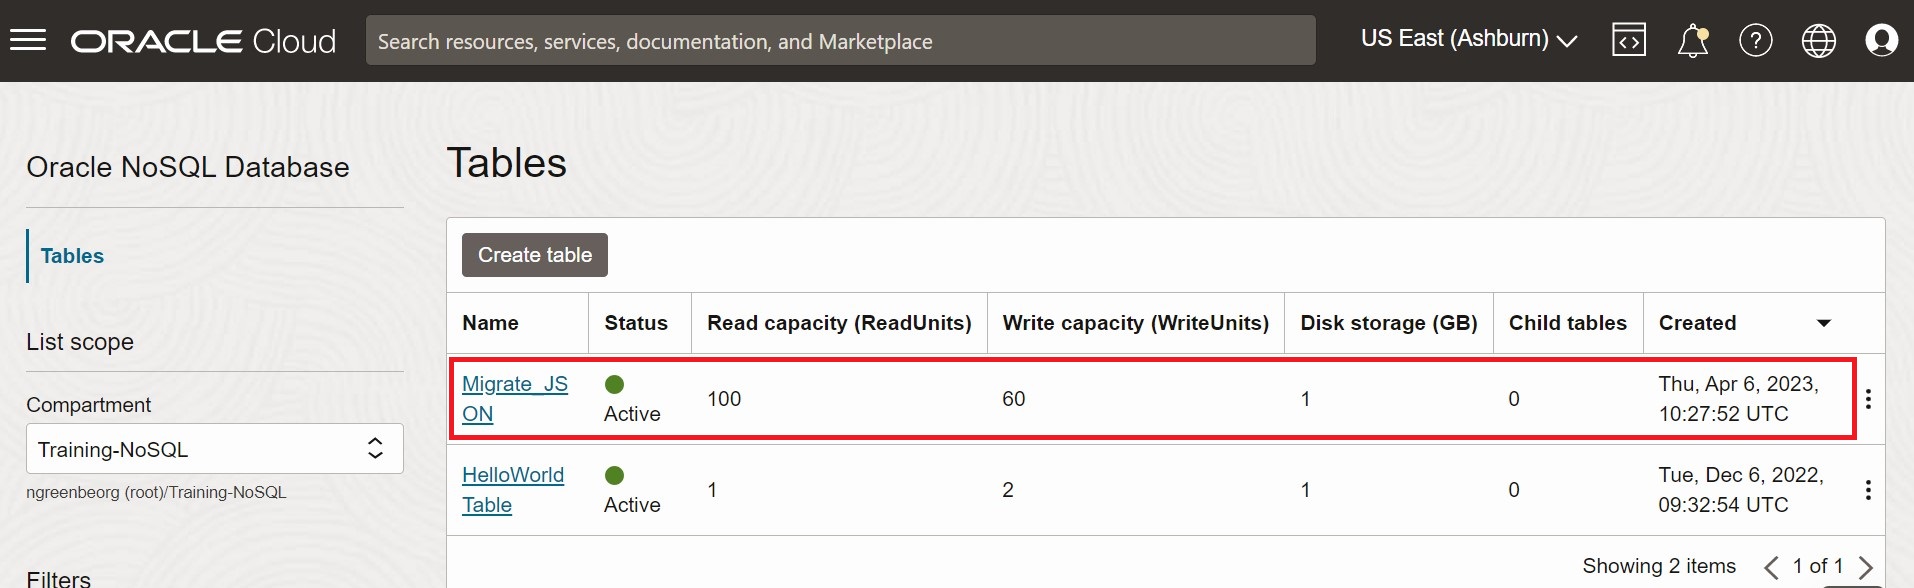
Description of the illustration migrate_json1.png
Figure - Oracle NoSQL Database Cloud Service Console Table Data
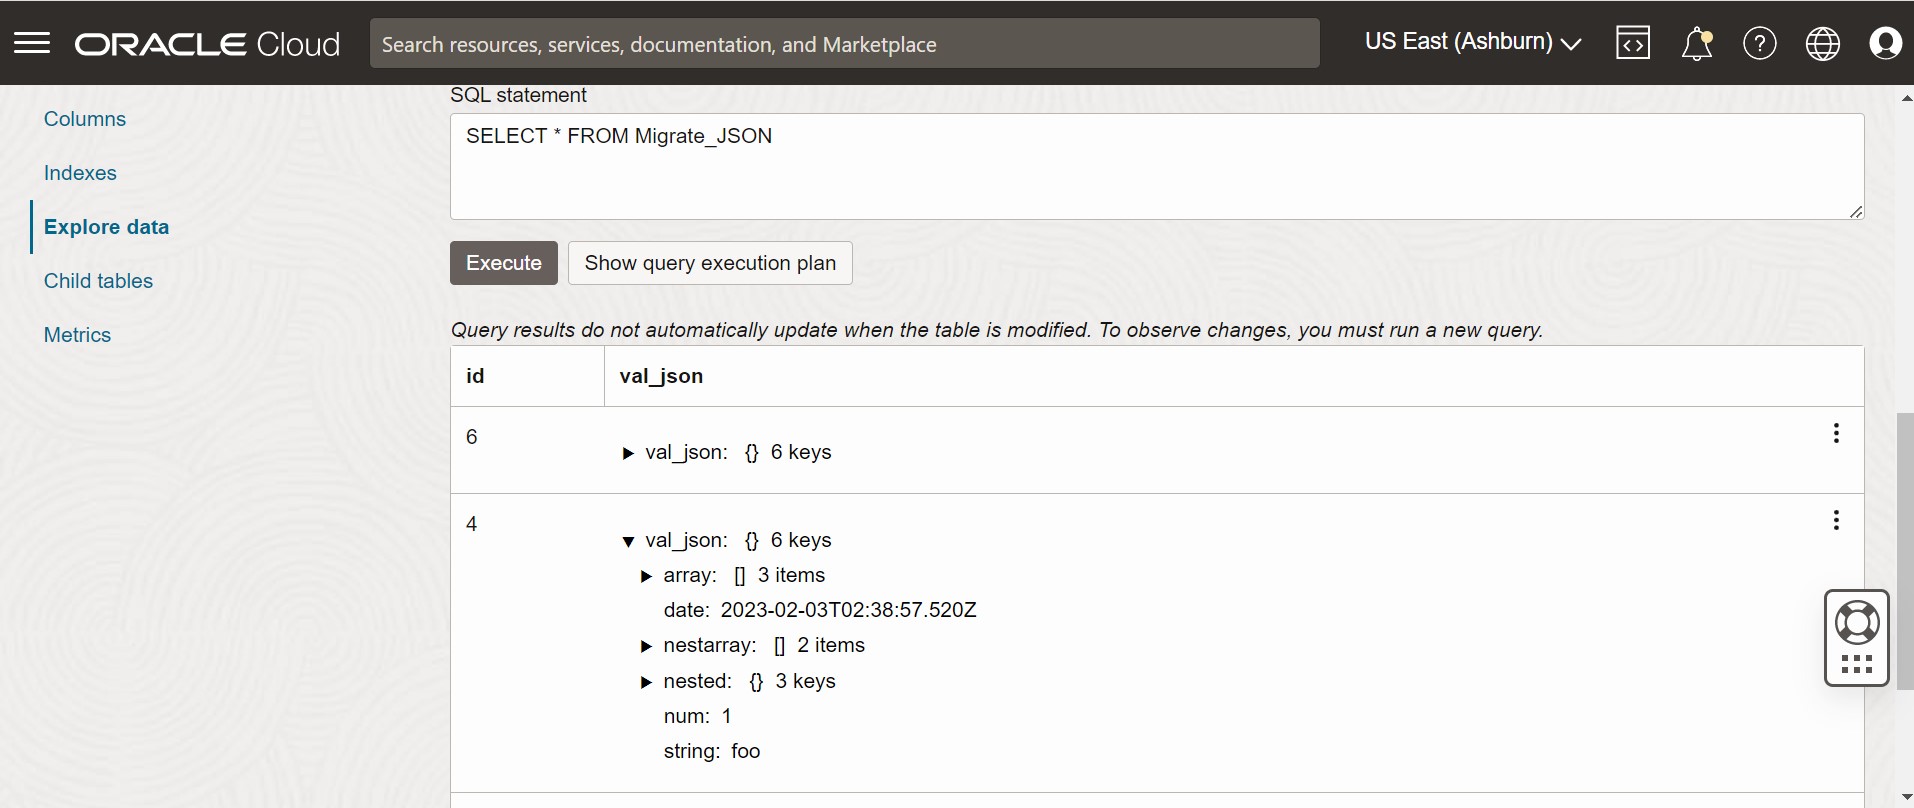
Description of the illustration migrate_json2.png
Migrate from MongoDB JSON file to Oracle NoSQL Database Cloud Service
This example shows how to use the Oracle NoSQL Database Migrator to copy MongoDB-formatted data to Oracle NoSQL Database Cloud Service (NDCS).
Use Case
After evaluating multiple options, an organization finalizes Oracle NoSQL Database Cloud Service as its NoSQL Database platform. The tables and data are in MongoDB and the organization wants to migrate both to Oracle NDCS.
You can copy a file or directory containing the MongoDB exported JSON data for migration by specifying the file or directory in the source configuration template.
Let us consider the following two sample JSON files exported from MongoDB to demonstrate our use case.
A sample MongoDB-formatted JSON file is as follows:
{"_id":0,"name":"Aimee Zank","scores":[{"score":1.463179736705023,"type":"exam"},{"score":11.78273309957772,"type":"quiz"},{"score":35.8740349954354,"type":"homework"}]}
{"_id":1,"name":"Aurelia Menendez","scores":[{"score":60.06045071030959,"type":"exam"},{"score":52.79790691903873,"type":"quiz"},{"score":71.76133439165544,"type":"homework"}]}
{"_id":2,"name":"Corliss Zuk","scores":[{"score":67.03077096065002,"type":"exam"},{"score":6.301851677835235,"type":"quiz"},{"score":66.28344683278382,"type":"homework"}]}
{"_id":3,"name":"Bao Ziglar","scores":[{"score":71.64343899778332,"type":"exam"},{"score":24.80221293650313,"type":"quiz"},{"score":42.26147058804812,"type":"homework"}]}
{"_id":4,"name":"Zachary Langlais","scores":[{"score":78.68385091304332,"type":"exam"},{"score":90.2963101368042,"type":"quiz"},{"score":34.41620148042529,"type":"homework"}]}
A sample MongoDB-formatted JSON file exported from a Spring application is as follows:
{"_id":{"$oid":"63d3a87cf564fc21dac3838d"},"firstName":"John","lastName":"Smith","address":{"Country":"France"},"_class":"com.example.demo.Customer"}
{"_id":{"$oid":"63d3a87cf564fc21dac3838e"},"firstName":"Sam","lastName":"David","address":{"Country":"USA"},"_class":"com.example.demo.Customer"}
{"_id":"3","firstName":"Dona","lastName":"William","address":{"Country":"England"},"_class":"com.example.demo.Customer"}
MongoDB supports two types of extensions to the formatted JSON files, Canonical mode and Relaxed mode. You can supply the MongoDB-formatted JSON file that is generated using the mongoexport tool in either Canonical or Relaxed mode. NoSQL Database Migrator supports both the modes.
For more information on the MongoDB Extended JSON (v2) file, See mongoexport_formats.
For more information on the generation of MongoDB-formatted JSON file, See mongoexport.
Example
For the demonstration, let us look at how to migrate a MongoDB-formatted JSON file to NDCS. We will use a manually created configuration file for this example.
Prerequisites
-
Identify the source and sink for the migration.
-
Source: MongoDB-formatted JSON File
-
Sink: Oracle NoSQL Database Cloud Service
-
- Extract the data from MongoDB using the mongoexport utility. See mongoexport.
-
Identify your OCI cloud credentials and capture them in the OCI config file. Save the config file in
/home/<user>/.oci/configdirectory. For details, see Acquiring Credentials.[DEFAULT] tenancy=ocid1.tenancy.oc1.... user=ocid1.user.oc1.... fingerprint= 43:d1:.... key_file=</fully/qualified/path/to/the/private/key/> pass_phrase=<passphrase> -
Identify the region endpoint and compartment name for your Oracle NoSQL Database Cloud Service.
-
endpoint:
us-ashburn-1 -
compartment:
ocid1.compartment.oc1..aaaaaaaaadeskhnnfkenws4k2vdyklcc32hfpzzz4z3zum3ubhmpz6zxnoza
-
Procedure
To migrate the MongoDB-formatted JSON data to Oracle NoSQL Database Cloud Service, you can choose from one of the following options:
-
Prepare the configuration file (in JSON format) with the identified Source and Sink details. See Source Configuration Templates and Sink Configuration Templates .
Here, you set the
defaultSchemaconfiguration parameter to true. Therefore, NoSQL Database Migrator creates a table with the default schema at the sink.{ "source" : { "type" : "file", "format" : "mongodb_json", "dataPath" : "<complete/path/to/the/MongoDB/Formatted/JSON/file>" }, "sink" : { "type" : "nosqldb_cloud", "endpoint" : "us-ashburn-1", "table" : "mongoImport", "compartment" : "ocid1.compartment.oc1..aaaaaaaaadeskhnnfkenws4k2vdyklcc32hfpzzz4z3zum3ubhmpz6zxnoza", "includeTTL" : false, "schemaInfo" : { "readUnits" : 100, "writeUnits" : 60, "storageSize" : 1, "defaultSchema" : true }, "credentials" : "<complete/path/to/the/oci/config/file>", "credentialsProfile" : "DEFAULT", "writeUnitsPercent" : 90, "overwrite" : true, "requestTimeoutMs" : 5000 }, "abortOnError" : true, "migratorVersion" : "1.8.0" }The default schema for MongoDB-formatted JSON file source is as follows:
CREATE TABLE IF NOT EXISTS <tablename>(id STRING, document JSON,PRIMARY KEY(SHARD(id));Where:
-
tablename= value provided for thetableattribute in the configuration. -
id= The_idvalue from each document of the MongoDB exported JSON source file. -
document= For each document in the MongoDB exported file, the contents excluding the_idfield are aggregated into thedocumentcolumn.
Note: If the table
<tablename>already exists in Oracle NoSQL Database Cloud Service and you want to migrate data to the table using thedefaultSchemaconfiguration, you must ensure that the existing table has the ID column in lower case (id) and is of the type STRING. -
-
Open the command prompt and navigate to the directory where you extracted the NoSQL Database Migrator utility.
-
Run the
runMigratorcommand by passing the configuration file. Use--configor-coption.$./runMigrator --config <complete/path/to/the/JSON/config/file> -
The utility proceeds with the data migration, as shown below.
[INFO] creating source from given configuration:
[INFO] source creation completed
[INFO] creating sink from given configuration:
[INFO] sink creation completed
[INFO] creating migrator pipeline
[INFO] [cloud sink] : start loading DDLs
[INFO] [cloud sink] : executing DDL: CREATE TABLE IF NOT EXISTS mongoImport (id STRING, document JSON, PRIMARY KEY(SHARD(id))),limits: [100, 60, 1]
[INFO] [cloud sink] : completed loading DDLs
[INFO] migration started
[INFO] [mongo file source] : start parsing MongoDB JSON records from file: mongoDBSample.json
[INFO] Migration success for source mongoDBSample. read=5,written=5,failed=0
[INFO] Migration is successful for all the sources.
[INFO] migration completed.
Records provided by source=5, Records written to sink=5, Records failed=0,Records skipped=0.
Elapsed time: 0min 0sec 448ms
Migration completed.
Verification
To verify the migration, you can log in to your Oracle NoSQL Database Cloud Service console and verify that mongoImport table is created with the source data. For the procedure to access the console, see the Accessing the Service from the Infrastructure Console article.
-
Prepare the configuration file (in JSON format) with the identified Source and Sink details. See Source Configuration Templates and Sink Configuration Templates .
Here, you specify the file containing the DDL statement of the sink table in the
schemaPathparameter of the source configuration template. Correspondingly, set theuseSourceSchemaconfiguration parameter to true in the sink configuration template.You can generate a custom schema as follows:
-
Note the names and data types for each column from the MongoDB-formatted JSON data. Use this information to create a schema DDL file for Oracle NoSQL Database Cloud Service table.
-
In the schema file, name the first column (primary key) as
idof type STRING. Include the same name and type for the remaining columns as recorded in the MongoDB-formatted JSON file. -
Save the schema file and note down it’s complete path.
The following user-defined schema is used in this example:
CREATE TABLE IF NOT EXISTS sampleMongoDBImp (id STRING, name STRING, scores JSON, PRIMARY KEY(SHARD(id)));You must include a
renameFieldstransformation instructing NoSQL Database Migrator to convert the_idcolumn toidwhile creating the table. For parameter details, see Transformation Configuration Templates. NoSQL Database Migrator creates a table with the custom schema at the sink.{ "source" : { "type" : "file", "format" : "mongodb_json", "schemaInfo" : { "schemaPath" : "<complete/path/to/the/schema/file>" }, "dataPath" : "<complete/path/to/the/MongoDB/Formatted/JSON/file>" }, "sink" : { "type" : "nosqldb_cloud", "endpoint" : "us-ashburn-1", "table" : "sampleMongoDBImp", "compartment" : "ocid1.compartment.oc1..aaaaaaaaadeskhnnfkenws4k2vdyklcc32hfpzzz4z3zum3ubhmpz6zxnoza", "includeTTL" : true, "schemaInfo" : { "readUnits" : 100, "writeUnits" : 60, "storageSize" : 1, "useSourceSchema" : true }, "credentials" : "<complete/path/to/the/oci/config/file>", "credentialsProfile" : "DEFAULT", "writeUnitsPercent" : 90, "overwrite" : false, "requestTimeoutMs" : 5000 }, "transforms": { "renameFields" : { "_id":"id" } }, "abortOnError" : true, "migratorVersion" : "1.8.0" } -
-
Open the command prompt and navigate to the directory where you extracted the NoSQL Database Migrator utility.
-
Run the
runMigratorcommand by passing the configuration file. Use--configor-coption.$./runMigrator --config <complete/path/to/the/JSON/config/file> -
The utility proceeds with the data migration, as shown below.
[INFO] creating source from given configuration:
[INFO] source creation completed
[INFO] creating sink from given configuration:
[INFO] sink creation completed
[INFO] creating migrator pipeline
[INFO] [cloud sink] : start loading DDLs
[INFO] [cloud sink] : executing DDL: CREATE TABLE IF NOT EXISTS sampleMongoDBImp (id INTEGER, name STRING, scores JSON, PRIMARY KEY(SHARD(id))),limits: [100, 60, 1]
[INFO] [cloud sink] : completed loading DDLs
[INFO] migration started
[INFO] [mongo file source] : start parsing MongoDB JSON records from file: mongoDBSample.json
[INFO] Migration success for source mongoDBSample. read=5,written=5,failed=0
[INFO] Migration is successful for all the sources.
[INFO] migration completed.
Records provided by source=5, Records written to sink=5, Records failed=0,Records skipped=0.
Elapsed time: 0min 0sec 438ms
Migration completed.
Verification
To verify the migration, you can log in to your Oracle NoSQL Database Cloud Service console and verify that sampleMongoDBImp table is created with the source data. For the procedure to access the console, see the Accessing the Service from the Infrastructure Console article.
-
For this use case, we will use the sample MongoDB-formatted JSON file exported from a Spring application as the source. For more details on this format, see Spring Data.
-
Prepare the configuration file (in JSON format) with the identified Source and Sink details. See Source Configuration Templates and Sink Configuration Templates .
Here, you specify the file containing the DDL statement of the sink table in the
schemaPathparameter of the source configuration template. Correspondingly, set theuseSourceSchemaconfiguration parameter to true in the sink configuration template.You can generate a custom schema as follows:
-
Note the names and data types for each column from the MongoDB-formatted JSON data.
-
In the schema file, name the first column (primary key) as
idof type STRING. Aggregate the remaining fields to a field namedkv_json_of type JSON, adhering to the Spring data format. For more details, see the Persistence Model of spring data framework. -
Save the schema file and note down it’s complete path.
The following user-defined schema is used in this example:
CREATE TABLE IF NOT EXISTS sampleMongoDBSpringImp(id STRING, kv_json_ JSON, PRIMARY KEY(SHARD(id)))For the Spring data sample given above, you must include the following transformations:
-
renameFieldstransformation to convert the_idcolumn toid -
ignoreFieldstransformation to ignore the_classcolumn and not include it in the sink table -
aggregateFieldstransformation to aggregate the remaining fields (other thanid) to a field of type JSON
For parameter details, see Transformation Configuration Templates. NoSQL Database Migrator creates a table with the custom schema at the sink.
{ "source": { "type": "file", "format": "mongodb_json", "schemaInfo": { "schemaPath": "<complete/path/to/the/schema/file>" }, "dataPath": "<complete/path/to/the/MongoDB/Formatted/JSON/file>" }, "sink": { "type": "nosqldb_cloud", "endpoint": "us-ashburn-1", "table": "sampleMongoDBSpringImp", "compartment": "ocid1.compartment.oc1..aaaaaaaaadeskhnnfkenws4k2vdyklcc32hfpzzz4z3zum3ubhmpz6zxnoza", "includeTTL": true, "schemaInfo": { "readUnits": 100, "writeUnits": 60, "storageSize": 1, "useSourceSchema": true }, "credentials": "<complete/path/to/the/oci/config/file>", "credentialsProfile": "DEFAULT", "writeUnitsPercent": 90, "overwrite": false, "requestTimeoutMs": 5000 }, "transforms": { "renameFields": { "_id": "id" }, "ignoreFields": ["_class"], "aggregateFields": { "fieldName": "kv_json_", "skipFields": ["id"] } }, "abortOnError" : true, "migratorVersion" : "1.8.0" } -
-
Open the command prompt and navigate to the directory where you extracted the NoSQL Database Migrator utility.
-
Run the
runMigratorcommand by passing the configuration file. Use--configor-coption.$./runMigrator --config <complete/path/to/the/JSON/config/file> -
The utility proceeds with the data migration, as shown below.
creating source from given configuration:
source creation completed
creating sink from given configuration:
sink creation completed
creating migrator pipeline
[cloud sink] : start loading DDLs
[cloud sink] : executing DDL: CREATE TABLE IF NOT EXISTS sampleMongoDBSpringImp (id STRING, kv_json_ JSON, PRIMARY KEY(SHARD(id))),limits: [100, 60, 1]
[cloud sink] : completed loading DDLs
migration started
[mongo file source] : start parsing MongoDB JSON records from file: mongodbspring.json
Migration success for source mongodbspring. read=3,written=3,failed=0
Migration is successful for all the sources.
migration completed.
Records provided by source=3, Records written to sink=3, Records failed=0,Records skipped=0.
Elapsed time: 0min 0sec 393ms
Migration completed.
Verification
To verify the migration, you can log in to your Oracle NoSQL Database Cloud Service console and verify that sampleMongoDBImp table is created with the source data. For the procedure to access the console, see the Accessing the Service from the Infrastructure Console article.
Migrate from DynamoDB JSON file to Oracle NoSQL Database Cloud Service
This example shows how to use Oracle NoSQL Database Migrator to copy DynamoDB JSON file to NoSQL Database Cloud Service.
Use Case
After evaluating multiple options, an organization finalizes Oracle NoSQL Database Cloud Service over DynamoDB database. The organization wants to migrate their tables and data from DynamoDB to Oracle NoSQL Database Cloud Service.
See Mapping of DynamoDB table to Oracle NoSQL table for more details.
You can migrate a file or directory containing the DynamoDB exported JSON data from a file system by specifying the path in the source configuration template.
A sample DynamoDB-formatted JSON File is as follows:
{"Item":{"Id":{"N":"101"},"Phones":{"L":[{"L":[{"S":"555-222"},{"S":"123-567"}]}]},"PremierCustomer":{"BOOL":false},"Address":{"M":{"Zip":{"N":"570004"},"Street":{"S":"21 main"},"DoorNum":{"N":"201"},"City":{"S":"London"}}},"FirstName":{"S":"Fred"},"FavNumbers":{"NS":["10"]},"LastName":{"S":"Smith"},"FavColors":{"SS":["Red","Green"]},"Age":{"N":"22"},"ttl": {"N": "1734616800"}}}
{"Item":{"Id":{"N":"102"},"Phones":{"L":[{"L":[{"S":"222-222"}]}]},"PremierCustomer":{"BOOL":false},"Address":{"M":{"Zip":{"N":"560014"},"Street":{"S":"32 main"},"DoorNum":{"N":"1024"},"City":{"S":"Wales"}}},"FirstName":{"S":"John"},"FavNumbers":{"NS":["10"]},"LastName":{"S":"White"},"FavColors":{"SS":["Blue"]},"Age":{"N":"48"},"ttl": {"N": "1734616800"}}}
You export the DynamoDB table to AWS S3 storage as specified in Exporting DynamoDB table data to Amazon S3.
Example
For this demonstration, you will learn how to migrate a DynamoDB JSON file to Oracle NoSQL Database Cloud Service. You will use a manually created configuration file for this example.
Prerequisites
-
Identify the source and sink for the migration.
-
Source: DynamoDB JSON File
-
Sink: Oracle NoSQL Database Cloud Service
-
-
In order to import DynamoDB table data to Oracle NoSQL Database, you must first export the DynamoDB table to S3. See the steps provided in Exporting DynamoDB table data to Amazon S3 to export your table. While exporting, you select the format as DynamoDB JSON. The exported data contains DynamoDB table data in multiple
gzipfiles as shown below./ 01639372501551-bb4dd8c3 |-- 01639372501551-bb4dd8c3 ==> exported data prefix |----data |------sxz3hjr3re2dzn2ymgd2gi4iku.json.gz ==>table data |----manifest-files.json |----manifest-files.md5 |----manifest-summary.json |----manifest-summary.md5 |----_started -
You must download the files from AWS S3. The structure of the files after the download will be as shown below.
download-dir/01639372501551-bb4dd8c3 |----data |------sxz3hjr3re2dzn2ymgd2gi4iku.json.gz ==>table data |----manifest-files.json |----manifest-files.md5 |----manifest-summary.json |----manifest-summary.md5 |----_started -
Identify your OCI cloud credentials and capture them in the OCI config file. Save the config file in
/home/<user>/.oci/configdirectory. For more details, see Acquiring Credentials in Using Oracle NoSQL Database Cloud Service.[DEFAULT] tenancy=ocid1.tenancy.oc1.... user=ocid1.user.oc1.... fingerprint= 43:d1:.... region=us-ashburn-1 key_file=</fully/qualified/path/to/the/private/key/> pass_phrase=<passphrase> -
Identify the region endpoint and compartment name for your Oracle NoSQL Database Cloud Service.
-
endpoint:
us-ashburn-1 -
compartment:
Training-NoSQL
-
Procedure
To migrate the DynamoDB JSON data to the Oracle NoSQL Database:
-
Prepare the configuration file (in JSON format) with the identified source and sink details. For details, see Source Configuration Templates and Sink Configuration Templates.
Note: If your DynamoDB exported JSON table items contain TTL attribute, to optionally import the TTL values, specify the attribute in the
ttlAttributeNameconfiguration parameter of the source configuration template and set theincludeTTLconfiguration parameter to true in the sink configuration template. For more details, see Migrating TTL Metadata for Table Rows.Here, you set the
defaultSchemaconfiguration parameter to true. Therefore, the NoSQL Database Migrator creates the default schema at the sink. You must specify theDDBPartitionKeyand the corresponding NoSQL column type. Otherwise, an error is displayed.For details on the default schema for a DynamoDB exported JSON source, see Identify the Source and Sink topic in Workflow for Oracle NoSQL Data Migrator.
    {
     "source" : {
      "type" : "file",
      "format" : "dynamodb_json",
      "ttlAttributeName" : "ttl",
      "dataPath" : "complete/path/to/the/DynamoDB/Formatted/JSON/file"
     },
     "sink" : {
      "type" : "nosqldb_cloud",
      "endpoint" : "us-sanjose-1",
      "table" : "sampledynDBImp",
      "compartment" : "ocid
1.compartment.oc1..aaaaaaaa......smq",
      "includeTTL" : true,
      "schemaInfo" : {
       "readUnits" : 10,
       "writeUnits" : 10,
       "storageSize" : 1,
       "schemaPath" : "complete/path/to/the/DDl/file"
      },
      "credentials" : "/home/<username>/.oci/config",
      "credentialsProfile" : "DEFAULT",
      "writeUnitsPercent" : 90,
      "overwrite" : true,
      "requestTimeoutMs" : 5000
     },
     "abortOnError" : true,
     "migratorVersion" : "1.8.0"
    }
The following default schema is used in this example:
CREATE TABLE IF NOT EXISTS sampledynDBImp (Id INTEGER, document JSON, PRIMARY KEY(SHARD(Id))) -
Open the command prompt and navigate to the directory where you extracted the NoSQL Database Migrator utility.
-
Run the
runMigratorcommand by passing separate configuration files. Use the--configor-coption../runMigrator --config <complete/path/to/the/JSON/config/file> -
The utility proceeds with the data migration as illustrated in the following sample:
[INFO] creating source from given configuration:
[INFO] source creation completed
[INFO] creating sink from given configuration:
[INFO] sink creation completed
[INFO] creating migrator pipeline
[INFO] [cloud sink] : start loading DDLs
[INFO] [cloud sink] : executing DDL: CREATE TABLE IF NOT EXISTS sampledynDBImp (Id INTEGER, document JSON, PRIMARY KEY(SHARD(Id)))
[INFO] [cloud sink] : completed loading DDLs
[INFO] migration started
[INFO] Start writing data to OnDB Sink
[INFO] executing for source:DynamoSample
[INFO] [DDB file source] : start parsing JSON records from file: DynamoSample.json.gz
[INFO] Writing data to OnDB Sink completed.
[INFO] migration completed.
Records provided by source=2, Records written to sink=2, Records failed=0,Records skipped=0.
Elapsed time: 0min 0sec 45ms
Migration completed.
Verification
To validate the migration, you can log in to your Oracle NoSQL Database Cloud Service console and verify that the sampledynDBImp table is created with the source data.
-
Prepare the configuration file (in JSON format) with the identified source and sink details. For details, see Source Configuration Templates and Sink Configuration Templates.
Note: If your DynamoDB exported JSON table items contain TTL attribute, to optionally import the TTL values, specify the attribute in the
ttlAttributeNameconfiguration parameter of the source configuration template and set theincludeTTLconfiguration parameter to true in the sink configuration template.Here, you set the
defaultSchemaconfiguration parameter to false. Therefore, you specify the file containing the sink table’s DDL statement in theschemaPathparameter. See Mapping of DynamoDB types to Oracle NoSQL types for more details.The following user-defined schema is used in this example:
CREATE TABLE IF NOT EXISTS sampledynDBImp (Id INTEGER, document JSON, PRIMARY KEY(SHARD(Id)))NoSQL Database Migrator uses the schema file to create the table at the sink as part of the migration. As long as the primary key data is provided, the input JSON record will be inserted. Otherwise, an error is displayed.
Note:
-
If the Dynamo DB table has a data type that is not supported in NoSQL Database, the migration fails.
-
If the input data does not contain a value for a particular column (other than the primary key) then the column default value will be used. The default value must be a part of the column definition while creating the table. For example
id INTEGER not null default 0. If the column does not have a default definition, SQL NULL is inserted if values are not provided for the column. -
If you are modeling DynamoDB table as a JSON document, ensure that you use
AggregateFieldstransform in order to aggregate non-primary key data into a JSON column. For details, see aggregateFields
Generated configuration is { "source" : { "type" : "file", "format" : "dynamodb_json", "ttlAttributeName" : "ttl", "dataPath" : "complete/path/to/the/DynamoDB/Formatted/JSON/file" }, "sink" : { "type" : "nosqldb_cloud", "endpoint" : "us-sanjose-1", "table" : "sampledynDBImp", "compartment" : "ocid 1.compartment.oc1..aaaaaaaa......smq", "includeTTL" : true, "schemaInfo" : { "readUnits" : 10, "writeUnits" : 10, "storageSize" : 1, "schemaPath" : "complete/path/to/the/DDl/file" }, "credentials" : "/home/<username>/.oci/config", "credentialsProfile" : "DEFAULT", "writeUnitsPercent" : 90, "overwrite" : true, "requestTimeoutMs" : 5000 }, "abortOnError" : true, "migratorVersion" : "1.8.0" } -
-
Open the command prompt and navigate to the directory where you extracted the NoSQL Database Migrator utility.
-
Run the
runMigratorcommand by passing separate configuration files. Use the--configor-coption../runMigrator --config <complete/path/to/the/JSON/config/file> -
The utility proceeds with the data migration as illustrated in the following sample:
[INFO] creating source from given configuration:
[INFO] source creation completed
[INFO] creating sink from given configuration:
[INFO] sink creation completed
[INFO] creating migrator pipeline
[INFO] [cloud sink] : start loading DDLs
[INFO] [cloud sink] : executing DDL: CREATE TABLE IF NOT EXISTS sampledynDBImp (Id INTEGER, document JSON, PRIMARY KEY(SHARD(Id)))
[INFO] [cloud sink] : completed loading DDLs
[INFO] migration started
[INFO] Start writing data to OnDB Sink
[INFO] executing for source:DynamoSample
[INFO] [DDB file source] : start parsing JSON records from file: DynamoSample.json.gz
[INFO] Writing data to OnDB Sink completed.
[INFO] migration completed.
Records provided by source=2, Records written to sink=2, Records failed=0,Records skipped=0.
Elapsed time: 0min 0sec 45ms
Migration completed.
Verification
To validate the migration, you can log in to your Oracle NoSQL Database Cloud Service console and verify that the sampledynDBImp table is created with the source data.
Migrate from DynamoDB JSON file in AWS S3 to Oracle NoSQL Database Cloud Service
This example shows how to use Oracle NoSQL Database Migrator to copy DynamoDB JSON file stored in an AWS S3 store to the Oracle NoSQL Database Cloud Service (NDCS).
Use Case:
After evaluating multiple options, an organization finalizes Oracle NoSQL Database Cloud Service over DynamoDB database. The organization wants to migrate their tables and data from DynamoDB to Oracle NoSQL Database Cloud Service.
See Mapping of DynamoDB table to Oracle NoSQL table for more details.
You can migrate a file containing the DynamoDB exported JSON data from the AWS S3 storage by specifying the path in the source configuration template.
A sample DynamoDB-formatted JSON File is as follows:
{"Item":{"Id":{"N":"101"},"Phones":{"L":[{"L":[{"S":"555-222"},{"S":"123-567"}]}]},"PremierCustomer":{"BOOL":false},"Address":{"M":{"Zip":{"N":"570004"},"Street":{"S":"21 main"},"DoorNum":{"N":"201"},"City":{"S":"London"}}},"FirstName":{"S":"Fred"},"FavNumbers":{"NS":["10"]},"LastName":{"S":"Smith"},"FavColors":{"SS":["Red","Green"]},"Age":{"N":"22"}}}
{"Item":{"Id":{"N":"102"},"Phones":{"L":[{"L":[{"S":"222-222"}]}]},"PremierCustomer":{"BOOL":false},"Address":{"M":{"Zip":{"N":"560014"},"Street":{"S":"32 main"},"DoorNum":{"N":"1024"},"City":{"S":"Wales"}}},"FirstName":{"S":"John"},"FavNumbers":{"NS":["10"]},"LastName":{"S":"White"},"FavColors":{"SS":["Blue"]},"Age":{"N":"48"}}}
You export the DynamoDB table to AWS S3 storage as specified in Exporting DynamoDB table data to Amazon S3.
Example:
For this demonstration, you will learn how to migrate a DynamoDB JSON file in an AWS S3 source to NDCS. You will use a manually created configuration file for this example.
Prerequisites
-
Identify the source and sink for the migration.
-
Source:DynamoDB JSON File in AWS S3
-
Sink: Oracle NoSQL Database Cloud Service
-
-
Identify the table in AWS DynamoDB that needs to be migrated to NDCS. Log in to your AWS console using your credentials. Go to DynamoDB. Under Tables, choose the table to be migrated.
-
Create an object bucket and export the table to S3. From your AWS console, go to S3. Under buckets, create a new object bucket. Go back to DynamoDB and click Exports to S3. Provide the source table and the destination S3 bucket and click Export.
Refer to steps provided in Exporting DynamoDB table data to Amazon S3 to export your table. While exporting, you select the format as DynamoDB JSON. The exported data contains DynamoDB table data in multiple
gzipfiles as shown below./ 01639372501551-bb4dd8c3 |-- 01639372501551-bb4dd8c3 ==> exported data prefix |----data |------sxz3hjr3re2dzn2ymgd2gi4iku.json.gz ==>table data |----manifest-files.json |----manifest-files.md5 |----manifest-summary.json |----manifest-summary.md5 |----_started -
You need aws credentials (including access key ID and secret access key) and config files (credentials and optionally config) to access AWS S3 from the NoSQL Database Migrator. See Set and view configuration settings for more details on the configuration files. See Creating a key pair for more details on creating access keys.
-
Identify your OCI cloud credentials and capture them in the OCI config file. Save the config file in a directory
.ociunder your home directory (~/.oci/config). See Acquiring Credentials for more details.[DEFAULT] tenancy=ocid1.tenancy.oc1.... user=ocid1.user.oc1.... fingerprint= 43:d1:.... key_file=</fully/qualified/path/to/the/private/key/> pass_phrase=<passphrase> -
Identify the region endpoint and compartment name for your Oracle NoSQL Database Cloud Service. For example,
-
endpoint:us-phoenix-1
-
compartment: developers
-
Procedure
To migrate the DynamoDB JSON data to Oracle NoSQL Database Cloud Service, use one of the following options:
-
Prepare the configuration file (in JSON format) with the identified source and sink details. For details, see Source Configuration Templates and Sink Configuration Templates.
Note: If the items in your DynamoDB JSON File in AWS S3 contain TTL attribute, to optionally import the TTL values, specify the attribute in the
ttlAttributeNameconfiguration parameter of the source configuration template and set theincludeTTLconfiguration parameter to true in the sink configuration template. For more details, see Migrating TTL Metadata for Table Rows.Set the
defaultSchematoTRUEand so the Migrator utility creates the default schema at the sink. You must specify theDDBPartitionKeyand the corresponding NoSQL column type. Otherwise, an error is thrown.{ "source" : { "type" : "aws_s3", "format" : "dynamodb_json", "s3URL" : "<https://<bucket-name>.<s3_endpoint>/export_path>", "credentials" : "</path/to/aws/credentials/file>", "credentialsProfile" : <"profile name in aws credentials file"> }, "sink" : { "type" : "nosqldb_cloud", "endpoint" : "<region_name>", "table" : "<table_name>", "compartment" : "<compartment_name>", "schemaInfo" : { "defaultSchema" : true, "readUnits" : 100, "writeUnits" : 60, "DDBPartitionKey" : "<PrimaryKey:Datatype>", "storageSize" : 1 }, "credentials" : "<complete/path/to/the/oci/config/file>", "credentialsProfile" : "DEFAULT", "writeUnitsPercent" : 90, "requestTimeoutMs" : 5000 }, "abortOnError" : true, "migratorVersion" : "1.8.0" }For a DynamoDB JSON source, the default schema for the table will be as shown below:
CREATE TABLE IF NOT EXISTS <TABLE_NAME>(DDBPartitionKey_name DDBPartitionKey_type,
[DDBSortKey_name DDBSortKey_type], DOCUMENT JSON,
PRIMARY KEY(SHARD(DDBPartitionKey_name),[DDBSortKey_name]))
Where:
TABLE_NAME = value provided for the sink ‘table’ in the configuration
DDBPartitionKey_name = value provided for the partition key in the configuration
DDBPartitionKey_type = value provided for the data type of the partition key in the configuration
DDBSortKey_name = value provided for the sort key in the configuration if any
DDBSortKey_type = value provided for the data type of the sort key in the configuration if any
DOCUMENT = All attributes except the partition and sort key of a Dynamo DB table item aggregated into a NoSQL JSON column
-
Open the command prompt and navigate to the directory where you extracted the NoSQL Database Migrator utility.
-
Run the
runMigratorcommand by passing the configuration file. Use the--configor-coption.[~/nosqlMigrator]$./runMigrator --config <complete/path/to/the/JSON/config/file> -
The utility proceeds with the data migration, as shown below.
Records provided by source=7..,
Records written to sink=7,
Records failed=0,
Records skipped=0.
Elapsed time: 0 min 2sec 50ms
Migration completed.
Verification
You can log in to your Oracle NoSQL Database Cloud Service console and verify that the new table is created with the source data.
-
Prepare the configuration file (in JSON format) with the identified source and sink details. For details, see Source Configuration Templates and Sink Configuration Templates.
Note: If the items in your DynamoDB JSON File in AWS S3 contain TTL attribute, to optionally import the TTL values, specify the attribute in the ttlAttributeName configuration parameter of the source configuration template and set the includeTTL configuration parameter to true in the sink configuration template. For more details, see Migrating TTL Metadata for Table Rows.
To specify a user-defined schema file in the sink configuration template, set the defaultSchema to
FALSEand specify the schemaPath as a file containing your DDL statement. For details, see Mapping of DynamoDB types to Oracle NoSQL types .Note: If the Dynamo DB table has a data type that is not supported in NoSQL, the migration fails.
A sample schema file is shown below.
CREATE TABLE IF NOT EXISTS sampledynDBImp (AccountId INTEGER,document JSON,
PRIMARY KEY(SHARD(AccountId)));
The schema file is used to create the table at the sink as part of the migration. As long as the primary key data is provided, the input JSON record will be inserted, otherwise it throws an error.
Note:
- If the input data does not contain a value for a particular column(other than the primary key) then the column default value will be used. The default value should be part of the column definition while creating the table. For example
id INTEGER not null default 0. If the column does not have a default definition then SQL NULL is inserted if no values are provided for the column. - If you are modeling DynamoDB table as a JSON document, ensure that you use
AggregateFieldstransform in order to aggregate non-primary key data into a JSON column. For details, see aggregateFields .
{ "source" : { "type" : "aws_s3", "format" : "dynamodb_json", "s3URL" : "<https://<bucket-name>.<s3_endpoint>/export_path>", "credentials" : "</path/to/aws/credentials/file>", "credentialsProfile" : <"profile name in aws credentials file"> }, "sink" : { "type" : "nosqldb_cloud", "endpoint" : "<region_name>", "table" : "<table_name>", "compartment" : "<compartment_name>", "schemaInfo" : { "defaultSchema" : false, "readUnits" : 100, "writeUnits" : 60, "schemaPath" : "<full path of the schema file with the DDL statement>", "storageSize" : 1 }, "credentials" : "<complete/path/to/the/oci/config/file>", "credentialsProfile" : "DEFAULT", "writeUnitsPercent" : 90, "requestTimeoutMs" : 5000 }, "transforms": { "aggregateFields" : { "fieldName" : "document", "skipFields" : ["AccountId"] } }, "abortOnError" : true, "migratorVersion" : "1.8.0" } - If the input data does not contain a value for a particular column(other than the primary key) then the column default value will be used. The default value should be part of the column definition while creating the table. For example
-
Open the command prompt and navigate to the directory where you extracted the NoSQL Database Migrator utility.
-
Run the
runMigratorcommand by passing the configuration file. Use the--configor-coption.[~/nosqlMigrator]$./runMigrator --config <complete/path/to/the/JSON/config/file> -
The utility proceeds with the data migration, as shown below.
Records provided by source=7..,
Records written to sink=7,
Records failed=0,
Records skipped=0.
Elapsed time: 0 min 2sec 50ms
Migration completed.
Verification
You can log in to your Oracle NoSQL Database Cloud Service console and verify that the new table is created with the source data.
Migrate between Oracle NoSQL Database Cloud Service regions
This example shows the usage of Oracle NoSQL Database Migrator to perform cross-region migration.
Use case
An organization uses Oracle NoSQL Database Cloud Service to store and manage its data. It decides to replicate data from an existing region to a newer region for testing purposes before the new region can be launched for the production environment.
In this use case, you will learn to use the NoSQL Database Migrator to copy data from the user_data table in the Ashburn region to the Phoenix region.
You run the runMigrator utility by passing a pre-created configuration file. If you don’t provide the configuration file as a runtime parameter, the runMigrator utility prompts you to generate the configuration through an interactive procedure.
Prerequisites
-
Download Oracle NoSQL Database Migrator from the Oracle NoSQL Downloads page and extract the contents to your machine. For details, see Workflow for Oracle NoSQL Database Migrator.
-
Identify the source and sink for the migration.
-
Source: The
user_datatable in the Ashburn region.The
user_datatable includes the following data:{"id":40,"firstName":"Joanna","lastName":"Smith","otherNames":[{"first":"Joanna","last":"Smart"}],"age":null,"income":75000,"address":{"city":"Houston","number":401,"phones":[{"area":null,"kind":"work","number":1618955},{"area":451,"kind":"home","number":4613341},{"area":481,"kind":"mobile","number":4613382}],"state":"TX","street":"Tex Ave","zip":95085},"connections":[70,30,40],"email":"joanna.smith123@reachmail.com","communityService":"**"} {"id":10,"firstName":"John","lastName":"Smith","otherNames":[{"first":"Johny","last":"Good"},{"first":"Johny2","last":"Brave"},{"first":"Johny3","last":"Kind"},{"first":"Johny4","last":"Humble"}],"age":22,"income":45000,"address":{"city":"Santa Cruz","number":101,"phones":[{"area":408,"kind":"work","number":4538955},{"area":831,"kind":"home","number":7533341},{"area":831,"kind":"mobile","number":7533382}],"state":"CA","street":"Pacific Ave","zip":95008},"connections":[30,55,43],"email":"john.smith@reachmail.com","communityService":"****"} {"id":20,"firstName":"Jane","lastName":"Smith","otherNames":[{"first":"Jane","last":"BeGood"}],"age":22,"income":55000,"address":{"city":"San Jose","number":201,"phones":[{"area":608,"kind":"work","number":6538955},{"area":931,"kind":"home","number":9533341},{"area":931,"kind":"mobile","number":9533382}],"state":"CA","street":"Atlantic Ave","zip":95005},"connections":[40,75,63],"email":"jane.smith201@reachmail.com","communityService":"*****"} {"id":30,"firstName":"Adam","lastName":"Smith","otherNames":[{"first":"Adam","last":"BeGood"}],"age":45,"income":75000,"address":{"city":"Houston","number":301,"phones":[{"area":618,"kind":"work","number":6618955},{"area":951,"kind":"home","number":9613341},{"area":981,"kind":"mobile","number":9613382}],"state":"TX","street":"Indian Ave","zip":95075},"connections":[60,45,73],"email":"adam.smith201reachmail.com","communityService":"***"}Identify either the region endpoint or the service endpoint and compartment name for your source.
-
endpoint:
us-ashburn-1 -
compartment:
ocid1.compartment.oc1..aaaaaaaahcrgrgptoaq4cgpoymd32ti2ql4sdpu5puroausdf4og55z4tnya
-
-
Sink: The
user_datatable in the Phoenix region.Identify either the region endpoint or the service endpoint and the compartment name for your sink.
-
endpoint:
us-phoenix-1 -
compartment:
ocid1.compartment.oc1..aaaaaaaaleiwplazhwmicoogv3tf4lum4m4nzbcv5wfjmoxuz3doreagvdma
Identify the sink table schema.
You can use the same table name and schema as the source table. For information on other schema options, see Identify the Source and Sink topic in Workflow for Oracle NoSQL Database Migrator
-
-
-
Identify your OCI cloud credentials for both regions and capture them in the configuration file. Save the config file on your machine in the location
/home/<user>/.oci/config. For more details, see Acquiring Credentials.Note:
-
If the regions are under different tenancies, you must provide different profiles in the
/home//.oci/configfile with appropriate OCI cloud credentials for each of them. -
If the regions are under the same tenancy, you can have a single profile in the
/home//.oci/configfile.
-
In this example, the regions are under different tenancies. The DEFAULT profile includes OCI credentials for the Ashburn region and DEFAULT2 includes OCI credentials for the Phoenix region.
In the migrator configuration file endpoint parameter (both source and sink configuration templates), you can provide either the service endpoint URL or the region ID of the regions. For the list of data regions supported for Oracle NoSQL Database Cloud Service and their service endpoint URLs, see Data Regions and Associated Service URLs in the Oracle NoSQL Database Cloud Service document.
[DEFAULT]
user=ocid1.user.oc1....
fingerprint=fd:96:....
tenancy=ocid1.tenancy.oc1....
region=us-ashburn-1
key_file=</fully/qualified/path/to/the/private/key/>
pass_phrase=abcd


[DEFAULT2]
user=ocid1.user.oc1....
fingerprint=1b:68:....
tenancy=ocid1.tenancy.oc1....
region=us-phoenix-1
key_file=</fully/qualified/path/to/the/private/key/>
pass_phrase=23456
Procedure
To migrate the user_data table from the Ashburn region to the Phoenix region, perform the following:
-
Prepare the configuration file (in JSON format) with the identified source and sink details. See Source Configuration Templates and Sink Configuration Templates.
{ "source" : { "type" : "nosqldb_cloud", "endpoint" : "us-ashburn-1", "table" : "user_data", "compartment" : "ocid1.compartment.oc1..aaaaaaaahcrgrgptoaq4cgpoymd32ti2ql4sdpu5puroausdf4og55z4tnya", "credentials" : "/home/<user>/.oci/config", "credentialsProfile" : "DEFAULT", "readUnitsPercent" : 100, "includeTTL" : false, "requestTimeoutMs" : 5000 }, "sink" : { "type" : "nosqldb_cloud", "endpoint" : "us-phoenix-1", "table" : "user_data", "compartment" : "ocid1.compartment.oc1..aaaaaaaaleiwplazhwmicoogv3tf4lum4m4nzbcv5wfjmoxuz3doreagvdma", "includeTTL" : false, "schemaInfo" : { "readUnits" : 100, "writeUnits" : 60, "storageSize" : 1, "useSourceSchema" : true }, "credentials" : "/home/<user>/.oci/config", "credentialsProfile" : "DEFAULT2", "writeUnitsPercent" : 90, "overwrite" : true, "requestTimeoutMs" : 5000 }, "abortOnError" : true, "migratorVersion" : "1.8.0" } -
On your machine, navigate to the directory where you extracted the NoSQL Database Migrator utility. You can access the
runMigratorcommand from the command line interface. -
Run the
runMigratorcommand by passing the configuration file using the –config or -c option.[~/nosql-migrator]$./runMigrator --config <complete/path/to/the/config/file> -
The utility proceeds with data migration as shown below. The
user_datatable is created at the sink with the same schema as the source table as you have configured the useSourceSchema parameter as true in the sink configuration template.creating source from given configuration: source creation completed creating sink from given configuration: sink creation completed creating migrator pipeline migration started [cloud sink] : start loading DDLs [cloud sink] : executing DDL: CREATE TABLE IF NOT EXISTS user_data (id INTEGER, firstName STRING, lastName STRING, otherNames ARRAY(RECORD(first STRING, last STRING)), age INTEGER, income INTEGER, address JSON, connections ARRAY(INTEGER), email STRING, communityService STRING, PRIMARY KEY(SHARD(id))),limits: [100, 60, 1] [cloud sink] : completed loading DDLs [cloud sink] : start loading records migration completed. Records provided by source=5, Records written to sink=5, Records failed=0, Records skipped=0. Elapsed time: 0min 5sec 603ms Migration completed.Note:
-
If the table already exists at the sink with the same schema as the source table, the rows with the same primary keys are overwritten as you have provided the overwrite parameter as true in the configuration template.
-
If the table already exists at the sink with a different schema from the source table, the migration will fail.
-
Validation
To validate the migration, you can log in to your Oracle NoSQL Database Cloud Service console in the Phoenix region. Verify that the source data from the user_data table in the Ashburn region is copied to the user_data table in this region. For the procedure to access the console, see Accessing the Service from the Infrastructure Console article.
Migrate from Oracle NoSQL Database Cloud Service to OCI Object Storage
This example shows the usage of Oracle NoSQL Database Migrator from a Cloud Shell.
Use case
A start-up venture plans to use Oracle NoSQL Database Cloud Service as its data storage solution. The company wants to use Oracle NoSQL Database Migrator to copy data from a table in the Oracle NoSQL Database Cloud Service to OCI Object Storage to make periodic backups of their data. As a cost-effective measure, they want to run the NoSQL Database Migrator utility from the Cloud Shell, which is accessible to all the OCI users.
In this use case, you will learn to copy the NoSQL Database Migrator utility to a Cloud Shell in the subscribed region and perform a data migration. You migrate the source data from Oracle NoSQL Database Cloud Service table to a JSON file in the OCI Object Storage.
You run the runMigrator utility by passing a pre-created configuration file. If you don’t provide the configuration file as a runtime parameter, the runMigrator utility prompts you to generate the configuration through an interactive procedure.
Prerequisites
-
Download Oracle NoSQL Database Migrator from the Oracle NoSQL Downloads page to your local machine.
-
Launch the Cloud Shell from the Developer tools menu on your cloud console. The web browser opens your home directory. Click the Cloud Shell menu on the top, right corner of the Cloud Shell window and select the uploadoption from the drop-down. In the pop-up window, either drag and drop the Oracle NoSQL Database Migrator package from your local machine, or click the Select from your computer option, select the package from your local machine, and click the Upload button. You can also drag and drop the Oracle NoSQL Database Migrator package directly from your local machine to your home directory in the Cloud Shell. Extract the contents of the package.
-
Identify the source and sink for the backup.
-
Source:
NDCSuploadtable in Oracle NoSQL Database Cloud Service Ashburn region.For demonstration, consider the following data in the
NDCSuploadtable:{"id":1,"name":"Jane Smith","email":"iamjane@somemail.co.us","age":30,"income":30000.0} {"id":2,"name":"Adam Smith","email":"adam.smith@mymail.com","age":25,"income":25000.0} {"id":3,"name":"Jennifer Smith","email":"jenny1_smith@mymail.com","age":35,"income":35000.0} {"id":4,"name":"Noelle Smith","email":"noel21@somemail.co.us","age":40,"income":40000.0}Identify the endpoint and compartment ID for your source. For the endpoint, you can supply either the region identifier or the service endpoint. For the list of data regions supported in Oracle NoSQL Database Cloud Service, see Data Regions and Associated Service URLs.
-
endpoint:
us-ashburn-1 -
compartment ID:
ocid1.compartment.oc1..aaaaaaaahcrgrgptoaq4cgpoymd32ti2ql4sdpu5puroausdf4og55z4tnya
-
-
Sink: JSON file in the OCI Object Storage Bucket.
Identify the region endpoint, namespace, bucket, and prefix for OCI Object Storage. For more details, see Accessing Oracle Cloud Object Storage. For the list of OCI Object Storage service endpoints, see Object Storage Endpoints.
-
endpoint:
us-ashburn-1 -
bucket:
Migrate_oci -
prefix:
Delegation -
namespace: <> If you do not provide a namespace, the utility uses the default namespace of the tenancy.
Note: If the Object Storage Bucket is in a different compartment, ensure that you have the privileges to write objects in the bucket. For more details on setting the policies, see Write objects in Object Storage.
-
-
Procedure
To migrate from Oracle NoSQL Database Cloud Service to OCI Object Storage, perform the following from the Cloud Shell window:
-
Prepare a Migrator configuration file,
migrator-config.json, with the Oracle NoSQL Database Cloud Service source and OCI Object Storage sink. For templates, see Source Configuration Templates and Sink Configuration Templates. Ensure that you set theuseDelegationTokenparameter totruein source and sink configuration templates.The following configuration template is used in this use case:
{ "source" : { "type" : "nosqldb_cloud", "endpoint" : "us-ashburn-1", "table" : "NDCSupload", "compartment" : "ocid1.compartment.oc1..aaaaaaaahcrgrgptoaq4cgpoymd32ti2ql4sdpu5puroausdf4og55z4tnya", "useDelegationToken" : true, "readUnitsPercent" : 90, "includeTTL" : true, "requestTimeoutMs" : 5000 }, "sink" : { "type" : "object_storage_oci", "format" : "json", "endpoint" : "us-ashburn-1", "namespace" : "", "bucket" : "Migrate_oci", "prefix" : "Delegation", "chunkSize" : 32, "compression" : "", "useDelegationToken" : true }, "abortOnError" : true, "migratorVersion" : "1.8.0" } -
From your Cloud Shell, navigate to the directory where you extracted the NoSQL Database Migrator utility.
-
Run the
runMigratorcommand by passing the configuration file using the--configor-coption.[~/nosql-migrator]$./runMigrator --config <complete/path/to/the/config/file> -
The NoSQL Database Migrator utility proceeds with data migration. As you have set the useDelegationToken parameter to true, the Cloud Shell automatically authenticates using the delegation token while running the NoSQL Database Migrator utility. The NoSQL Database Migrator copies your data from the
NDCSuploadtable to a JSON file in the Object Storage bucketMigrate_oci. Check the logs for successful data backup.[INFO] creating source from given configuration: [INFO] source creation completed [INFO] creating sink from given configuration: [INFO] sink creation completed [INFO] creating migrator pipeline [INFO] migration started [INFO] [OCI OS sink] : writing table schema to Delegation/Schema/schema.ddl [INFO] [OCI OS sink] : start writing records with prefix Delegation [INFO] migration completed. Records provided by source=4,Records written to sink=4,Records failed=0. Elapsed time: 0min 0sec 486ms Migration completed.Note:
Data is copied to the file:
Migrate_oci/NDCSupload/Delegation/Data/000000.jsonDepending on the chunkSize parameter in the sink configuration template, the source data can be split into several JSON files in the same directory.
The schema is copied to the file:
Migrate_oci/NDCStable1/Delegation/Schema/schema.ddl
Validation
To validate your data backup, log in to the Oracle NoSQL Database Cloud Service console. Navigate through the menus, Storage > Object Storage & Archive Storage > Buckets. Access the files from the NDCSupload/Delegation directory in the Migrate_oci bucket. For the procedure to access the console, see Accessing the Service from the Infrastructure Console article.
Migrate from OCI Object Storage to Oracle NoSQL Database Cloud Service Using OKE Authentication
This example shows how to use Oracle NoSQL Database Migrator with OKE Workload Identity Authentication to copy data from a JSON file in the OCI Object Storage to Oracle NoSQL Database Cloud Service table.
Use case
As a developer, you are exploring an option to restore data from a JSON file in OCI Object Storage (OCI OS) bucket to Oracle NoSQL Database Cloud Service (NDCS) table using NoSQL Database Migrator in a containerized application. A Containerized application is a virtualized environment that bundles the application and all its dependencies (like libraries, binaries, and configuration files) in a package. This allows the application to run consistently across different environments, regardless of the underlying infrastructure.
You want to run NoSQL Database Migrator within an Oracle Cloud Infrastructure Container Engine for Kubernetes (OKE) pod. To securely access OCI OS and NDCS services from the OKE pod, you will use Workload Identity Authentication (WIA) method.
In this demonstration, you will build a docker image for NoSQL Database Migrator, copy the image into a repository in the Container Registry, create an OKE cluster, and deploy the Migrator image in the OKE cluster pod to run the Migrator utility. Here, you will supply a manually created NoSQL Database Migrator configuration file to run the Migrator utility as a containerized application.
Prerequisites
-
Identify the source and sink for the migration.
-
Source: JSON files and schema file in the OCI OS bucket.
Identify the region endpoint, namespace, bucket, and prefix for OCI OS bucket where the source JSON files and schema are available. For more details, see Accessing Oracle Cloud Object Storage. For the list of OCI OS service endpoints, see Object Storage Endpoints.
-
endpoint:
us-ashburn-1 -
bucket:
Migrate_oci -
prefix:
userSession -
namespace:
idhkv1iewjzj
The namespace name for a bucket is the same as its tenancy’s namespace and is autogenerated when your tenancy is created. You can get the namespace name as follows:
-
From the Oracle NoSQL Database Cloud Service console, navigate to Storage > Buckets.
-
Select your compartment from List Scope and select the bucket. The Bucket Details page displays the name in the Namespace parameter.
If you do not provide an OCI OS namespace name, the Migrator utility uses the default namespace of the tenancy.
-
-
Sink:
userstable in Oracle NoSQL Database Cloud Service.Identify either the region endpoint or the service endpoint and the compartment name for your sink:
-
endpoint:
us-ashburn-1 -
compartment:
ocid1.compartment.oc1..aaaaaaaaleiwplazhwmicoogv3tf4lum4m4nzbcv5wfjmoxuz3doreagvdma
Identify the sink table schema.
To use the table name and schema stored in the OCI OS bucket, set
useSourceSchemaparameter to true. For information on other schema options, see the Identify the Source and Sink topic in Workflow for Oracle NoSQL Database Migrator.Note: Ensure that you have the write privileges to the compartment in which you are restoring data to NDCS table. For more details, see Managing Compartments.
-
-
-
Prepare a Docker image for NoSQL Database Migrator and move it to Container Registry.
-
Get the tenancy-namespace from the OCI console.
Log in to the Oracle NoSQL Database Cloud Service console. In the navigation bar, select the Profile menu and then select Tenancy: <Tenany name>.
Copy the Object Storage namespace name, which is the tenancy-namespace, to the clipboard.
-
Build a Docker image for the Migrator utility.
Navigate to the directory where you have extracted the NoSQL Database Migrator utility. The Migrator package includes a docker file named Dockerfile. From a command interface, use the following command to build a Docker image of the Migrator utility:
#Command:
docker build -t nosqlmigrator:<tag> .
#Example: docker build -t nosqlmigrator:1.0 .You can specify a version identifier for the Docker image in the
tagoption. Check your Docker image using the command:#Command: Docker images#Example output ------------------------------------------------------------------------------------------ REPOSITORY TAG IMAGE ID CREATED SIZE localhost/nosqlmigrator 1.0 e1dcec27a5cc 10 seconds ago 487 MB quay.io/podman/hello latest 83fc7ce1224f 10 months ago 580 kB docker.io/library/openjdk 17-jdk-slim 8a3a2ffec52a 2 years ago 406 MB ------------------------------------------------------------------------------------------ -
Generate an Auth token.
You need an Auth token to log in to the Container Registry to store the Migrator Docker image. If you don’t have an Auth token already, you must generate one. For details, see Getting an Auth Token.
-
Store the Migrator Docker image in Container Registry.
To access the Migrator Docker Image from the Kubernetes pod, you must store the image in any public or private registry. For example, Docker, Artifact Hub, OCI Container Registry, and so forth are a few registries. In this demonstration, we use Container Registry. For details, see Overview of Container Registry.
-
From the OCI console, create a repository in the Container Registry. For details, see Creating a Repository.
For this demonstration, you create the
okemigratorrepository.Figure - Repository in Container Registry
-
Log in to the Container Registry from your command interface using the following command:
#Command:
docker login <region-key>.ocir.io -u <tenancy-namespace>/<user name>password: <Auth token>
#Example: docker login iad.ocir.io -u idhx..xxwjzj/rx..xxxxh@oracle.com password: <Auth token>#Output: Login Succeeded!In the command above,
region-key: Specifies the key for the region in which you are using Container Registry. For details, see Availability by Region.tenancy-namespace: Specifies the tenancy-namespace that you copied from the OCI console.user name: Specifies your OCI console user name.password: Specifies your Auth token. -
Tag and push your Migrator Docker image to Container Registry using the following commands:
#Command:
docker tag <Migrator Docker image> <region-key>.ocir.io/<tenancy-namespace>/<repo>:<tag>
docker push <region-key>.ocir.io/<tenancy-namespace>/<repo>:<tag>
#Example: docker tag localhost/nosqlmigrator:1.0 iad.ocir.io/idhx..xxwjzj/okemigrator:1.0 docker push iad.ocir.io/idhx..xxwjzj/okemigrator:1.0In the command above,
repo: Specifies the name of the repository that you created in Container Registry.tag: Specifies the version identifier for the Docker image.#Output: Getting image source signatures Copying blob 0994dbbf9a1b done | Copying blob 37849399aca1 done | Copying blob 5f70bf18a086 done | Copying blob 2f263e87cb11 done | Copying blob f941f90e71a8 done | Copying blob c82e5bf37b8a done | Copying blob 2ad58b3543c5 done | Copying blob 409bec9cdb8b done | Copying config e1dcec27a5 done | Writing manifest to image destination
-
-
-
Configure an OKE cluster with WIA to NDCS and OCI OS.
-
Create a Kubernetes cluster using OKE.
From the OCI console, define and create a Kubernetes cluster based on the availability of network resources using OKE. You need a Kubernetes cluster to run the Migrator utility as a containerized application. For cluster creation details, see Creating Kubernetes Clusters Using Console Workflows.
For this demonstration, you can create a single-node managed cluster using the Quick Create workflow detailed in the link above.
Figure - Kubernetes Cluster for Migrator Container
-
Set up WIA from the OCI console to access other OCI resources from Kubernetes Cluster.
To grant Migrator utility access to NDCS and OCI OS bucket while running from the Kubernetes cluster pods, you must set up WIA. Follow these steps:
-
Set up the cluster’s kubeconfigconfiguration file.
-
From the OCI console, open the Kubernetes cluster that you created and click the Access Cluster button.
-
From the Access Your Cluster dialog box, click Cloud Shell Access.
-
Click Launch Cloud Shell to display the Cloud Shell window.
-
Run the Oracle Cloud Infrastructure CLI command to set up the kubeconfig file. You can copy the command from the Access Your Cluster dialog box. You can expect the following output:
#Example:
oci ce cluster create-kubeconfig --cluster-id ocid1.cluster.oc1.iad.aaa...muqzq --file $HOME/.kube/config --region us-ashburn-1 --token-version 2.0.0  --kube-endpoint PUBLIC_ENDPOINT
#Output: New config written to the Kubeconfig file /home/<user>/.kube/config
-
-
Copy the OCID of the cluster from the
cluster-idoption in the command above and save it to use in further steps.ocid1.cluster.oc1.iad.aaa...muqzq -
Create a namespace for the Kubernetes service account using the following command in the Cloud shell window:
#Command:
kubectl create namespace <namespace-name>
#Example: kubectl create namespace migrator#Output: namespace/migrator created -
Create a Kubernetes service account for the Migrator application in a namespace using the following command in the Cloud shell window:
#Command:
kubectl create serviceaccount <service-account-name> --namespace <namespace-name>
#Example: kubectl create serviceaccount migratorsa --namespace migrator#Output: serviceaccount/migratorsa created -
Define an IAM policy from the OCI console to enable the workload to access the OCI resources from the Kubernetes cluster.
From the OCI console, navigate through the menus Identity & Security > Identity > Policies. Create the following policies to allow access to
nosql-familyandobject-familyresources. Use the OCID of the cluster, namespace, and service account values from the previous steps.#Command: Allow <subject> to <verb> <resource-type> in <location> where <conditions>#Example: Allow any-user to manage nosql-family in compartment Training-NoSQL where all { request.principal.type = 'workload', request.principal.namespace = 'migrator', request.principal.service_account = 'migratorsa', request.principal.cluster_id = 'ocid1.cluster.oc1.iad.aaaaaaaa2o6h5noeut7i4xr2bp4aohcc2ncozgvn3nny3uqu7cvp2rwmuqzq'} Allow any-user to manage object-family in compartment Training-NoSQL where all { request.principal.type = 'workload', request.principal.namespace = 'migrator', request.principal.service_account = 'migratorsa', request.principal.cluster_id = 'ocid1.cluster.oc1.iad.aaaaaaaa2o6h5noeut7i4xr2bp4aohcc2ncozgvn3nny3uqu7cvp2rwmuqzq'}For more details on creating policies, see Using Console to Create Policy.
-
-
Procedure
To migrate from JSON file in the OCI OS bucket to NDCS table, perform the following from the Cloud Shell window:
-
Prepare a Migrator configuration file,
migrator-config.json, with OCI OS source and NDCS sink. For templates, see Source Configuration Templates and Sink Configuration Templates.To use the OKE WIA to access OCI OS bucket and NDCS, set the
useOKEWorkloadIdentityparameter to true in both source and sink configuration templates. Here, you will use source schema from the schema DDL file in the OCI OS bucket. Therefore, setuseSourceSchemaparameter to true in the sink configuration template.Note: While using OKE WIA, you can’t generate the Migrator configuration file interactively. You must prepare the configuration file manually by referring to the source and sink configuration templates.
{ "source" : { "type" : "object_storage_oci", "format" : "json", "endpoint" : "us-ashburn-1", "namespace" : "", "bucket" : "Migrate_oci", "prefix" : "userSession", "useOKEWorkloadIdentity" : true }, "sink" : { "type" : "nosqldb_cloud", "endpoint" : "us-ashburn-1", "table" : "users", "compartment" : "Training-NoSQL", "includeTTL" : true, "schemaInfo" : { "readUnits" : 100, "writeUnits" : 60, "storageSize" : 1, "useSourceSchema" : true }, "useOKEWorkloadIdentity" : true, "writeUnitsPercent" : 90, "overwrite" : true, "requestTimeoutMs" : 5000 }, "abortOnError" : true, "migratorVersion" : "1.8.0" } -
Create a configure map resource (configmap) to pass the
migrator-config.jsonconfiguration input file to the Migrator container at runtime in the Kubernetes pod. The configmap mounts the Migrator configuration file in the file system of the container as a mount volume.#Command: kubectl create configmap oci-migrator-config --from-file=<Migrator configuration file> -n <namespace-name>#Example: kubectl create configmap oci-migrator-config --from-file=migrator-config.json -n migrator#Output: configmap/oci-migrator-config created -
Create a Docker registry secret that includes the OCI credentials to use while pulling the Migrator Docker image from Container Registry into the Kubernetes pod.
#Command:
kubectl create secret docker-registry ocirsecret --docker-server=<region-key>.ocir.io --docker-username='tenancy-namespace/username' --docker-password='auth token' --docker-email='<user Email>' -n <namespace-name>
#Example: kubectl create secret docker-registry ocirsecret --docker-server=iad.ocir.io --docker-username='idhx..xxwjzj/rx..xxxxh@oracle.com' --docker-password='<Auth token>' --docker-email='rx..xxxxh@oracle.com' -n migrator#Output: secret/ocirsecret created -
Create a manifest file, which you will use to specify the Migrator Docker image. Ensure that you provide the values from the previous steps for namespace, Kubernetes service account name, Docker image name, Docker registry secret, and configmap. You can refer to the following sample manifest file:
#migrator-deployment.yaml apiVersion: apps/v1 kind: Deployment metadata: name: nosql-migrator spec: replicas: 1 selector: matchLabels: app: nosql-migrator template: metadata: labels: app: nosql-migrator spec: serviceAccountName: migratorsa automountServiceAccountToken: true containers: - name: nosqlmigrator image: iad.ocir.io/idhx..xxwjzj/okemigrator:1.0 imagePullPolicy: Always args: ["--config", "/config/migrator-config.json", "--log-level", "DEBUG"] volumeMounts: - name: config-volume mountPath: /config # Mount the file here imagePullSecrets: - name: ocirsecret volumes: - name: config-volume configMap: name: oci-migrator-config -
Deploy the Migrator Docker image in the Kubernetes pod using the following command. OKE runs the Migrator utility in a container on one of the nodes of the Kubernetes cluster.
#Command:
kubectl create -f <manifest file> -n <namespace-name>
#Example: kubectl create -f migrator-deployment.yaml -n migrator#Output: deployment.apps/nosql-migrator created -
You can check the logs using the following commands:
-
Fetch the pod’s name on which the Migrator utility is running.
#Command:
kubectl get pods -n <namespace-name>
#Example: kubectl get pods -n migrator#Output: NAME READY STATUS RESTARTS AGE nosql-migrator-ccdbf549-6sjjg 1/1 Running 0 56s -
Use the pod’s name to fetch the Migrator logs.
#Command:
kubectl logs -f <kubernetes cluster pod name> -n <namespace-name>
#Example: kubectl logs -f nosql-migrator-ccdbf549-6sjjg -n migrator#Output: SLF4J(I): Connected with provider of type [org.apache.logging.slf4j.SLF4JServiceProvider] [INFO] Configuration for migration: { "source" : { "type" : "object_storage_oci", "format" : "json", "endpoint" : "us-ashburn-1", "namespace" : "idhkv1iewjzj", "bucket" : "Migrate_oci", "prefix" : "userSession", "useOKEWorkloadIdentity" : true }, "sink" : { "type" : "nosqldb_cloud", "endpoint" : "us-ashburn-1", "table" : "users", "compartment" : "Training-NoSQL", "includeTTL" : true, "schemaInfo" : { "readUnits" : 100, "writeUnits" : 60, "storageSize" : 1, "useSourceSchema" : true }, "useOKEWorkloadIdentity" : true, "writeUnitsPercent" : 90, "overwrite" : true, "requestTimeoutMs" : 5000 }, "abortOnError" : true, "migratorVersion" : "1.8.0" } [INFO] creating source from given configuration: [INFO] source creation completed [INFO] creating sink from given configuration: [INFO] sink creation completed [INFO] creating migrator pipeline [INFO] migration started [INFO] [cloud sink] : start loading DDLs [INFO] [cloud sink] : completed loading DDLs [INFO] [cloud sink] : start loading records [INFO] [OCI OS source] : start parsing JSON records from object: users/userSession/Data/users_1_5_0.json [INFO] [OCI OS source] : start parsing JSON records from object: users/userSession/Data/users_6_10_0.json [INFO] migration completed. Records provided by source=5, Records written to sink=5, Records failed=0, Records skipped=0. Elapsed time: 0min 1sec 15ms Migration completed.
Note:
You can iteratively run data migration as follows:
-
Delete the
nosql-migratorcontainer using the following command:#Command: kubectl delete -f <manifest file> -n <namespace-name>#Example: kubectl delete -f migrator-deployment.yaml -n migrator#Output: deployment.apps "nosql-migrator" deleted -
Update the
migrator-config.jsonconfiguration input file. -
Delete and recreate the configmap using the commands from Step 2.
It is not required to create the Docker registry secret, and manifest file again.
-
Deploy the Migrator Docker image in the Kubernetes pod using the manifest file (Step 5).
-
Verification
To verify your data restore, log in to the Oracle NoSQL Database Cloud Service console. From the navigation bar, go to Databases > NoSQL Database. Select your compartment from the drop-down to view the users table. For the procedure to access the console, see Accessing the Service from the Infrastructure Console.
Migrate from Oracle NoSQL Database to OCI Object Storage Using Session Token Authentication
This example shows how to use Oracle NoSQL Database Migrator with session token authentication to copy data from Oracle NoSQL Database table to a JSON file in an OCI Object Storage bucket.
Use case
As a developer, you are exploring an option to back up Oracle NoSQL Database table data to OCI Object Storage (OCI OS). You want to use session token-based authentication.
In this demonstration, you will use the OCI Command Line Interface commands (CLI) to create a session token. You will manually create a Migrator configuration file and perform data migration.
Prerequisites
-
Identify the source and sink for the migration.
-
Source:
userstable in Oracle NoSQL Database. -
Sink: JSON file in the OCI OS bucket
Identify the region endpoint, namespace, bucket, and prefix for OCI OS. For more details, see Accessing Oracle Cloud Object Storage. For the list of OCI OS service endpoints, see Object Storage Endpoints.
-
endpoint:
us-ashburn-1 -
bucket:
Migrate_oci -
prefix:
userSession -
namespace:
idhkv1iewjzjThe namespace name for a bucket is the same as it’s tenancy’s namespace and is autogenerated when your tenancy is created. You can get the namespace name as follows:
-
From the Oracle NoSQL Database Cloud Service console, navigate to Storage> Buckets.
-
Select you Compartmentfrom the List Scope and select the bucket. The Bucket Details page displays the name in Namespace parameter.
If you do not provide an OCI OS namespace name, the Migrator utility uses the default namespace of the tenancy.
-
-
Note: Ensure that you have the privileges to write objects in the OCI OS bucket. For more details on setting the policies, see Write to Object Storage.
-
Generate a session token by following these steps:
-
Install and configure OCI CLI. See Quickstart.
-
Use one of the following OCI CLI commands to generate a session token. For more details on the available options, see Token-based Authentication for the CLI.
# Create a session token using OCI CLI from a web browser:
oci session authenticate --region <region_name> --profile-name <profile_name>

# Example:
oci session authenticate --region us-ashburn-1 --profile-name SESSIONPROFILE
or
# Create a session token using OCI CLI without a web browser:
oci session authenticate --no-browser --region <region_name> --profile-name <profile_name>

# Example:
oci session authenticate --no-browser --region us-ashburn-1 --profile-name SESSIONPROFILE
In the command above:
region_name: Specifies the region endpoint for your OCI OS. For a list of data regions supported in Oracle NoSQL Database Cloud Service, see Data Regions and Associated Service URLs.profile_name: Specifies the profile, which the OCI CLI command uses to generate a session token.The OCI CLI command creates an entry in the OCI config file at
$HOME/.oci/configpath as shown in the following sample:[SESSIONPROFILE] fingerprint=f1:e9:b7:e6:25:ff:fe:05:71:be:e8:aa:cc:3d:0d:23 key_file=$HOME/.oci/sessions/SESSIONPROFILE/oci_api_key.pem tenancy=ocid1.tenancy.oc1..aaaaa ... d6zjq region=us-ashburn-1 security_token_file=$HOME/.oci/sessions/SESSIONPROFILE/tokenThe
security_token_filepoints to the path of the session token that you generated using the OCI CLI command above.Note:
-
If the profile already exists in the OCI config file, the OCI CLI command overwrites the profile with session-token related configuration while generating the session token.
-
Specify the following in your sink configuration template:
-
The path to the OCI config file in the credentials parameter.
-
The profile used while generating the session token in the credentialsProfile parameter.
"credentials" : "$HOME/.oci/config"

"credentialsProfile" : "SESSIONPROFILE"
The Migrator utility automatically fetches the details of the session token generated using the parameters above. If you don't specify the credentials parameter, the Migrator utility looks for the credentials file in the path
$HOME/.oci. If you don't specify the credentialsProfile parameter, the Migrator utility uses the default profile name (DEFAULT) from the OCI config file.- The session token is valid for 60 minutes. To extend the session duration, you can refresh the session. For details, see Refreshing a Token.
-
-
Procedure
To migrate from Oracle NoSQL Database table to a JSON file in the OCI OS bucket:
-
Prepare the configuration file (in JSON format) with Oracle NoSQL Database source and JSON file in the OCI OS bucket sink. For templates, see Source Configuration Templates and Sink Configuration Templates.
To use the session token authentication to access OCI OS bucket, set the useSessionToken parameter to true in the sink configuration template. Correspondingly, specify the config path in the credentials parameter and the profile name in the credentialsProfile parameter.
{ "source" : { "type" : "nosqldb", "storeName" : "kvstore", "helperHosts" : ["<hostname>:<port>"], "table" : "users", "includeTTL" : true, "requestTimeoutMs" : 5000 }, "sink" : { "type" : "object_storage_oci", "format" : "json", "endpoint" : "us-ashburn-1", "namespace" : "idhkv1iewjzj", "bucket" : "Migrate_oci", "prefix" : "userSession", "chunkSize" : 32, "compression" : "", "useSessionToken" : true, "credentials" : "$/home/.oci/config", "credentialsProfile" : "SESSIONPROFILE" }, "abortOnError" : true, "migratorVersion" : "1.8.0" } -
Open the command prompt and navigate to the directory where you extracted the NoSQL Database Migrator utility.
-
Run the runMigrator command by passing configuration file option. Use the
--configor-coption to pass the configuration file as follows:./runMigrator --config ./migrator-config.json -
The Migrator utility proceeds with data migration. A sample output is shown below.
With useSessionToken parameter to true, the Migrator utility automatically authenticates using the session token. The Migrator utility copies your data from
userstable to a JSON file in the OCI OS bucket namedMigrate_oci. Check the logs for successful data backup.[INFO] creating source from given configuration: [INFO] source creation completed [INFO] creating sink from given configuration: [INFO] sink creation completed [INFO] creating migrator pipeline [INFO] [OCI OS sink] : writing table schema to userSession/Schema/schema.ddl [INFO] migration started [INFO] Migration success for source users_6_10. read=2,written=2,failed=0 [INFO] Migration success for source users_1_5. read=3,written=3,failed=0 [INFO] Migration is successful for all the sources. [INFO] migration completed. Records provided by source=5, Records written to sink=5, Records failed=0,Records skipped=0. Elapsed time: 0min 0sec 982ms Migration completed.Note:
Depending on the chunkSize parameter in the sink configuration template, the Migrator utility splits the source data into several JSON files in the same directory. In this example, the Migrator utility copies data to
users_1_5_0.jsonandusers_6_10_0.jsonfiles inMigrate_oci/userSession/Datadirectory.The source table schema is copied to
schema.ddlfile inMigrate_oci/userSession/Schemadirectory.
Verification
To verify your data backup, log in to the Oracle NoSQL Database Cloud Service console. Navigate through the menus, Storage > Object Storage & Archive Storage > Buckets. Access the files from the userSession directory in the Migrate_oci bucket. For the procedure to access the console, see Accessing the Service from the Infrastructure Console
Migrate from CSV file to Oracle NoSQL Database Cloud Service
This example shows the usage of Oracle NoSQL Database Migrator to copy data from a CSV file to Oracle NoSQL Database Cloud Service.
Example
After evaluating multiple options, an organization finalizes Oracle NoSQL Database Cloud Service as its NoSQL Database platform. As its source contents are in CSV file format, they are looking for a way to migrate them to Oracle NoSQL Database Cloud Service.
In this example, you will learn to migrate the data from a CSV file called course.csv, which contains information about various courses offered by a university. You generate the configuration file interactively from the runMigrator utility.
You can also prepare the configuration file with the identified source and sink details. See Oracle NoSQL Database Migrator Reference.
Prerequisites
-
Identify the source for the migration.
-
Source: CSV file
In this example, the source file is
course.csv1,"Computer Science", "San Francisco", "2500" 2,"Bio-Technology", "Los Angeles", "1200" 3,"Journalism", "Las Vegas", "1500" 4,"Telecommunication", "San Francisco", "2500" -
The CSV file must conform to the
RFC4180format. -
Create a file containing the DDL commands for the schema of the target table,
course. The table definition must match the CSV data file concerning the number of columns and their types.In this example, the DDL file is
mytable_schema.ddlcreate table course (id INTEGER, name STRING, location STRING, fees INTEGER, PRIMARY KEY(id));
-
-
Identify the sink for the migration.
-
Sink: Oracle NoSQL Database Cloud Service
-
Identify your OCI cloud credentials and capture them in the configuration file. Save the config file in
/home/<user>/.oci/config. For more details, see Acquiring Credentials.[DEFAULT] tenancy=ocid1.tenancy.oc1.... user=ocid1.user.oc1.... fingerprint= 43:d1:.... region=us-ashburn-1 key_file=</fully/qualified/path/to/the/private/key/> pass_phrase=<passphrase> -
Identify the region endpoint and compartment name for your Oracle NoSQL Database Cloud Service.
-
endpoint:
us-ashburn-1 -
compartment:
ocid1.compartment.oc1..aaaaaaaavjikiwmylfnpofefbdaleg6rqyf7cdnr5o6vozg4lyajeunrhsmq
-
-
Procedure
To migrate data from course.csv file to Oracle NoSQL Database Cloud Service, perform the following steps:
-
Open the command prompt and navigate to the directory where you extracted the Oracle NoSQL Database Migrator utility.
-
To generate the configuration file using Oracle NoSQL Database Migrator, execute the
runMigratorcommand without any runtime parameters.[~/nosql-migrator-1.8.0]$./runMigrator -
As you did not provide the configuration file as a runtime parameter, the utility prompts if you want to generate the configuration now. Type
y.You can choose a location for the configuration file or retain the default location by pressing the
Enter key.Configuration file is not provided. Do you want to generate configuration? (y/n) [n]: y Generating a configuration file interactively. Enter a location for your config [./migrator-config.json]: ./migrator-config.json already exist. Do you want to overwrite?(y/n) [n]: y -
Based on the prompts from the utility, choose your options for the Source configuration.
Select the source: 1) nosqldb 2) nosqldb_cloud 3) file 4) object_storage_oci 5) aws_s3 #? 3 Configuration for source type=file Select the source file format: 1) json 2) mongodb_json 3) dynamodb_json 4) csv #? 4 -
Provide the path to the source CSV file. Further, based on the prompts from the utility, you can choose to reorder the column names, select the encoding method, and trim the tailing spaces from the target table.
Enter path to a file or directory containing csv data: [~/nosql-migrator]/course.csv Does the CSV file contain a headerLine? (y/n) [n]: n Do you want to reorder the column names of NoSQL table with respect to CSV file columns? (y/n) [n]: n Provide the CSV file encoding. The supported encodings are: UTF-8,UTF-16,US-ASCII,ISO-8859-1. [UTF-8]: Do you want to trim the tailing spaces? (y/n) [n]: n -
Based on the prompts from the utility, choose
nosqldb_cloudoption for the Sink configuration.Select the sink: 1) nosqldb 2) nosqldb_cloud #? 2 -
Supply the end point URL or region ID of your tenancy and select the authentication type for the Migrator utility to access Oracle NoSQL Database Cloud Service.
Configuration for sink type=nosqldb_cloud Enter endpoint URL or region ID of the Oracle NoSQL Database Cloud: us-ashburn-1 Select the authentication type: 1) credentials_file 2) instance_principal 3) delegation_token 4) session_token 5) oke_workload_identity #? 1 -
Based on the prompts from the utility, provide the name of the credentials file to be used for authentication, credentials profile, compartment ID, and the name of the table into which you want to copy data at the sink.
Enter path to the file containing OCI credentials [/home/<user>/.oci/config]: Enter the profile name in OCI credentials file [DEFAULT]: Enter the compartment name or id of the table []: ua_nosql Enter table name: course -
Enter your choice to set the TTL value. The default value is
n.Include TTL data? If you select 'yes' TTL value provided by the source will be set on imported rows. (y/n) [n]: y Would you like to provide TTL reference time?(y/n) [n]: n -
Based on the prompts from the utility, specify whether or not the target table must be created through the Oracle NoSQL Database Migrator tool. If the table is already created, it is suggested to provide
n. If the table is not created, the utility will request the path for the file containing the DDL commands for the schema of the target table.Would you like to create table as part of migration process? Use this option if you want to create table through the migration tool. If you select yes, you will be asked to provide a file that contains table DDL or to use schema provided by the source or default schema. (y/n) [n]: y Enter path to a file containing table DDL: [~/nosql-migrator]/mytable_schema.ddl -
Enter the throughput values and storage allocation for the sink table.
Would you like to use on demand read and write units? (y/n) [n]: n Enter read throughput in KB of new table: 100 Enter write throughput in KB of new table: 60 Enter storage size in GB of new table: 1 Enter percentage of table write units to be used for migration operation. (1-100) [90]: 90 -
Enter your choices to determine whether or not to overwrite the records if the table is already available at the sink. You can also add transformations to your source data.
would you like to overwrite records which are already present? If you select 'no' records with same primary key will be skipped [y/n] [y]: y Enter store operation timeout in milliseconds. [5000]: Would you like to add transformations to source data? (y/n) [n]: n Would you like to continue migration if any data fails to be migrated? (y/n) [n]: n -
The utility displays the generated configuration on the screen.
{ "source" : { "type" : "file", "format" : "csv", "dataPath" : "[~/nosql-migrator]/course.csv", "hasHeader" : false, "csvOptions" : { "encoding" : "UTF-8", "trim" : false } }, "sink" : { "type" : "nosqldb_cloud", "endpoint" : "us-ashburn-1", "table" : "course", "compartment" : "ua_nosql", "includeTTL" : true, "schemaInfo" : { "readUnits" : 100, "writeUnits" : 60, "storageSize" : 1, "schemaPath" : "[~/nosql-migrator]/mytable_schema.ddl" }, "credentials" : "/home/<user>/.oci/config", "credentialsProfile" : "DEFAULT", "writeUnitsPercent" : 90, "overwrite" : true, "requestTimeoutMs" : 5000 }, "abortOnError" : true, "migratorVersion" : "1.8.0" } -
Finally, the utility prompts you to specify whether or not to proceed with the migration using the generated configuration file. The default option is
y.Note:
If you select
n, data migration is not initiated. The generated configuration file is saved in the Migrator directory. Use one of the following commands to run the Migration utility with configuration file option../runMigrator -c ./migrator-config.json./runMigrator --config ./migrator-config.jsonWould you like to run the migration with above configuration? If you select no, you can use the generated configuration file to run the migration using: ./runMigrator --config ./migrator-config.json (y/n) [y]: y -
The NoSQL Database Migrator copies your data from the CSV file to Oracle NoSQL Database Cloud Service.
creating source from given configuration:
source creation completed
creating sink from given configuration:
sink creation completed
creating migrator pipeline
[cloud sink] : start loading DDLs
[cloud sink] : executing DDL: create table if not exists course (id INTEGER, name STRING, location STRING, fees INTEGER, PRIMARY KEY(id)),limits: [100, 60, 1]
[cloud sink] : completed loading DDLs
migration started
[csv file source] : start parsing CSV records from file: course.csv
Migration success for source course. read=4,written=4,failed=0
Migration is successful for all the sources.
migration completed.
Records provided by source=4, Records written to sink=4, Records failed=0,Records skipped=0.
Elapsed time: 0min 0sec 395ms
Migration completed.
Verification
To verify the migration, you can log in to your Oracle NoSQL Database Cloud Service console and access the course table. The table contains the source data. For the procedure to access the console, see Accessing the Service from the Infrastructure Console article in the Oracle NoSQL Database Cloud Service document.