Configure Events

By configuring one or more events on a control or presentation, you change the control or presentation’s behavior. Configuring events in forms enables you to trigger connector calls, actions, conditions, and functions.

To configure events for a control or presentation:
  1. In the web forms editor, select a control or presentation, and locate the Events options.
    1. For a control, select the control and scroll down the General tab of the Properties pane until you see Events.
    2. For a presentation, click a blank area of the form so that the Form and Presentation tabs display in the Properties pane. On the Form tab, select a presentation, then select the Presentation tab. Scroll down until you see Events.
    Notice placeholder text displayed in the Events field No events defined.
  2. Click Add to define an event.

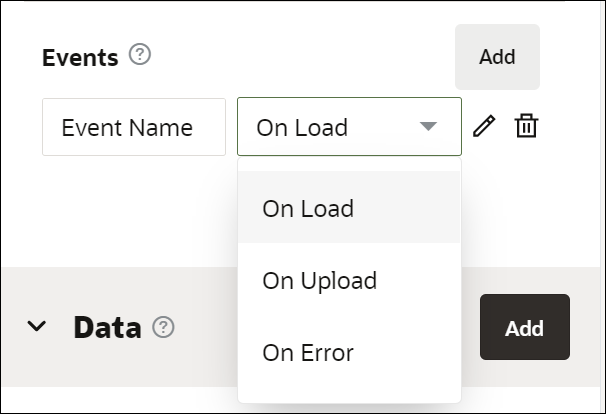
    The Events section now displays two fields; an Event Name field and a field with a drop-down menu listing event options available for the control or presentation.


  3. Select an event option from the list and, optionally, enter a name for the event.

    Available event options are specific to the selected control or presentation.

    Event Description Control or Presentation

    On Load

    Fires when a form or presentation loads.

    Input Text, Text Area, Date, Time, Date Time, Email, URL, Money, Phone, Checklist, Checkbox, Radio Button, Button, Select, Section, Table, Repeatable Section, Message, Image, Video, Tab and Panel.

    Presentation

    On Change

    Fires when an end user changes the control’s value.

    Input Text, Text Area, Date, Time, Date Time, Email, URL, Money, Phone, Checklist, Checkbox, Radio Button and Select.

    On Focus

    Fires when the cursor is in the control.

    Input text, Text Area, Number, Date, Time, Date Time, Email, URL, Money and Phone.

    On Blur

    Fires when the control loses focus.

    Input text, Text Area, Number, Date, Time, Date Time, Email, URL, Money and Phone.

    On Submit

    Fires before the form or presentation is submitted.

    Input Text, Text Area, Date, Time, Date Time, Email, URL, Money, Phone, Checklist, Checkbox, Radio Button, Button and Select.

    Presentation

    On Click

    Fires when an end user clicks the button.

    Button and Link

    On Expand

    Fires when a section is expanded.

    Section

    On Collapse

    Fires when a section is collapsed.

    Section

    On Expand Toggle

    Fires when an expanded section is toggled.

    Section

    On Row Add

    Fires when an end user adds a row to a table or repeatable section.

    Table and Repeatable Section

    On Row Remove

    Fires when an end user removes a row from a table or repeatable section.

    Table and Repeatable Section

    On Selection Change

    Fires when an end user changes the row selection in a table or repeatable section.

    Table and Repeatable Section

    On Upload Fires when a file upload is successful. File Upload in the File Manager
    On Error Fires when a file upload is unsuccessful. File Upload in the File Manager
    On List Refresh Fires when the file list is refreshed. File List in the File Manager
    On Download Fires when a file is downloaded successfully. File List in the File Manager
    On Delete Fires when a file is deleted successfully. File List in the File Manager
    On Download Error Fires when a file download is unsuccessful. File List in the File Manager
    On Delete Error Fires when a file delete is unsuccessful. File List in the File Manager
  4. After selecting an event option, click the editing icon next to the events drop-down menu to specify the actions, conditions, connectors, or functions for the event. Click OK to complete configuring the event.

    See Specify Actions, Specify Conditions, and Execute REST Connector Calls in Events.

    Note:

    To cancel an event, click its delete icon. Click Add to define an additional event. You can define multiple events for a control.

You can configure multiple events in a control. The configured events are executed sequentially in runtime. Note that, by default, the newest configured event is added last in the event sequence, and subsequently gets executed last in runtime. But you can re-order events to control their execution sequence. Use the event re-order handler Event re-order to re-order events and ensure that they get executed in the correct sequence in runtime. The event re-order handler gets displayed in front of each event name field only when there is more than one event configured on a control.

If you want to disable all events configured for a control, select the control, and specify the action Disable Events. See Specify Actions. This disables all events configured for the control and the events do not get executed in runtime. But note that On Load type of events are exceptions. On Load events get executed even if you specify the Disable Events action.

To enable events in controls where they have been disabled by the Disable Events action, configure the Enable Events action. This ensures that all those events get executed in runtime.

If the Disable Events action is configured for container controls such as tables, repeatable sections, sections, panels, and tabs, then all events in child controls that reside inside them are disabled. This also applies to any rows that you add to container controls after the Disable Events action has been configured in the container controls. To enable events in container controls, and also in all child controls inside the container controls, configure the Enable Events action in the container controls.