Specify Actions
Actions let you trigger changes to a control. You can choose from a variety of control and style actions. For example, you might configure a Clear button to clear the values of other form controls.
- Select a control on the form canvas and specify an event for it. For example, choose On Click for a button control. See Configure Events.
- Click the Event editing icon adjacent to the Event field.
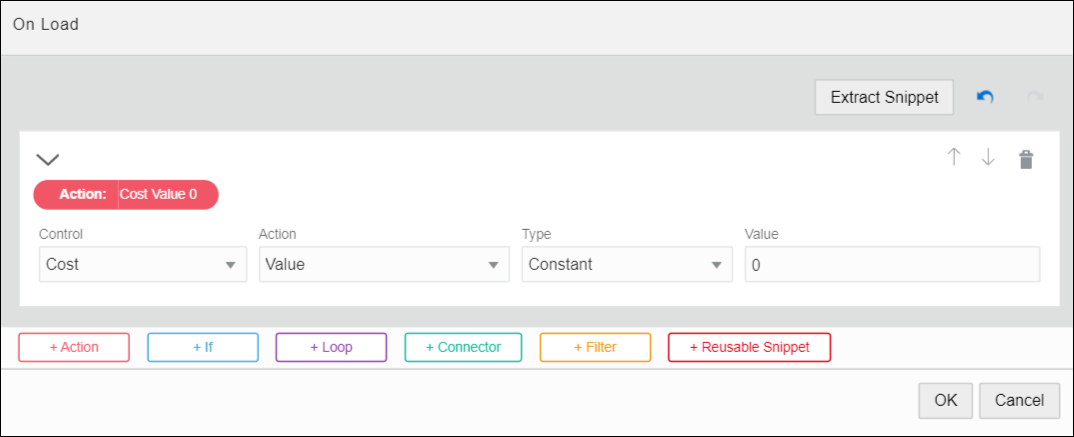
The event window displays with the selected event option (for example, On Load) at the top, and color coded buttons for adding actions, conditions, or connectors to the event.
- Click +Action to add an action.
A solid red Action indicator appears. The Summary field below it displays a compact version of the action you'll define. Use the button at the end of this field to collapse or expand the actions editor.
- In the Control Name field, select the control the action will affect.
- In the Action field, select the action to take place. For example, select Clear Value to clear the selected control’s value.
You can select from a variety of actions grouped in Control and Style categories. The options vary based on the control.
- If configuring a control action, complete any additional fields that display. Control actions such as Value, Label, Help, Hint, Placeholder, Min Value, Max Value, and Pattern require further configuration for Type and Value fields.
If a Type field displays, select from these options:
-
Constant lets you specify a value for the selected control. Be sure to specify the corresponding value in the Value field.
-
Data Definition lets you use the data from the payload. When you click the adjacent Value field that displays, available items are listed.
-
Control lets you use the data from a control. Be sure to select the control name and property to use.
Properties are control specific. For example, some controls, such as the number control, have many properties as options. Other controls, such as the image control, only have one property: Hidden. Email and phone controls have a property Placeholder but don't have the Min Value and Max Value properties.
- Function lets you perform common operations with strings, values and arrays, as described in Specify Functions.
- Connector Data lets you assign a value from a connector call made from the same event.
Note:
You can modify multiple properties of controls such as their value or label. You can also use the data, such as connector data, to modify the control, but you cannot modify data. -
- If configuring a style action, complete additional fields that display for the selected action.
For example, you might combine a condition with a style action so that if a certain value is exceeded, a control’s color, label, or class changes to alert users.
- If needed, use the buttons at the bottom of the event window to configure additional actions or specify a condition or connector call. See Specify Conditions and Execute REST Connector Calls in Events.Connector calls cannot be executed based on a condition. Connectors are always executed when their event is executed. You can later use the connector response values in any condition or action.
Note:
In the event window, use the Undo or Redo buttons to remove or restore recent changes to actions. Use the delete icon to delete an action. Click Cancel to exit the event window without saving changes. - After completing the event, click OK, then Save.
