Restore a Block Volume
You can restore a block volume that has been previously backed up.
- Unmount the Oracle Database File System (DBFS)
- Unmount the old volume
- Disable the old volume
- Detach the old volume from Compute
- Create a new volume from the backup volume
- Attach the new volume to the SOA instance
- Connect to the new volume
- Mount the new volume
- Mount the Oracle Database File System (DBFS)
- (Optional) Delete the old volume
Unmount the Oracle Database File System (DBFS)
Note:
These steps apply only if your DBFS is not mounted on /u01/soacs .
-
Use the
sshcommand to connect to the Administration Server VM (as theopcuser):ssh -i private_key opc@AdminServerVM_IP_address - Enter the following
commands:
sudo fusermount -u /u01/data/dbfs
sudo fusermount -u /u01/data/dbfs_directio
Unmount the old volume
-
Use the
sshcommand to connect to the Administration Server VM (as theopcuser):ssh -i private_key opc@AdminServerVM_IP_address - Enter the following commands:
sudo fdisk -l(Make a note of the/dev/sdcdevice)df -h(Check that/u01/datais mounted)sudo umount /u01/datadf -h(Check that/u01/datais not mounted)
Disable the old volume
For volumes attached with iSCSI as the volume attachment type, you need to disconnect the volume from an instance before you detach the volume.
- Log on to your instance's guest OS and unmount the volume.
- Sign in to the Oracle Cloud Infrastructure Console.
- Open the navigation menu and click Compute. Under Compute, click Instances.
- Click the name of the instance to display the Instance Details page.
- In the Resources section, click Attached Block Volumes.
- At the far right of the row for the block volume that you want to disconnect, click
 and select iSCSI Commands & Information.
-
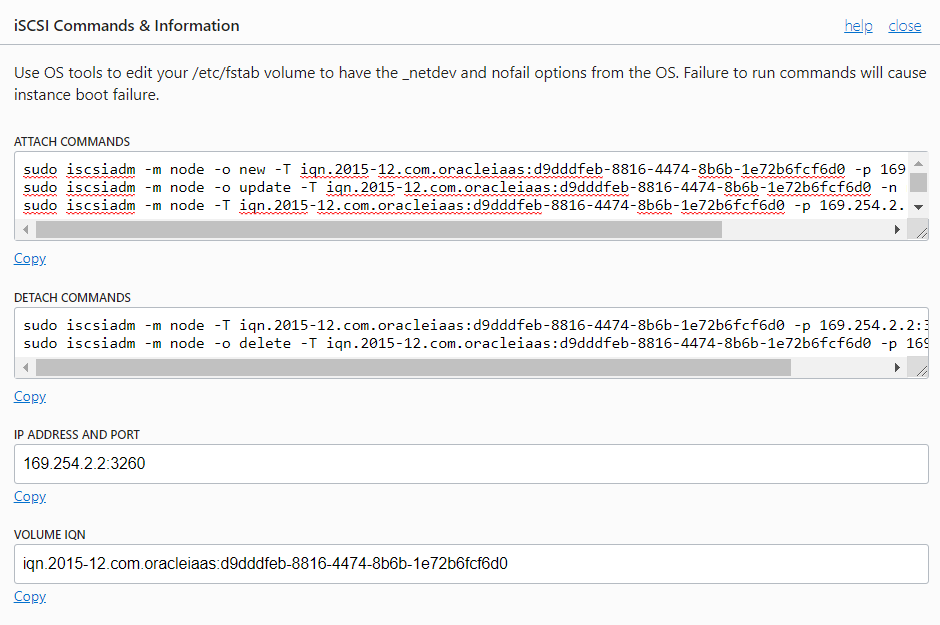
In the iSCSI Commands & Information dialog, copy the
DETACH COMMANDSand execute the commands on your Admin VM. These commands will unmount the volume and disconnect the instance from the volume.Note:
If you see the following error, the unmount was not successful. You need to unmount DBFS mounts from/u01/soacs..sudo iscsiadm -m node -T iqn.2015-12.com.oracleiaas:d7ebe8-4ef7-430d-87cd-8127332bb0fd -p 169.254.2.2:3260 -u
Logging out of session [sid: 2, target: iqn.2015-12.com.oracleiaas:d7ebe8-4ef7-430d-87cd-8127332bb0fd, portal: 169.254.2.2,3260]
iscsiadm: Could not logout of [sid: 2, target: iqn.2015-12.com.oracleiaas:d7ebe8-4ef7-430d-87cd-8127332bb0fd, portal: 169.254.2.2,3260].
iscsiadm: initiator reported error (28 - device or resource in use)
iscsiadm: Could not logout of all requested sessionsA successful logout response resembles the following:Logging out of session [sid: 2, target: iqn.2015-12.us.oracle.com:c6acda73-90b4-4bbb-9a75-faux09015418, portal: 169.254.0.2,3260]
Logout of [sid: 2, target: iqn.2015-12.us.oracle.com:c6acda73-90b4-4bbb-9a75-faux09015418, portal: 169.254.0.2,3260] successful.
Detach the old volume from Compute
- Open the navigation menu and click Compute. Under Compute, click Instances.
- Click the name of the instance to display the Instance Details page.
- In the Resources section, click Attached Block Volumes.
- At the far right of the row for the block volume that you want to disconnect, click
 and select Detach.
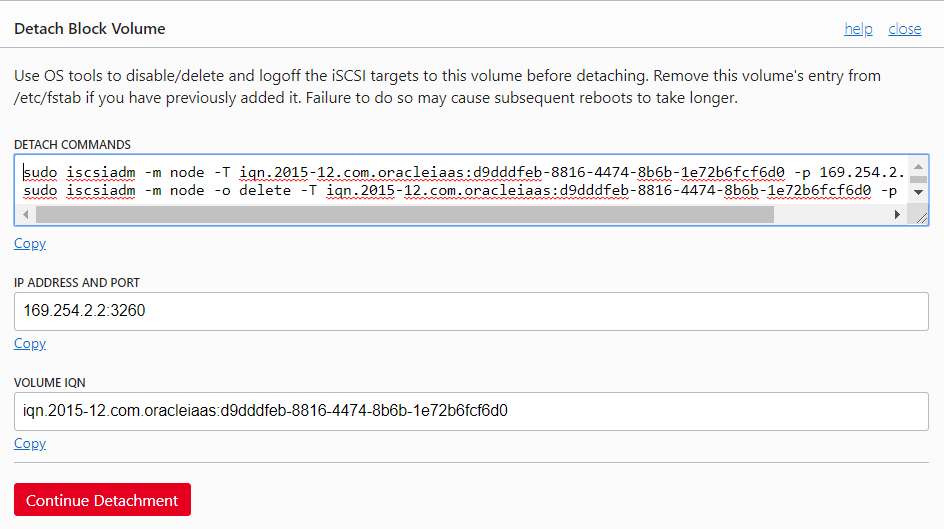
- In the Detach Block Volume dialog, click Continue Detachment.
Create a new volume from the backup volume
- Select the compartment in which the block volume backup you are restoring is saved.
- Open the navigation menu and click Storage. Under Block Storage, click Block Volume Backups.
- At the far right of the row for the block volume backup you want to restore, click
 and select Create Block Volume.
- In the Create Block Volume dialog, enter a name for the block volume and choose the availability domain in which you want to restore it.
-
Click Create Block Volume.
The volume is ready to attach once its icon no longer lists it as PROVISIONING in the volume list.
Attach the new volume to the SOA instance
- Open the navigation menu and click Compute. Under Compute, click Instances.
- Click the name of the instance to which you want to attach the new volume.
- In the Resources section, click Attached Block Volumes.
-
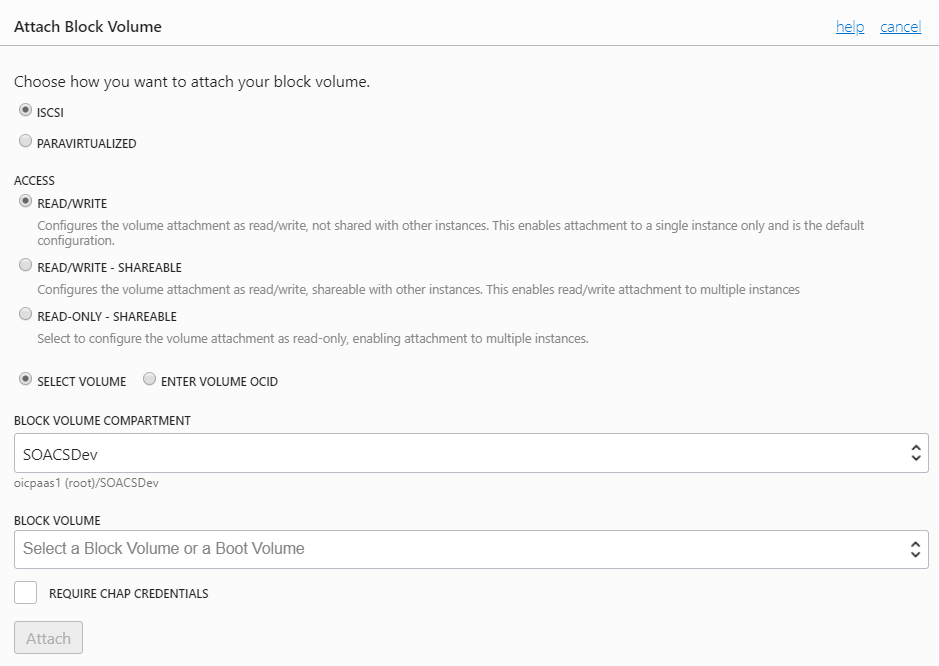
Click Attach Block Volume.

-
In the Attach Block Volume dialog, select iSCSI the volume attachment type.
-
For
ACCESS, select Read/Write or Read Only - SHAREABLE. -
In the
BLOCK VOLUME COMPARTMENTlist, select the compartment. -
To select the volume you want to attach to by name, select
SELECT VOLUMEand then select the volume from theBLOCK VOLUMElist. -
Click Attach.
Connect to the new volume
Use the Oracle Cloud Infrastructure Console to obtain the iSCSI data you need to connect the volume.
- Open the navigation menu and click Compute. Under Compute, click Instances.
- Click the name of the instance to display the instance details.
- In the Resources section, click Attached Block Volumes.
- At the far right of the row for the block volume that you want to attach, click
 and select iSCSI Commands and Information.
The iSCSI Commands and Information dialog displays specific identifying information about your volume and the iSCSI commands you'll need. The commands are ready to use with the appropriate information included.
-
Use the
sshcommand to connect to the Administration Server VM (as theopcuser):ssh -i private_key opc@Admin_VM_Public_IP -
Copy and paste the
ATTACH COMMANDSinto your instance session window to connect the volume and configure iSCI to automatically connect to the authenticated block storage volumes after a reboot.
Mount the new volume
-
Use the
sshcommand to connect to the Administration Server VM (as theopcuser):ssh -i private_key opc@AdminServerVM_IP_address - Enter the following commands:
sudo fdisk -lNote that the device is on/dev/sdbdf -hCheck that/u01/datais not available, then continue.sudo mount /dev/sdb /u01/datadf -hCheck that/u01/datais mounted
- Restart the Administration Server VM from the Oracle Cloud Infrastructure Console
to ensure that
/u01/datais mounted after restart.
Mount the Oracle Database File System (DBFS)
Note:
These steps apply only if your DBFS is not mounted on /u01/soacs
-
Use the
sshcommand to connect to the Administration Server VM (as theopcuser):ssh -i private_key opc@AdminServerVM_IP_address - Enter the following commands:
sudo su - oraclecd /u01/data/domains/DomainName/dbfs./dbfsMount.sh -o wallet /@ORCL -o direct_io /u01/data/dbfs_directio./dbfsMount.sh -o wallet /@ORCL -o direct_io /u01/data/dbfsdf -hCheck that/u01/data/dbfs*are mounted
- Restart the VM from the Oracle Cloud Infrastructure console to ensure that
/u01/datais mounted after restart. If you see that DBFS is not mounted, then mount DBFS for every restart.
(Optional) Delete the old volume
- In the Oracle Cloud Infrastructure Console, click
 in the top left corner. In the navigation menu, under Core Infrastructure, go to Block Storage and click Block Volumes.
- At the far right of the row for the block volume backup you want to delete, click
 and select Terminate and confirm when prompted.