Configure Row Finders for a Business Object
If a ADF REST service includes row finders, you can view and configure them through the Finders tab of the Business Object Editor.
Row finders are predefined filters available through services that allow you to download a specific subset of records. For example, your service may include a row finder that filters expense reports by "unapproved" status and assigned to the "current user". In this case, a business user could use the row finder to download only those expense reports that require their approval. See Use Row Finders to Limit Downloaded Data.
From the Finders tab, you can open a row finder in the Row Finder Editor and configure how it appears in the add-in. For example, you can:
- Set row finder variables for either basic or advanced searches.
- Remove unwanted row finder variables so that they don't appear in the prompt at download time.
- Give row finders or row finder variables a more readable title.
- Add some help text to help your business users understand what a row finder does or what should go in a row finder variable.
- Configure a list of values for a row finder variable.
- Reorder how row finder variables appear in the Search prompt.
- Define default values for row finder variables.
Note:
Row finders are defined through the service. You can't add row finders or row finder variables through Oracle Visual Builder Add-in for Excel. Nor can you change properties like the finder's ID or a variable's data type on the service. Any changes you make must be compatible with the service. If your changes are incompatible, you will likely see errors during a download.To configure row finders:
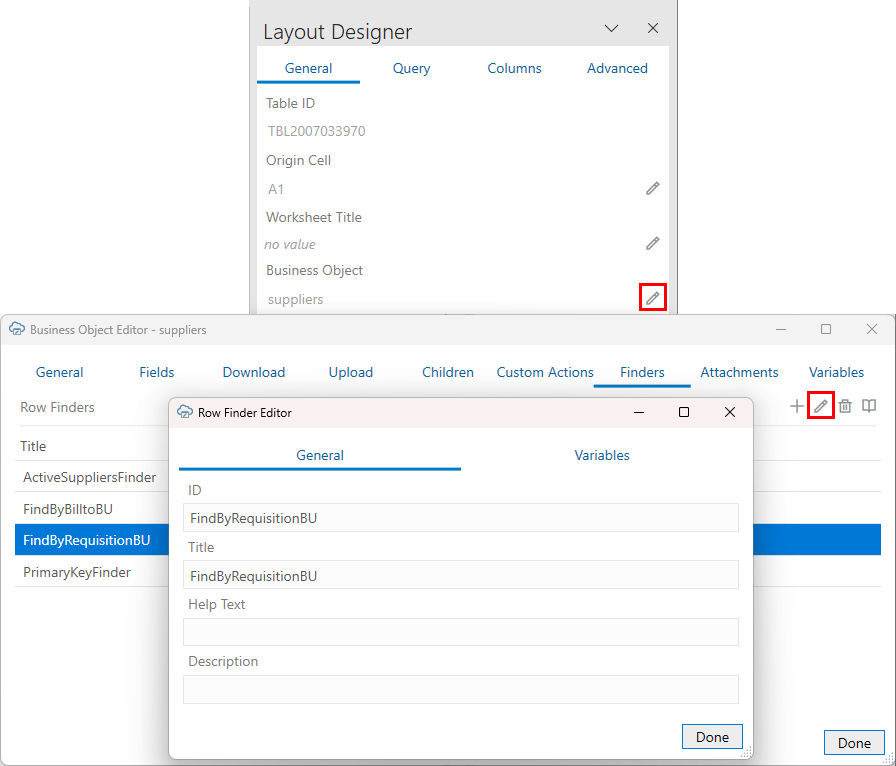
- Navigate to the Row Finder Editor for the row finder you want to edit:
- In the Excel ribbon, click Designer.
- In the Layout Designer, click the Edit icon (
 ) next to the Business Object field.
- Click the Finders tab in the Business Object Editor to view a list of available row finders. Remove row finders if required.
Note:
The Finders tab is only displayed for Oracle ADF REST Resource services. - Select a row finder from the list and click the Edit icon (
 ).
).
- Edit the settings on the General tab as required.
Caution:
Take care not to change the row finder's ID.For example, you can:
- Change the value for the Title property to be more readable.
- Add descriptions of the row finder using the Help Text and Description properties.
The Help Text property is intended to give your business users more information about the row finder. This text is displayed in a popup next to the row finder title in the Search Editor. The Description property is intended for workbook developers. This text is displayed only in the designer UI, like the Finders tab of the Business Object Editor. You can use this property, for example, to provide technical details of the row finder to workbook developers.
Note:
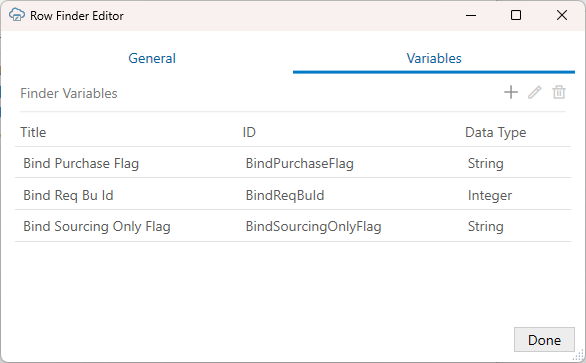
The values for the Title and Help Text properties can be translated. See Manage Workbook Translations.If a row finder supports variables, they'll be listed on the Variables tab. Variables act as arguments or parameters for the finder.
- Click the Variables tab, to view a list of variables.
Variables are shown in the order they appear in the Search prompt. To change the order of the variables, drag a variable to another location in the list.
You may want to reorder variables if you are configuring lists of values with dynamic filters. Consider a row finder, "Employees By Country, State, and City" that includes three row finder variables in this order: "CityId", "CountryId", and "StateId". You'll want to move the CityId variable to the bottom so that the business user first selects a country, then a state, and finally a city.
Tip:
You can also right-click a variable and select an action (Move Up, Move Down, and so on) from the popup menu. - To open a row finder variable, select it from the list and click the Edit icon (
 ).
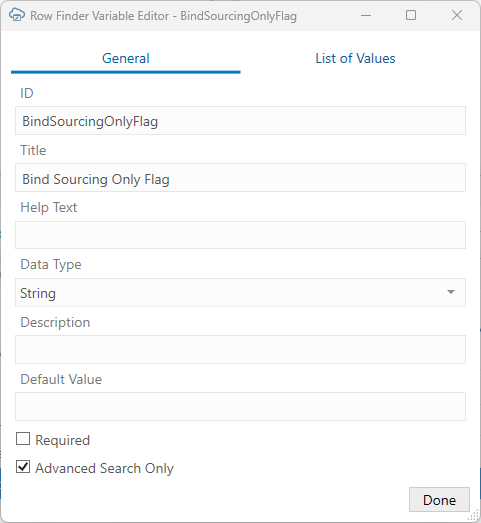
). - Edit the variable as required.
Caution:
Take care not to change the variable's ID.For example, you can:
- Change the row finder variable's title.
- Use the Help Text and Description properties to provide useful descriptions of the variable. The Help Text value is displayed as a popup next to the row finder variable in the Search Editor.
- Set a default value for the row finder variable. Default values can be constants or expressions such as
Today ()for Date (no time) fields. See Use Expressions in an Integrated Workbook.Expressions can also refer to a workbook parameter values. See Use a Workbook Parameter Value for a Row Finder Variable.
- Select the Required check box to force the business user to provide a value at download.
- Select the Advanced Search Only check box to include this variable only in advanced searches. Deselect this check box to include this variable in the basic search.
During a download, the add-in opens a search prompt that includes only basic search variables. If a business user wants to perform a more refined search, they can click the Advanced button to display both the basic and the advanced variables.
If the business user proceeds with a basic search, the advanced variables are not included in the download request.
Note:
When editing a row finder's variables, make sure to leave at least one basic variable to display in the search prompt.
Note:
The values for the Help Text and Title properties can be translated. See Manage Workbook Translations. - If required, configure a list of values for a row finder variable from the List of Values page in the Row Finder Variable Editor. See Configure a List of Values with a Business Object.
- Click Done until you return to the Layout Designer.
Once you are done making changes, the row finders become available to you as an option to limit downloaded data, as described in Use Row Finders to Limit Downloaded Data.
Use a Workbook Parameter Value for a Row Finder Variable
Let's say you have a workbook that needs to show expense reports based on the business unit using it. In this case, you may be able to use a row finder, "FindByBusinessUnit", with a variable, "BusinessUnit". When a business user downloads data, they are prompted to provide the business unit for the row finder, which then returns expense reports matching this value.
To simplify this for your users, you can set a default value for the row finder variable so that the variable field is populated with the necessary value.
If you want the default value to be set dynamically based on where the workbook is downloaded from, you would need to write the value to a workbook parameter during download. Workbook parameters are name-value pairs that are embedded in your workbook programmatically, typically by a web developer. For help writing values to workbook parameters, see Embedding Workbook Parameters in a Workbook.
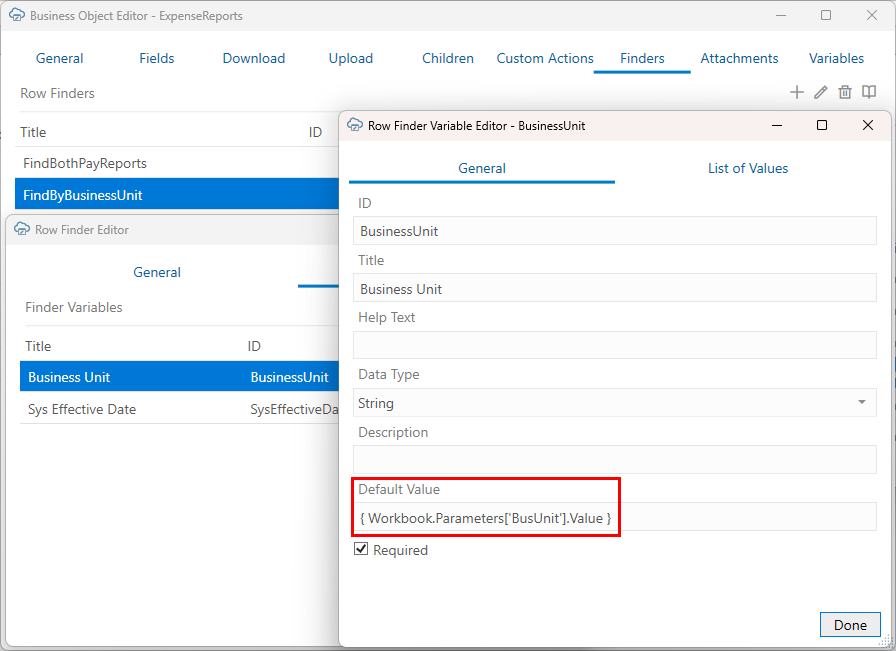
To use a workbook parameter value as the default value, enter an expression like this: { Workbook.Parameters['<para_name>'].Value } in the Default Value field of the Row Finder Variable Editor.
In this example, the expression references a workbook parameter, BusUnit which stores the name of the business unit.
Oracle Visual Builder Add-in for Excel does not validate expressions in the Row Finder Variable Editor. You should test your expression before distributing the workbook.
Keep in mind the following when testing:
- If the expression result cannot be successfully converted to the appropriate data type for the row finder variable, the row finder variable value will be blank/empty. There is no error message.
- Missing workbook parameters result in an error that blocks download.
- Workbook parameters do not have a data type associated with them. Expressions that use them treat them as string data values.
There are no conversions for different cultures within the expression. If you attempt to use a workbook parameter value in a non-string operation, you may get an error.
- If you change the default value in the editor after downloading data, be sure to clear the layout to test the new default value.
- The expected format of the workbook parameter values is "invariant":
- Dates: ISO 8601 "1992-06-15"
- Numbers: decimal point; "3.14"
- Date-time: ISO 8601 UTC: "2017-04-19T12:33:19Z"
- Boolean: "True" / "False" (not localized)
BusUnit workbook parameter when downloading data.


