2 Migrate a Visual Builder Studio (VB Studio) Instance on OCI Classic to Visual Builder Studio on OCI

Migrating your projects from the source VB Studio instance to the target VB Studio instance involves migrating the source instance's build executors, build executor templates, and each project's data to the target instance.

In this documentation, the DevCS in OCI Classic icon indicates either the source VB Studio instance or the source project. The VB Studio in OCI icon indicates either the target VB Studio instance or the target project.

Open the Source and the Target Instances

Open the source VB Studio instance in a browser and the target VB Studio instance in another browser. Note that you can't open both instances in the same session of a browser; however, you may open one instance in a tab and another instance in an incognito or a private tab in the same browser.

For example, in this image the source VB Studio instance on the left is open in Mozilla Firefox, and the target VB Studio instance on the right is open in Google Chrome.
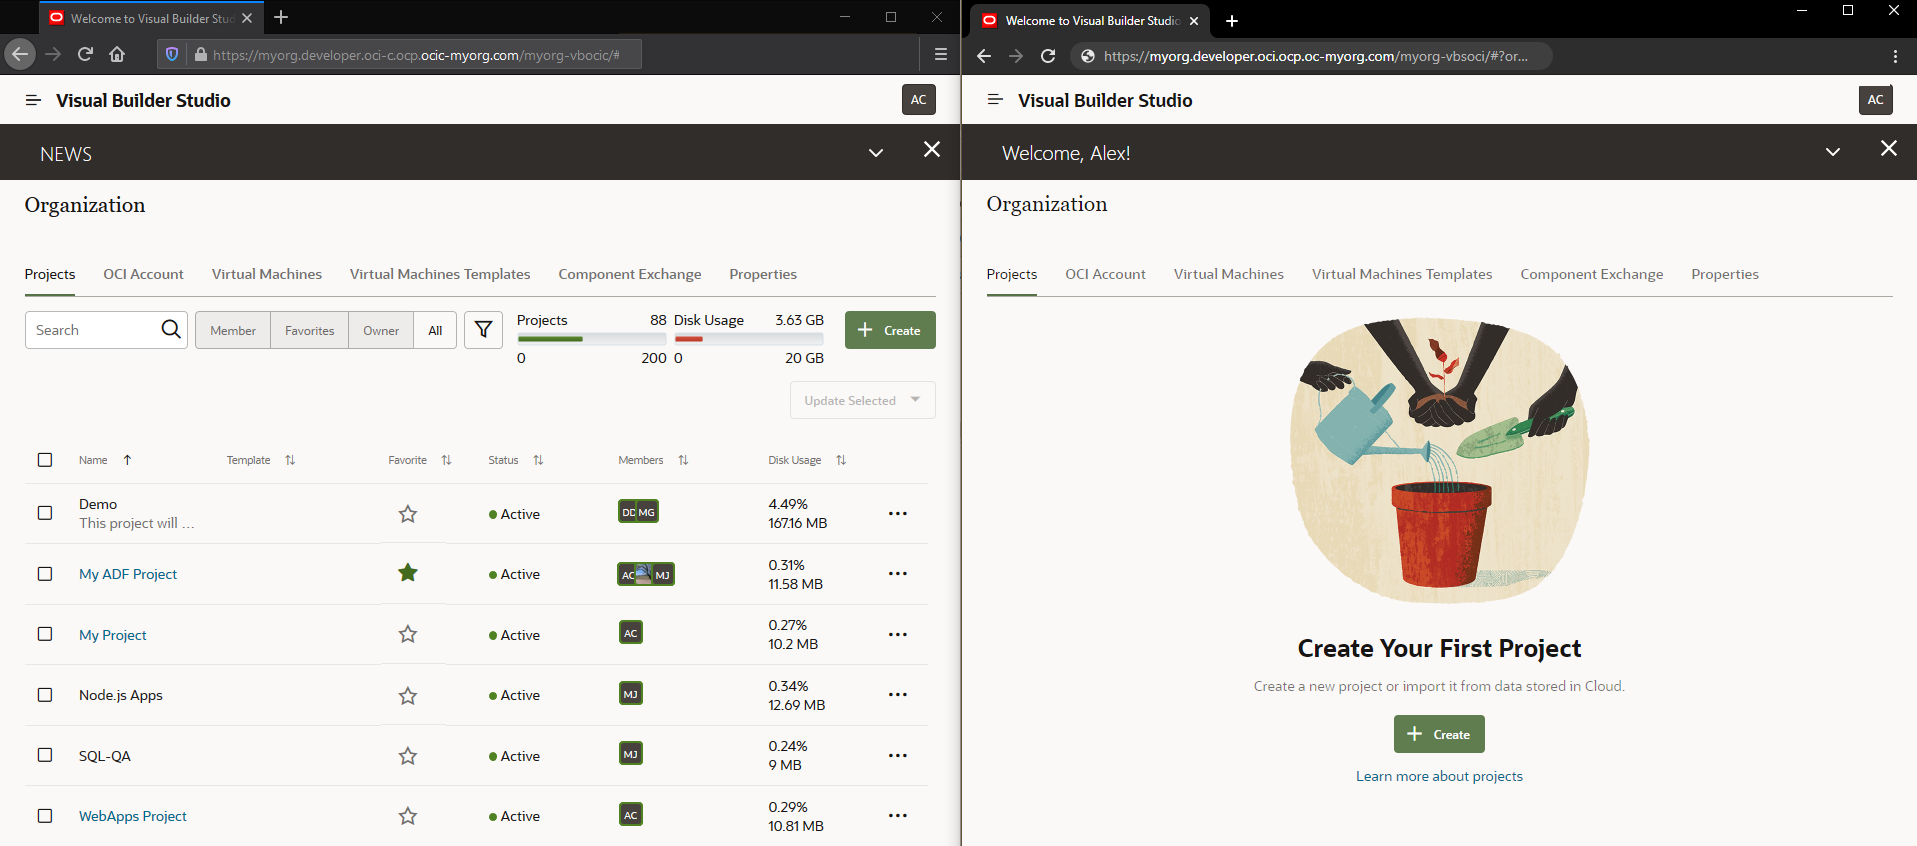
DevCS source and target instances in different browsers

To open source and target instances as described here, you must be assigned the DEVCS_APP_ENTITLEMENT_ADMINISTRATOR identity domain role for both the source and target instances.

To open the source VB Studio instance:

  1. In a web browser, go to https://www.oracle.com/cloud/sign-in.html.
  2. In Cloud Account Name, enter your tenant name or the identity domain name.
  3. Click Next.
  4. On the sign-in page, enter your Oracle Cloud account credentials, and click Sign In.
  5. On the OCI console, in the upper-left corner, click Navigation Menu the Menu icon.
  6. Under More Oracle Cloud Services, select Platform Services, and then select Developer Classic.
  7. On the Instances tab, click Manage this instance the Action menu icon and select Access service instance.

To open the target VB Studio instance:

  1. In a web browser, go to https://cloud.oracle.com.
  2. On the Sign-In page, in Cloud Account Name, enter your Oracle Cloud account or tenancy name and click Next.
  3. On the Single Sign-On (SSO) panel, if required, select your identity provider and click Continue.
  4. Enter your Oracle Cloud account credentials and click Sign In.

    The Oracle Cloud Console, also called the OCI console, opens. If you've recently created your Oracle Cloud account, wait for some time to see your services in the Oracle Cloud Console.

  5. In the upper-left corner, click Navigation Menu the Menu icon.
  6. Select Developer Services and then select Visual Builder Studio.
  7. On the Visual Builder Studio Instances page, click the VB Studio instance's name.
  8. On the Instance Details page, click Service Console.

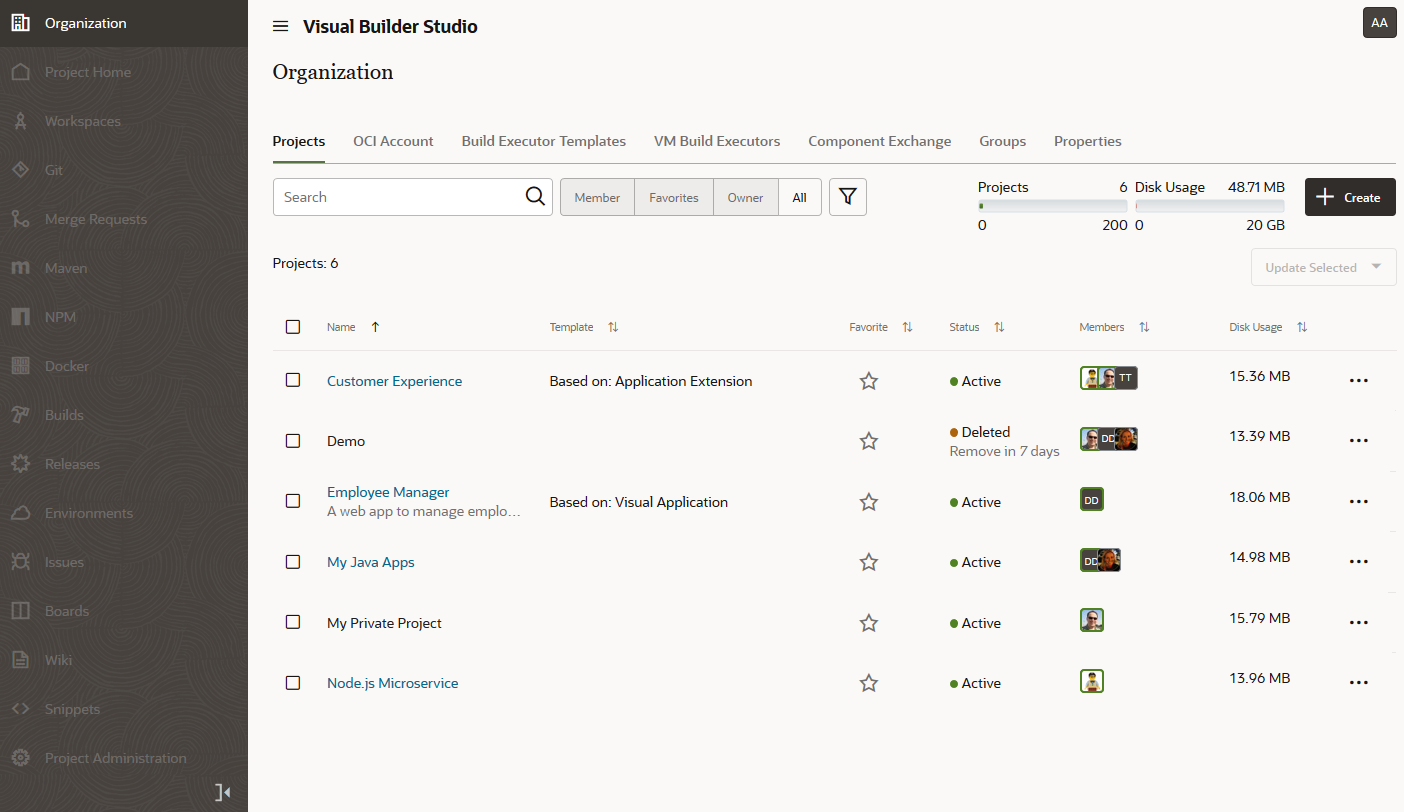
The VB Studio Organization page opens, which displays all the projects you're a member of, as well as your favorite projects, the projects you own, and all the shared projects in your organization.

Here's an example of the Organization page with some projects:

Migrate the Organization's Properties

To migrate the source VB Studio instance's organization properties, note its details and then configure the target VB Studio instance's Organization with the same properties.

Gather Information About the Organization From the Source VB Studio Instance

Source DevCS Perform these steps in the source VB Studio instance.

  1. Switch to the browser with the source VB Studio instance.
  2. In the navigation menu, click Organization Organization.
  3. Click the Properties tab.
  4. Note the values for the organization's name, description, and default wiki markup language (Markdown, Coinfluence, or Textile).

    Example:

Configure the Organization's Properties in the Target VB Studio Instance

DevCS in OCI Perform these steps in the target VB Studio instance.

  1. Get the details of the Organization's properties from the source VB Studio instance.

    You'll use this information (organization;s name, description, and markup language) to configure the Organization properties in the target VB Studio instance.

  2. Switch to the browser with the target VB Studio instance.
  3. In the navigation menu, click Organization Organization.
  4. Click the Properties tab.
  5. In Name and Description, update the organization's name and description.
  6. In Markup Language, select the wiki markup language.

    Remember that the organization's wiki markup language defines the default wiki markup language for new projects. You can change the markup language when you create a project or after creating a project.

When you're done, verify that the Organization's properties that are set in the target VB Studio instance match those in the source VB Studio instance.

Migrate VMs

To migrate build executors from the source VB Studio instance to the target VB Studio instance, create build executor templates with the same name and software on the target VB Studio instance, and then allocate the same number of build executors to each template.

Follow these steps to migrate build executor templates and build executors:

  1. Open the browser with the source VB Studio instance.
  2. In the navigation menu, click Organization Organization, and then click the Build Executor Templates tab.
  3. Repeat these steps for each build executor template in the source VB Studio instance:
    1. In the source VB Studio instance, get the details of the build executor template and number of build executors allocated to it.
    2. In the target VB Studio instance, create the build executor template and allocate the same number of build executors to the build executor template.
  4. After creating all build executor templates and build executors, with the Build Executor Templates tab open in both source VB Studio and target VB Studio instances, verify that the build executor templates in the target VB Studio instance match those in the source VB Studio instance.
  5. Open the Build Executors tab in both source and target instances and verify that number of build executors in the target VB Studio instance matches the number of build executors in the source VB Studio instance.

Gather Information About a Build Executor Template and Its Build Executors From the Source VB Studio Instance

DevCS in OCI Classic Perform these steps in the source VB Studio instance.

  1. Switch to the browser with the source VB Studio instance.
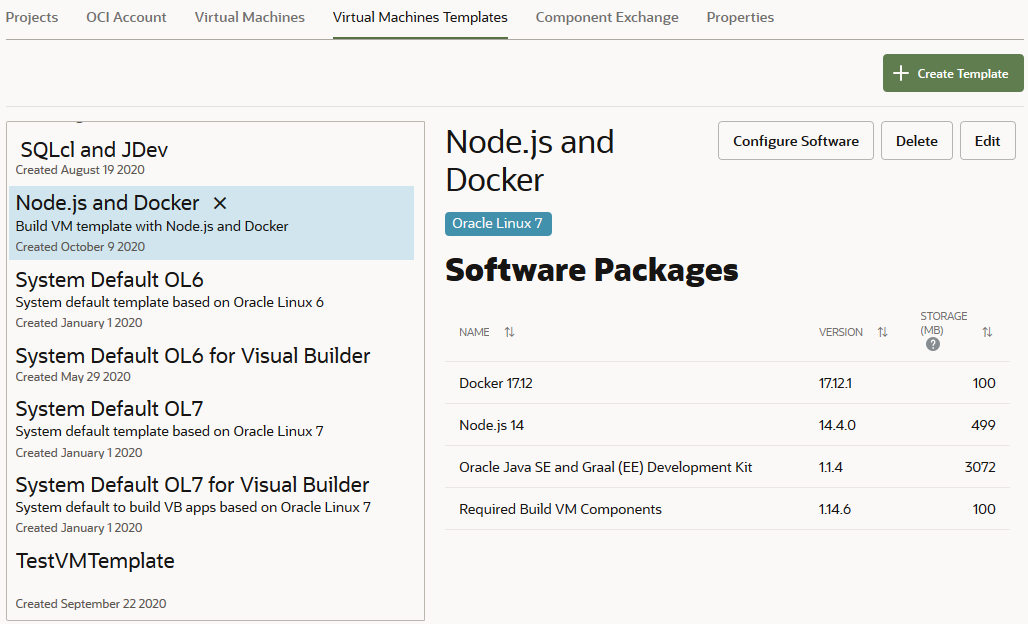
  2. In the Virtual Machines Templates tab, select the template name on the left.
  3. Note the template's name, platform, and software packages.

    Example:

    This table shows the template's name, platform, and software values from the above image.

    Field Value
    Template Name Node.js and Docker
    Description Build Executor Template with Node.js and Docker
    Platform Oracle Linux 7
    Software
    • Docker 17.12 (ver 17.12.1)
    • Node.js 14 (ver 14.4.0)
    • SQLcl 18 (ver 18.4.0.007.1818)

    Don't add Oracle Java SE and Graal ((EE) Development Kit and Required Build Executor Components in the above list. They are available by default.

    Note:

    Don't add Java and Required Software. They are available by default.

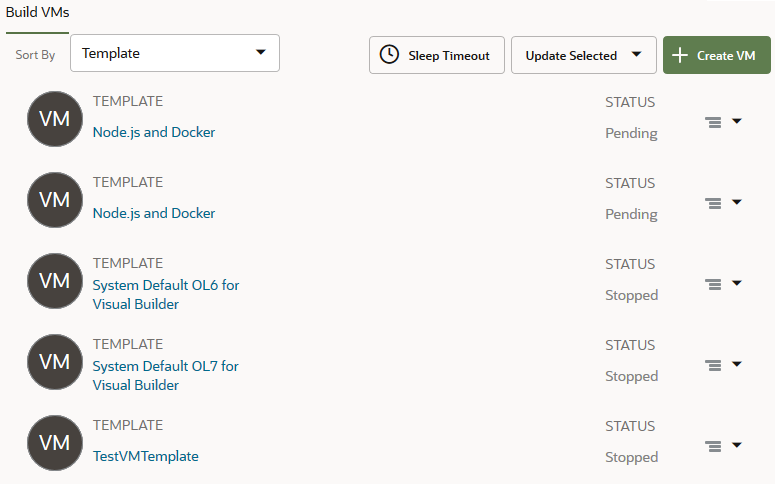
  4. Click the Virtual Machines tab.
  5. If necessary, you can sort (with ascending or descending order) by Id, Template name, Region, Shape, or Status and then locate and select the template.
  6. Note the number of VMs allocated to the VM template.

    Example:

    This table shows the Virtual Machine's details you noted in Step 5 with a new row at the bottom that describes the number of VMs allocated to it.
    Field Value
    Template Name Node.js and Docker
    Description Build VM Template with Node.js and Docker
    Platform Oracle Linux 7
    Software
    • Docker 17.12 (ver 17.12.1)
    • Node.js 14 (ver 14.4.0)
    • SQLcl 18 (ver 18.4.0.007.1818)

    Don't add Oracle Java SE and Graal ((EE) Development Kit and Required Build VM Components in the above list. They are available by default.

    Number of VMs 2

Create a Build Executor Template and Its Build Executors in the Target VB Studio Instance

DevCS in OCI Perform these steps in the target VB Studio instance.

  1. Get the details of the virtual machines template and its virtual machines from the source VB Studio instance.
  2. Switch to the browser with the target VB Studio instance.
  3. In the the Build Executor Templates tab (called Virtual Machines Templates in the source instance), click + Create Template.
  4. In the New Build Executor Template dialog box, enter a name and description for the build executor template.
  5. In Platform, use the selector to choose the operating system.
  6. Click Create.
  7. Select the template you just created and click Configure Software.
    The Software Catalog is displayed.
  8. Click the check box for each software package that you want to add to the build executor template. You'll see a message when a software package is dependent on another software package.

    If you can't find a software package, enter a search term in the Search bar and click Search the Search icon.

    To see the latest version of the software, select the Show latest versions only check box. This can be helpful when multiple versions of the same software are available in the catalog.

  9. Click Done.
  10. Click the Build Executors tab (called Virtual Machines in the source instance).
  11. Click + Create VM.
  12. In the Add VM Build Executor dialog box:
    1. Use the up and down arrows to set the number of build executors in Quantity.
    2. Use the selector in Build Executor Template to choose the build executor template.
    3. Select the build executor's region and shape in Region and Shape.
    4. Enter a number between 50 and 500 in Volume Size (GB) to override the default size of 100 GB.
  13. Click Add.
When you're done, verify that the build executor template's details and the build executors that were created in the target VB Studio instance match the ones in the source VB Studio instance.

Migrate the Organization's Component Exchange

If teams in your organization develop custom components (web components, application templates, UI patterns, and actions) for visual applications, a Component Exchange may have been set up to make the components available to all VB Studio users.

To host the custom components, you can define either a VB Studio project or an external server as the Componengt Exchange. Although any VB Studio project can be used as the Component Exchange, you should create and set up a separate project to host components. If you have multiple VB Studio instances across multiple tenancies, you can specify an external server as the common Component Exchange for all VB Studio instances.

To use a project or a server as the Component Exchange, you specify its details on the Organization page. When set, the VB Studio Designer automatically shows the Component Exchange's hosted components in the Components tab.

To migrate the Component Exchange from the source VB Studio instance to the target VB Studio instance, configure the Component Exchange with the same project name or server on the target VB Studio instance.

  1. Open the browser with the source VB Studio instance.
  2. In the left navigator, click Organization Organization, then click the Component Exchange tab.
  3. In the source VB Studio instance, get the details of the Component Exchange's project or server.
  4. In the target VB Studio instance, create the Component Exchange using the source VB Studio instance's details (project or server).
  5. After creating the Component Exchange in the target VB Studio instance, with the Component Exchange tab open in both the source VB Studio and target VB Studio instances, verify that settings in the target instance match those in the source instance.

Gather Information About the Component Exchange From the Source VB Studio Instance

DevCS in OCI Classic Perform these steps in the source VB Studio instance.

  1. Switch to the browser with the source VB Studio instance.
  2. In the Component Exchange tab, note whether or not the Enable organization-wide component hosting check box has been selected.
    If the check box isn't selected, you have nothing else to do for this part of the migration.

    If the check box is selected, go to the next step.

  3. Note where the source instance's custom components are hosted:
    • If In a project is selected, note the project name displayed in the Project field.

      Example:

      Field Value
      Project Name HCM Project Custom Compents
    • If On a custom server is selected, note the URL in the Server URL field. The credentials (username and password) are optional. If a username is displayed, note it.

      Example:

      Field Value
      Server URL https://exchange.mycompany.com/api/0.2.0
      Username (Optional) alex.admin
      Password (Optional) *********
  4. If the Validate button is active, click it and make sure that the connection to the custom server works.

Create the Component Exchange in the Target VB Studio Instance

DevCS in OCI Perform these steps in the target VB Studio instance:

  1. Get the details of the Component Exchange from the source instance.
  2. Switch to the browser with the target VB Studio instance.
  3. Go to the Component Exchange tab, and select the Enable organization-wide component hosting check box.
  4. Select where the target instance's custom components will be hosted:
    • Select In a project and then use the selector in the Project field to select the project that will host the custom components.

      Note:

      If you are going to use a project to host custom components, the project's security setting in the project's Properties must be set to Shared.
    • Select On a custom server and enter the Server URL shown in the source instance's Server URL field. If any credentials (username and password) were shown in their respective fields for the source instance, enter those in the Username and Passoord fields now..
  5. Click the Test Connection button to make sure that the connection to the custom server works.
  6. Click Save.

Migrate Projects

To migrate projects from the source VB Studio instance, you will export each project's data to an OCI Object Storage bucket or an OCI Object Storage Classic container.

You'll then create projects in the target VB Studio instance using the exported data. Finally, you will copy any data or artifacts that were not part of the export from the source VB Studio instance to the target VB Studio instance.

Gather Information About a Project From the Source VB Studio Instance

Note the name, description, security, and the wiki markup language of the project in the source VB Studio instance.

To get the details, you must be assigned the project's Owner role. If the role is not assigned to you, sign in as the Organization Administrator and assign the Owner role to yourself.

DevCS in OCI Classic Perform these steps in the source VB Studio instance.

  1. Switch to the browser with the source VB Studio instance.
  2. In the navigation menu, click Organization Organization.
  3. In the Projects tab, click the All toggle button.
  4. Find the project to migrate. If you can't find it in the list, use the Search box.
  5. After finding the project, note whether the project's name is a link and whether you are an owner. Projects where you're not a member don't appear as links. If you're a member, but not an owner, your name wouldn't appear in the Owners list.

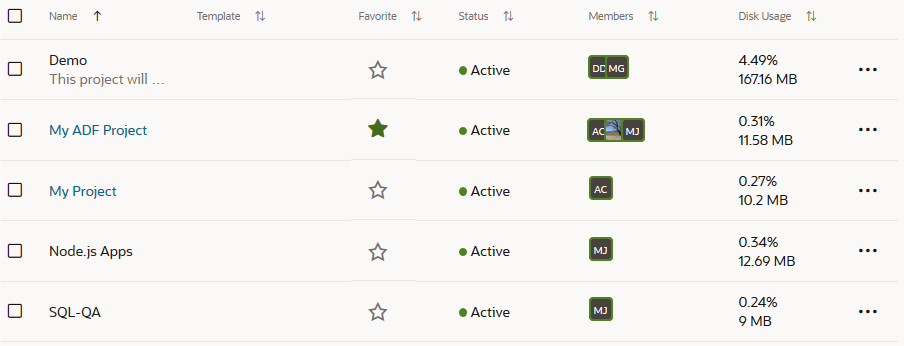
    In this example, you're signed in as Alex Cloud. Note that some projects aren't links.

    List of projects

    This table shows the project's name and information whether you're a member of the project.

    Field Value
    Project Name My Project
    Are you a Member? Yes
    Are you an Owner? Yes
  6. If you're not an owner or the project doesn't appear as a link, select the project's check box. From Update Selected Actions, select Assign Me as Owner.
  7. Click the project name.
  8. In the navigation menu, click Project Administration Project Administration.
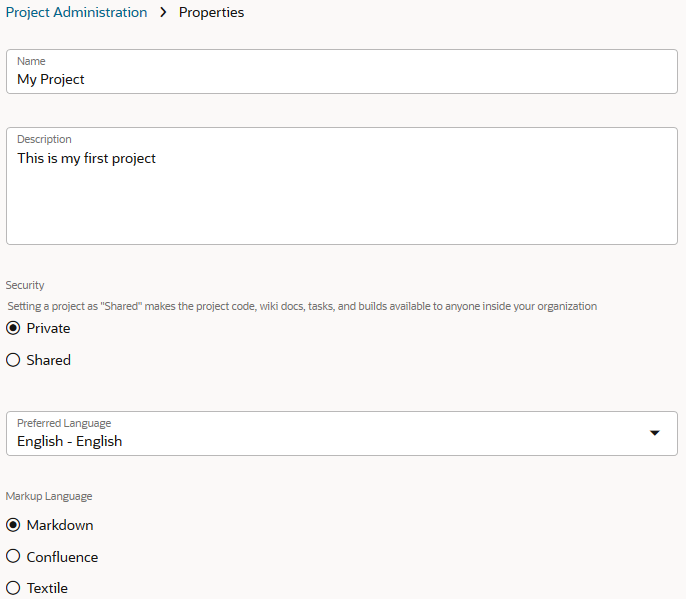
  9. Click Properties.
  10. Note the values of Name, Description, Security, and Markup Language.

    Example:

    Project Properties

    This table shows the Project Name, Description, Security, and Wiki values from the above image.

    Field Value
    Project Name My Project
    Description This is my first project
    Security Private
    Wiki Markdown

Export Project Data From the Source VB Studio Instance

You can export a project’s data to an OCI Object Storage bucket or an OCI Object Storage Classic container.

There are no differences between exporting project data to an OCI Object Storage bucket or an OCI Object Storage Classic container, so the choice is yours. Do note that OCI offers better security and speed than OCI Classic. When you export project data, not all the artifacts are included. You'll have to manually export the remaining artifacts and data manually.

This table shows you which artifacts are exported and which are not:

Artifact Exported? Notes
Project users No When you export a project's data, its users are not exported. However, all the data associated with the usernames (issue ownership and reviewers of a merge request, for example) will be preserved.

After you import the project's data to another project, all the data associated with the username will automatically be restored after you add a user with the same username to the project.

User's favorite settings or personal preferences No
Hosted Git repositories Yes
Mirrored public external Git repositories Yes
Mirrored private external Git repositories No Password-protected external Git repositories aren't exported.

After you import the project's data to another project, you must add each external private Git repository.

Branch restrictions Yes
Merge Requests Yes  
Default reviewers of a branch Yes After you import the project's data to another project, default reviewers are added automatically after the same users are added to the target project.
Workspaces No Repositories that are associated with your user's workspaces will be exported, but the workspaces themselves will not be.

Users must push all workspace changes to their Git repository before those changes can be exported/imported.

Maven artifacts No  
NPM artifacts No  
Linked Docker registries No  
Build jobs Yes

All builds of jobs are exported, along with their logs and artifacts. If a job retains an excessive number of builds, it will adversely affect the export process and will require a large amount of storage space in your bucket or container.

Configure a job to retain a reasonable number of builds before you export the project.

Build job's history and artifacts Yes
Name of the build job's build executor template No  
Pipelines Yes  
Releases Yes  
Deployment configurations No  
Environments No
Issues Yes  
Agile boards Yes  
Wiki pages Yes  
Snippets Yes  
Project template definition No
Announcements No
Webhooks No
RSS/ATOM feeds No
Link rules No
Project tags Yes
Issue products and components Yes
Default owners of issue components Yes After you import the project's data to another project, owners are activated automatically after the same users are added to the target project.
Issue custom fields Yes
Named passwords/private keys Yes

Note:

The passwords are securely exported and imported as keystore binary data.
Export a Project's Data to an OCI Object Storage Bucket

To export a project's data to an OCI Object Storage bucket, you need the bucket's name, private key and fingerprint of a user who can write objects to the bucket, and details of the compartment that hosts the bucket.

To get the input values, see Get the Required OCI Input Values.

DevCS in OCI Classic Perform these steps for each project in the source VB Studio instance as the project's Owner.

  1. Open the source project.
  2. In the navigation menu, click Project Administration Administration.
  3. Click Data Export/Import.
  4. Click the Job tab.
  5. In Account Type, select OCI.
  6. In Tenancy OCID, enter the tenancy's OCID copied from the Tenancy Details page.
  7. In User OCID, enter the user's OCID value who can access the bucket.
  8. In Home Region, select the home region of the OCI account.
  9. In Private Key, enter the private key of the user who can access the bucket.
  10. In Passphrase, enter the passphrase used to encrypt the private key. If no passphrase was used, leave the field empty.
  11. In Fingerprint, enter the fingerprint value of the private-public key pair.
  12. In Compartment OCID, enter the compartment's OCID copied from the Compartments page.
  13. In Storage Namespace, enter the storage namespace copied from the Tenancy Details page.
  14. Click Connect.
  15. In the Create Job section, in Type, select Export.
  16. In Name, enter a name for the export job.
  17. In Description, enter the job's description.
  18. In Storage Container, select the bucket to export the project data.
  19. In Storage Object, if required, update the default .zip file name.
  20. Click Export.
  21. In the Confirm Project Export dialog box, select the Export project data check box, and click Yes.
  22. In the Exporting Project page, expand Steps to see the status of each module.
  23. After the project export is successful, make a note of the bucket name and the archive file along with the project's other details.

    Example:

    Field Value
    Project Name My Project
    Description This is my first project
    Security Private
    Wiki Markdown
    Bucket/Container Name MyProjects.Bucket
    Archive File Export-my-domain_My Project_2019-03-12T05-34-20.627Z-by_alex.admin.zip
Export a Project's Data to an OCI Object Storage Classic Container

To export a project's data to an OCI Object Storage Classic container, you need the container's name, credentials of a user with the Storage_Administrator or the Storage_ReadWriteGroup identity domain role, and the service ID and the authorization URL of your OCI Object Storage Classic service.

To get the input values, see Get OCI Classic Input Values.

DevCS in OCI Classic Perform these steps for each project in the source VB Studio instance as the project's Owner.

  1. Open the source project.
  2. In the navigation menu, click Project Administration Project Administration.
  3. Click Data Export/Import.
  4. Click the Job tab.
  5. In Account Type, select OCI Classic.
  6. In Service ID, enter the value copied from the last part of the REST Endpoint URL field of the Service Details page.
    For example, if the value of REST Endpoint URL is https://demo12345678.storage.oraclecloud.com/v1/Storage-demo12345678, then enter Storage-demo12345678.
  7. In Username and Password, enter the credentials of the user assigned the Storage_Administrator or Storage_ReadWriteGroup identity domain role.
  8. In Authorization URL, enter the URL copied from the Auth V1 Endpoint field of the Service Details page.
    Example: http://storagetria01234-usoracletria12345.storage.oraclecloud.com/auth/v1.0.
  9. Click Connect.
  10. In the Create Job section, in Type, select Export.
  11. In Name, enter a name for the export job.
  12. In Description, enter the job's description.
  13. In Storage Container, select the container to export the project data.
  14. In Storage Object, if required, update the default .zip file name.
  15. Click Export.
  16. In the Confirm Project Export dialog box, select the Export project data check box, and click Yes.
  17. In the Exporting Project page, expand Steps to see the status of each module.
  18. After the project export is successful, make a note of the container name and the archive file in the Bucket/Container Name and Archive File columns.

    Example:

    Field Value
    Project Name My Project
    Description This is my first project
    Security Private
    Wiki Markdown
    Bucket/Container Name My-Container
    Archive File Export-my-domain_My Project_2019-03-12T05-34-20.627Z-by_alex.admin.zip
Get OCI Classic Input Values
  1. Open the Oracle Cloud Dashboard.
  2. In the Storage Classic tile, click Actionthe Action menu icon and select View Details.

    If the Storage Classic tile isn’t visible, click Customize Dashboard. Under Infrastructure, find Storage Classic, click Show, and then close the Customize Dashboard window.

  3. On the Service Details page, in the Additional Information section of the Overview tab, note the values of the Auth V1 Endpoint URL and the last part of the REST Endpoint URL.

    If you’re using an Oracle Cloud traditional account, the fields shown in this graphic might differ from the fields on your Service Details page.

    Here's an example:

    Description of storage_cloud_console.png follows
    Description of the illustration storage_cloud_console.png

  4. Return to the Oracle Cloud Dashboard.
  5. In the Compute Classic tile, click Actionthe Action menu icon and select View Details.
  6. On the Service Details page, in the Additional Information section of the Overview tab, note the values of Service Instance ID and REST Endpoint.

    Here's an example:

    Compute Classic console

Create a Project With an Exported Project's Data in the Target VB Studio Instance

While creating a project, you can import data from an exported project's archive file stored in an OCI Object Storage bucket or an OCI Object Storage Classic container.

To import project data, you need these details:

If you've exported to OCI Object Storage, you need: If you've exported to OCI Object Storage Classic, you need:
Name of the target bucket Name of the target container
Name of the exported archive file Name of the exported archive file
Private key and fingerprint of a user who has the BUCKET_INSPECT (or BUCKET_READ) and OBJECT_READ permissions of the bucket Credentials of a user with the Storage_Administrator or Storage_ReadOnlyGroup identity domain role.
Details of the compartment that hosts the bucket Service ID and the authorization URL of OCI Object Storage Classic

Note that if you've moved the exported file to an OCI Archive Storage bucket, you must restore the exported file object and move it to an OCI Object Storage bucket or an OCI Object Storage Classic container before creating the project. To restore objects in OCI Object Storage, see Managing Objects.

After you have the required input values, you can import the project.

DevCS in OCI Perform these steps in the target VB Studio instance.

  1. Get the details of the project from the source VB Studio instance.

    Example:

    Field Value
    Project Name My Project
    Description This is my first project
    Security Private
    Wiki Markdown
    Bucket/Container Name MyProjects.Bucket
    Archive File Export-my-domain_My Project_2019-03-12T05-34-20.627Z-by_alex.admin.zip
  2. Switch to the browser with the target VB Studio instance.
  3. In the navigation menu, click Organization Organization, if required.
  4. On the Organization page, click + Create.
  5. On the Project Details page of the New Project wizard, in Name and Description, enter the project name and a description.
  6. In Security, select the project's privacy.
  7. Click Next.
  8. On the Template page, select Import Project, and click Next.
  9. In the Storage Connection section of the Project Properties page, to import the project's data from an OCI Object Storage bucket, in Account Type, select OCI.
    To import the project's data from an OCI Object Storage Classic container, in Account Type, select OCI Classic.
  10. If you selected OCI as Account Type, enter the required connection details.
    1. In Tenancy OCID, enter the tenancy's OCID copied from the Tenancy Details page.
    2. In User OCID, enter the user's OCID value who can access the bucket.
    3. In Home Region, select the home region of the OCI account.
    4. In Private Key, enter the private key of the user who can access the bucket.
    5. In Passphrase, enter the passphrase used to encrypt the private key. If no passphrase was used, leave the field empty.
    6. In Fingerprint, enter the fingerprint value of the private-public key pair.
    7. In Compartment OCID, enter the compartment's OCID copied from the Compartments page.
    8. In Storage Namespace, enter the storage namespace copied from the Tenancy Details page.
  11. If you selected OCI Classic as Account Type, enter the required connection details.
    1. In Service ID, enter the value copied from the last part of the REST Endpoint URL field of the Service Details page.
      For example, if the value of REST Endpoint URL is https://demo12345678.storage.oraclecloud.com/v1/Storage-demo12345678, then enter Storage-demo12345678.
    2. In Username and Password, enter the credentials of the user who can access the archive file.
    3. In Authorization URL, enter the URL copied from the Auth V1 Endpoint field of the Service Details page.
      Example: http://storagetria01234-usoracletria12345.storage.oraclecloud.com/auth/v1.0.
  12. Click Next.
  13. On the Project Properties page, from Wiki Markup, select the project’s wiki markup language.
  14. In Container, select the storage bucket or the container where the data was exported.
  15. In File, select the exported file.
  16. Click Finish.
  17. After the import is complete, check the log to learn about the imported artifacts.
    1. In the navigation menu, click Project Administration Project Administration.
    2. Click Data Export/Import.
    3. Click the History tab.
    4. Select the import entry.
    5. In the Job Details section, expand Steps.

In the created project, verify artifacts listed in the table of Export Project Data From the Source VB Studio Instance with Yes value in the Exported? column have been imported.

If the import fails, you can import the data again without creating the project. See Export and Import Project Data in Using Visual Builder Studio.

Migrate Other Artifacts and Data

After exporting a project from the source VB Studio instance and creating a project of the same name with the exported project’s data in the target VB Studio instance, migrate the artifacts that weren't exported.

Before you begin, open the source project in a browser and the target project in another browser. Then, to migrate an artifact, note and copy its details from the source project and create or add it manually to the new project.

For example, in this image, the source project, on the left, is open in Mozilla Firefox and the target project, on the right, is open in Google Chrome.
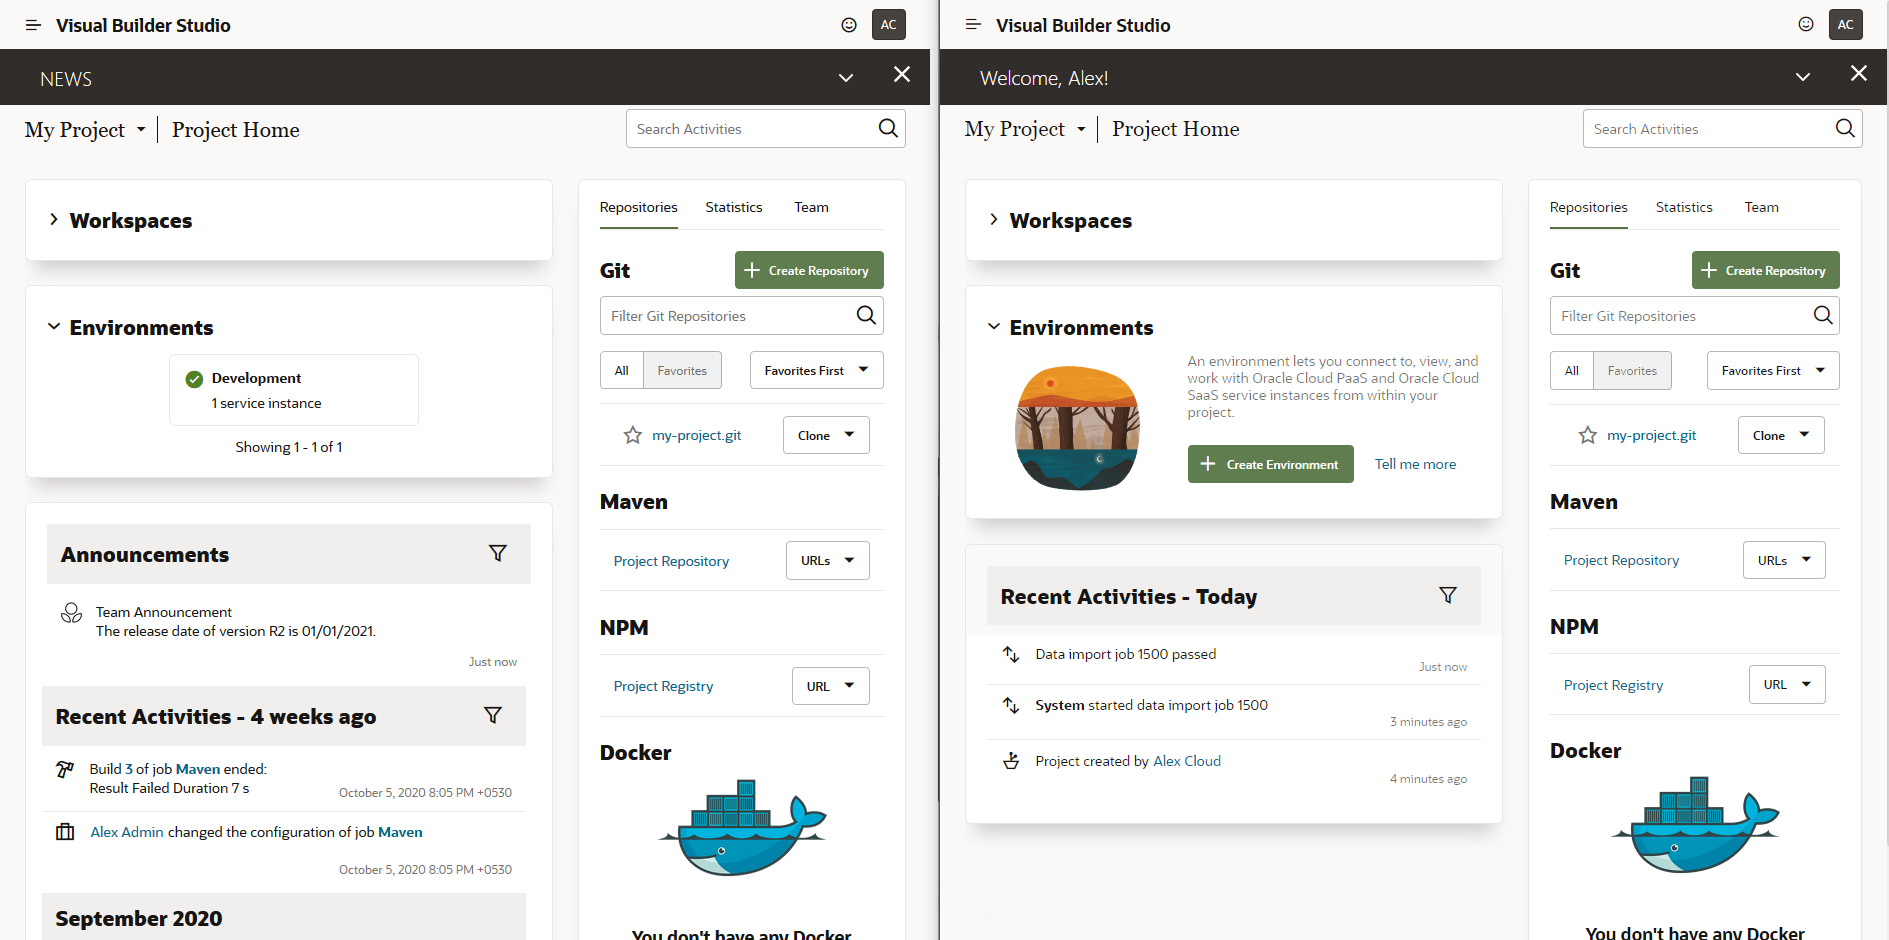
Source and Target Projects

Project Users

To migrate users, you'll need to add them manually to the new project.

If you're switching to another identity domain, make sure that VB Studio users of the source identity domain are added to the target identity domain with the same usernames and roles. See Create Users and Assign Roles in Getting Started with Oracle Cloud.

Follow these steps to migrate project users:

  1. Open the source project. In the navigation menu, click Project Home Project Home.
  2. Open the target project. In the navigation menu, click Project Home Project Home.
  3. Click the Team tab.
  4. In the source project, gather information about the usernames and roles of project users.
  5. In the target project, add the users and assign them the same membership types.
  6. After adding users, with the Team tab open in both source and target projects, verify that users and roles in the target project match the source project.
Gather Information About Users From the Source Project

Source Perform these steps in the source project.

  1. Switch to the browser with the source project.
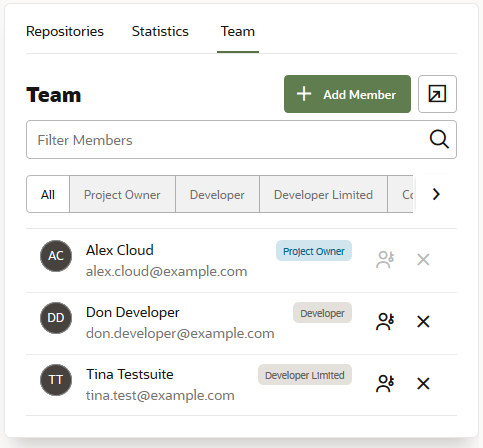
  2. In the Team tab, for each user, note the usernames and project membership types.
    Example:
    Team

    This table shows the User Name and Owner values from the above image.

    User Name Project Role
    Alex Admin Owner
    Don Developer Developer
    Tina Testsuite Developer Limited
  3. Click Export Export.
  4. In the Members List Export dialog box, copy the names of project members.
  5. Click OK to close the dialog box.
Add Users in the Target Project

Target Perform these steps in the target project.

  1. Get the details of users from the source project. You'll use the information to add users and assign them the same roles in the target project.

    Example:

    User Name Project Role
    Alex Admin Owner
    Don Developer Developer
    Tina Testsuite Developer Limited
  2. Switch to the browser with the target project.
  3. In the Team tab, click + Add Member.
  4. In the New Member dialog box, in Membership, select Project Owner.
  5. Select the Multiple Users toggle button.
  6. In Username List text box, enter the comma delimited list of usernames exported from the source project.
  7. Click Add.
  8. For each user who wasn't assigned the Owner role, click Change Membership the Promote to Owner iconand select the new project membership for that user.

When you're done, verify that the users and roles in the target project match the source project.

Before you exported the source project's data, you noted whether you're a member or an owner in the source project. Don't delete that data. You'll need it after migrating all source project's artifacts to the target project.

Mirrored Private Git Repositories

If the project users have been using private Git repositories on another platform, such as GitHub or Bitbucket, and have mirrored them to the project, note that they aren't exported to the archive file when you export project data.

Follow these steps to migrate a project's mirrored private Git repositories:

  1. Open the source project. In the navigation menu, click Project Administration Project Administration.
  2. Open the target project. In the navigation menu, click Project Administration Project Administration.
  3. In the source and target projects, follow these steps:
    1. Click Repositories.
    2. Expand External Repositories.
  4. Repeat these steps to migrate each mirrored private Git repository:
    1. In the source project, gather information about a mirrored private Git repository.
    2. In the target project, add a mirror to the private Git repository.
  5. After migrating all private Git repositories, with the Repositories page open in both source and target projects, verify that repositories in the target project match the source project.
Gather Information About a Mirrored Private Git Repository From the Source Project

Source Perform these steps in the source project.

  1. Switch to the browser with the source project.
  2. In External Repositories, note the name, description, and URL of the mirrored Git repository.
    You can get the URL from the Clone drop-down menu.

    Example:

    External Repositories

    This table shows the Name, Description, and URL values from the above image.

    Field Value
    Repository Name myprivaterepo
    Description GitHub Private Repository
    URL https://github.com/alex-cloud/myprivaterepo.git

    Get the credentials of the repository too. They aren't displayed in the drop-down menu.

Mirror a Private Git Repository in the Target Project

Target Perform these steps in the target project.

  1. Get the details of the mirrored private Git repository from the source project. You'll use the information to add the external Git repository in the target project.

    Example:

    Field Value
    Repository Name myprivaterepo
    Description GitHub Private Repository
    URL https://github.com/alex-cloud/myprivaterepo.git
  2. Switch to the browser with the target project.
  3. In External Repositories, click + Link External Repository
  4. In the New Repository dialog box, enter the URL of the external Git repository in URL and enter the repository's description in Description.
  5. Expand the Credentials for non-public repos section and enter the credentials to access the external Git repository.
  6. Click Create.
  7. In the navigation menu, click Git Git.
  8. From the Repository list, select the external repository and verify that you can view its files.

Docker Registries

Follow these steps to migrate Docker registries:

  1. Open the source project. In the navigation menu, click Project Administration Project Administration.
  2. Open the target project. In the navigation menu, click Project Administration Project Administration.
  3. In the source and target projects, follow these steps:
    1. Click Repositories.
    2. Expand Docker Repositories.
  4. Repeat these steps to migrate each Docker registry:
    1. In the source project, gather information about a Docker registry.
    2. In the target project, add the Docker registry.
  5. After migrating all Docker registries, with the Repositories page open in both source and target projects, verify that registries in the target project match the source project.
Gather Information About a Linked Docker Registry From the Source Project

Source Perform these steps in the source project.

  1. Switch to the browser with the source project.
  2. In Docker Repositories, note the linked Docker registry's name, URL, description, and authentication.

    Click Menu menu icon of the registry and select Edit. Copy the required details from the Edit Registry dialog box.

    If a registry is private, get its access credentials too. The password (or the auth token) is not visible in the dialog box.

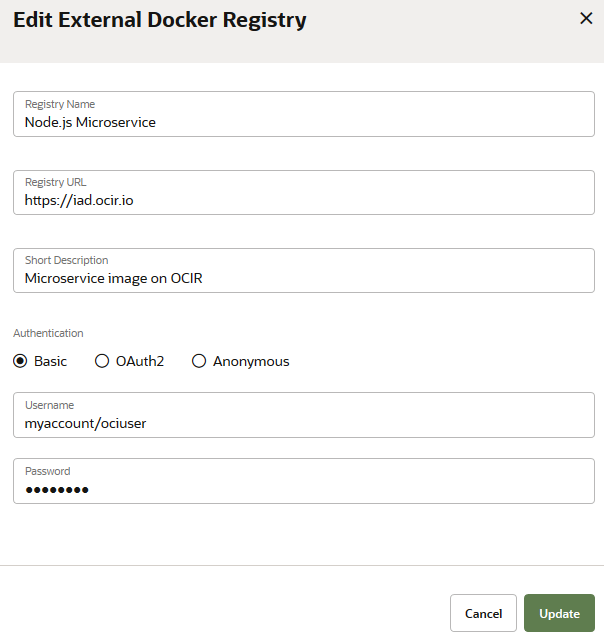
    Example:

    Edit Docker Registry dialog box

    This table shows the Name, Description, URL, and Authentication values from the above image.

    Field Value
    Registry Name Node.js Microservice
    Registry URL https://iad.ocir.io
    Short Description Microservice image on OCIR
    Authentication Basic

    Get the authorised user's access credentials too.

Link a Docker Registry in the Target Project

Target Perform these steps in the target project.

  1. Get the details of the Docker registry from the source project. You'll use the information to add the Docker registry in the target project.

    Example:

    Field Value
    Registry Name Node.js Microservice
    Registry URL https://iad.ocir.io
    Short Description Microservice image on OCIR
    Authentication Basic

    Get the authorised user's access credentials too.

  2. Switch to the browser with the target project.
  3. In Docker Registries, click + Link External Registry.
  4. In Registry Name and Short Description, enter the Docker registry name and a description.
  5. In Registry URL, enter the URL of the Docker registry.
  6. In Authentication, select the authentication type.
  7. Click Create.
  8. In the navigation menu, click Docker Docker Registry.
  9. Browse and verify that you can access the repositories and images of the linked Docker registry.

Maven Artifacts

You might have several artifacts in the source project's Maven repository, such as dependencies and build artifacts. To migrate them, you'll need to note details of each artifact, download it, and then upload it again in the target project. You may choose not to migrate build artifacts stored in the Maven repository of the source project as you can generate and archive them by running a build in the target project.

Follow these steps to migrate Maven artifacts:

  1. Open the source project. In the navigation menu, click Maven Maven.
  2. Open the target project. In the navigation menu, click Maven Maven.
  3. Repeat these steps to migrate each Maven artifact:
    1. In the source project, gather information about a Maven artifact and download it to your computer.
    2. In the target project, upload the Maven artifact.
  4. After migrating all Maven artifacts, with the Maven page open in both source and target projects, verify that artifacts in the target project match the source project.
  5. Switch to the browser with the source project. In the navigation menu, click Project Administration Project Administration and then click Repositories.
  6. Switch to the browser with the target project. In the navigation menu, click Project Administration Project Administration and then click Repositories.
  7. Note the Maven auto-cleanup and overwrite settings of the source project and make the same settings in the target project.
  8. After migrating all Maven settings, with the Repositories page open in both source and target projects, verify that Maven settings in the target project match the source project.
Gather Information About a Maven Artifact From the Source Project

Source Perform these steps in the source project.

  1. Switch to the browser with the source project.
  2. On the right side of the page, click Browse.
  3. Browse and select the artifact.
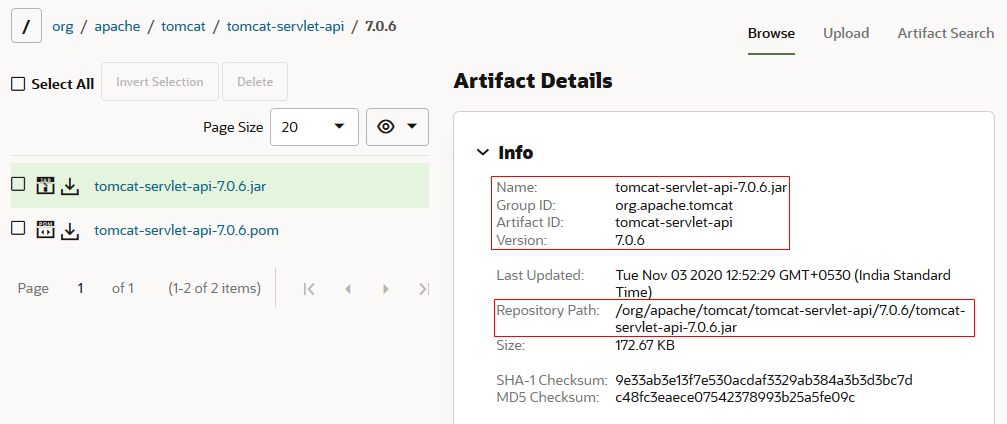
  4. From the Artifact Details section on the right, note the artifact's name, path, group ID, artifact ID, and version number.
    Example:
    Maven artifact's details

    This table shows the Artifact Name, Path, Group ID, Artifact ID, and Version Number values from the above image.

    Field Value
    Name tomcat-servlet-api-7.0.6.jar
    Path tomcat/servlet/api/tomcat-servlet-api/7.0.6
    Group ID tomcat-servlet-api
    Artifact ID tomcat-servlet-api
    Version Number 7.0.6
  5. Click Download Download.
Upload a Maven Artifact in the Target Project

Target Perform these steps in the target project.

  1. Get the details of the Maven artifact from the source project. You'll use the information to upload the artifact in the target project.
    Example:
    Field Value
    Name tomcat-servlet-api-7.0.6.jar
    Path tomcat/servlet/api/tomcat-servlet-api/7.0.6
    Group ID tomcat-servlet-api
    Artifact ID tomcat-servlet-api
    Version Number 7.0.6
  2. Switch to the browser with the target project.
  3. On the right side of the Maven page, click Upload.
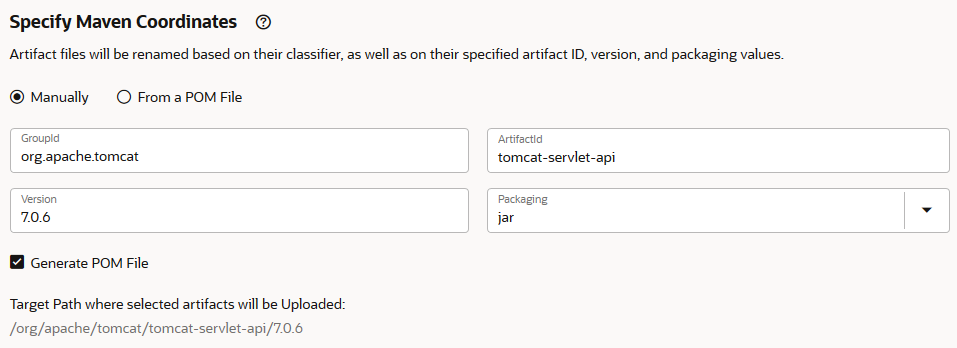
  4. In the Upload Artifacts section, add the artifact to upload, and specify its Maven coordinates (Group ID, Artifact ID, and version number) that you noted.
    Some fields might get populated automatically when you add the artifact in the Upload section. Make sure the path of the uploaded artifact is the same as you noted.

    Example:

    Upload Maven artifact
  5. Click Start Upload.
  6. After uploading, verify the path of the uploaded artifact is same as you noted in the source project.
Gather Information About Maven Administration Settings From the Source Project

Source Perform these steps in the source project.

  1. Switch to the browser with the source project.
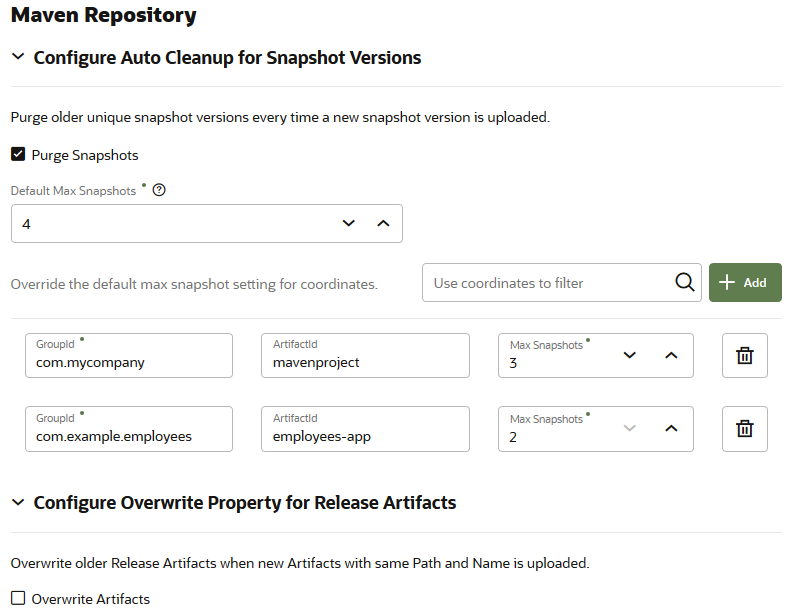
  2. In Maven Repository, expand Configure auto cleanup for Snapshot versions and Configure Overwrite Property for Release Artifacts, and note their field values.

    Example:

    Maven admin settings

    This table shows the fields and their values from the above image.

    Field Value
    Purge Snapshots Selected
    Default Max Snapshots 4
    Customized Snapshot Counts

    Snapshot 1:

    • GroupID: com.mycompany
    • ArtifactID: mavenproject
    • Snapshot Count: 3

    Snapshot 2:

    • GroupID: com.example.employees
    • ArtifactID: employees-app
    • Snapshot Count: 2
    Overwrite Artifacts Not selected
Configure Maven Administration Settings in the Target Project

Target Perform these steps in the target project.

  1. Get the details of Maven administration settings from the source project. You'll use the information to configure Maven admin settings in the target project.
    Example:
    Field Value
    Purge Snapshots Selected
    Default Max Snapshots 4
    Customized Snapshot Counts

    Snapshot 1:

    • GroupID: com.mycompany
    • ArtifactID: mavenproject
    • Snapshot Count: 3

    Snapshot 2:

    • GroupID: com.example.employees
    • ArtifactID: employees-app
    • Snapshot Count: 2
    Overwrite Artifacts Not selected
  2. Switch to the browser with the target project.
  3. In Maven Repository, expand Configure auto cleanup for Snapshot versions and Configure Overwrite Property for Release Artifacts.
  4. Set the fields of both sections as noted in the table.

    Example:

    Maven admin settings

Environments

Follow these steps to migrate environments and its service instances:

  1. Open the source project. In the navigation menu, click Environments Environments.
  2. Open the target project. In the navigation menu, click Environments Environments.
  3. Repeat these steps to migrate each environment:
    1. In the source project, gather information about an environment and its service instances.
    2. In the target project, create the environment and add its service instances.
  4. After migrating all environments, with the Environments page open in both source and target projects, verify that environments in the target project match the source project.
Gather Information About an Environment and Service Instances From the Source Project

Source Perform these steps in the source project.

  1. Switch to the browser with the source project.
  2. On the Environments page, from the left list, select the environment.
  3. Note the details of each service instance of the environment.

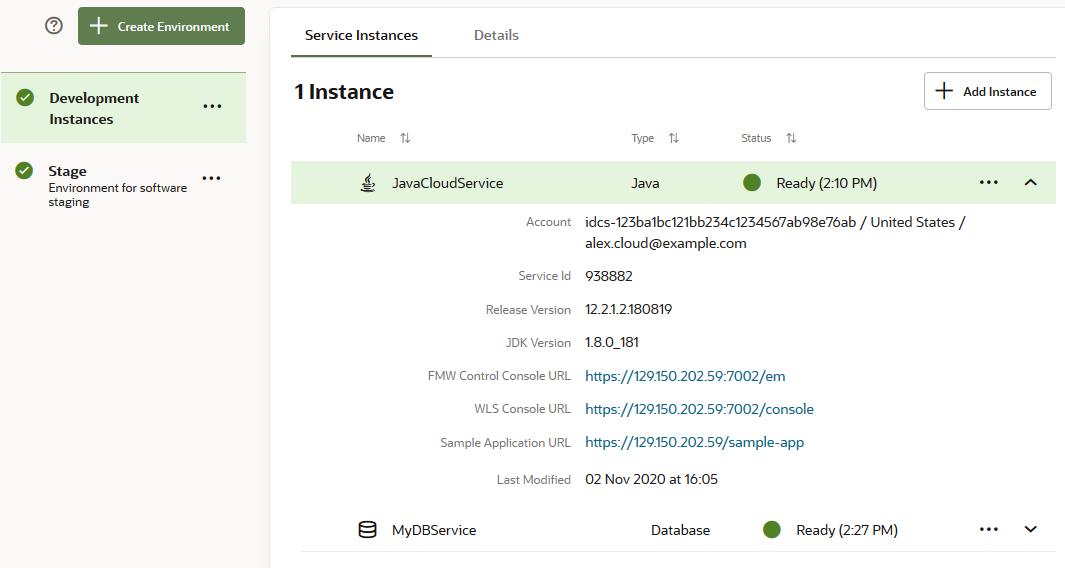
    Example:

    Environment instances

    This table shows the Environment Name, Description, Service Instance, and Accountvalues from the above image.

    Environment Name Description Service Instance Account
    Development Instances Environment for software development Java idcs-123a1bc121bb234c1234567ab98e76ab / United States / alex.cloud@example.com
        Database idcs-123a1bc121bb234c1234567ab98e76ab / United States / alex.cloud@example.com
Create an Environment and Add Service Instances in the Target Project

Target Perform these steps in the target project.

  1. Get the details of the environment from the source project.. You'll use the information to create the environment and add its service instances to them in the target project.
    Example:
    Environment Name Description Service Instance Account
    Development Instances Environment for software development Java idcs-123a1bc121bb234c1234567ab98e76ab / United States / alex.cloud@example.com

      Database idcs-123a1bc121bb234c1234567ab98e76ab / United States / alex.cloud@example.com
  2. Switch to the browser with the target project.
  3. On the Environments page, click + Create (or + Create Environment if the page is empty).
  4. Enter the name of the environment in Environment Name and enter the description in Description.
  5. Click Create.
  6. In the Service Instances tab, click Add.
  7. Add the relevant service instances listed in the table from the appropriate identity domain.

    To add instances from an identity domain other than the one you are currently connected to, click Edit at the top of the Add Service Instances dialog box.

After you recreate Environments on the target instance, update the entries in the individual build jobs that reference the environments. In some cases, you may also need to provide updated user credentials for any jobs that deploy artifacts to the target Environments.

Build Job's VM Template

When you create a project with the exported project's data, the build jobs of the source project are migrated to the target project, but the job's Build VM template's name, its Java version, its Notifications setting isn't migrated.

Follow these steps to migrate the Build VM Template information of jobs:

  1. In the source and target projects, in the navigation bar, click Builds Builds.
  2. Repeat these steps to migrate each job:
    1. In the source project, gather information about a job's VM template, Java version, and notification settings.
    2. In the target project, configure the same job and specify its VM template, Java version, and notification setting.
  3. After specifying VM templates to all jobs of the target project, run a build of each job.

    If a job's build fails, verify its configuration.

    Note that if a job is part of a pipeline, a build of its dependent jobs would run automatically after the build of the job is complete. So, trigger a build of all pipelines. This would ensure that dependent jobs do not fail. After builds of all pipelines is complete, run a build of jobs that aren't part of a pipeline.

Gather Information About a Job's Build VM Template From the Source Project

Source Perform these steps in the source project.

  1. Switch to the browser with the source project.
  2. In the Jobs tab of the Builds page, click the job name.
  3. Click Settings the Gear icon.
  4. Click the Software tab.
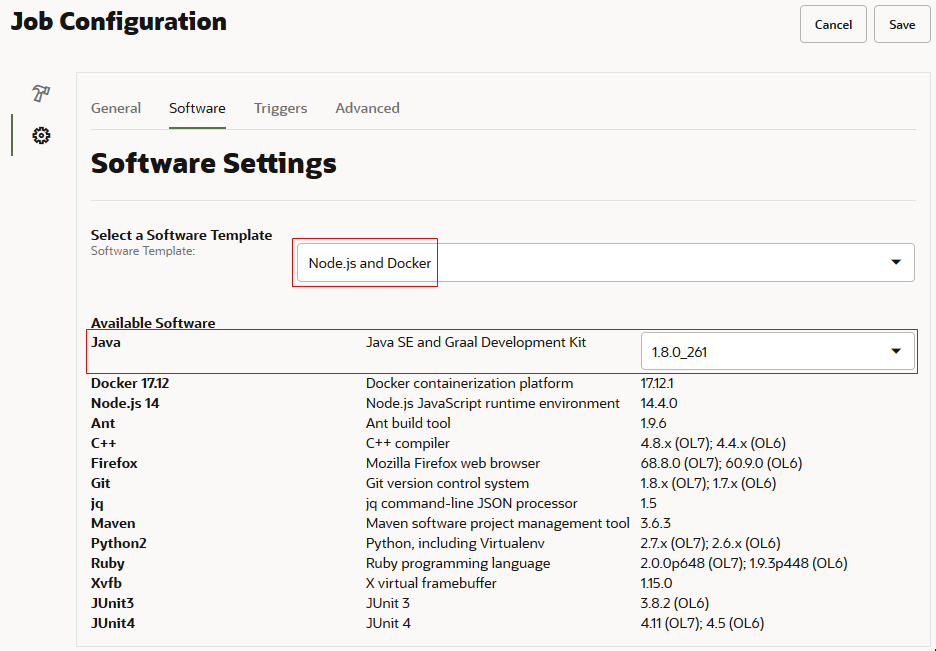
  5. Note the name of Software Template and the version of Java.

    Example:

    VM template in job

    This table shows the Build VM Template Name and Java Version values from the above image.

    Field Value/Status
    Job Name build-microservice
    Build VM Template Name Node.js and Docker
    Java Version 1.8.0_261
  6. Click Cancel.
  7. On the Job Details page, check whether Notifications is On or Off. If it's Off, note it.
    Field Value/Status
    Job Name build-microservice
    Build VM Template Name Node.js and Docker
    Java Version 1.8.0_261
    Notifications Off
Set Build VM Template of a Job in the Target Project

Target Perform these steps in the target project.

  1. Get the details of Build VM template and Java version of the job from the source project.

    Example:

    Field Value/Status
    Job Name build-microservice
    Build VM Template Name Node.js and Docker
    Java Version 1.8.0_261
    Notifications Off
  2. Switch to the browser with the target project.
  3. In the Jobs tab of the Builds page, click the job name.
  4. Click Settings the Gear icon.
  5. Click the Software tab.
  6. In Software Template, select the VM template.
  7. If required, in Java, select the version used in the source job.
  8. Click Save.
  9. On the Job Details page, set Notifications, if required.

Webhooks

Follow these steps to migrate webhooks:

  1. Open the source project. In the navigation menu, click Project Administration Project Administration and click Webhooks.
  2. Open the target project. In the navigation menu, click Project Administration Project Administration and click Webhooks.
  3. Repeat these steps to migrate each webhook:
    1. In the source project, gather information about a webhook.
    2. In the target project, create and configure the webhook.
  4. After migrating all webhooks, with the Webhooks page open in both source and target projects, verify that webhooks in the target project match the source project.
Gather Information About a Webhook From the Source Project

Source Perform these steps in the source project.

  1. Switch to the browser with the source project.
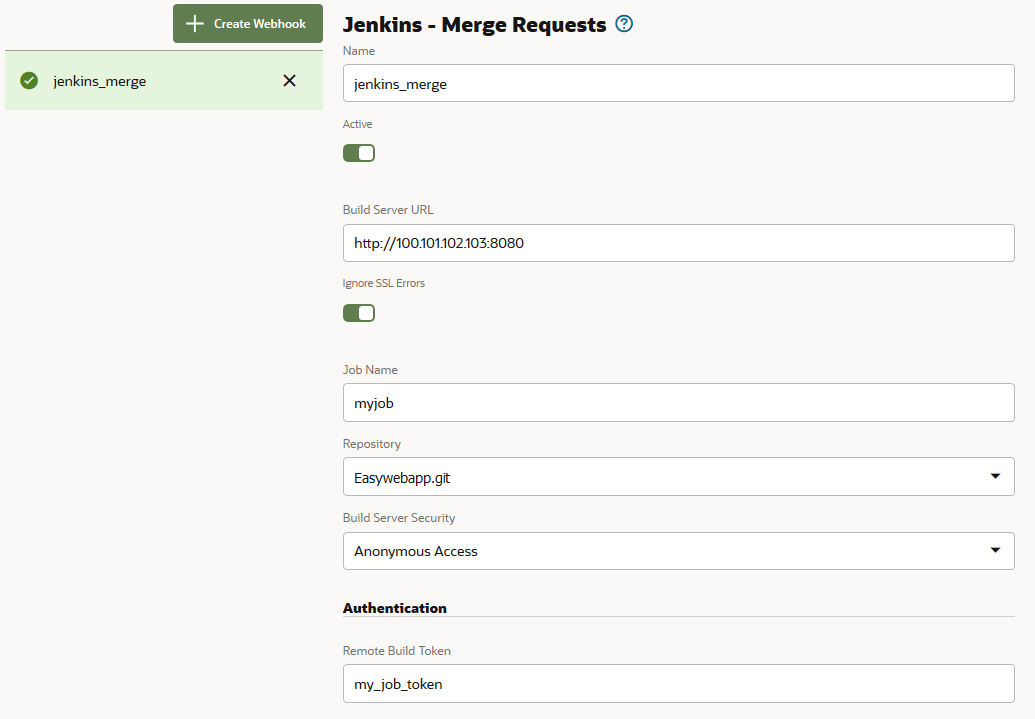
  2. On the Webhooks page, in the left list, select the webhook and note the type and values of its fields. The webhook type is displayed as the title.
    Example:
    Webhook

    This table shows the webhook's fields and its values from the above image.

    Field Value
    Webhook Type Jenkins - Merge Requests
    Name jenkins_merge
    Active Selected
    Build Server URL http://100.101.102.103:8080/
    Ignore SSL Errors Not selected
    Job Name myjob
    Repository Easywebapp.git
    Build Server Security Anonymous Access
    Remote Build Token my_job_token
Create a Webhook in the Target Project

Target Perform these steps in the target project.

  1. Get the details of the webhook from the source project. You'll use the information to create the webhook in the target project.
    Example:
    Field Value
    Webhook Type Jenkins - Merge Requests
    Name jenkins_merge
    Active Selected
    Build Server URL http://100.101.102.103:8080/
    Ignore SSL Errors Not selected
    Job Name myjob
    Repository Easywebapp.git
    Build Server Security Anonymous Access
    Remote Build Token my_job_token
  2. Switch to the browser with the target project.
  3. On the Webhooks page, click Webhooks.
  4. Click + Create Webhook.
  5. In Type, select the webhook type.
  6. In other fields, enter the values you noted.
  7. When you're done, click Create.
  8. On the Webhooks page, select the webhook, and click Test.
    If the test fails, reconfigure the webhook.

Template Definition

If the source project is a template, then to migrate its template variables and rules, you'll need to add them manually to the new project.

Follow these steps to migrate a project's template definition:

  1. Open the source project. In the navigation menu, click Project Administration Project Administration.
  2. Open the target project. In the navigation menu, click Project Administration Project Administration.
  3. In both source and target projects, click Properties.
  4. In the source project, gather information about the project's template definition.
  5. In the target project, configure the template definition.
Gather Information About the Source Project's Template Definition

Source Perform these steps in the source project.

  1. Switch to the browser with the source project.
  2. In the Template section of the Properties page, click Edit.
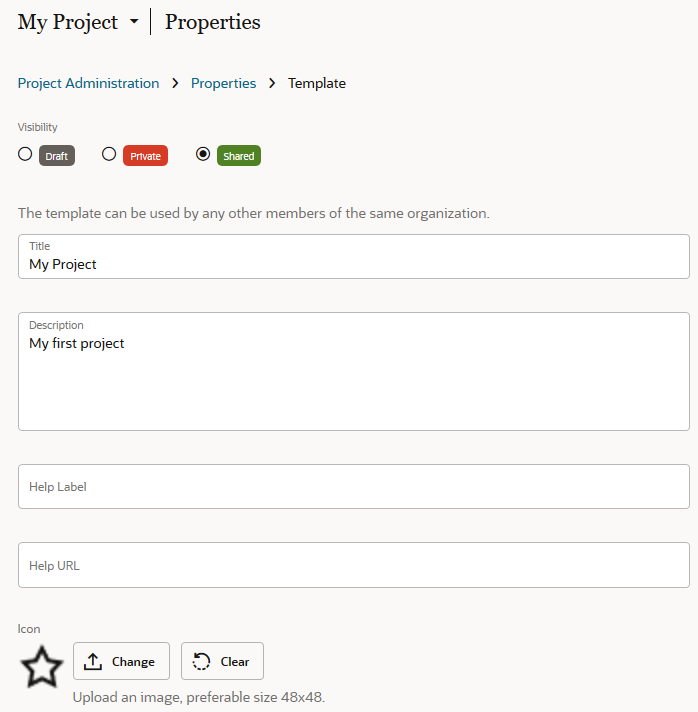
  3. Note the project's title, description, help label, help URL, and visibility. If there's an icon, right-click the icon, save it to your computer, and note the path of the icon on your computer.

    Example:

    Template definition

    This table shows the Title and Visibility values from the above image. Also, note the icon's path.

    Field Value
    Visibility Shared
    Title My Project
    Description My first project
    Help Text  
    Help Label  
    Icon path on your computer D:\Images\Demo\demo_icon.png
  4. For each variable in the Variables section, click Edit Edit icon and note the name, display name, and values of the variable.

    Example:

    Variables

    This table shows the Name, Display Name, Description, and Definition values from the above image.

    Name Display Name Description Definition
    str_proxy Proxy String String variable to get proxy URL

    Hint: Enter proxy URL

    Min Length: 1

    Max Length: 100

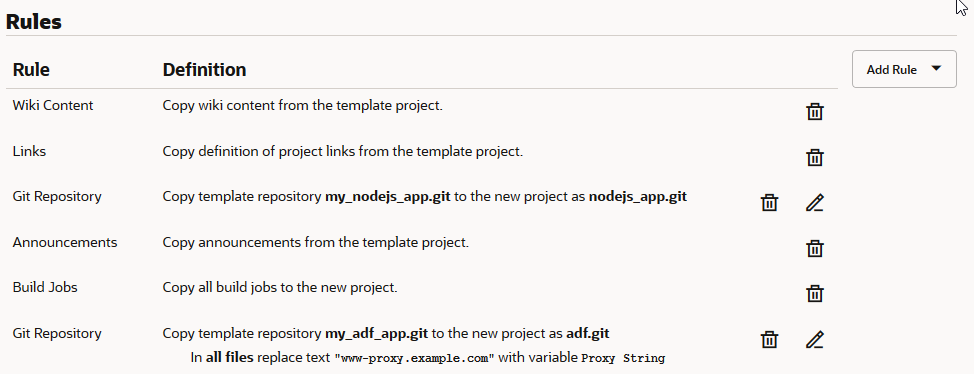
  5. For each rule in the Rules section, note its name and definition. For each Git repository, click Edit Edit icon and note the source repository name, the target repository name, and the replacement rules (if any).

    Example:

    Rules

    This table shows the Rule, Definition, and Additional Notes values from the above image.

    Rule Definition Additional Notes
    Build Jobs Copy all build jobs to the new project.  
    Wiki Content Copy wiki content from the template project.  
    Links Copy definition of project links from the template project.  
    Git Repository Copy template repository my_nodejs_app.git to the new project as nodejs_app.git

    Source Repository: my_nodejs_app.git

    Repository Name: nodejs_app.git

    Use target project name check box: Not selected

    Replacements:
    • In: All Files
    • Replace: www-proxy.example.com
    • With: Variable
    • variable value: str_proxy
    Git Repository Copy template repository my_adf_app.git to the new project as adf.git

    Source Repository: my_adf_app.git

    Repository Name:adf.git

    Use target project name check box: Not selected

    Announcements Copy announcements from the template project.  
Define the Target Project as a Template

Target Perform these steps in the target project.

  1. Get the details of the template from the source project. You'll use the information to define the project as a template.
    Example:
    Field Value
    Visibility Shared
    Title My Project
    Description My first project
    Help Text  
    Help Label  
    Icon path on your computer D:\Images\Demo\demo_icon.png

    Get the details of variables from the source project.

    Name Display Name Description Definition
    str_proxy Proxy String String variable to get proxy URL

    Hint: Enter proxy URL

    Min Length: 1

    Max Length: 100

    Get the details of rules from the source project.

    Rule Definition Additional Notes
    Build Jobs Copy all build jobs to the new project.  
    Wiki Content Copy wiki content from the template project.  
    Links Copy definition of project links from the template project.  
    Git Repository Copy template repository my_nodejs_app.git to the new project as nodejs_app.git

    Source Repository: my_nodejs_app.git

    Repository Name: nodejs_app.git

    Use target project name check box: Not selected

    Replacements:
    • In: All Files
    • Replace: www-proxy.example.com
    • With: Variable
    • variable value: str_proxy
    Git Repository Copy template repository my_adf_app.git to the new project as adf.git

    Source Repository: my_adf_app.git

    Repository Name:adf.git

    Use target project name check box: Not selected

    Announcements Copy announcements from the template project.  
  2. Switch to the browser with the target project.
  3. In the Template section of the Properties page, click Define Template.
  4. Click Edit.
  5. In Visibility, set the template's visibility.
  6. Update Title and Description.
  7. Add Help Text and Help URL.
  8. In Variables, define the variables.
    For each variable to add, from the Add Variable menu, select the variable type. Fill in the fields of the variable and click Save Save Changes.
  9. In the Rules section, define the rules.
  10. Click Save.

Announcements

Follow these steps to migrate announcements:

  1. Open the source project. In the navigation menu, click Project Administration Project Administration.
  2. Open the target project. In the navigation menu, click Project Administration Project Administration.
  3. In both source and target projects, click Announcements.
  4. Repeat these steps to migrate each announcement:
    1. In the source project, gather information about an announcement.
    2. In the target project, create and configure the announcement.
  5. After migrating all announcements, with the Announcements page open in both source and target projects, verify that announcements in the target project match the source project.
Gather Information About an Announcement From the Source Project

Source Perform these steps in the source project.

  1. Switch to the browser with the source project.
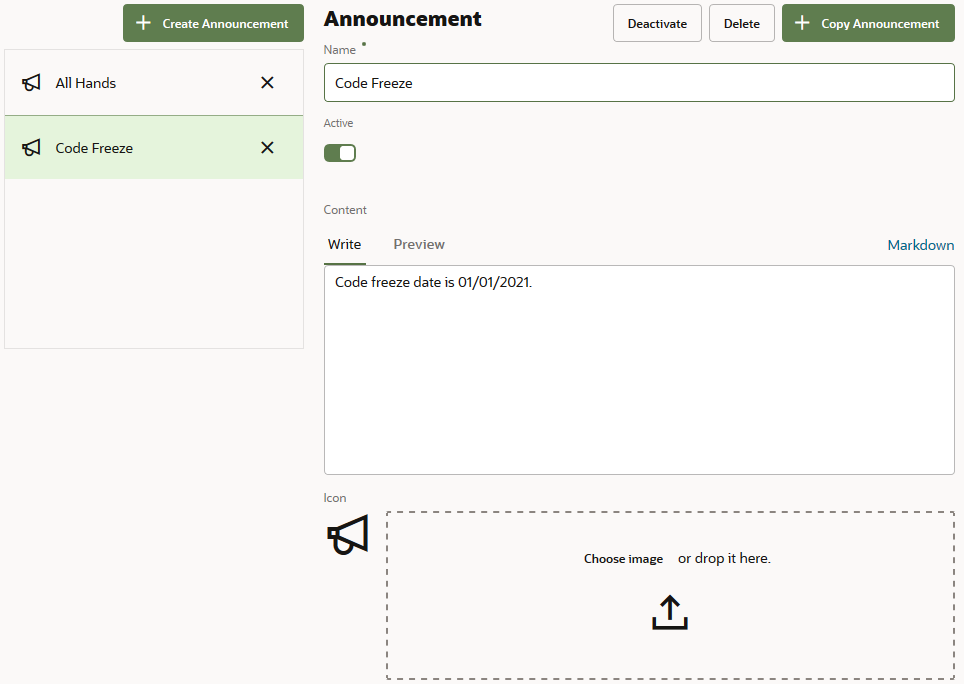
  2. On the Announcements page, in the left list, select the announcement and note its name, active status, and content. If there's an icon, right-click the icon, save it to your computer, and note the path of the icon on your computer.

    Example:

    Announcement

    This table shows the Announcement Name, Active, Content, and Icon values from the above image.

    Field Value/Status
    Announcement Name Code Freeze
    Active Selected
    Content Code freeze date is 01/01/2021
    Icon's path on your computer D:\Announcements\lock_icon.png
Create an Announcement in the Target Project

Target Perform these steps in the target project.

  1. Get the details of the announcement from the source project. You'll use the information to create the announcement in the target project
    Example:
    Field Value/Status
    Announcement Name Code Freeze
    Active Selected
    Content Code freeze date is 01/01/2021
    Icon's path on your computer D:\Announcements\lock_icon.png
  2. Switch to the browser with the target project.
  3. On the Announcements page, click + New Announcement.
  4. In Name and Contents, enter the name and the announcement’s text.
  5. Upload the icon's image, if there was an icon associated with the announcement in the source project.
  6. Click Create.
  7. In the navigation menu, click Project Home Project Home.
  8. Above the activities feed, verify the announcement.

RSS/ATOM Feeds

Follow these steps to migrate RSS/ATOM feeds:

  1. Open the source project. In the navigation menu, click Project Administration Project Administration.
  2. Open the target project. In the navigation menu, click Project Administration Project Administration.
  3. In both source and target projects, click RSS/ATOM Feeds.
  4. Repeat these steps to migrate each RSS/ATOM feed:
    1. In the source project, gather information about a feed.
    2. In the target project, create and configure the feed.
  5. After migrating all feeds, with the RSS/ATOM Feeds page open in both source and target projects, verify that feeds in the target project match the source project.
Gather Information About a RSS/ATOM Feed From the Source Project

Source Perform these steps in the source project.

  1. Switch to the browser with the source project.
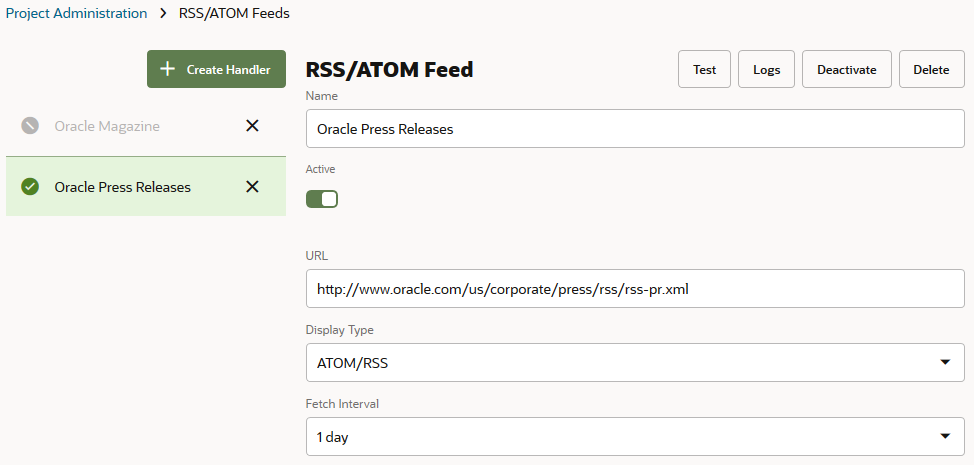
  2. On the RSS/ATOM Feeds page, in the left list, select a feed and note its name, active status, URL, display type, and fetch interval.

    Example:

    RSS/Atom Feeds

    This table shows the Feed Name, Active, URL, Display Type, and Fetch Interval values from the above image.

    Field Value/Status
    Feed Name Oracle Press Releases
    Active Yes
    URL http://www.oracle.com/us/corporate/press/rss/rss-pr.xml
    Display Type ATOM/RSS
    Fetch Interval 1 day
Add a RSS/ATOM Feed in the Target Project

Target Perform these steps in the target project.

  1. Get the details of the RSS/ATOM feeds from the source project. You'll use the information to create RSS/ATOM feeds in the target project.
    Example:
    Field Value/Status
    Feed Name Oracle Press Releases
    Active Yes
    URL http://www.oracle.com/us/corporate/press/rss/rss-pr.xml
    Display Type ATOM/RSS
    Fetch Interval 1 day
  2. Switch to the browser with the target project.
  3. On the RSS/ATOM Feeds page, click + New Handler.
  4. In Name, enter the name of the handler.
  5. In URL, enter the URL of the feed.
  6. In Display Type, select the feed’s display type.
  7. In Fetch Interval, enter the feed’s fetch interval.
  8. Click Create.
  9. On the RSS/ATOM Feeds page, select the feed, and click Test.
    If the test fails, reconfigure the RSS/ATOM feed.
  10. In the navigation menu, click Project Home Project Home.
  11. In the activities feed, verify the feed's results.

Custom Link Rules

You don't need to migrate the default link rules as they are available in the target project.

Follow these steps to migrate link rules:

  1. Open the source project. In the navigation menu, click Project Administration Project Administration.
  2. Open the target project. In the navigation menu, click Project Administration Project Administration.
  3. In both source and target projects, click Links.
  4. Repeat these steps to migrate each link rule:
    1. In the source project, gather information about a rule.
    2. In the target project, create and configure the link rule.
  5. After migrating all link rules, with the Links page open in both source and target projects, verify that link rules in the target project match the source project.
Gather Information About a Link Rule From the Source Project

Source Perform these steps in the source project.

  1. Switch to the browser with the source project.
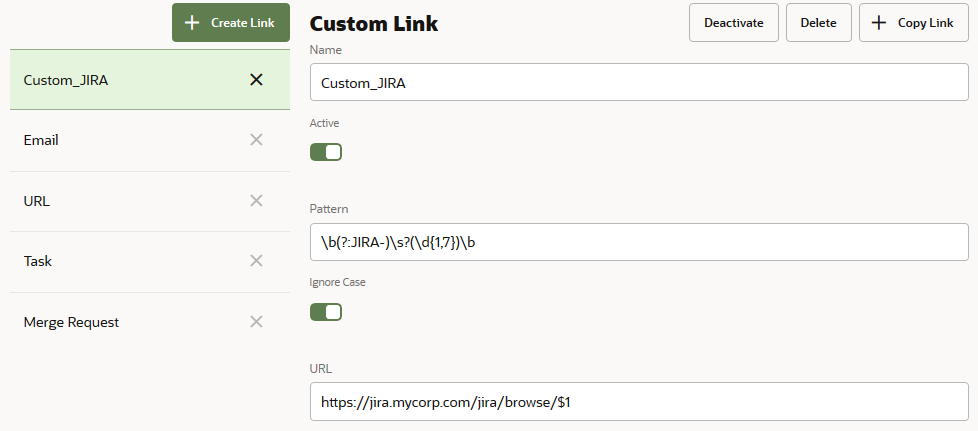
  2. On the Links page, in the left list, select a custom rule and note its name, active status, pattern, ignore case status, and URL. Ignore the default link rules.

    Example:

    Link rule

    This table shows the Rule Name, Active Status, Pattern, Ignore Case, and URL values from the above image.

    Field Value/Status
    Name Custom_JIRA
    Active Yes
    Pattern \b(?:JIRA-)\s?(\d{1,7})\b
    Ignore Case Selected
    URL https://jira.mycorp.com/jira/browse/$1
Create a Link Rule in the Target Project

Target Perform these steps in the target project.

  1. Get the details of a link rule from the source project. You'll use the information to create a link rule in the target project.
    Example:
    Field Value/Status
    Name Custom_JIRA
    Active Yes
    Pattern \b(?:JIRA-)\s?(\d{1,7})\b
    Ignore Case Selected
    URL https://jira.mycorp.com/jira/browse/$1
  2. Switch to the browser with the target project.
  3. On the Links page, click + Create Link.
  4. In Name, enter a name.
  5. Deselect the Active check box, if it wasn't selected in the source project.
  6. In Pattern, enter the RegExp link rule pattern.
  7. In URL, enter the link URL.
  8. Deselect the Ignore Case check box, if it was in the source project.
  9. Expand Test and in Test Value, enter a test value. Verify the result link in Test Result.
  10. Click Create.

Remove Your Membership or Ownership

Before you exported the source project's data, you noted whether you're a member or an owner of the project. If you were not a member or owner, you assigned the project's ownership to yourself. See Gather Information About a Project From the Source VB Studio Instance.

After migrating all artifacts of the source project to the target project, if you were not a member or an owner of the source project, you should remove your membership or ownership of the target project.

Target Perform these steps in the target project.

  1. Get the details of of the source project's ownership and membership.

    Example:

    Field Value
    Project Name Demo Project
    Are you a Member? No
    Are you an Owner? No
  2. Open the target project.
  3. In the navigation menu, click Project Home Project Home.
  4. Click the Team tab.
  5. FIf you were a member but not an owner of the source project, then for your username, click Change Membership the Promote to Owner iconand select your membership type.
  6. If you were not a member or an owner of the source project, then for your username, click Remove Close.

Migrate User Preferences

After migrating a project's artifacts and adding team members, ask each user to sign in to VB Studio and set their user preferences and project preferences.

User Preferences

To migrate your user preferences, note them in the source VB Studio instance and set them again in the target VB Studio instance.

User preferences include your display name, email address, and email notification preferences.

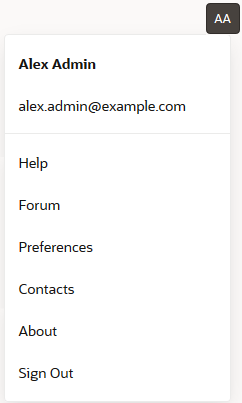
  1. In the source VB Studio instances, click the user avatar, and select Preferences.
  2. Gather information about your preferences.
  3. In the target instance, set them.
  4. After setting preferences, with the User Preferences tab open in both source and target instances, verify that your preferences in the target instance match the source instance.
Gather Information About Your User Preferences From the Source VB Studio Instance

DevCS in OCI Classic Perform these steps in the source VB Studio instance.

  1. Switch to the browser with the source VB Studio instance.
  2. On the User Preferences, click the Profile tab.
  3. Note the values of First Name, Last Name, and Email Address.

    Example:

    Field Value/Status
    First Name Alex
    Last Name Admin
    Email Address alex.admin@example.com
  4. Click the Notifications tab.
  5. Note the selected check boxes only.

    Example:

    Field Value/Status
    First Name Alex
    Last Name Admin
    Email Address alex.admin@example.com
    Selected check boxes in Notifications
    • Issue updates, attachments, and comments
    • Merge Request updates and comments
    • Build activities
    • SCM/Push activities
Set User Preferences in the Target VB Studio Instance

DevCS in OCI Perform these steps in the target VB Studio instance.

  1. Get the details of the user preferences from the source VB Studio instance.

    Example:

    Field Value/Status
    First Name Alex
    Last Name Admin
    Email Address alex.admin@example.com
    Selected check boxes in Notifications
    • Issue updates, attachments, and comments
    • Merge Request updates and comments
    • Build activities
    • SCM/Push activities
  2. Switch to the browser with the target VB Studio instance.
  3. On the User Preferences, click the Profile tab.
  4. Set the name and email address. Changing the name and email address doesn't change your account's name and email, but the display name and display email address on VB Studio pages.
  5. Click the Notifications tab.
  6. Select the check boxes that were selected in the source VB Studio instance.
  7. Click the Authentication tab.
  8. Add the public key of the SSH private-public key pair. You must upload the public key to access a Git repository via SSH.
    If you don't have a key pair, generate it. See Generate an SSH Key in Using Visual Builder Studio.

    If you don't plan to use SSH to access a Git repository, ignore this step.

Project Preferences

To migrate your project preferences, note them in the source project and set them again in the target project.

Project preferences include favorite Git repositories and Agile boards, and the watch settings of branches and jobs.

Git Repositories and Branches
  1. Open the source project. In the navigation menu, click Project Home Project Home.
  2. Open the target project. In the navigation menu, click Project Home Project Home.
  3. In the source and target projects, click the Repositories tab.
  4. Switch to the browser with the source project.
  5. Note the repositories marked as your favorite. You can identify them with the Favorite icon icon.
  6. Switch to the browser with the target project.
  7. In the Repositories tab, click the Favorite the Star iconicon of the repository to mark it as your favorite.
  8. In the source project, click Git Git and then click Refs.
  9. Switch to the browser with the source project.
  10. For each repository in the Repositories list, note the branches you watch. They are marked with the Subscribed the check mark icon.
  11. Switch to the browser with the target project.
  12. In the Refs tab, select the repository and click cc in the branch to watch it.
Jobs
In the source and target projects, open the Builds page and repeat these steps for each job in the source project:
  1. Switch to the browser with the source project.
  2. Click the job's name to open it.
  3. If CCme is CCed, click it and note the states of check boxes in the CC Me dialog box. Click Cancel. Then, follow these steps in the target project:
    1. Switch to the browser with the target project.
    2. Open the same job.
    3. Click CCme. In the CC Me dialog box, select the check boxes as noted, and click OK.
    4. Switch to the browser with the source project.
Agile Boards
  1. In the source project's navigation bar, click Boards Boards.
  2. In the target project's navigation bar, click Boards Boards.
  3. Note the boards marked as your favorite. You can identify them with the Favorite icon icon.
  4. Switch to the browser with the target project.
  5. For the boards marked as favorite in the source project, click the Favorite the Star iconicon to mark it as your favorite.