Lock and Unlock a Deployed Visual Application

After your visual application goes live, you have the option to lock and unlock the deployed visual application and the apps it contains. Use this option when you have maintenance tasks to complete and don’t want users accessing web apps in the deployed visual application during the maintenance period.

Lock/unlock is available when you've deployed a live version of your application, that is, live appears in the application URL instead of the application version.

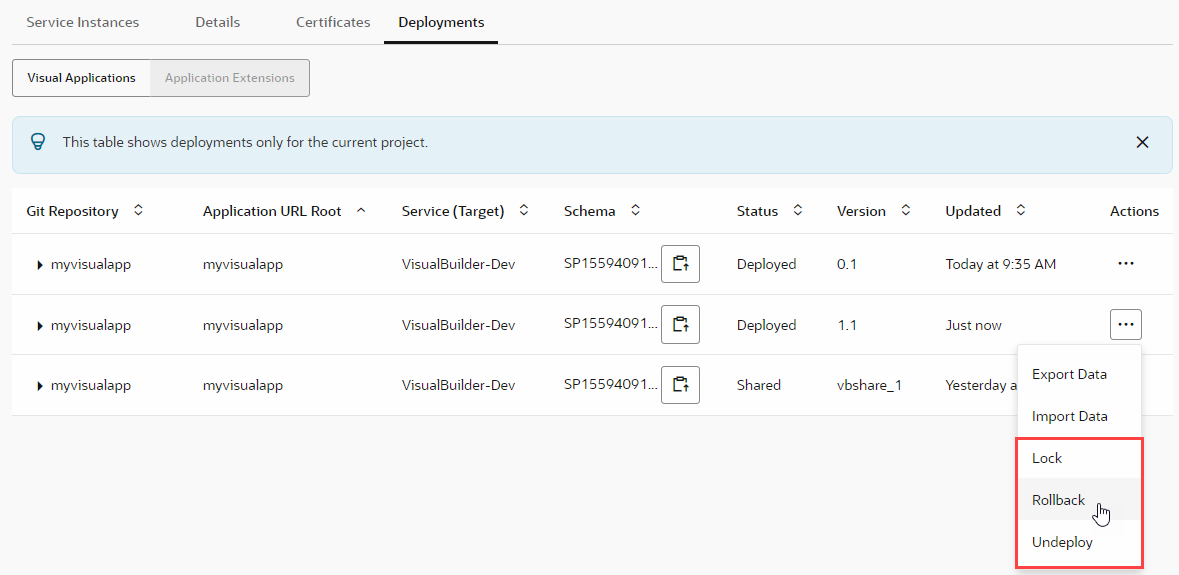
  • If your visual application was deployed to a Visual Builder instance in the same identity domain as your VB Studio instance, you can manually lock and unlock the application from your environment's list of deployments:
    1. In the VB Studio left navigator, click Environments Environments.
    2. If necessary, select the environment where the visual application was deployed to, then click Deployments.
    3. From the deployed application's Actions Three horizontal dots menu, select Lock, then confirm your selection:

      Take note of the application's Status, which changes from Deployed to Deployed (Locked). Users accessing a web app from this visual application should now see a message that the application is locked for maintenance.

      Tip:

      You can display a custom locked page when users try to access an application that you've locked for maintenance—but you'll need to create the page and add it to the visual application or web application before locking the application. See Create a Custom Lock Page.
    4. When maintenance is complete, click Unlock from the deployed visual application's Actions Three horizontal dots menu and confirm your selection.
      The application's Status changes to Deployed , and web apps within the visual application should now be available to users.
  • If your visual application is deployed to a Visual Builder instance in a different identity domain (say, a production instance) or the instance was added to an environment through credentials, you'll need to add and configure steps in a build job to lock and unlock the application:
    1. In the VB Studio left navigator, click Builds Builds.
    2. Click + Create Job. Give the job a new name and a description, select the build executor template, then click Create.
    3. On the Job Configuration page, click Steps.
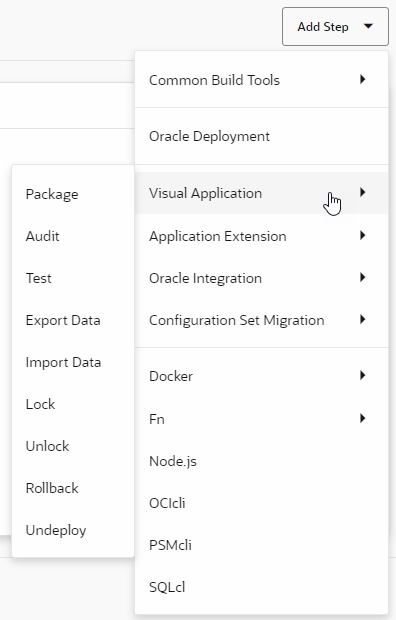
    4. Click Add Step, select Visual Application, then select Lock.

    5. In Instance, select the Visual Builder instance where the application was deployed to.
    6. In the Authorization section, Use OAuth is selected by default. You can also select Use Basic, but OAuth is the recommended authorization method. You should use Basic authentication only if you run into issues with setting up an OAuth connection.
      • With Use OAuth selected, the Authorization is required message indicates that this build step needs to be authorized, which you can do either by clicking Authorize or by running the build manually and entering the credentials when prompted. After authorization, the Authorization has been provided message shows.
      • With Use Basic selected, enter your Visual Builder instance credentials in Username and Password.
    7. In Application URL Root and Application Version, enter the visual application's root URL and its version. You can find this information from the Deployments tab of the environment where the visual application is deployed.
    8. Click Save.
    9. To run the build job, click Build Now.
    10. When maintenance is complete, repeat the steps to add an Unlock build step and run the build.