Built-in Actions

VB Studio provides a set of built-in actions that you use to create your action chain.


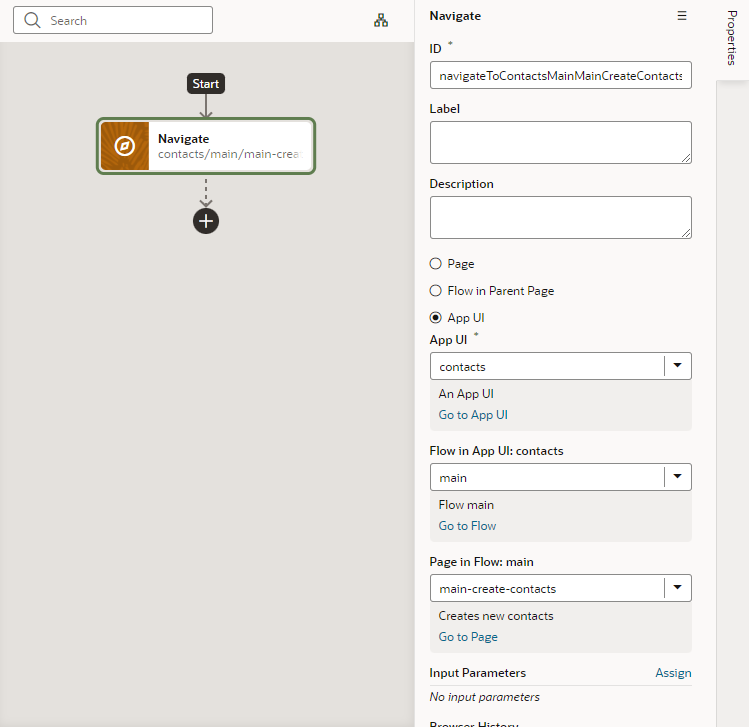
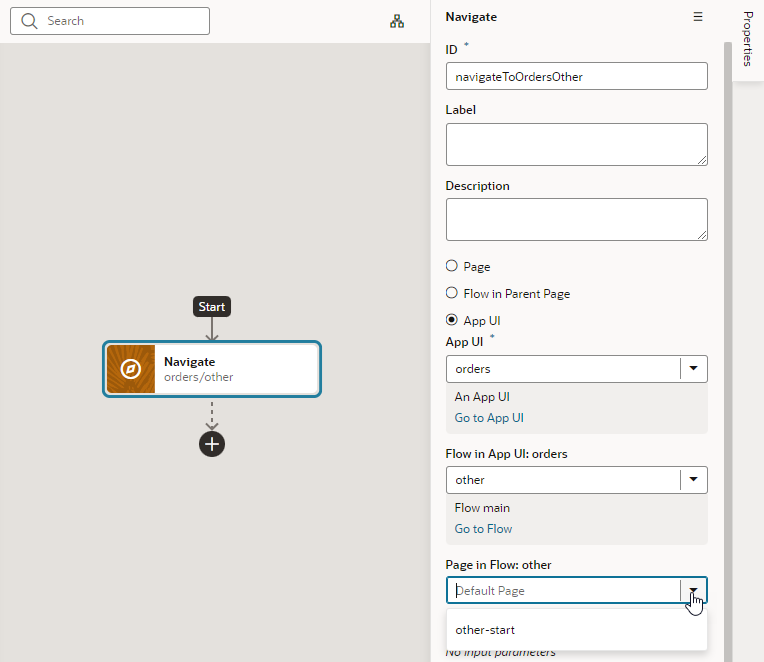
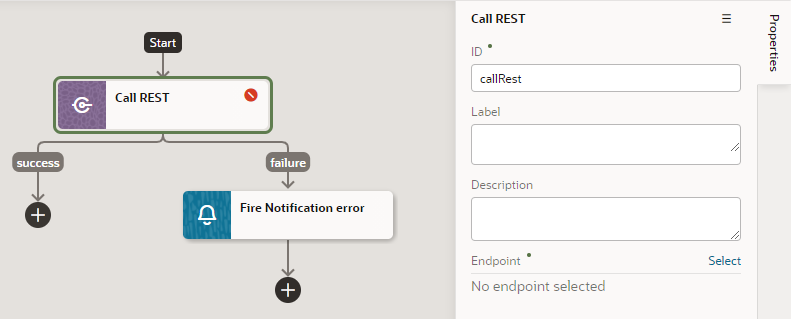
Each action performs a specific function and requires you to set different properties. For example, when you add the Call REST endpoint action to your action chain, you need to specify the endpoint and other details about the response to the Call REST endpoint action. Similarly, when you add the Navigate action to an action chain, you are required to select a page that the action navigates to, as shown here:


Regarding an action's output, an action can have multiple potential outcomes (such as success or failure, or a branch), and it can return results. For more details, refer to Action Results in the Oracle Visual Builder Page Model Reference guide.

Use this section to learn more about the steps particular to a built-in action.

Note:

Some built-in actions might be deprecated over time. To view actions deprecated in the latest release of VB Studio, use the Show Deprecated option in the Actions palette's menu. The actions will show up in the actions palette, but won't be updated any more. The Show Deprecated option gives you time to move away from deprecated actions in your action chains.

Add an Assign Variables Action

You add an Assign Variables action to an action chain to map the source of some value to a variable. The variable can be used by other action chains or bound to a component.

For example, if your action chain sends a request to a GET endpoint, you can use the Assign Variables action to map the response to a page variable bound to a page component. Or, suppose you want to capture the ID of an item selected in a list. You could use a Selection event to start an action chain that assigns the selected item’s ID to a variable.

To add an Assign Variables action to an action chain:

  1. Open the Action Chain editor for the page.
  2. Create an action chain, or open an existing action chain to add the action in the editor.
  3. Drag Assign Variables from the Actions palette into the action chain.

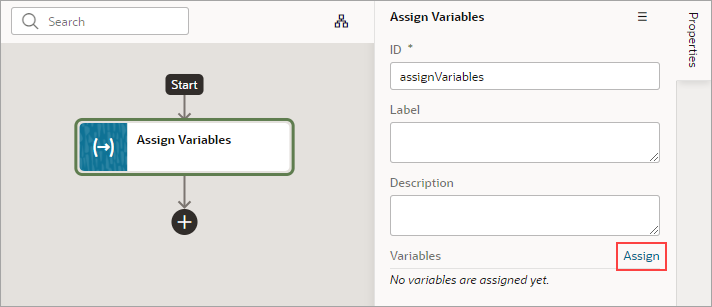
    You can drag the action onto the Add icon ( Add icon ) in the action chain, or between existing actions in the chain. The properties pane opens when you add the action to the chain.
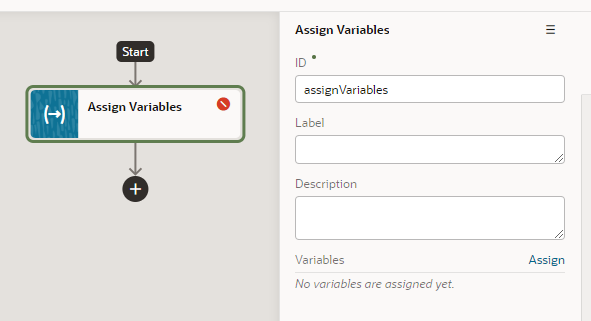
    Description of action-chain-editor-assignvariable.png follows
    Description of the illustration action-chain-editor-assignvariable.png

    The Assign Variables action is badged with a warning icon when no variables have been assigned.

  4. Update the ID field in the Properties pane to make the action more easily identifiable.
  5. Click Assign in the properties pane to open the Assign Variables window to map the source of the value to a page variable.
  6. Drag the sources of the values in the Sources pane onto targets in the Targets pane. Click Save.

    Each target can only be mapped to one source, but you can use the action to assign multiple variables. For example, you might want to map a value from the Chain in the Sources pane, such as an input variable or the result of an action, to a Page variable or to the input of another action in the Target pane. When you select the variable in the Target pane, the expression editor in the dialog box displays the expression for the source.

    If you need to define the variable, use the + icon to open a dialog where you can define a variable for the artifact (action chain, page, flow, or application).
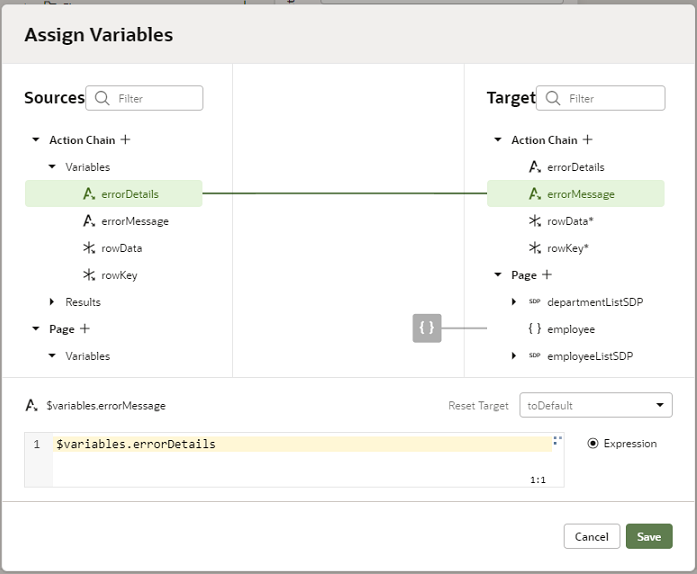
    Description of action-chain-editor-assignvariable-mapdialog.png follows
    Description of the illustration action-chain-editor-assignvariable-mapdialog.png

Use Filter Builder to Create Filter Criteria for an SDP

If you're using an SDP to provide a table or list's data, and you'd like to filter out rows, you can use the Assign Variable action to create and assign the filter criteria to the SDP's filterCriterion property. For further details about using an SDP to filter a table or list's rows, see Filter Data by Filter Criteria

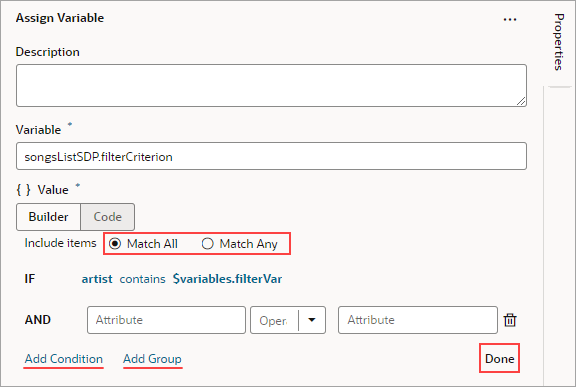
When the Assign Variable action's Variable property is set to an SDP's filterCriterion property, the Filter Builder appears under the Variable property for you to create the filter criterion.

To set the action's Variable property to an SDP's filterCriterion property:
  1. In the Properties pane, click Assign to open the Assign Variables window:

  2. In the Target pane, open the node for the SDP that's connected to your table or list, and select its filterCriterion property.

    When an SDP's filterCriterion property is selected in the Target pane, the Filter Builder appears for you to create the filter criterion. Alternatively, you can expand the SDP's filterCriterion property in the Target pane and build your filter by specifying values for the attribute, op, and value properties.

    To directly work with the code, click the Code button. For details, see Filter Builder's Code Editor.
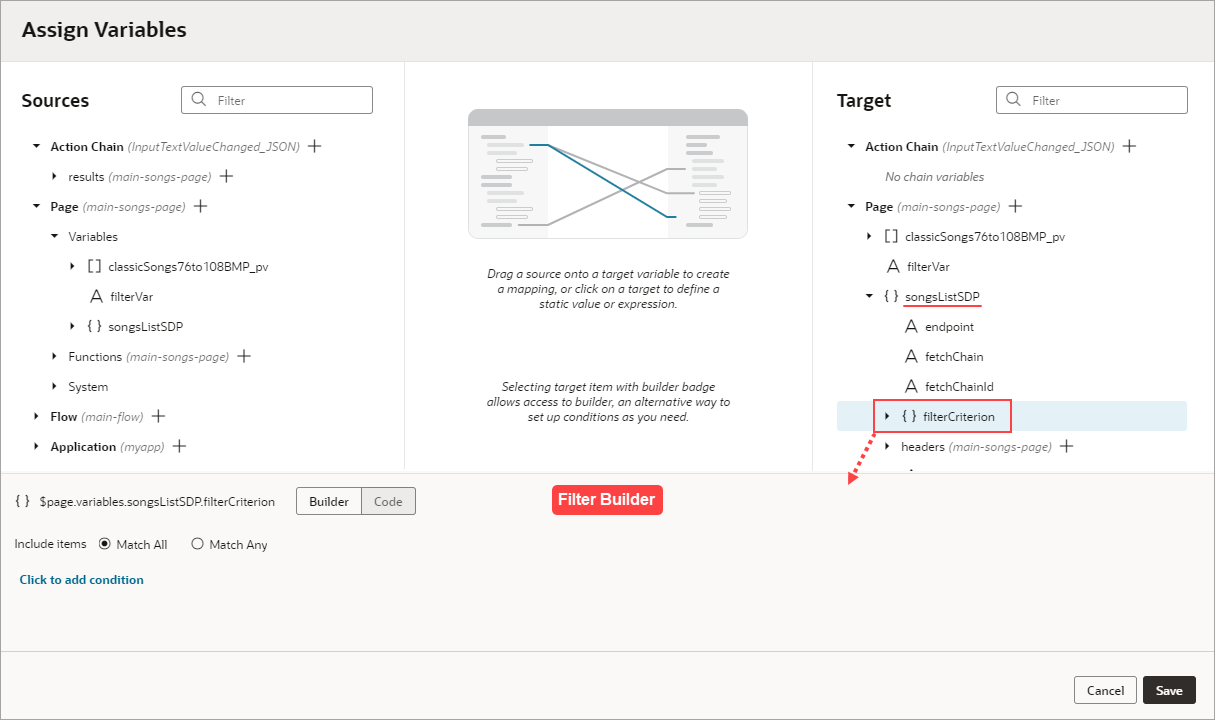
    Description of filter-builder-assign.png follows
    Description of the illustration filter-builder-assign.png

To use the Filter Builder to create the filter criterion for the SDP:

  1. Click the Filter Builder's Click to add condition link. To create the filter criterion:
    1. For the first Attribute textbox, enter the name of the column (record field) that you want to compare its values against the user's inputted value.
    2. For the Operator drop-down list, select the operator for the criterion.
    3. For the second Attribute textbox, select the page variable that was bound to the Input Text component.

    4. To add another condition, click the Add Condition link to add a condition with an AND or OR operator, or click the Add Group link to add a group of conditions that are to be evaluated together (conditions enclosed in brackets). To combine conditional expressions with the AND operator, select Match All, and to combine them with the OR operator, select Match Any:

    5. Click Done when you're finished.

Filter Builder's Code Editor

You can use the Filter Builder's Code tab to view and edit the filter's code. After defining a condition on the Builder tab, you will see that the Code tab contains an attribute, op and value property.

Here's an example of a filter with two conditions combined by an AND operator:

{
 "op": "$and",
 "criteria": [
  {
   "op": "$eq",
   "attribute": "name",
   "value": "{{ $page.variables.filterVar }}"
  },
  {
   "op": "$eq",
   "attribute": "id",
   "value": "{{ $page.variables.idVar }}"
  }
 ]
}
In this example:
  • The Oracle JET operator is "$eq" (it must include the dollar sign (“$”)).
  • The attribute property is set to the name of the field (column) that you want to be evaluated against the value property.
  • The value property ($page.variables.customerListSDP.filterCriterion.criteria[0].value) is mapped to a page variable ($page.variables.filterVar) that holds the value to be evaluated against each field (column) value.

Add a Call Action Chain Action

You add a Call Action Chain action to an action chain to start a different action chain. The action can call other action chains defined in the same page, parent flow, or App UI.

Note:

You can call a JSON action chain from a JavaScript action chain using this action; however, you can't call a JavaScript action chain from a JSON action chain.

To add a Call Action Chain action:

  1. Open the Actions editor for the page.
  2. Create an action chain, or open an existing action chain to add the action in the editor.
  3. Drag Call Action Chain from the Actions palette into the action chain.

    You can drag the action onto the Add icon ( Add icon ) in the action chain, or between existing actions in the chain. The properties pane opens in the editor when you add the action to the chain.


    Description of action-chain-editor-callactionchain.png follows
    Description of the illustration action-chain-editor-callactionchain.png
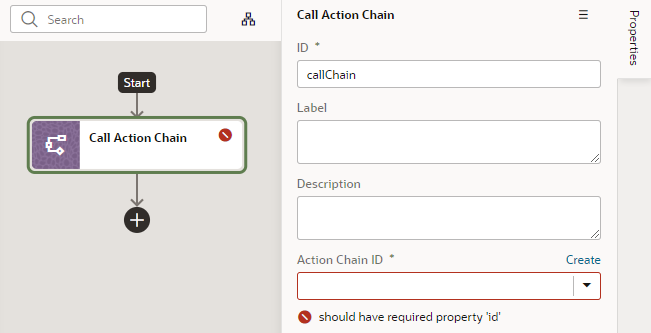
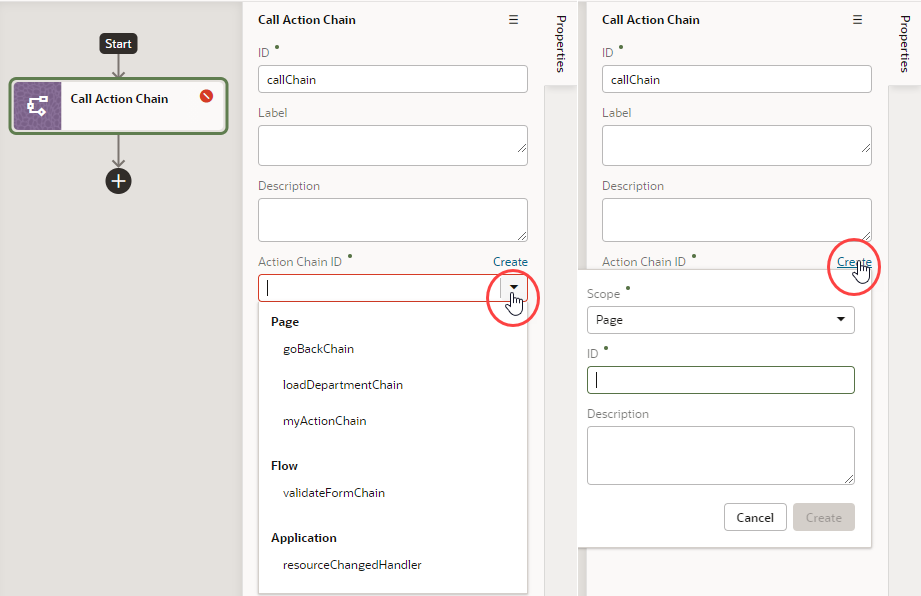
  4. Select an existing action chain from the drop-down list of available action chains, or click Create to create a new action chain.

    The dialog where you create the new action chain to call displays a drop-down list where you choose where to define the scope of the new action chain (Page, Flow, or Application for App UI). Depending on where you are creating the action chain, the drop-down list might have entries for action chains defined in the page, in the current flow, or in the App UI. If you are creating an action chain in a flow artifact, you can only select other action chains defined in the same flow artifact or in the App UI artifact, and you will not see an entry for Page action chains.


    Description of action-chain-editor-selectactionchain.png follows
    Description of the illustration action-chain-editor-selectactionchain.png
  5. Optional: If the action chain that is called requires input parameters, click Assign in the Input Parameter section of the properties pane to map the input parameter to a variable.

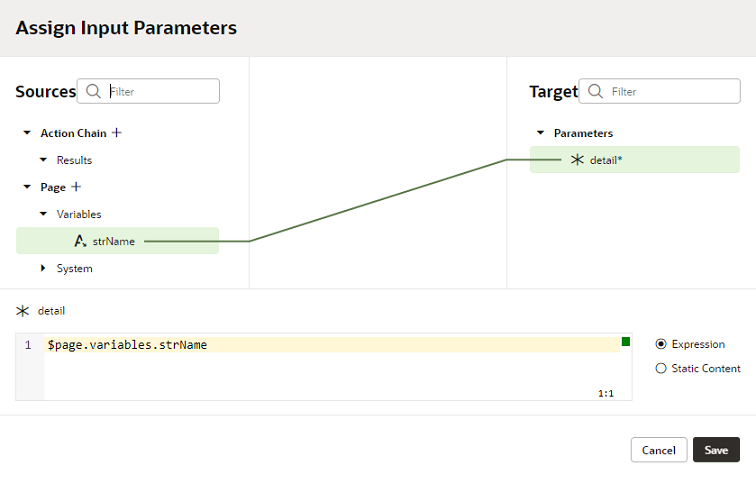
    You map variables to parameters by dragging the variable for the source value in the Sources pane onto the Parameter for the input parameter in the Target pane. If a suitable variable does not exist, use the + icon beside the relevant node (Action Chain, Page, and so on) to create a new variable. Click Save.


    Description of action-chain-editor-callactionchain-map.png follows
    Description of the illustration action-chain-editor-callactionchain-map.png

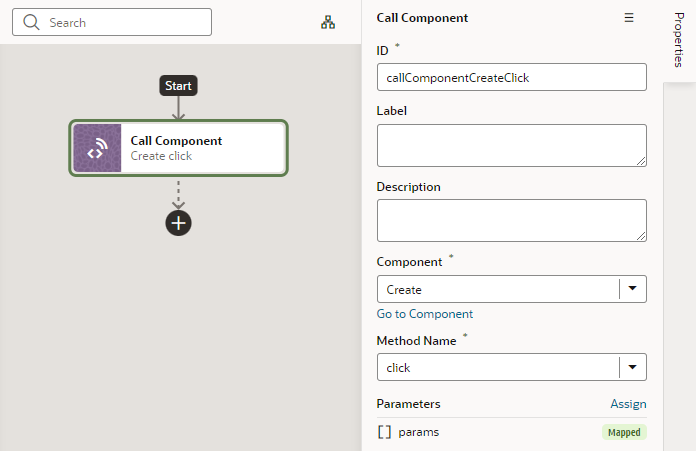
Add a Call Component Action

You add a Call Component action to an action chain to call a method on a component.

To add a Call Component action to an action chain:

  1. Open the Actions editor for the page or application.
  2. Create an action chain, or open an existing action chain to add the action in the editor.
  3. Drag Call Component from the Actions palette into the action chain.

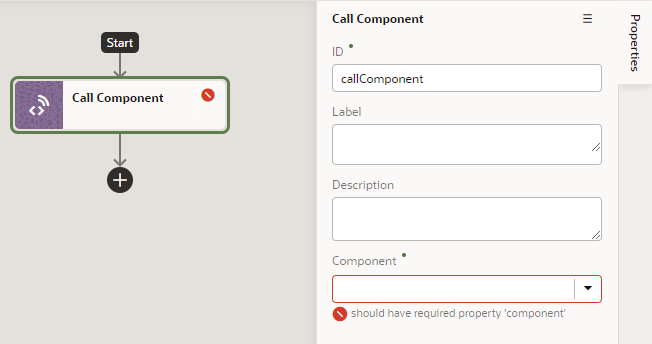
    You can drag the action onto the Add icon ( Add icon ) in the action chain, or between existing actions in the chain. The properties pane opens when you add the action to the chain.


    Description of action-chain-editor-callcomponentmethod.png follows
    Description of the illustration action-chain-editor-callcomponentmethod.png
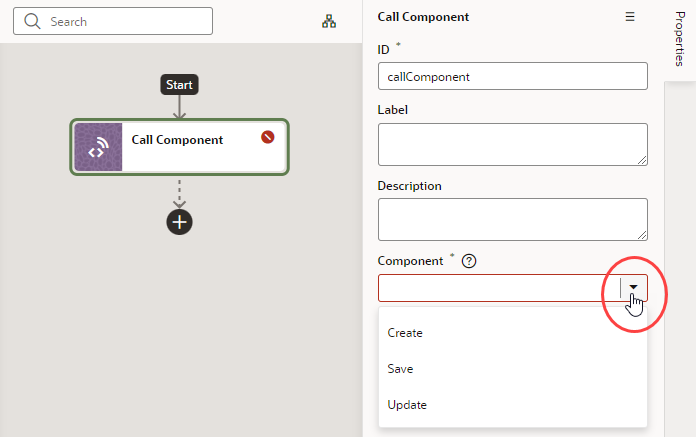
  4. In the Properties pane, select the component name in the Component drop-down list.

    For example, if your page contains three buttons whose IDs are Create, Update, and Save, you'll see those options available for selection in the drop-down list:
    Description of action-chain-editor-callcomponentmethod-selectcomponent.png follows
    Description of the illustration action-chain-editor-callcomponentmethod-selectcomponent.png

  5. With the component selected, select or enter the Method Name, then click Assign to map the parameters required by the method.

Add a Call Function Action

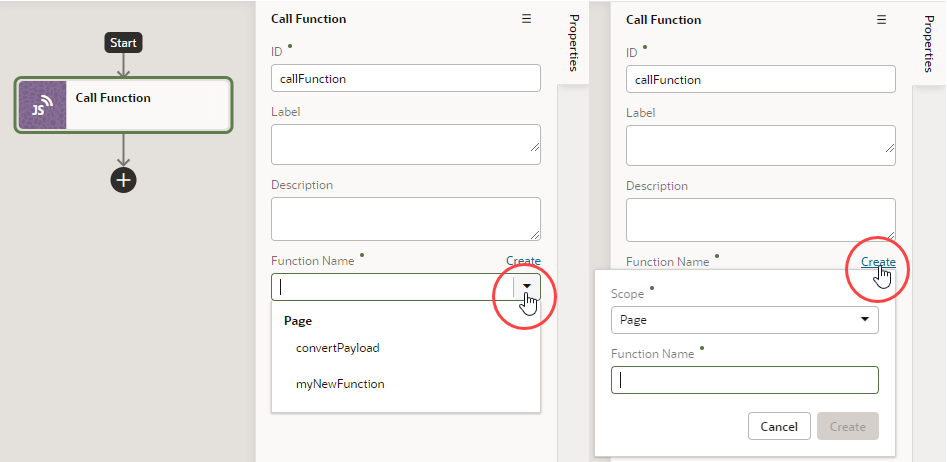
You add a Call Function action to an action chain to call a function defined for the current page, current flow, or the application. You create and edit module functions in the JavaScript editor.

To add a Call Function action to an action chain:

  1. Open the Actions editor for the page or application.
  2. Create an action chain, or open an existing action chain to add the action in the editor.
  3. Drag Call Function from the Actions palette into the action chain.

    You can drag the action onto the Add icon ( Add icon ) in the action chain, or between existing actions in the chain. The properties pane opens when you add the action to the chain.

  4. In the Properties pane, select an existing function from the drop-down list of available functions, or click Create to create a new function.

    You can select functions that are defined for the current page, the current flow, or for the application.


    Description of action-chain-call-modulefunction.png follows
    Description of the illustration action-chain-call-modulefunction.png
  5. Click Go to Module Function to go to the JavaScript editor where you write or modify code for the function.
  6. Specify any input parameters and return type for the function in the properties pane.

    You can click Assign to map variables to the parameters. If a suitable variable does not exist, use the + icon beside the relevant node (Action Chain, Page, and so on) to create a new variable.

Add a Call REST Action

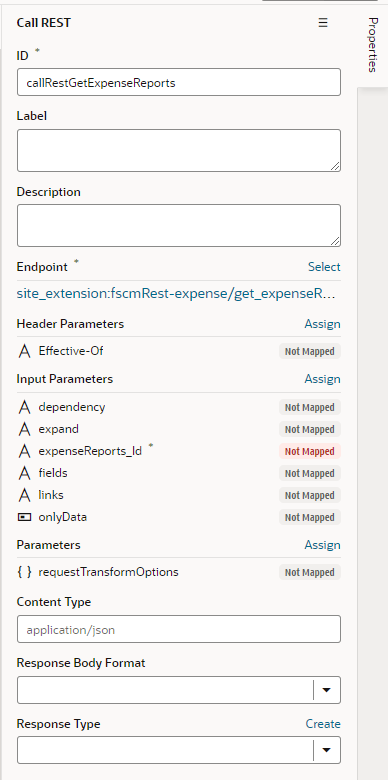
When you add a Call REST action to an action chain, you might need to specify input parameters for the endpoint request or create variables for the endpoint response that you can bind to page components.

When you add the Call REST action to an action chain, the endpoint that you select will depend upon the functions that are available. Depending on the function, you might also need to create some variables to map to the action’s parameters, such as input parameters and the action’s results. For example, an endpoint might require an ID to identify a record. In this case, you will need to create a page variable that stores the ID, and that variable needs to be mapped to the action’s input parameter. If you did not create the variables before creating the action chain, you can create a variable during the process of creating the action chain; you can also edit the action chain after creating the variables you need.

You will use the Call REST endpoint action in action chains that perform typical functions such as creating, updating, and deleting records, and any time you want to display the details of a record in a page. You can use the Quick Starts to help you create the action chains and variables for these functions.

Type of Endpoint Typical Requirements
POST

When you call a POST endpoint, you will typically need:

  • Parameters: The page variable for the data needs to be mapped to the parameters of the payload of the POST call.

  • No input parameter is required.

GET

When you call a GET endpoint, you will typically need:

  • Input parameter: The ID of the record you want to retrieve should be passed as an input variable.

  • The payload of the GET call needs to be assigned to a variable using the Assign Variable action.

When you want to send a request to a GET endpoint to retrieve a collection, you will typically use a page variable of the type ServiceDataProvider.

DELETE

When you call a DELETE endpoint, you will typically need:

  • Input parameter: The ID of the record you want to delete should be passed as an input variable.

  • There is no payload when calling a DELETE endpoint.

PATCH

When you call a PATCH endpoint, you will typically need:

  • Input Parameter: The page variable storing the ID of the record you want to update should be mapped to the Input Parameter.

  • Parameters: The page variable for the updated data needs to be mapped to the parameters of the payload of the PATCH call.

To add a Call REST endpoint to an action chain:

  1. Open the Actions editor for the page.
  2. Click the action chain in the list to open it in the Action Chain editor.
  3. Drag Call REST from the Actions palette into the action chain.

    You can drag the action onto the Add icon ( Add icon ) in the action chain, or between existing actions in the chain. The properties pane opens when you add the Call REST endpoint action to the action chain.


    Description of action-chain-editor-selectendpoint.png follows
    Description of the illustration action-chain-editor-selectendpoint.png
  4. Click Select beside the Endpoint property in the properties pane.

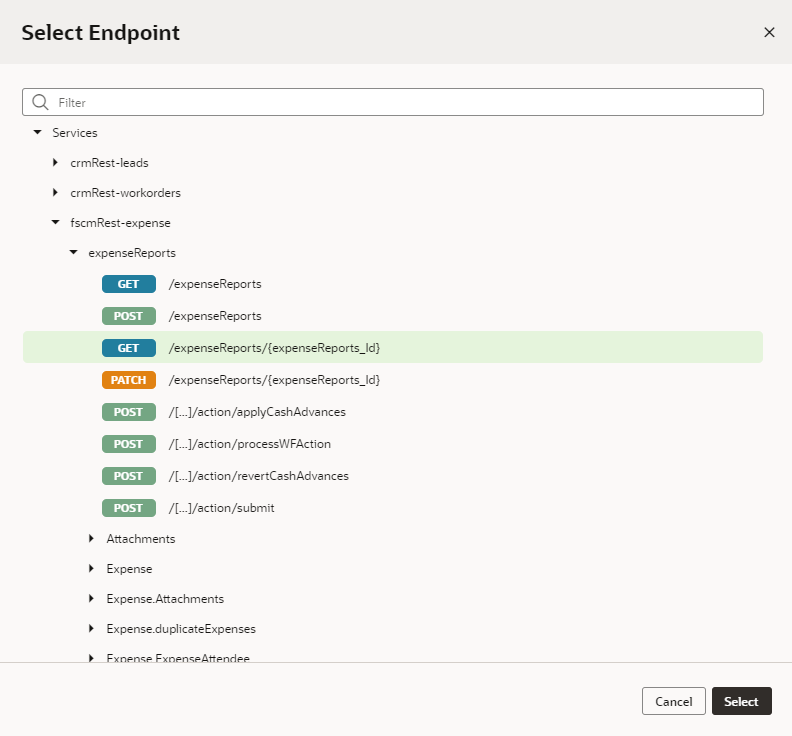
    The Select Endpoint window displays a list of the endpoints that are available in your application. Each business object and service usually exposes multiple endpoints. The endpoint that you select will depend upon the function of the action chain. The endpoint that you select will also determine the properties that you will need to specify for the action, for example, input parameters.


  5. Select an endpoint from the list. Click Select.
  6. Edit the action’s properties in the properties pane.

    The properties pane is displayed when the action is selected on the canvas.


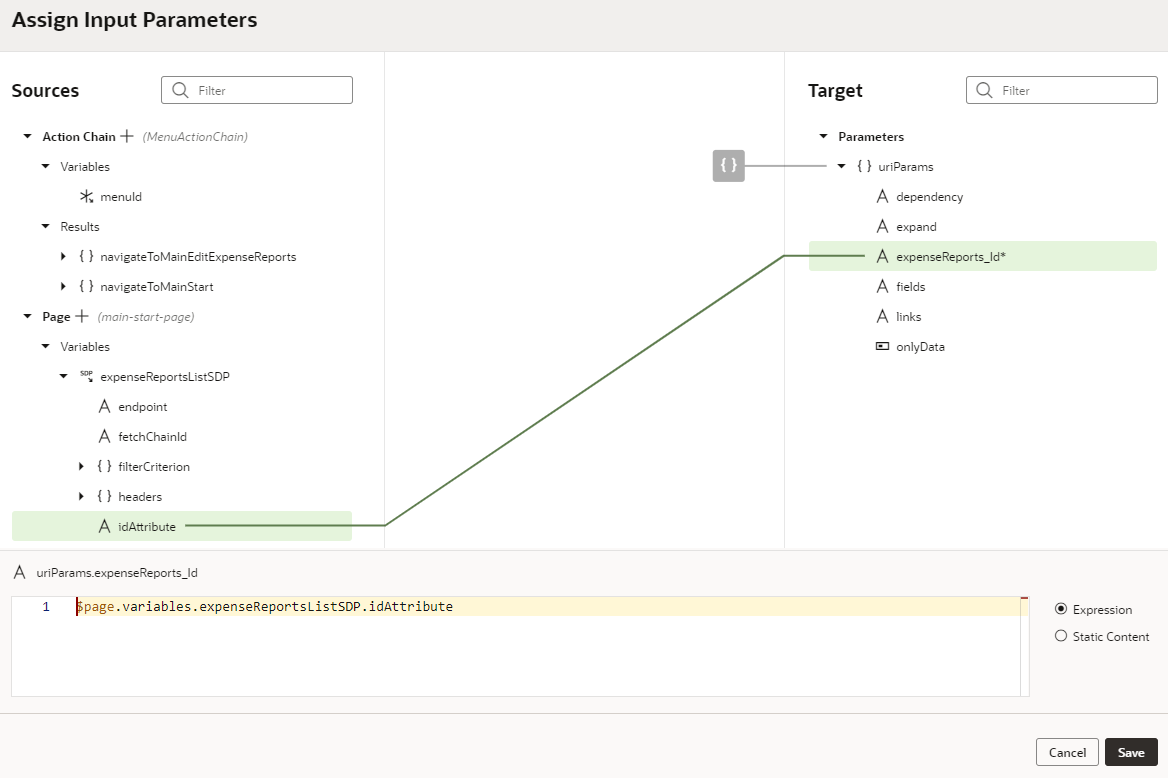
  7. Optional: If the REST call requires input parameters, click Assign next to Input Parameters to map the variable for the input value to the action’s parameter. Click Save.

    You map variables to parameters in the Assign Input Parameters window by dragging the variable in the Sources pane onto the parameter in the Target pane. In some cases, you might need to make multiple mappings. To delete a line mapping a variable to a parameter, place your cursor on the line and then right-click to open a Delete option. You can select the parameter name to view the expression for the mapped variable.
    Description of action-chain-map-inputparameters-appui.png follows
    Description of the illustration action-chain-map-inputparameters-appui.png

    If a suitable variable does not exist, use the + icon beside the relevant node (Action Chain, Page, and so on) to create a new variable.

  8. Optional: If the REST call requires other parameters, click Assign in the Parameters section to open the window for mapping the variables to the action’s parameters. Click Save.

    If the structure and names of attributes match, they can be automapped. The mapping can also be done individually.

  9. Optional: Specify any other parameters that may be required for the action.
After adding the Call REST endpoint action, you can continue by adding more actions to the action chain, or by invoking the action chain from an event. If the REST call has a result, you might want to add a Fire Notification action, or add Assign Variables to the chain and map the result to a page variable.

Add a Call Variable Action

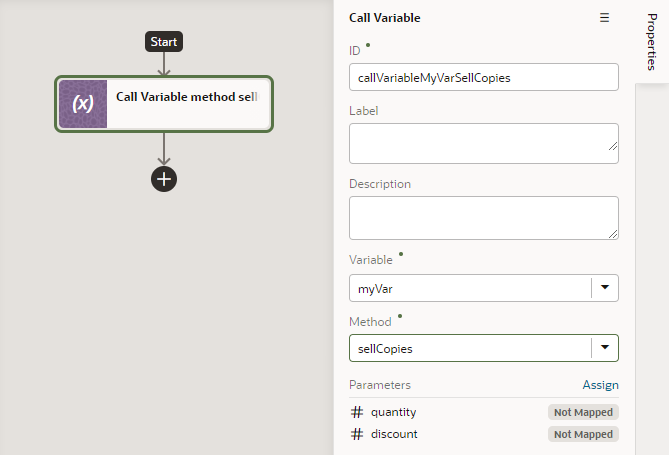
You add a Call Variable action to an action chain to call a method on an InstanceFactory variable defined for the current container (flow, page, or application). You can use this action to call any method on the current instance associated with the InstanceFactory variable, including asynchronous ones.

Note:

Because actions are by design synchronous, it will wait for the asynchronous call to resolve before proceeding to the next action in the chain.

Before you use a Call Variable action in an action chain, make sure an InstanceFactory type variable is already defined for the application. See Create a Type From Code.

To add a Call Variable action to an action chain:

  1. Open the Actions editor for the application.
  2. Create an action chain, or open an existing action chain to add the action in the editor.
  3. Drag Call Variable from the Actions palette into the action chain.

    You can drag the action onto the Add icon ( Add icon ) in the action chain, or between existing actions in the chain. The properties pane opens when you add the action to the chain.

  4. Update the ID field in the Properties pane to make the action more easily identifiable.
  5. From the Variables drop-down list, select an InstanceFactory type variable defined for the application.
  6. In the Method field, select the method you want to call. The available methods are based on the definition file imported for the type.
  7. Click Assign to open the Assign Parameters window, then map variables to the action's parameters by dragging the variable in the Sources pane onto the parameter in the Target pane. If a suitable variable does not exist, use the + icon to create a new variable.

    The method's return value will be part of the outcome passed to the subsequent chain.

Add a Fire Data Provider Event Action

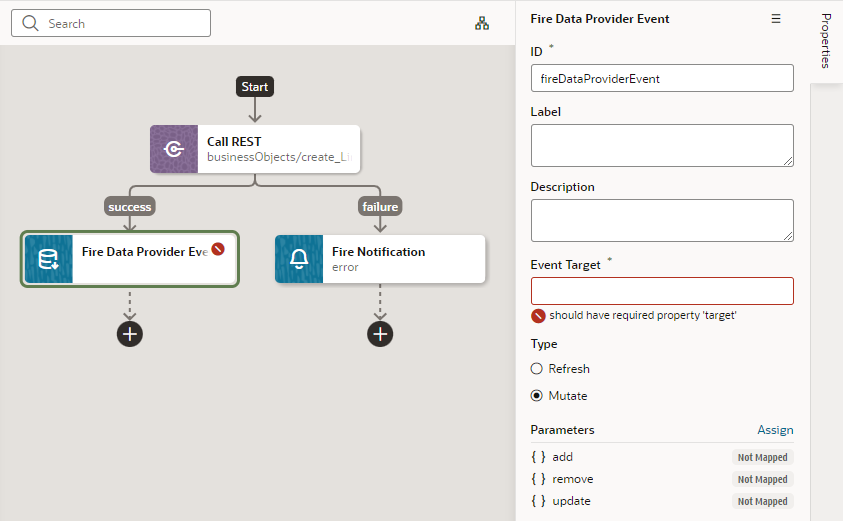
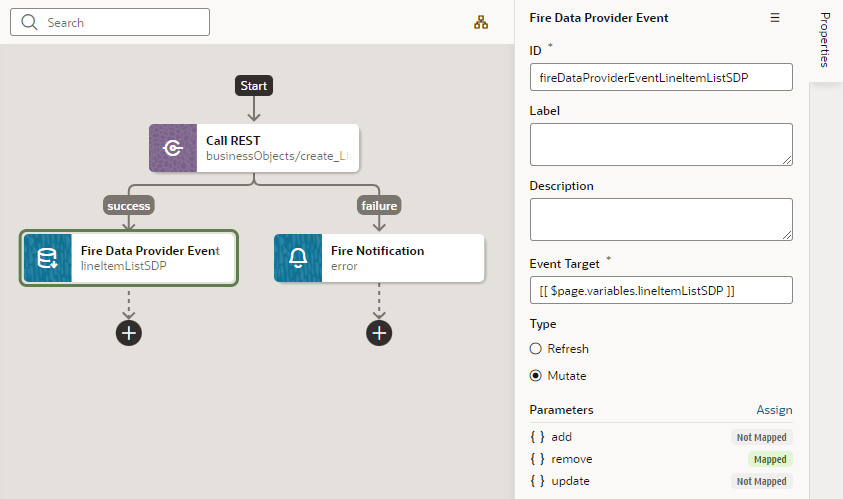
You add a Fire Data Provider Event action to dispatch an event on a data provider to reflect changes to your data. For example, a component using a particular ServiceDataProvider may need to render new data because new data has been added to the endpoint used by the ServiceDataProvider.

To add a Fire Data Provider Event action to an action chain:

  1. Open the Actions editor, for example, at the page level.
  2. Create an action chain, or open an existing action chain to add the action in the editor.
  3. Drag Fire Data Provider Event from the Actions palette into the action chain.

    You can drag the action onto the Add icon ( Add icon ) in the action chain, or between existing actions in the chain. The Properties pane opens when you add the action to the chain.


  4. Update the ID field in the Properties pane to make the action more easily identifiable.
  5. Set the target of the event. Usually, this is a variable of type ServiceDataProvider or ArrayDataProvider.
  6. Select the type of event you want to dispatch:
    • Refresh: Indicates a refresh event needs to be dispatched to the data provider identified by the target.
    • Mutate: Indicates a mutation event needs to be dispatched to the data provided identified by the target. Generally, a mutation event is raised when items have been added, updated, or removed from the data that the data provider represents.
  7. If you chose a Mutate event, click Assign to map variables for the add, remove, and update operations.

    A mutation event can include multiple operations (add, update, remove) as long as the id values between operations do not intersect.


Add a Fire Event Action

You add a Fire Event action to invoke a custom event that you have defined in your application.

A custom event can be defined in an application, flow or page, and can be used to perform some action, such as navigating to a page. A custom event can carry a payload that you define when you create the event. The Events editor displays a list of the custom events available in the context.

To add a Fire Event Action:

  1. Open the Actions editor for the page or application.
  2. Create an action chain, or open an existing action chain to add the action in the editor.
  3. Drag Fire Event from the Actions palette into the action chain.
  4. In the Properties pane, select an existing custom event from the drop-down list of available custom events, or click Create to create a new custom event.

    The drop-down list displays the custom events that are available in the current context.

  5. Click Assign to open the Mapper and define the event's payload.

    The event payload depends upon how the custom event is defined. You can use the Mapper to map the payload to a source, such as a page variable, or define a specific value or expression.

    If you need to define the variable, use the + icon to open a dialog where you can define a variable for the artifact (action chain, page, flow, or application).

Add a Fire Notification Action

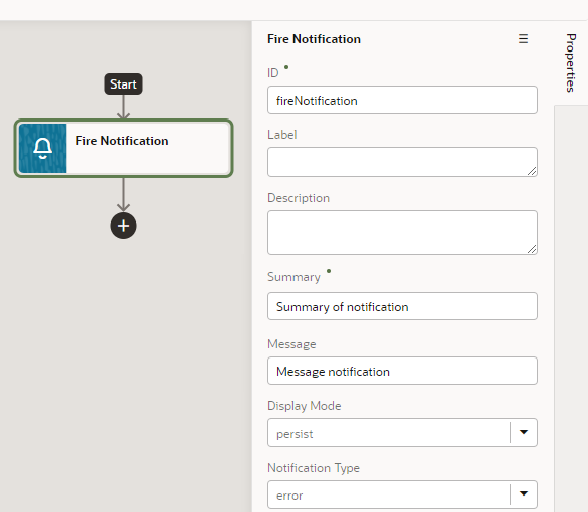
You add a Fire Notification action to display a notification to the user in the browser window.

There are four types of notifications: Info, Error, Warning and Confirmation. The notifications display a summary and a message underneath:
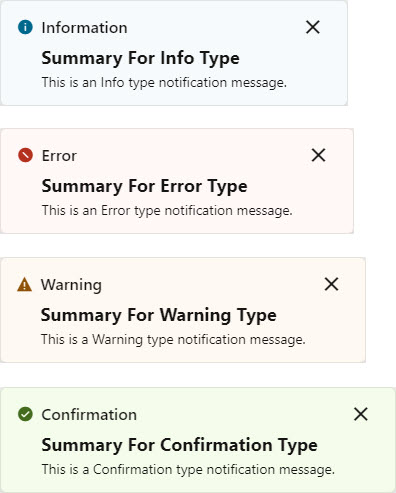
Description of jac-notification-type-examples.jpg follows
Description of the illustration jac-notification-type-examples.jpg

To add a Fire Notification action:

  1. Drag Fire Notification from the Actions palette onto the empty canvas, onto an Add icon ( Add icon), or between existing actions in the chain. The Properties pane displays the action's parameters:
    Description of action-chain-editor-firenotification.png follows
    Description of the illustration action-chain-editor-firenotification.png
  2. Update the ID field in the Properties pane to make the action more easily identifiable.
  3. Enter a summary of the notification in the Summary field.
  4. Enter the message you want to display in the Message field.

    The message can be a static string (The name was updated.) or can contain variables ({{ 'Could not create new Contacts: status ' + $chain.results.createContacts.payload.status }}).

  5. For Display Mode, specify how the notification is to be dismissed. Choose Transient for the notification to go away on its own after a few seconds, or Persist for the notification to stay until the user closes it.
  6. Select a Notification Type to specify the look of the notification window.
  7. Select the Target to specify where you want the event to be fired. Choose current to have the event fire where it is executed and then all the way up the hierarchy. Choose leaf (or leave the setting undefined) to have the event fire at the bottom of the hierarchy.

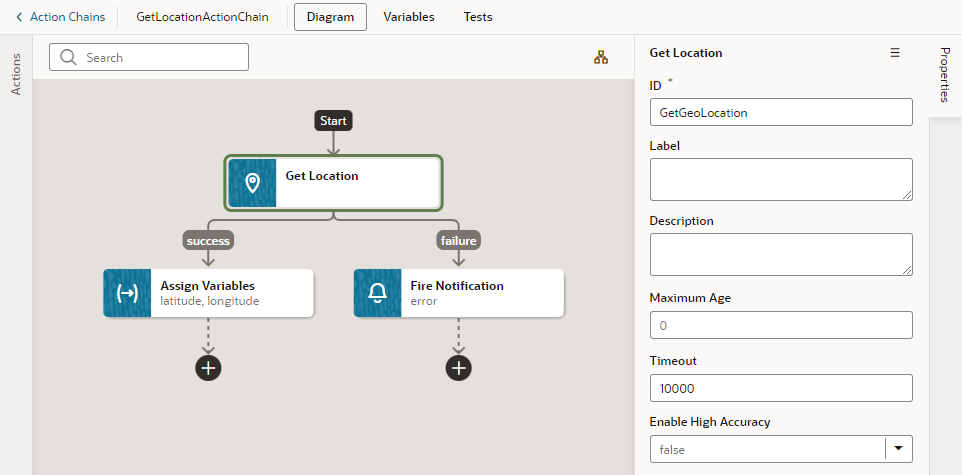
Add a Get Location Action

You add a Get Location action to get a user’s live location. This action requires the user's consent. As a best practice, it should only be fired on a user gesture, so users can associate the system permission prompt for access with the action they just initiated.

To add a Get Location action to an action chain:

  1. Open the Actions editor, for example, at the page level.
  2. Create an action chain, or open an existing action chain to add the action in the editor.
  3. Drag Get Location from the Actions palette into the action chain.

    You can drag the action onto the Add icon ( Add icon ) in the action chain, or between existing actions in the chain. The Properties pane opens when you add the action to the chain.


  4. Update the ID field in the Properties pane to make the action more easily identifiable.
  5. Set the Maximum Age (in milliseconds) of a possible cached position that is acceptable to return. If set to 0 (default), it means that the device cannot use a cached position and must attempt to retrieve the real current position. If set to Infinity, the device must return a cached position regardless of its age.
  6. Set the Timeout value, representing the maximum length of time (in milliseconds) that the device is allowed to take in order to return a position.
  7. Set the Enable High Accuracy value that indicates whether the application would like to receive the best possible results. If true and if the device is able to provide a more accurate position, it will do so. This can result in slower response times or increased power consumption. If false (default), the device can save resources by responding more quickly or using less power. For mobile devices, you should set this to true in order to use GPS sensors.

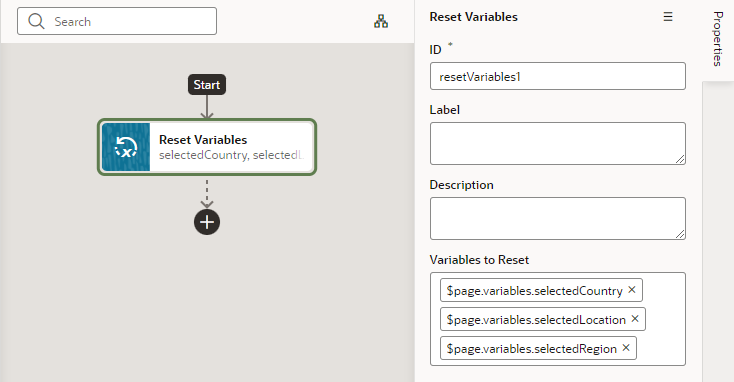
Add a Reset Variables Action

You add a Reset Variables action to reset variables to their default values, as specified in the variable definitions.

To add a Reset Variables action to an action chain:

  1. Open the Actions editor, for example, at the page level.
  2. Create an action chain, or open an existing action chain to add the action in the editor.
  3. Drag Reset Variables from the Actions palette into the action chain.

    You can drag the action onto the Add icon ( Add icon ) in the action chain, or between existing actions in the chain. The Properties pane opens when you add the action to the chain.

  4. Update the ID field in the Properties pane to make the action more easily identifiable.
  5. From the Variables to Reset list, select the variables you want to reset.

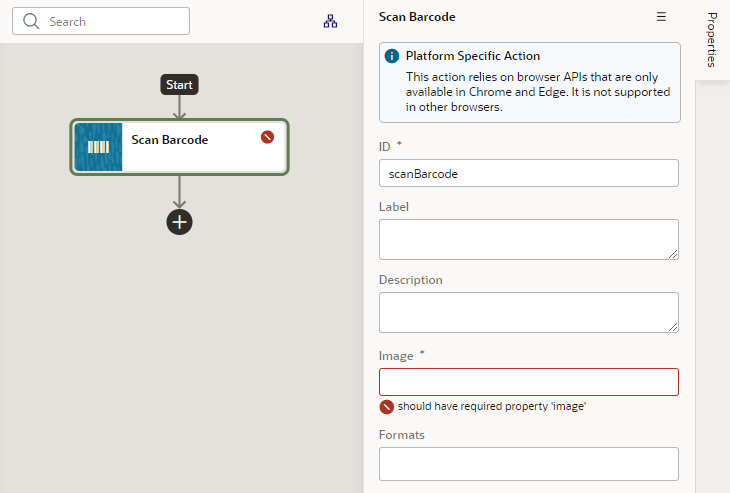
Add a Scan Barcode Action

You can add the Scan Barcode action when you want your application to decode information such as URLs, Wi-Fi connections, and contact details from QR codes and barcodes.

Note:

The Scan Barcode action relies on browser APIs and is supported only on Chrome for VB Studio apps.

To add a scan barcode action to an action chain:

  1. Open the Actions editor for the page.
  2. Click the action chain in the list to open it in the Action Chain editor.
  3. Drag Scan Barcode from the Actions palette into the action chain.

    You can drag the action onto the Add icon ( Add icon ) in the action chain, or between existing actions in the chain. The Properties pane opens when you add the action to the chain.


  4. Specify the action's properties in the Properties pane:
    1. Update the ID field to make the action more easily identifiable.
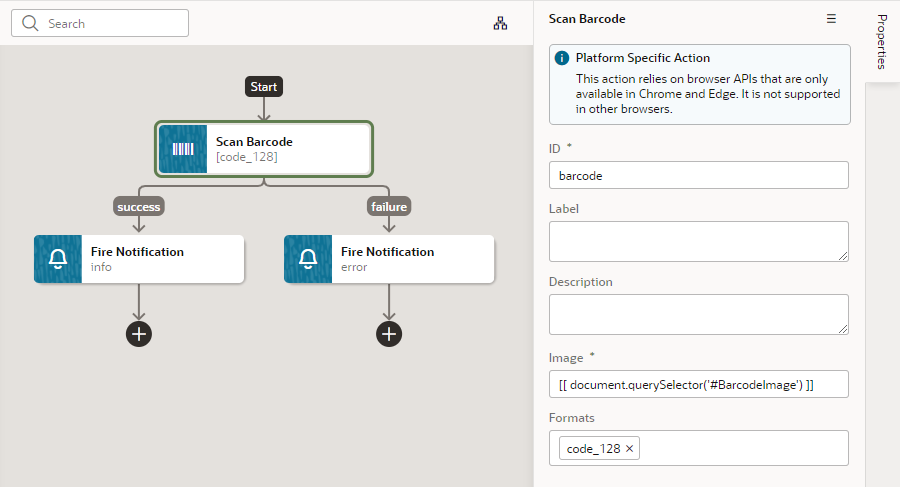
    2. In the Image field, enter an image object (either a CanvasImageSource, Blob, ImageData, or an <img> element) to decode.

      Note:

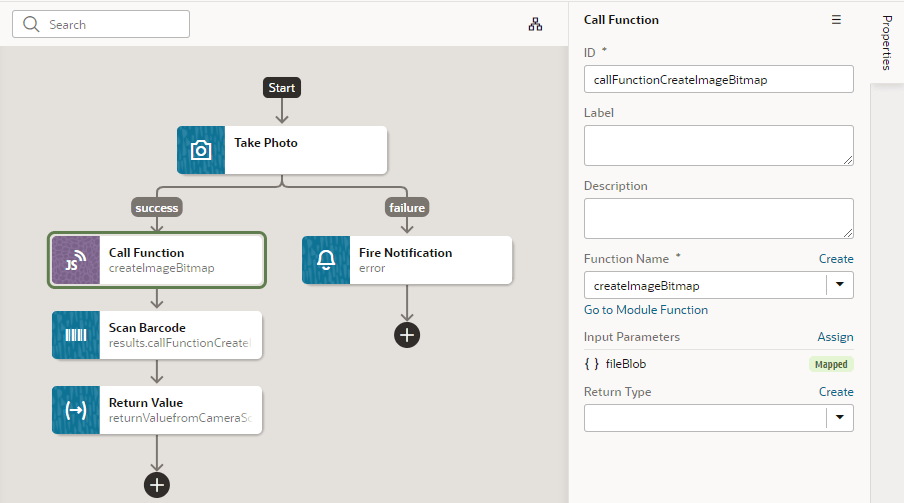
      If you're using the Take Photo Action or the camera component to pass a Blob to the Scan Barcode action, you might run into the Failed to execute 'detect' on 'BarcodeDetector error. To get around this error, convert the Blob to an ImageBitmap before passing it to the Scan Barcode action. For example:
      1. Add a function to do the image conversion, something like:
          // Convert Blob to ImageBitmap
          //
         PageModule.prototype.createImageBitmap = function(fileBlob) {
            return window.createImageBitmap(fileBlob);
          };
      2. Add a Call Function action to the action chain, similar to:

      3. Pass the converted ImageBitmap as the Image parameter for the Scan Barcode action, for example:
        [[ $chain.results.callFunctionCreateImageBitmap ]]
    3. Optional: In the Formats field, select the barcode formats you want the browser to search for.

      Barcode formats unlock a variety of use cases. QR codes can be used for online payments, web navigation, or social media connections, aztec codes can be used to scan boarding passes, and shopping apps can use EAN or UPC barcodes to compare prices of physical items.

      If Formats is not specified, the browser will search all supported formats, so limiting the search to a particular subset of supported formats may provide better performance.

    One option when using the Scan Barcode action is to use document.querySelector to get the image, as shown here where the first image with the ID BarcodeImage will be returned:
    Description of action-chain-call-scanbarcode-example.png follows
    Description of the illustration action-chain-call-scanbarcode-example.png

Add a Share Action

You add a Share action to share content with other applications, such as Facebook, Twitter, Slack, and SMS, by invoking the native sharing capabilities of the host platform. This action requires the user's consent. As a best practice, it should only be fired on a user gesture, such as a button click.

Note:

Web apps require the web browser running the app to support the Share action. Currently, not all browsers support this native feature.

To add a Share action to an action chain:

  1. Open the Actions editor, for example, at the page level.
  2. Create an action chain, or open an existing action chain to add the action in the editor.
  3. Drag Share from the Actions palette into the action chain.

    You can drag the action onto the Add icon ( Add icon ) in the action chain, or between existing actions in the chain.

  4. Update the ID field in the Properties pane to make the action more easily identifiable.
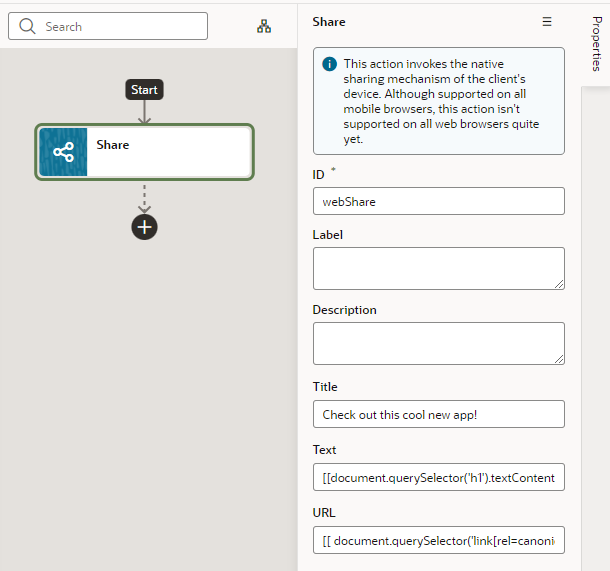
  5. Configure the Title, Text, and URL. All parameters are individually optional, but at least one parameter must be specified. Any URL can be shared, not just those under the website's current scope. Text can be shared with or without a URL.
    1. In the Title field, enter the title of the document to be shared.
    2. In the Text field, enter the text that will form the body of the message being shared.
    3. In the URL field, enter the URL that refers to a resource being shared.

    Here's an example that shares the current page's title and URL:
    Description of share-action.png follows
    Description of the illustration share-action.png

Add a Take Photo Action

The Take Photo action, used to access the camera or the image gallery on the device where your application is installed, is deprecated. Use the JET file upload component, or the camera component in the Components palette which uses the JET file upload component.

To add a Take Photo action to an action chain:

  1. Open the Actions editor, for example, at the page level.
  2. Create an action chain, or open an existing action chain to add the action in the editor.
  3. Drag Take Photo from the Actions palette into the action chain.

    You can drag the action onto the Add icon ( Add icon ) in the action chain. The Properties pane opens when you add the action to the action chain.

  4. Update the ID field in the Properties pane to make the action more easily identifiable.
  5. Select a value for the Media Type property: either image (default) or video. If Media Type is set to video, options to record video using the Camera or to select video files will be provided for PWA apps on iOS and Android.

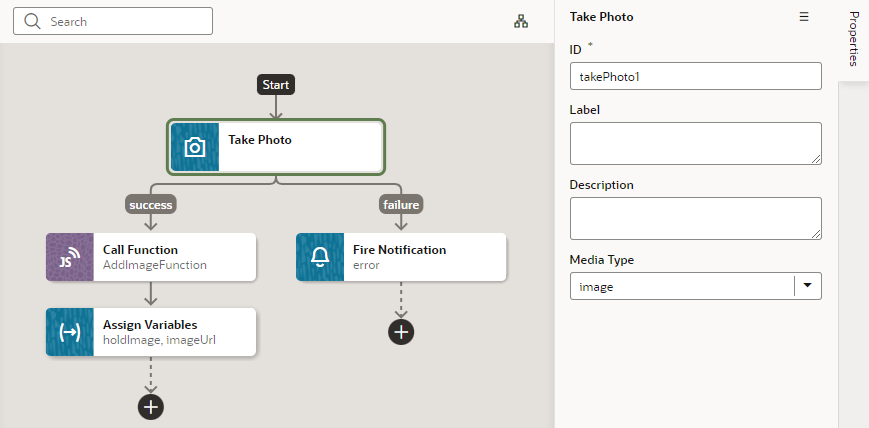
    Here's an example of a Take Photo action (with the Media Type set to image) that calls a custom module function, then maps its output to variables.
    Description of takephoto-action.png follows
    Description of the illustration takephoto-action.png

Add a For Each Action

You add a For Each action to execute another action for each item in an array. The action in the loop will be executed once for each item in the array.

To add a For Each action to an action chain:

  1. Open the Actions editor, for example, at the page level.
  2. Create an action chain, or open an existing action chain to add the action in the editor.
  3. Drag For Each from the Logic section of the Actions palette into the action chain.

    You can drag the action onto the Add icon ( Add icon ) in the action chain, or between existing actions in the chain.
    Description of foreach-add.png follows
    Description of the illustration foreach-add.png

  4. Configure the action's properties in the Properties pane:
    1. Update the ID field to make the action more easily identifiable.
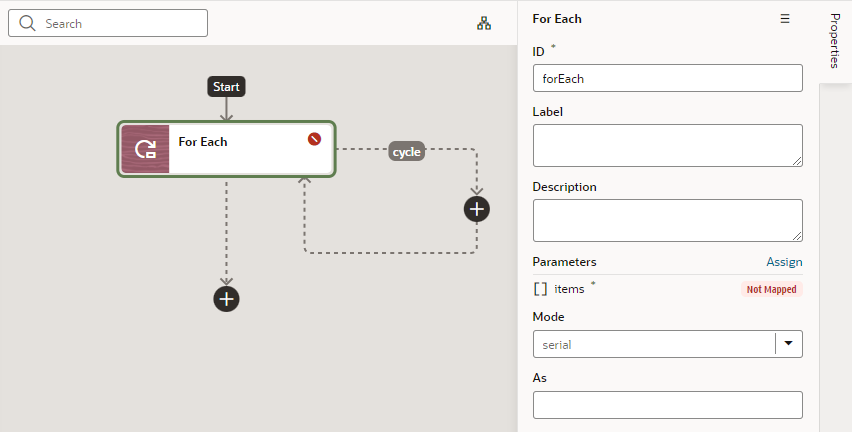
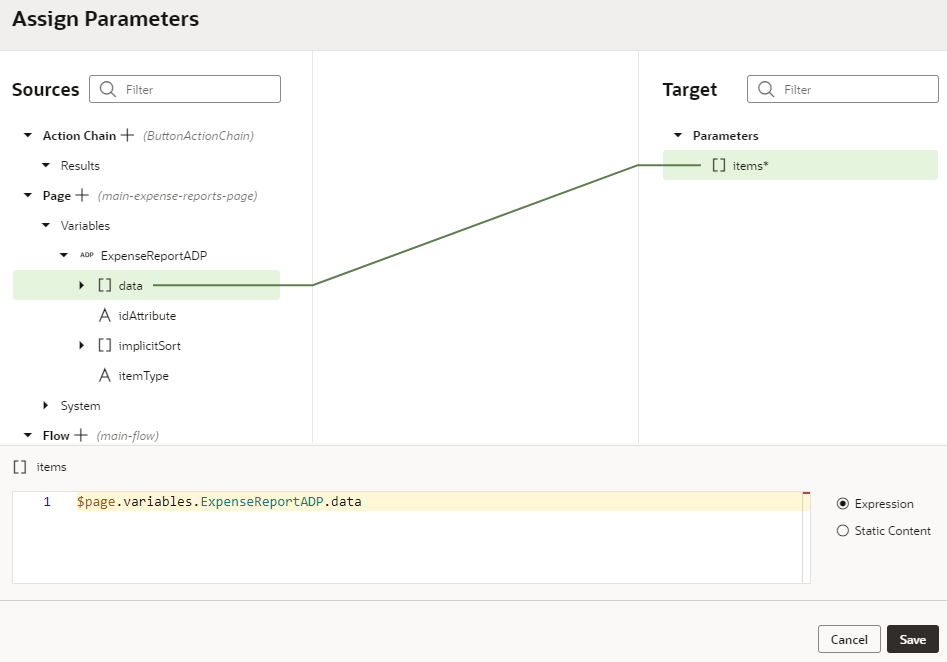
    2. Click Assign next to Parameters to set up an expression for the items parameter that evaluates to an array, for example, $page.variables.ExpenseReportADP.data:


      The For Each action uses 'items' and the 'actionId' and adds a $current context variable for the called action to access the current item. You can inject additional properties into the available contexts for the called action to reference in its parameter expressions (as we'll see in subsequent steps).

    3. If you want to use your own context name, enter an alias for $current in the As field, for example, foo. This alias can then be referenced in nested called actions.
    4. Define whether your called actions must run serially (default) or in parallel. Regardless of the mode, the For Each action will not complete until the actions for each item in the items array are complete.
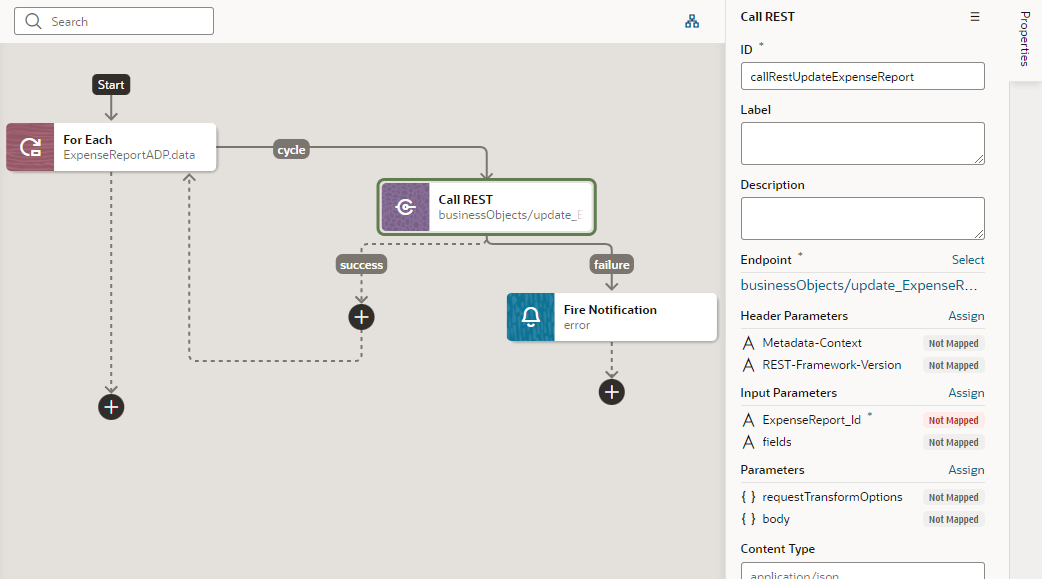
  5. Now click the Add icon ( Add icon ) inside the cycle loop and add the action you want to loop over the array. Here's an example that adds an action to call the PATCH /ExpenseReport/{ExpenseReport_Id} REST endpoint.


    When assigning the results of the REST call to a variable, you can use the following parameter expressions for the called action:
    Parameter Name Description
    $current.data The current array item.
    $current.index The current array index.
    alias.data An alternate syntax for $current.data, which allows a reference to $current from nested contexts.
    alias.index An alternate syntax for $current.index, which allows a reference to $current from nested contexts.

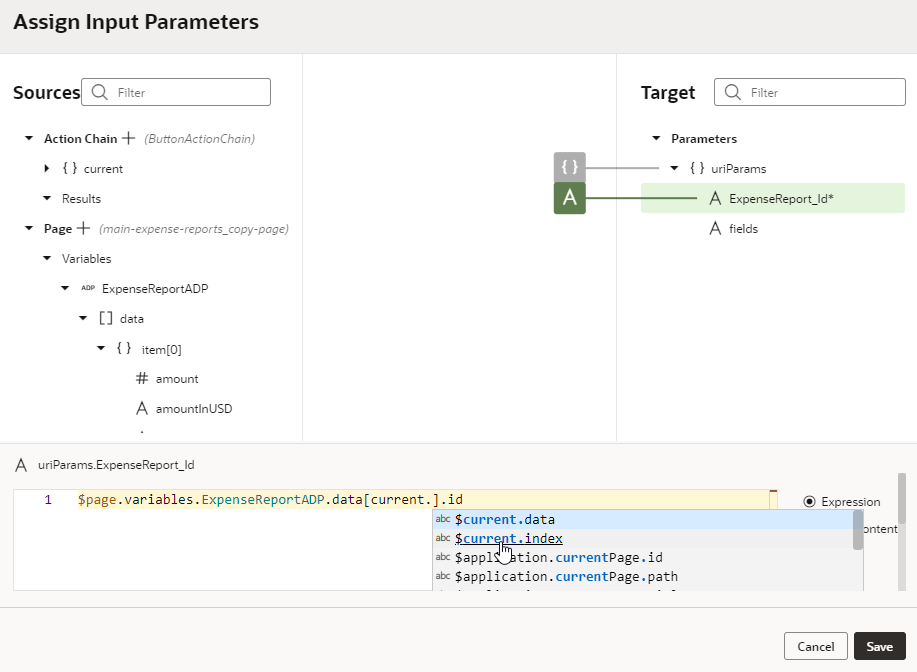
    For example, to pass the ID of the current expense report in the loop, you can use $current.index in the source expression:
    Description of foreach-assignparams-currentindex.png follows
    Description of the illustration foreach-assignparams-currentindex.png

    If you defined a context alias, for example, foo, you'd be able to create expressions that reference foo.data and foo.index:
    Description of foreach-asalias.png follows
    Description of the illustration foreach-asalias.png

    The outcome of the action is either "success", with an array containing the return value of the last action's results or "failure" if there is some exception/error.

  6. As a final step, click the Add icon ( Add icon ) to add an action (for example, a Fire Notification action) where the For Each action's loops ends.

Add an If Action

You add an If action to evaluate an expression based on conditions and return a 'true' outcome if the expression evaluates to true, and a 'false' outcome otherwise. You use this action typically to execute custom logic, say to validate data before you actually call REST APIs in your action chain.

To add an If action to an action chain:

  1. Open the Actions editor, for example, at the page level.
  2. Create an action chain, or open an existing action chain to add the action in the editor.
  3. Drag If from the Logic section in the Actions palette into the action chain.

    You can drag the action onto the Add icon ( Add icon ) in the action chain, or between existing actions in the chain. The Properties pane opens when you add the action to the chain.

  4. Update the ID field in the Properties pane to make the action more easily identifiable.
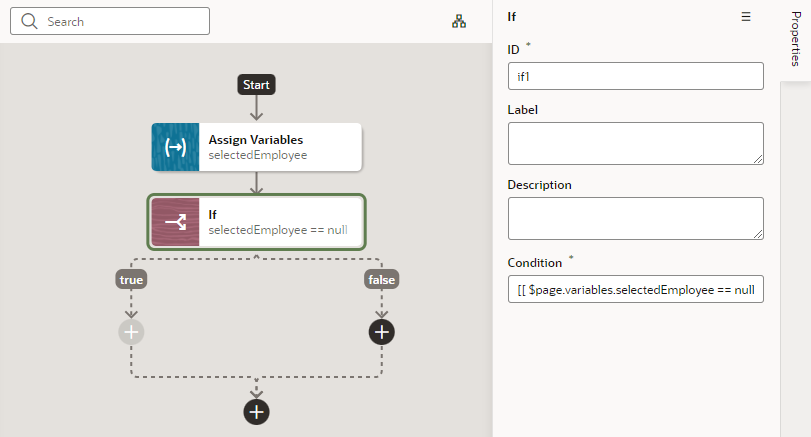
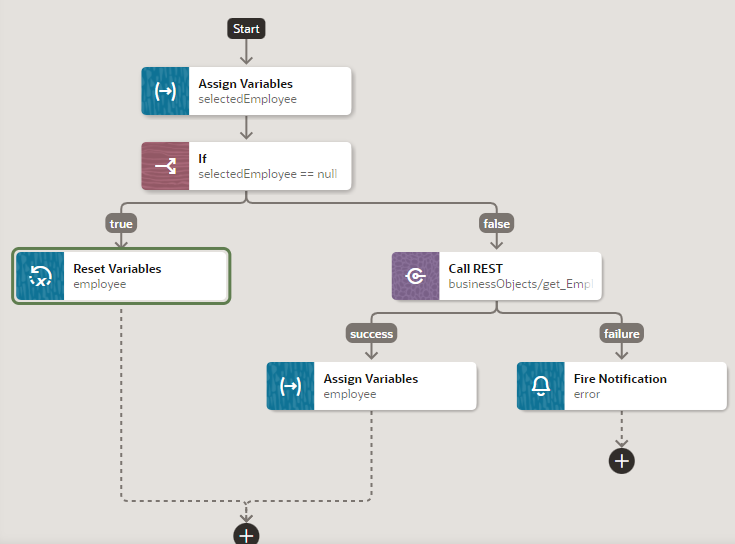
  5. In the Condition property, add a condition, for example, [[ $page.variables.selectedEmployee == null ]].
  6. Add actions for the true and false branches to define what should happen when the If action's outcome evaluates to true and false. Here's one possible scenario:

Add a Return Action

You add a Return action as the final action of a chain to control the outcome and payload of that chain. It's particularly useful in a Call Action Chain action to control the payload resulting from calling that action chain.

To add a Return action to an action chain:

  1. Open the Actions editor, for example, at the page level.
  2. Create an action chain, or open an existing action chain to add the action in the editor.
  3. Drag Return from the Logic section of the Actions palette into the action chain.

    You can drag the action onto the Add icon ( Add icon ) in the action chain, or between existing actions in the chain. The Properties pane opens when you add the action to the chain.

  4. Update the ID field in the Properties pane to make the action more easily identifiable.
  5. In the Outcome property, select the outcome to return: success or failure.
  6. Click Assign next to Payload to open the Assign Parameters window and map the payload to return from this action.

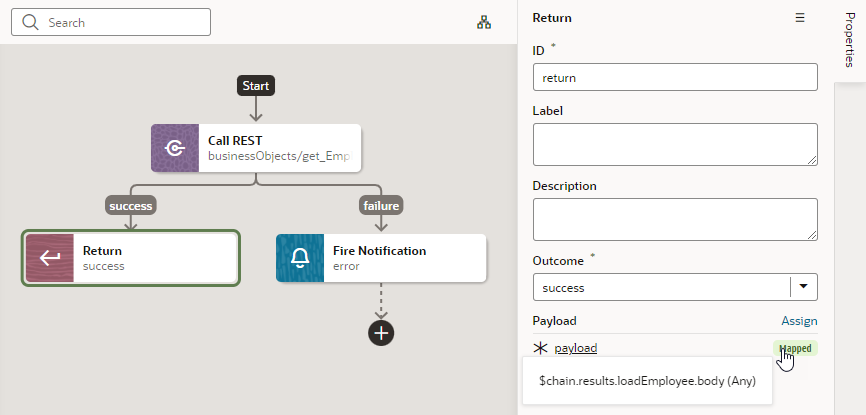
    Here's an example that uses the Return action on a chain that makes a REST call:
    Description of return-action-result.png follows
    Description of the illustration return-action-result.png

Add a Run In Parallel Action

You use the Run In Parallel action to run multiple action chain paths in parallel, wait for their responses, and produce a combined result.

To add a Run In Parallel action to an action chain:
  1. Open the Actions editor, for example, at the page level.
  2. Create an action chain, or open an existing action chain to add the action in the editor.
  3. Drag Run in Parallel from the Logic section of the Actions palette into the action chain.

    You can drag the action onto the Add icon ( Add icon ) in the action chain, or between existing actions in the chain.
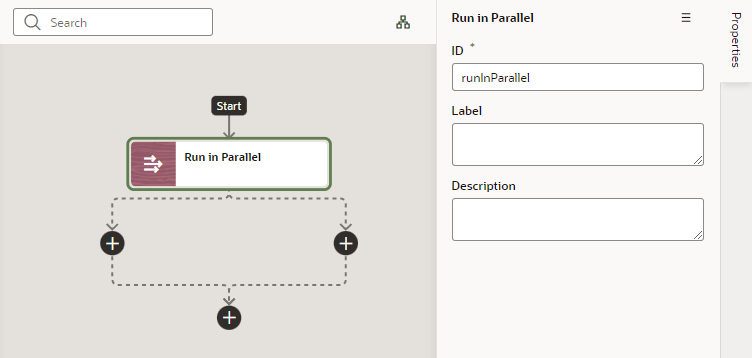
    Description of runinparallel-add.png follows
    Description of the illustration runinparallel-add.png

  4. Update the ID field in the Properties pane to make the action more easily identifiable.
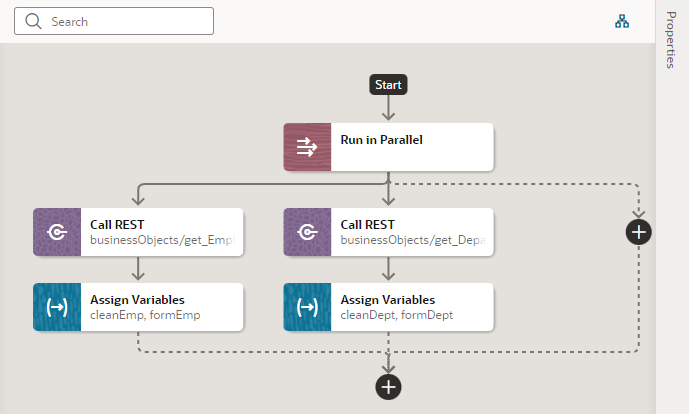
  5. Click each Add icon ( Add icon ) under the Run in Parallel node to define the actions you want to run in parallel, for example, you could make two REST calls, then do some assignments only after they both complete:

Add a Switch Action

You add a Switch action when you want to evaluate an expression and create an outcome with that value. An outcome of "default" is used when the expression does not evaluate to a usable string.

To add a Switch action to an action chain:
  1. Open the Actions editor, for example, at the page level.
  2. Create an action chain, or open an existing action chain to add the action in the editor.
  3. Drag Switch from the Logic section of the Actions palette into the action chain.

    You can drag the action onto the Add icon ( Add icon ) in the action chain, or between existing actions in the chain. The Properties pane opens when you add the action to the chain.

  4. Update the ID field in the Properties pane to make the action more easily identifiable.
  5. In the Value property, enter a value that should be used as the outcome value. If this property is null or undefined, the outcome is "default".

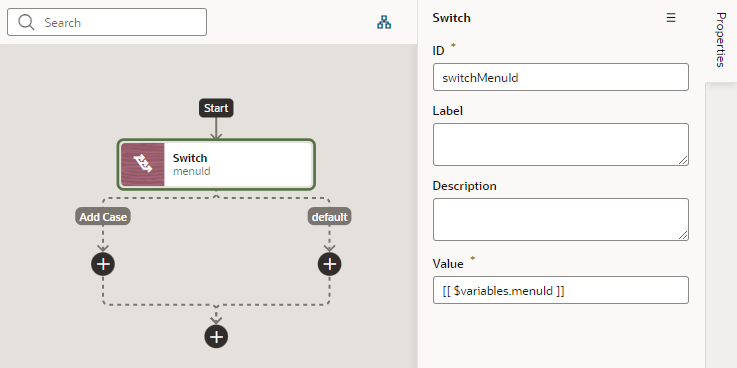
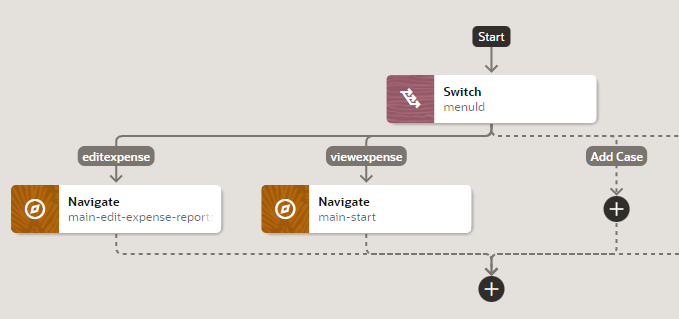
    For example, when a menu defines a set of options, you can use the Switch action to perform actions for each menu item. In this case, you'd pass the menuId input parameter containing the selected menu item's ID in the Value property:
    Description of switch-action-add.png follows
    Description of the illustration switch-action-add.png

  6. Optional: You can add further actions for each case. For example, if you want to navigate to a particular page when the menu item is selected, you can add a Navigate action for each menu item.
    1. Click the Add icon ( Add icon) under Add Case.
    2. In the Add Case dialog, enter the case value to be used as the outcome. In our menu example, you would specify the ID of each menu item. Again, if this property is null or undefined, the outcome is "default".

Add a Navigate Action

You add a Navigate action to navigate to a specific page and optionally pass parameters to activate that page.

To add a navigation action to an action chain:
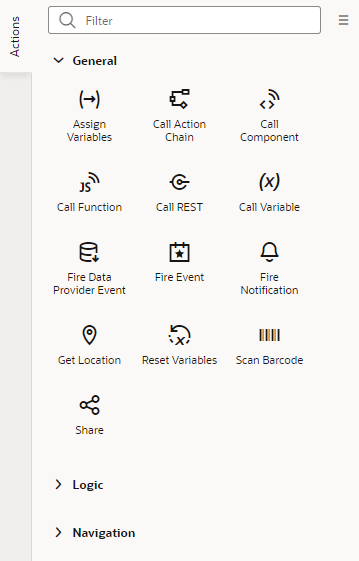
  1. Open the Actions editor.
  2. Click the action chain in the list to open it in the Action Chain editor.
  3. Drag Navigate from the Navigation section in the Actions palette and drop it into the action chain.

    You can drag the action onto the Add icon ( Add icon ) in the action chain; typically this action will be the final action in the chain. The properties pane opens when you add the action to the action chain.

  4. Select the type of navigation you want in the Properties pane:
    • Page: Enables navigation to a sibling of the current page or a deeply nested page relative to the root of the App UI or the current page.
    • Flow in Parent Page: Enables navigation to a flow of the parent page.
    • Flow in Current Page: If the page includes a flow container component, enables navigation to a flow or page within the current page.
    • App UI: Enables navigation to a flow or page within an App UI, which could be the current App UI or any other App UI.

      If you're working with fragments or layouts, App UI is your only option.

    Complete the following steps as it applies to your use case:

    1. Select an existing page from the drop-down list of available pages, or click the Create link next to Page to create a new page as the target for the Navigate action.
      The page you select can be in the current flow or in another flow, a different flow in the parent page, or in a flow within the current or another App UI. When navigating to another App UI, valid targets are:
      • The default page of the App UI, or
      • A page in the App UI that is externally accessible. To do this, navigation to that App UI must be enabled in the Settings editors, wherein the page-level Let other App UIs navigate to this page setting and the flow-level Let other App UIs navigate to this flow setting is selected for the page as well as the flow containing the page.

      Here's an example of what you might see when navigating to a page in another App UI:
      Description of navigate-action-appui.png follows
      Description of the illustration navigate-action-appui.png

      Note though that it's simpler to use the Flow in Parent Page option (instead of App UI) when you want to change the content of the flow in the current page, for example, to navigate from myAppUI/flowA/page to myAppUI/flowB/otherPage.

    2. If the page you select requires input parameters, click the Assign link next to Input Parameters to map a page variable to the action’s Input Parameter. Click Save.

      In the Assign Input Parameters dialog box, you map Sources to Targets by dragging the variable in the Sources pane onto the parameter in the Target pane. If a suitable variable does not exist, use the + icon beside the relevant node (Action Chain, Page, and so on) to create a new variable.

      You can click the parameter name to view the expression for the mapped variable.

Add a Navigate Back Action

Add a Navigate Back action to return to the previous page in a browser's history.

To add a Run In Parallel action to an action chain:
  1. Open the Actions editor (for example, at the page level).
  2. Create an action chain, or open an existing action chain to add the action in the editor.
  3. Drag Navigate Back from the Navigation section of the Actions palette into the action chain.

    You can drag the action onto the Add icon ( Add icon ) in the action chain; typically this action will be the final action in the chain. The Properties pane opens when you add the action to the chain.

  4. Optional: Specify a key/value pair map of parameters to pass to the previous page. If a parameter is not specified, the original value of the input parameter on the destination page is used. If a parameter is specified, it has precedence over fromUrl parameters.

Add an Open URL Action

You add an Open URL action to navigate to an external URL. In a web app, this action opens the specified URL in the current window or in a new window.

To add an Open URL action to an action chain:
  1. Open the Actions editor, for example, at the page level.
  2. Create an action chain, or open an existing action chain to add the action in the editor.
  3. Drag Open URL from the Navigation section of the Actions palette into the action chain.

    You can drag the action onto the Add icon ( Add icon ) in the action chain; typically this action will be the final action in the chain. The Properties pane opens when you add the action to the chain.

  4. Enter the URL to navigate to.
  5. Optional: Specify a key/value pair map of query parameters to pass to the specified URL as URL parameters.
  6. Optional: Specify the hash entry to append to the URL. 
  7. Define a Browser History value, either replace or push (default), to define the effect on browser history. This value is used only if the resource is used in the same window. If you choose replace, the current browser history entry is replaced instead of pushed, meaning that the back button will not go back to it.
  8. Specify a name identifying the window as defined in the window.open() API. If not defined, the URL opens in the current window. For apps on mobile devices, you have three possible values: _self (default), _blank, or _system. For local file types, this property is ignored.

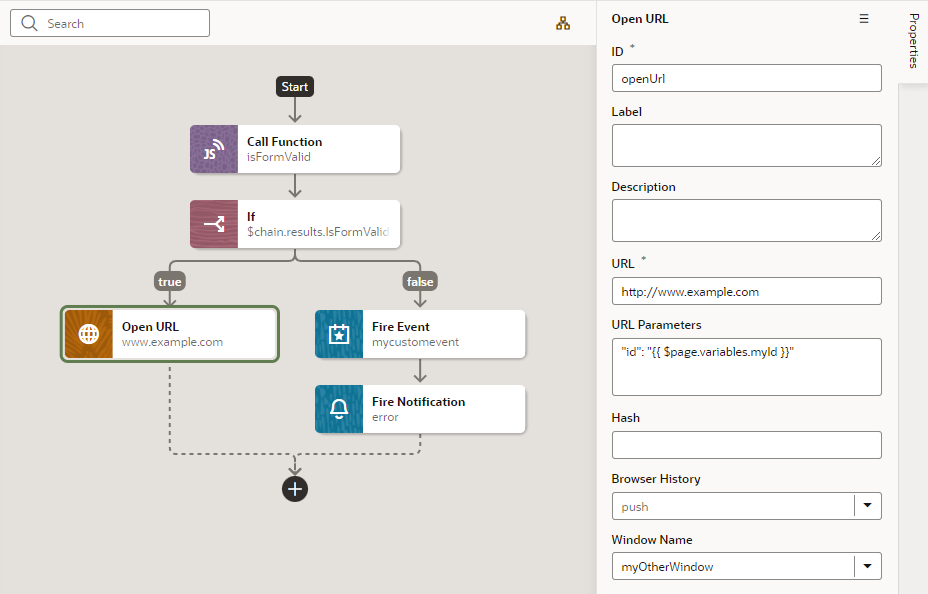
    Here's an example to open a new window in the browser with the given URL; if you specify a value for the Window Name (as shown here), once on the URL, the browser back button will re-enter the last page and the page input parameters will be remembered.
    Description of add-open-url-action.png follows
    Description of the illustration add-open-url-action.png