Create a Layout in a Rule Set

A rule set's layout defines the fields that are displayed in a dynamic component at runtime. You create and configure the component's layouts in the Rule Sets editor.

Note:

Whereas a Layout (with a capital L) is a resource that is available to everything in the extension, a layout (lowercase) is an intrinsic part of a particular rule set.

When extending a dynamic form or table, each rule set contains a default layout that is seeded for you. You can't edit the default layout, but you can duplicate it and use it as the basis for a new layout. The default layout is always used in the last rule of the display logic tree.

The fields you can display in a rule set's layout are determined by the fields available from the data resource used by the component. This data resource is defined in the Layout containing the rule set you're configuring. For example, the Layout might define a data resource that has five fields. You can choose which of these five fields (and also any other virtual or calculated fields defined in the same Layout) that you want to display in the dynamic component—and the order in which they should appear—but you can't include fields from other data resources. For details on creating fields in Layouts, see Create Fields For a Layout.

To create a new layout in a rule set:

  1. In the Rule Sets editor, open the rule set for the component you want to configure.
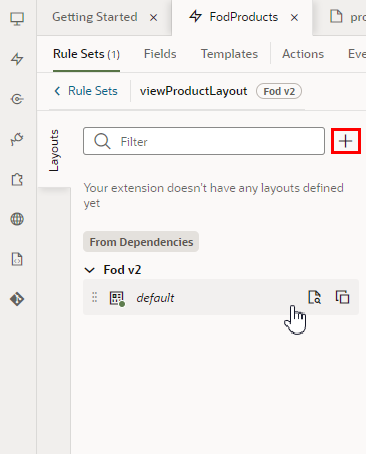
  2. Click New in the rule set's Layouts pane and type a name for the new layout. Click Create.


    You can also click Duplicate in an existing layout to duplicate it and use it as a starting point.

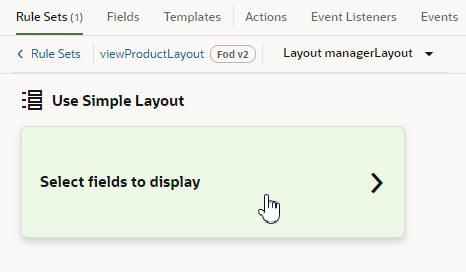
  3. Click the new layout name, then click Select fields to display to open it in the layout editor.


    When you create a layout and haven't selected any fields for it yet, you'll see the Select fields to display option when you open the layout. (You won't see this option if the layout is a duplicate.) You'll also see the templates that already exist in the Layout listed as options. Click a template name if you want apply the template to the layout, otherwise, click Select fields to display.

    If you create a new layout rather than duplicating one, the layout might already contain some fields before you've added any. Any fields that are marked as "Required" in the Layout's Fields editor are automatically added when you create a new rule set layout.

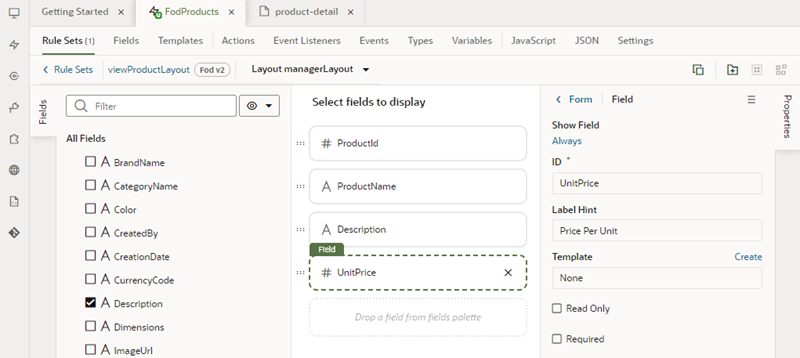
  4. Add fields from the Fields palette to the rule set layout.

    The Fields palette lists all the fields and objects you can add to your layout. You can add a field or object to a layout by selecting its checkbox in the Fields palette or by dragging it from the palette onto the drop target in the center pane. You can remove a field from the layout by clicking its Delete icon in the center pane.


    To help you locate the fields you might want to add, the Fields palette might contain a Suggested Fields section at the top of the palette. This section lists the fields that have been identified as the most relevant or most important when building your layout, which are usually the custom object fields created in App Composer (which you can usually identify because _c is appended to the name) and the fields marked as required in the Layout.

    You can also filter the list of fields by entering a string in the Filter field at the top of the Fields palette.

  5. Change the order that fields are displayed in the component by dragging fields into position in the center pane.
After a rule set layout is created, you can set it as the layout that a display logic rule should display, as described in Determine What's Displayed at Runtime With a Rule Set. You can use the same layout in multiple rules.

Edit a Field's Properties in a Layout

When you edit a field's properties in a rule set's layout, your changes only apply to the field in the current layout. You might want to do this to override a field's properties in a specific layout, for example, to mark a field as Required or Read Only. If you want to edit a property so that it's the same in all layouts—for example, if you want it always to be Read Only—you should edit the field's properties in the Fields editor.

To edit a field's properties:

  1. In the Rule Sets editor, open the layout and select the field in the center pane.
  2. Set the Show Field property to control when the field is displayed.
    The default setting for this property is Always. For details on how to set the property, see Use Conditions to Hide and Show Fields in a Layout .
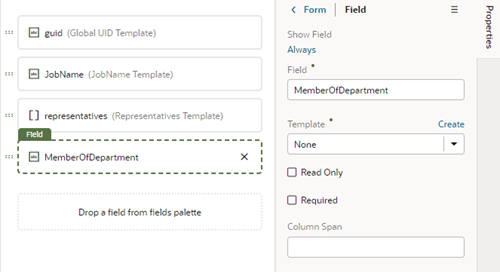
  3. Edit the field's Read Only and Required properties in the Properties pane.

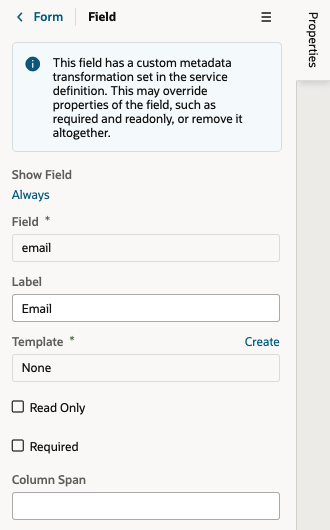
    If you are editing the properties of a field defined by an Oracle Cloud Application service, the image below shows the message you'll see in the Properties pane if the field has undergone a custom transformation, which may override any changes you make to the field's properties.


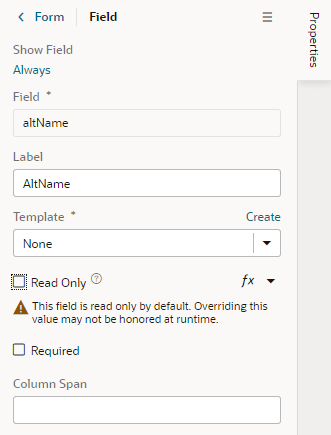
    In the next image, you can see the warning that is displayed in the Properties pane when you try to edit a property that you might not be able to override because it was already set in the Fields editor. For example, you'll see this warning if a custom field's property is set to Read Only and you try to override it in your layout.


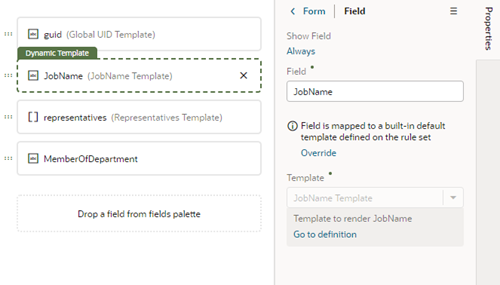
    The Read Only and Required properties might not be editable in the Properties pane if you select a field that has a template applied to it. In this case, you might need to remove the template if you want to edit these properties in the layout. In the next image, you can see that a field template is already applied to the selected field. For details about using templates with fields, see Apply a Template to a Field.


Use Conditions to Hide and Show Fields in a Layout

Fields in the active layout are displayed by default, but if you want to hide a field or group in a layout in some cases, for example, to hide it from everyone except managers, you can use the field's Show Field property to set conditions that determine when it is displayed. When you add conditions, the field is displayed only when the conditions you set are true. The conditions are only applied to the field in the layout you are editing.

To set display settings for a field in a layout:

  1. In the Rule Sets editor, open the layout and select the field in the center pane.

    When you select the field, you can see the field's properties in the Properties pane. By default, the Show Field property is set to Always, so the field is always displayed.


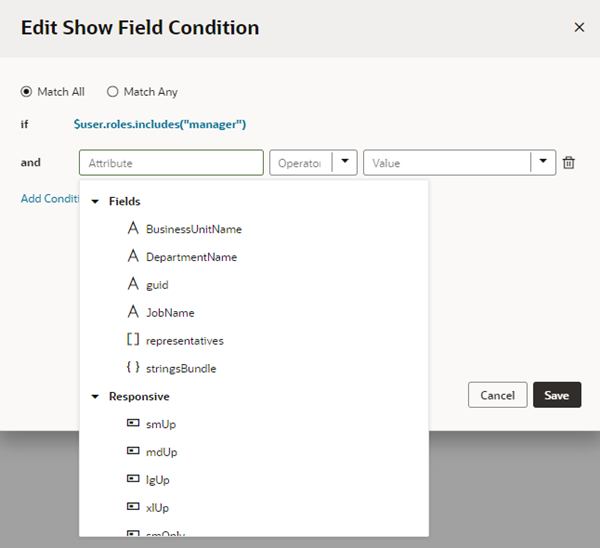
  2. In the Properties pane, click Always under the Show Field property to open the Edit Show Field Condition dialog box.
  3. Define the field's conditions by selecting attributes, operators and values in the condition builder in the dialog box. Click Save.

    The Attributes drop-down list contains the fields and variables that you can use in your layout, and the Operators list contains the operators (for example, '=' and '<=') that are valid for the attribute you select. The Values list shows values already defined for the attribute (for example, 'true' and 'false'), if any, but you can also enter your own value.

    The Attributes variables are grouped by context in the list. In addition to the $fields context, there are variables in other built-in contexts that provide a way to access various pieces of information when building conditions. For example, you can check the size of the device accessing your app, or information about the user using the app such as their role or email. Context variables include:

    • $fields variables determined by the fields displayed in the Fields editor. For example, the $fields.firstName.value lets you access the value of the First Name field in your data source. Look for these variables under the Fields group in the condition builder.

      Note:

      For each field, regardless of type, you can choose $numberValue (for example, $fields.ConflictId.numberValue()) or $value ($fields.ConflictId.value()). You should use $numberValue when you know the field's value should contain a number. For example, if the ConflictId field's type is a string and you choose $numberValue, the field's value will be converted to a number, if possible. If the value can't be converted, the $numberValue will be NaN (Not a Number).

      The only limitation is that $numberValue is limited by the maximum precision allowed by the Number type in Javascript.

    • $responsive variables determined by the screen size of the device the app is currently displayed on. For example, the responsive.mdUp variable's value is True if the current user is using a device where the screen width is 768 pixels or more, such as a tablet. Look for these variables under the Responsive group in the condition builder.
    • $user variables determined by the current user. For example, the user.isAuthenticated variable's value is True if the current user is an authenticated user. You can use the user.roles variable to check the role of the user using the app. Look for these variables under the User group in the condition builder.

      Note:

      When using user.roles, the Value drop-down lists the available Oracle Applications Cloud job and abstract roles. (The drop-down will not list any duty roles. If you want to specify a duty role, you can manually type the duty role name in the Value field.)

      You must be granted the ASE_REST_SERVICE_ACCESS_IDENTITY_INTEGRATION_PRIV privilege to see user roles in the drop-down list. Contact your instance administrator if you require this user privilege.


Configure How Columns Are Rendered in a Dynamic Table Layout

When editing the layout for a dynamic table, you can edit the fields in the Properties pane to configure the width of each column in the table, and if the table is sortable by any of the fields. You can also "freeze" table columns, so that a column's content remains visible, and a horizontal scroll bar is used to scroll the table's content.

When you set the properties for a field in a layout, the settings only apply to the current layout. The other layouts are not affected.

To configure the properties for columns in a table layout:

  1. In the Rule Sets editor, open the dynamic table's layout.
  2. Select the field in the center pane that you want to edit.

    When you select the field, you can see the field's properties in the Properties pane.


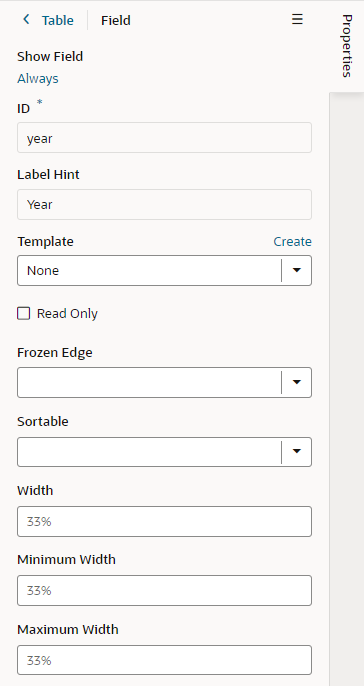
    For fields in a dynamic table's layout, the Properties pane contains some display properties to control how the field is rendered in the table:

    • Frozen Edge: Set this property to start or end to "freeze" the column of the selected field. Select start to pin the column at the beginning (which means it can't be scrolled past), or end to freeze the column at the end (to lock it in view). For details, see Frozen Columns in the Oracle JET Developer Cookbook.
    • Sortable: This property determines if the table is sortable on the selected field.
    • Width: This property sets the default width of the selected field column in the table.
    • Minimum Width: This property sets the minimum width of the selected field column when the table is first rendered on the page. A user can manually resize the column width to make it narrower.
    • Maximum Width: This property sets the maximum width of the selected field column when the table is first rendered on the page. A user can manually resize the column width to make it wider.

Set a Field to Display as a Text Area in a Form

If a field's value is a long string, for example, when a field is used to display a long description, you can configure the field so that it is rendered as a multi-line text area in forms instead of the default single-line text field.

  • To set a field to display as a text area in all layouts:
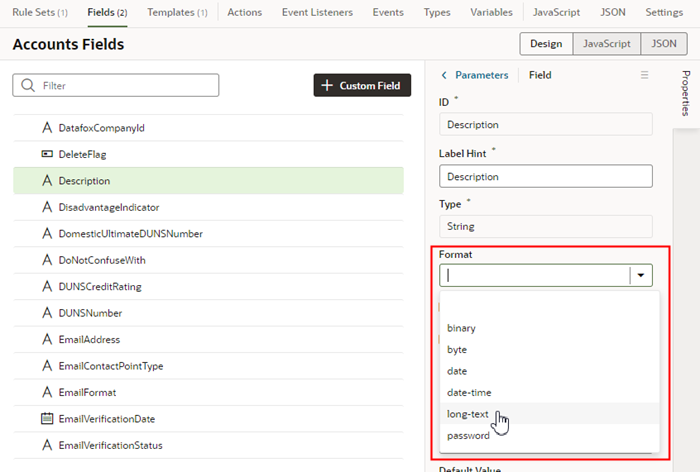
    1. In the layout's Fields tab, select the field you want to work with.
    2. Set the Format property in the Properties pane to long-text.


      Notice that the Format property now has a blue dot next to it to indicate the property has been modified by the extension.

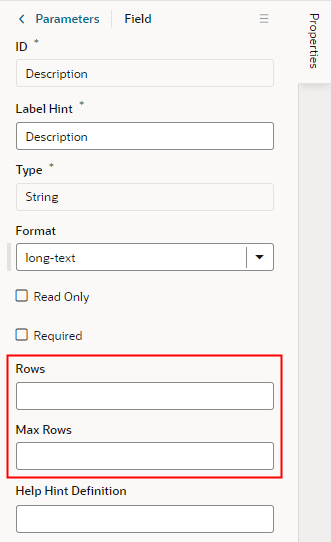
      When you switch the format to long-text, two additional properties are displayed in the Properties pane.

    3. Set the Rows property to the number of rows to display in the form by default.
    4. Set the Max Rows property to the maximum number of rows you want to be displayed in the form. The text area will expand to the Max Row number if needed. The maximum number of rows defaults to three if you don't set a number in the Max Rows property.
  • To set a field to display as a text area in a particular form layout:
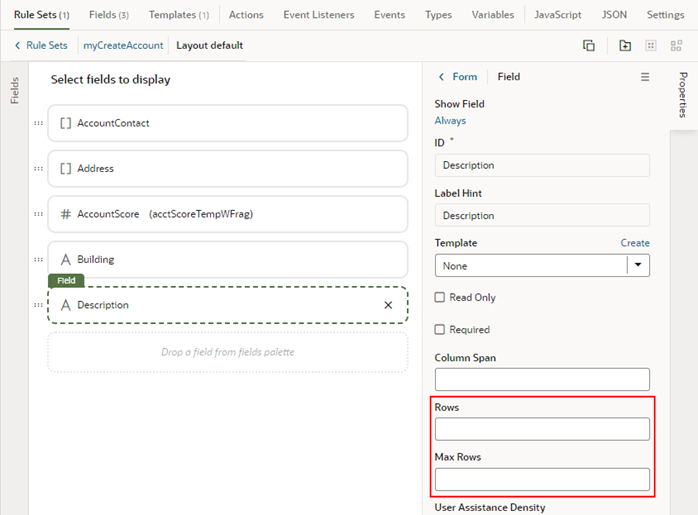
    1. In the Rule Set editor, open the layout and select the field in the center pane.
    2. Set the Rows property to the number of rows to display in the form by default.
    3. Set the Max Rows property to the maximum number of rows you want to be displayed in the form. The text area will expand to the Max Row number if needed. The maximum number of rows defaults to three if you don't set a number in the Max Rows property.

Set How User Assistance is Rendered in a Layout

Use the User Assistance Density property to set how a field's user assistance text, like messages, help text, and hints, are displayed in the form.

To edit a field's User Assistance Density property in a layout:

  1. In the Rule Sets editor, open the layout and select the field in the center pane.
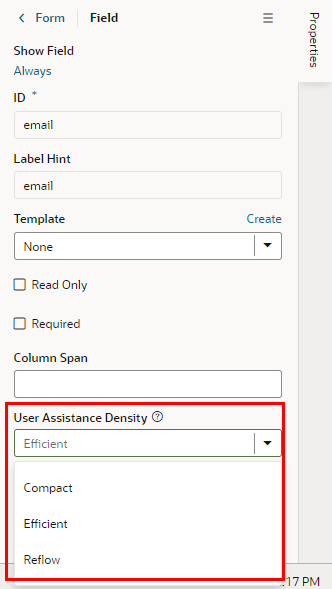
  2. Select the field's User Assistance Density property from the dropdown list in the Properties pane.


    You can choose from three options:

    • compact - User assistance text is displayed so that the layout is more compact, such as using a popup for messages and a required icon to indicate a Required field.
    • efficient - User assistance text is shown inline under the field. The form is rendered with space under the field for the user assistance text. This is the default option.
    • reflow - User assistance text is shown inline under the field. The form is rendered with no space under the field for the user assistance text. The space below the field expands to display the user assisstance text.

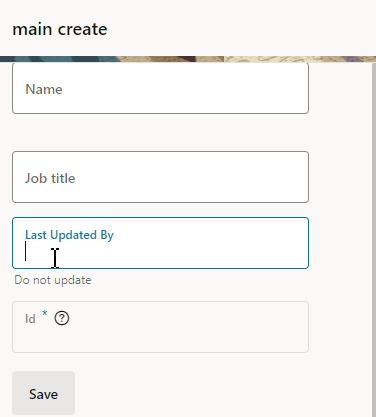
    This image of a form can help you visualize how these settings affect how fields are rendered:


    In this form, the User Assistance Density property for the first field (Name) is set to efficient, the second and third fields (Job Title, Last Updated By) are set to reflow, and the fourth field (Id) is set to compact. You can see that the cursor is in the Last Updated By field, and that the space below the field has expanded so that the field's user assistance text ("Do not update") can be rendered below the field.