Visually Create an Action Chain
Here, we'll use the Action Chain editor's Design view to assemble built-in actions into a sequence that performs a task. Each action performs a specific function and returns results that can serve as inputs for subsequent actions.
To visually create an action chain:
- Navigate to where you want to initiate the creation of the action chain, depending on your preference and how you want it triggered:
- Actions Chains Tab:
If you prefer to go straight to creating an action chain and later assigning it to an event listener, component event, or variable event, go to the relevant Actions Chains tab at the App UI, flow, or page level. On the Actions Chains tab, click the + Action Chain button. If an action chain is displayed on the tab instead, click the Action Chains link in the Action Chain editor to get to the list of created action chains and the button for creating a new action chain:

Description of the illustration jsac-action-chains-link-editor.jpg - Event Listeners Tab:
To have your new action chain started by a lifecycle, application, flow, or page event (
vbBeforeEnter, vbEnter, vbAfterNavigate...), select the Event Listeners tab and click + Event Listener. In the Create Event Listener wizard, select the event and click Next. On the wizard's Select Action Chain step, select the create action chain option at the appropriate level (page, flow, or App UI) and click Finish. For further details, see Start an Action Chain From a Lifecycle Event.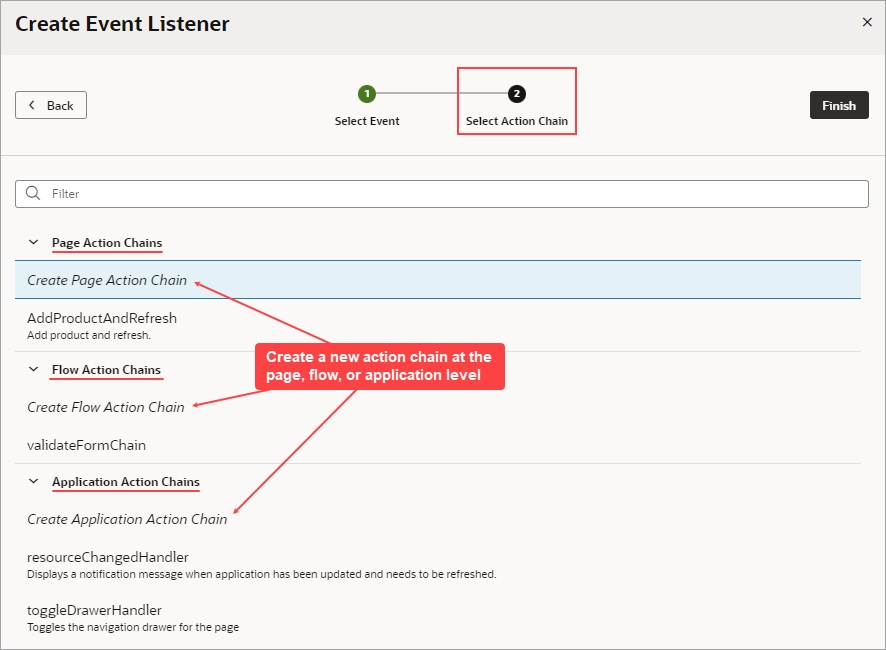
Description of the illustration jsac-create-action-chain-wizard.jpg - Custom Event:
To have your new action chain started by a custom event that's triggered by a Fire Event action in another action chain, see Add a Fire Event Action.
- Component:
To have your new action chain started by a component event, select the component on the Page Designer's canvas, and in the Properties pane use the Events tab to create a new event, event listener and action chain for the component. For further details, see Start an Action Chain From a Component and Start an Action Chain By Firing a Custom Event.
- Variable:
To have an action chain started when a variable’s value changes, open the relevant Variables tab, at the App UI, flow, or page level, and select the variable. In the Properties pane, select the Events tab and click + Event Listener. A new
onValueChangedevent is automatically created for the variable, and you're presented with a window for you to either select an existing action chain or create a new one. For further details, see Start an Action Chain When a Variable Changes.
For more about events and event listeners, refer to Work With Events and Event Listeners.
- Actions Chains Tab:
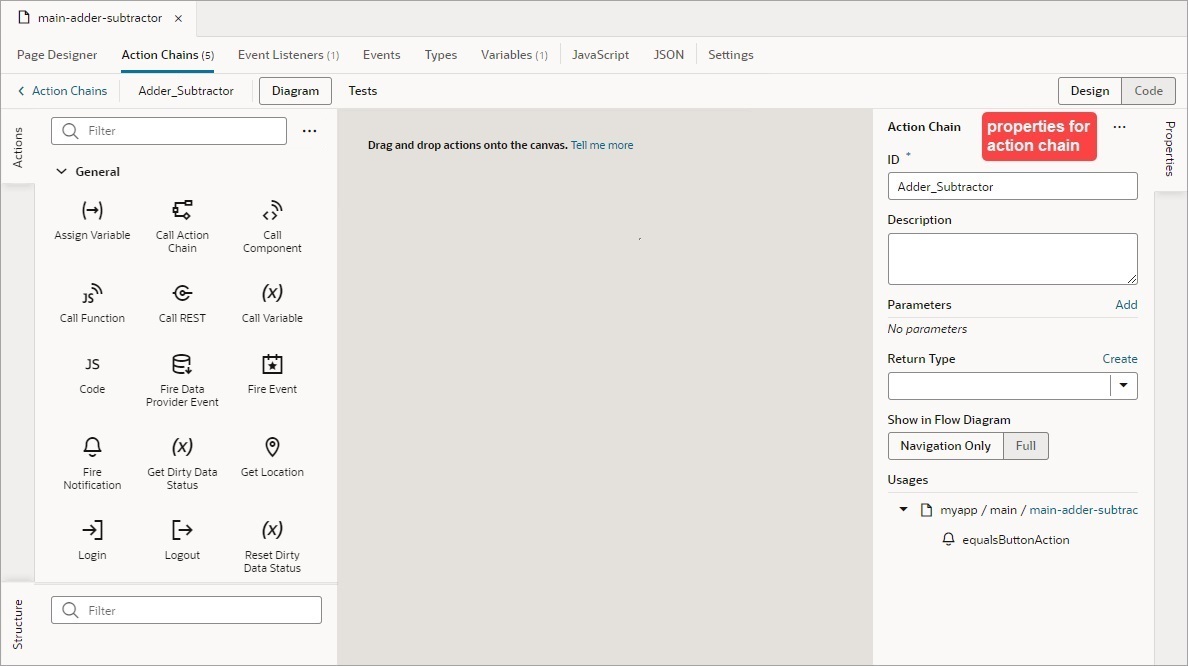
- Enter a name for the action chain in the ID field, and if you like, a description. The new action chain opens in the Action Chain editor:
- If your new action chain needs input parameters:
- Define the input parameters using the Add link for the Parameters property in the Properties pane.
- Pass the input parameter values to the action chain:
- If your action chain is to be started by another action chain, the input parameters are passed through the call to your new action chain.
-
If your new action chain is to be started by an event listener, open the relevant Event Listeners tab (App UI, flow, or page level), select the event listener, and use the Assign link for the Input Parameters property in the Properties pane:
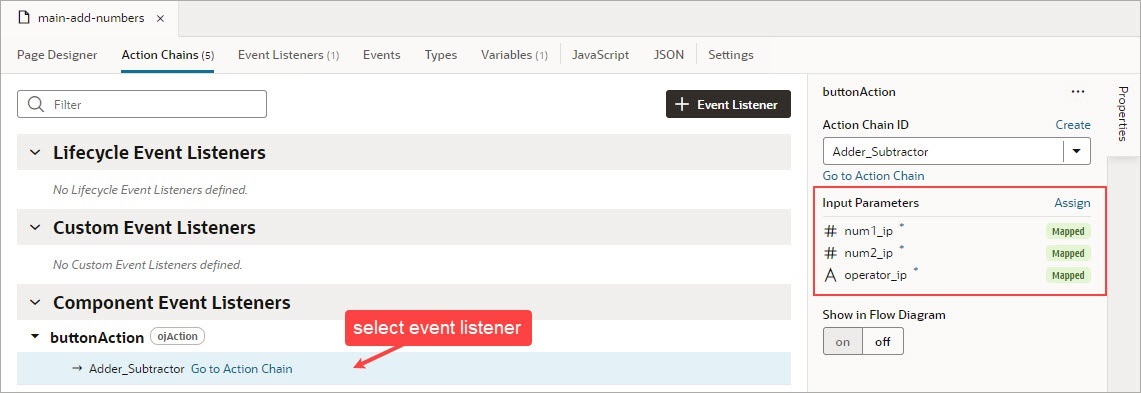
Description of the illustration jsac-select-event-listener.jpg - If your action chain is to be started by a component, select the component on the Page Designer’s canvas and in the Properties pane select the Events tab. Use the Assign link for the Input Parameters property.
- If your action chain is to be started by a variable, open the relevant Variables tab (App UI, flow, or page level), and in the Properties pane select the Events tab. Use the Assign link for the Input Parameters property.
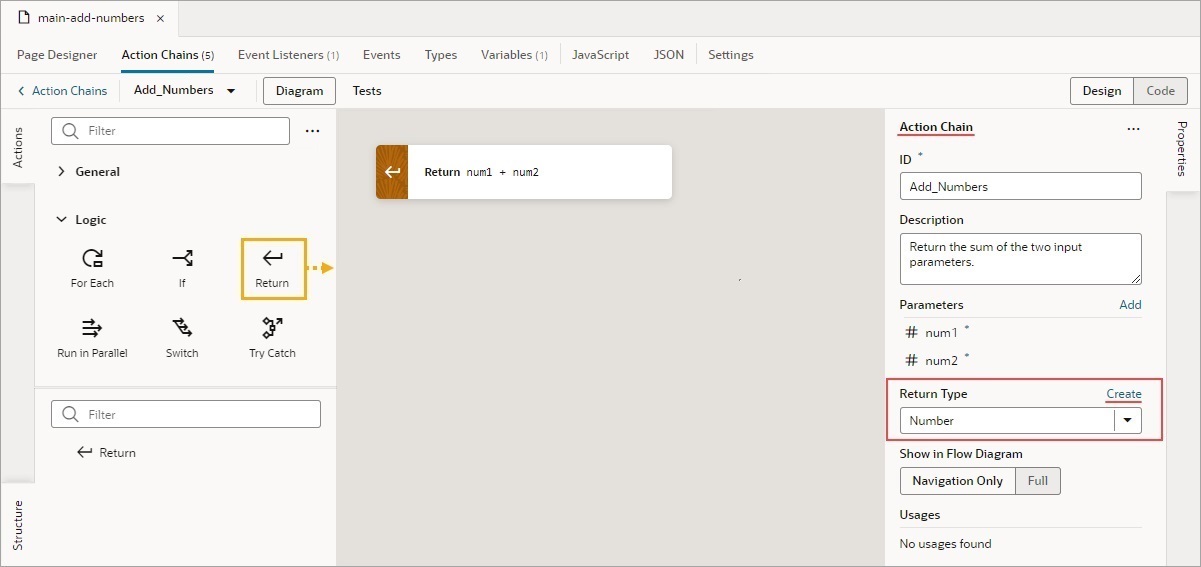
- If your action chain needs to return a payload, click the canvas to bring up the action chain in the Properties pane. For Return Type, select the type, or click the Create link to create a return type:
As shown in this example, in which the variable for the Return action to return is selected, the result returned by an action chain is available in the Variables picker, under the Local node, :
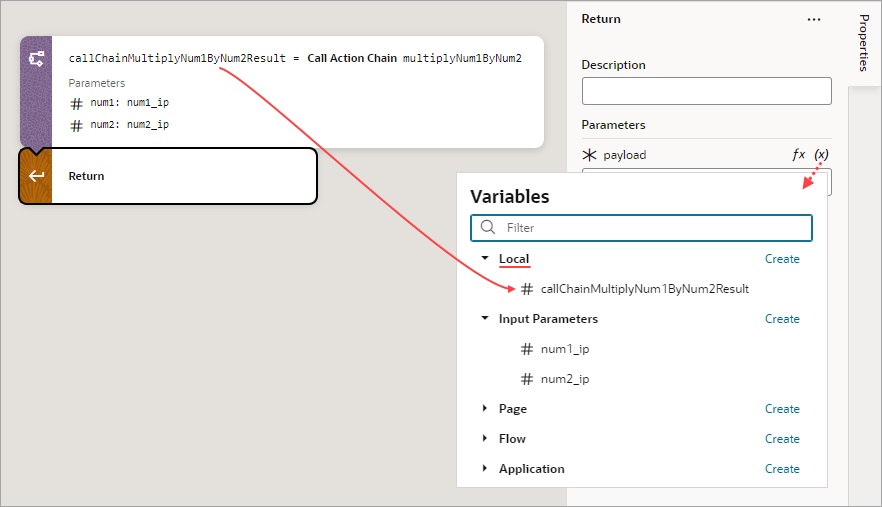
Description of the illustration jsac-action-chain-results-assigner.jpgYou are now ready to add the actions that will compose the action chain.
- If an action you need isn't available in the Actions palette, add the Code action to add your own block of code, or create a custom action if you think you'll need it in the future. For details about how to create a custom action, see Custom Actions.
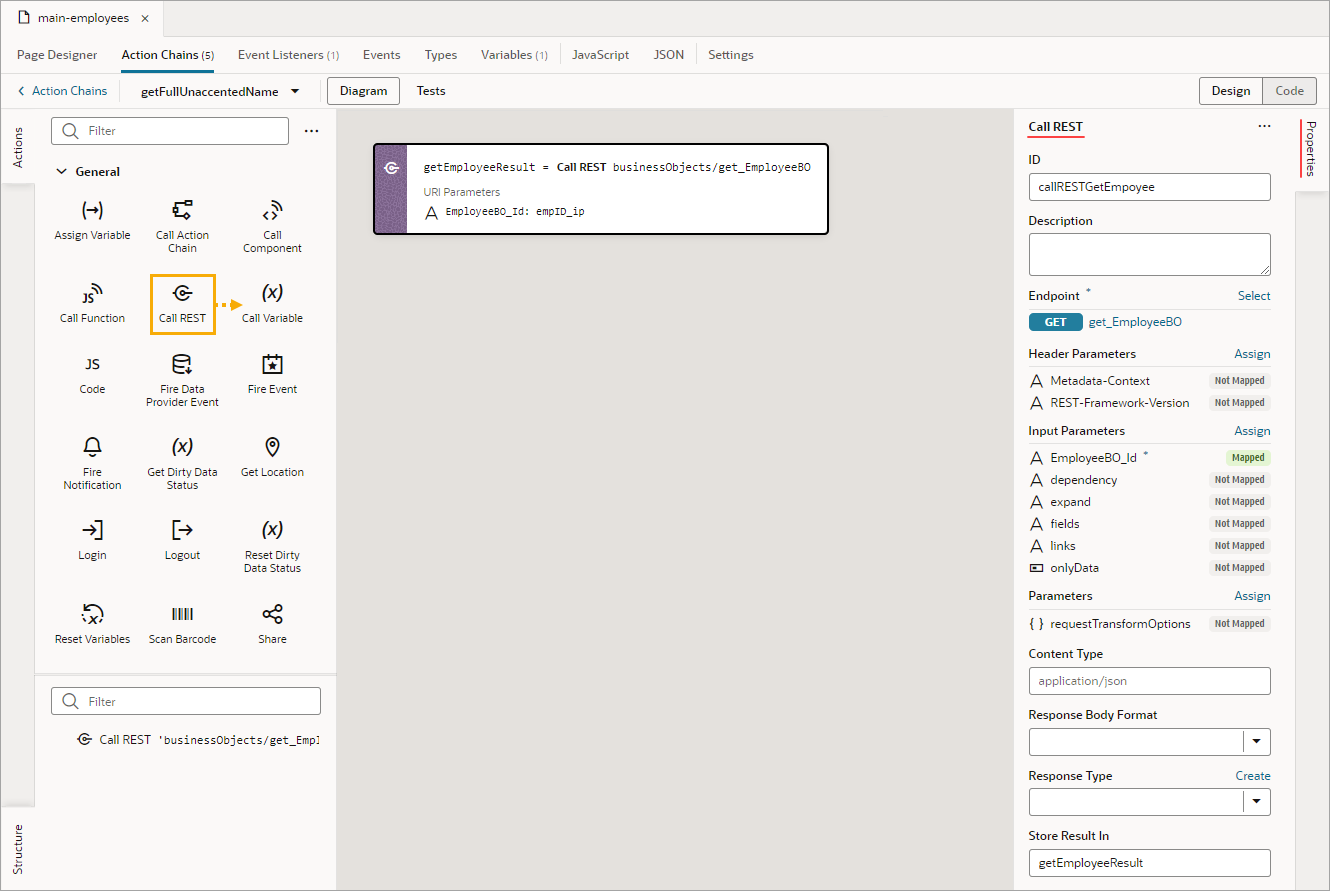
- From the Actions palette, double click an action or drag and drop it onto the canvas. The new action is added to the chain and is selected by default. The Properties pane displays the properties that you can specify for the action, and the action's card on the canvas displays the specified values. For example, here’s a Call Rest action with its properties set in the Properties pane:
- Double click or drag and drop the next action from the Actions palette onto the bottom edge of the action that it follows. Configure the action in the Properties pane or through code. To add an action before another action, drop it on the top edge of the action it is to precede.
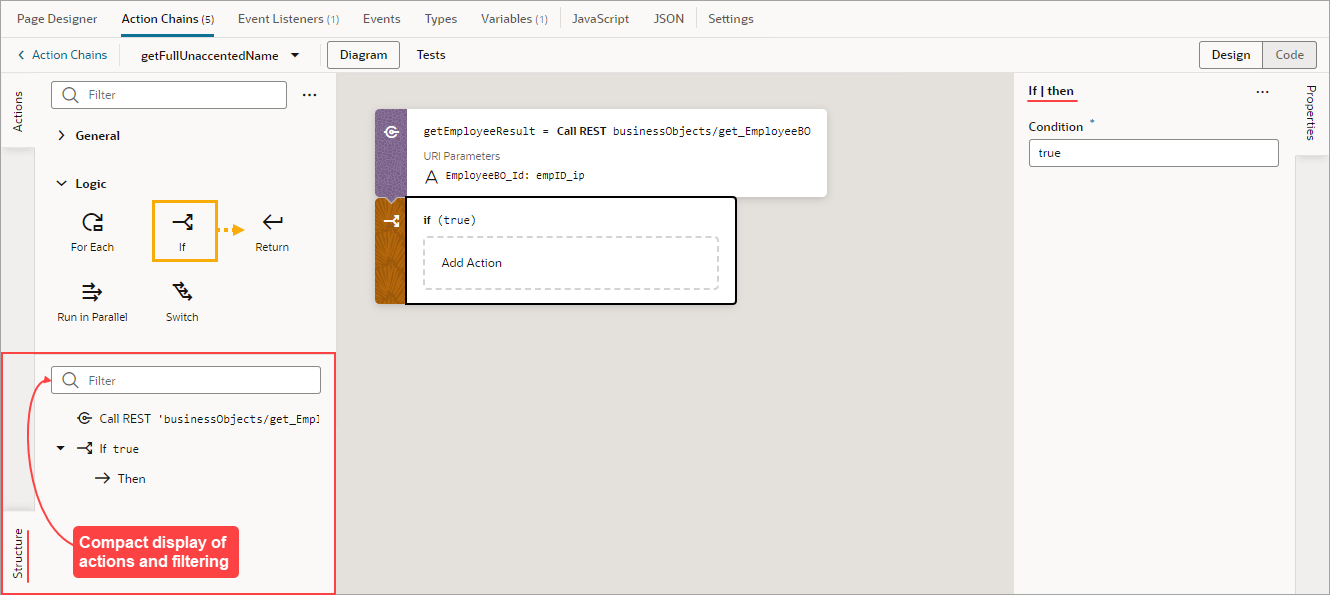
As shown above, the Structure pane displays a compact view of the actions and it provides a filter to quickly find and select an action.
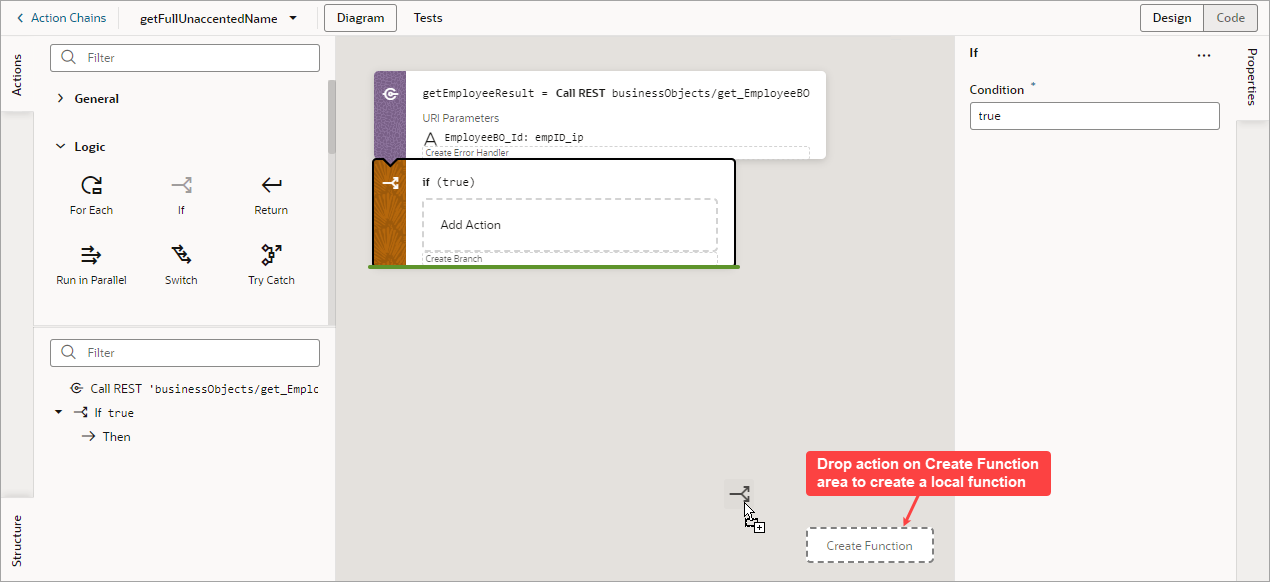
- If you want to create a local function for your action chain, for the sake of modularity, drop the function's first action on the Create Function area that appears when you drag an action over the canvas:
When a local function is created, it gets its own space on the canvas, the Property pane displays its properties, and the Structure pane displays its actions. Also, the local function is added to the Actions palette, under the Local Functions category, for you to quickly add a call to it.
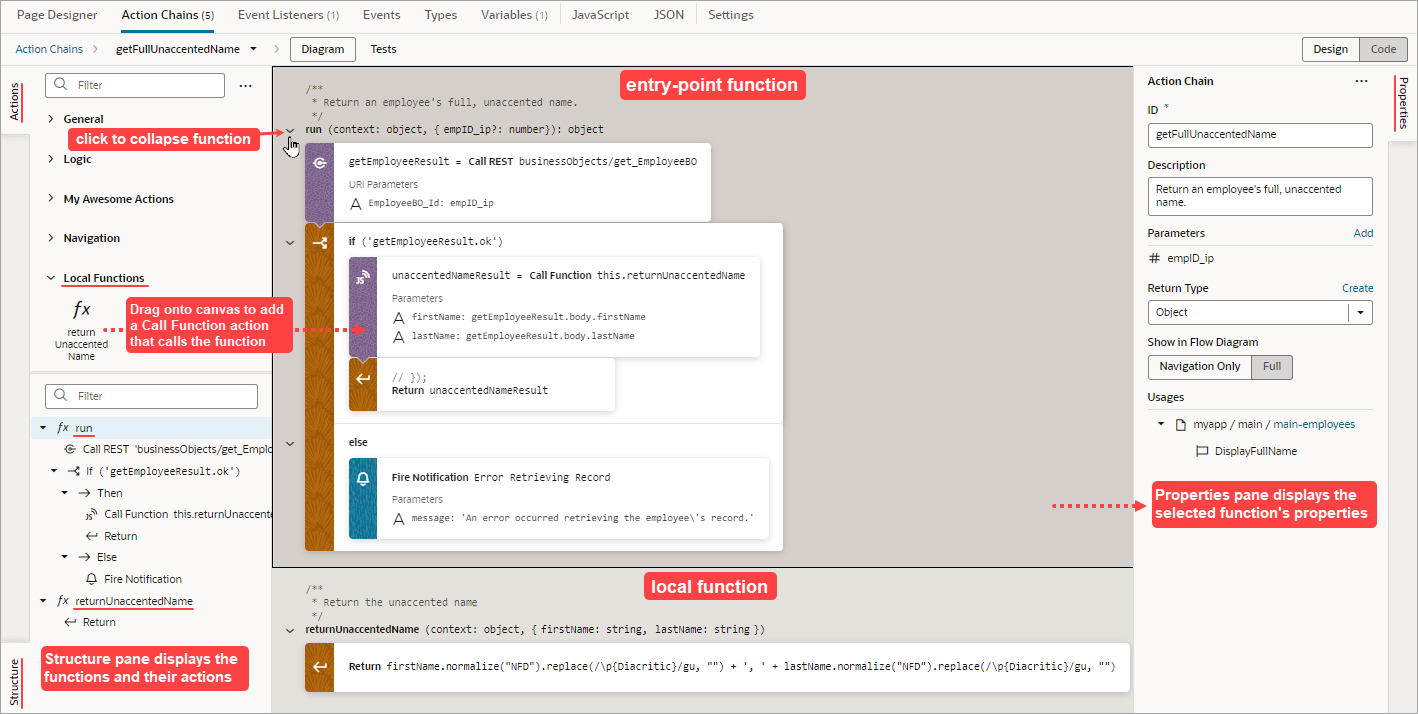
Description of the illustration jsac-create-chain-create-function-ui.png - Continue to add and configure actions until your action chain is complete. The action chain is saved automatically as you make changes.
If you need to remove an action from the chain, right-click the action on the canvas and select Delete or press Delete on your keyboard. You can also delete the action in the Properties pane using its options menu: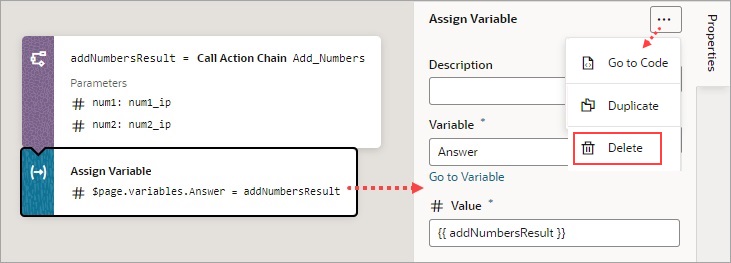
Description of the illustration jsac-delete-action-canvas.jpg
To view usage details for your action chain, such as which pages use it, click an empty space on the canvas to select the action chain and look under Usages in the Properties pane. Click a usage to navigate there. The event listener tied to the event that calls the action chain is also listed, as shown here: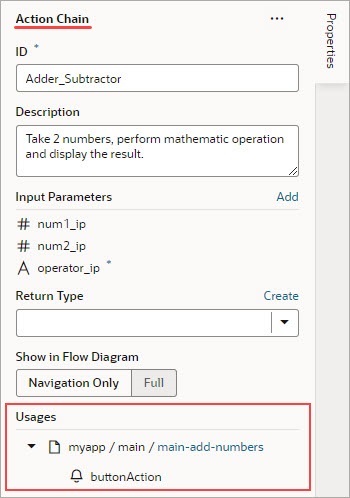
Description of the illustration jsac-action-chain-usage.jpg
Example of How to Create an Action Chain
In this example, we implement this Adder and Subtractor interface by creating an action chain that either adds or subtracts two numbers and displays the result: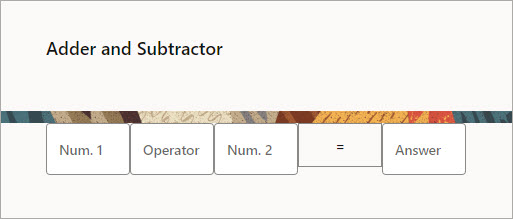
Description of the illustration jsac-adder-subtractor-interface.jpg
The interface has:
- Four text components:
- Two for entering the numbers to add or subtract (Num. 1, Num. 2)
- One for entering either a plus or minus sign (Operator)
- One to display the result (Answer)
- One button (=) that triggers the action chain that performs the operation and displays the result
Each of the four text components is bound to a page variable:
Description of the illustration jsac-four-components-bound-var-appui.png
Here, we create the action chain that either adds or subtracts two numbers and displays the result:
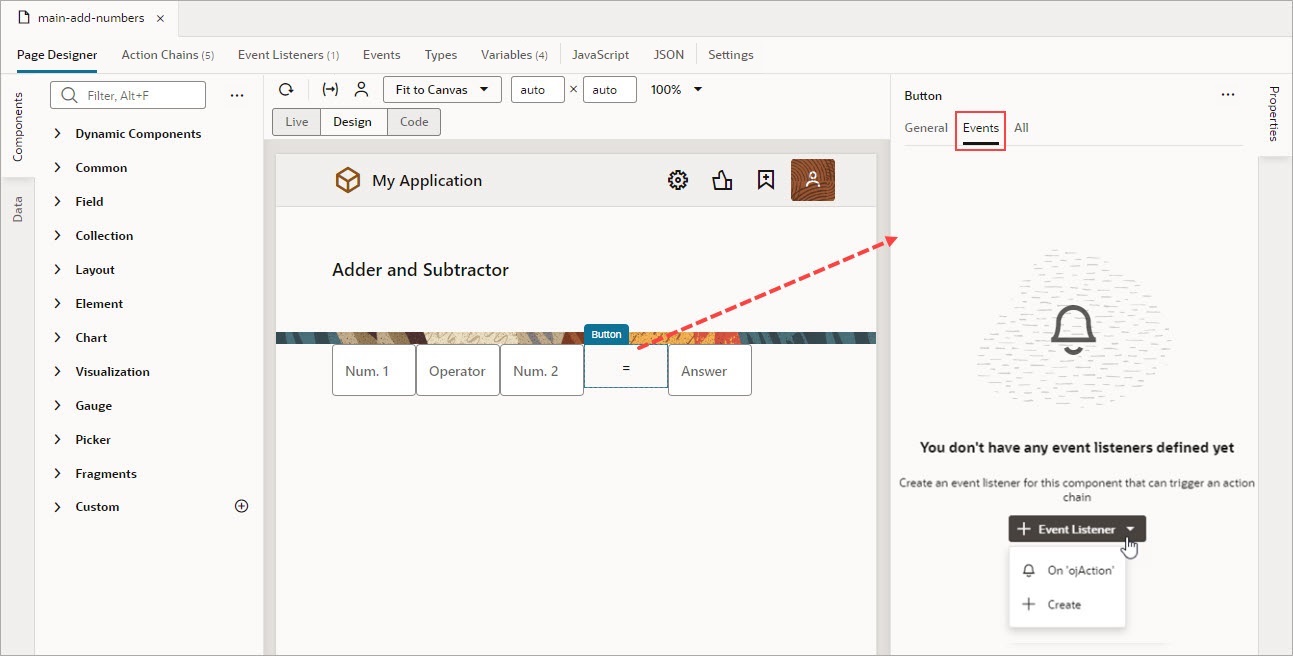
- We want the action chain to be triggered by clicking the equals button, so select the equals button on the Page Designer’s canvas, then select the Events tab in the Properties pane:
- Click + Event Listener, then On ‘ojAction’ to create an event that’s triggered by clicking the button, as shown above.
The new action chain opens in the Action Chain editor.
- Using the Properties pane, enter Adder_Subtractor for the action chain’s ID field, and optionally a description.
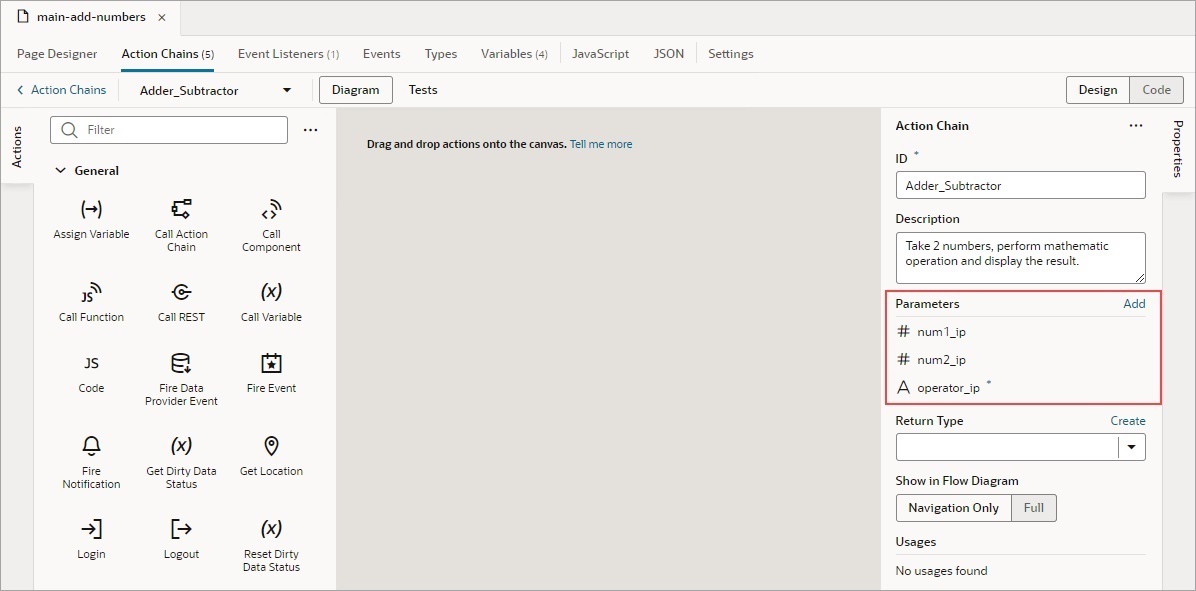
- Since three input parameters are needed, two for the numbers and one for the operator, you need to add them using the Add link next to the Parameters property in the Properties pane:
Nothing needs to be returned by this action chain, so we don’t need to define a return type.
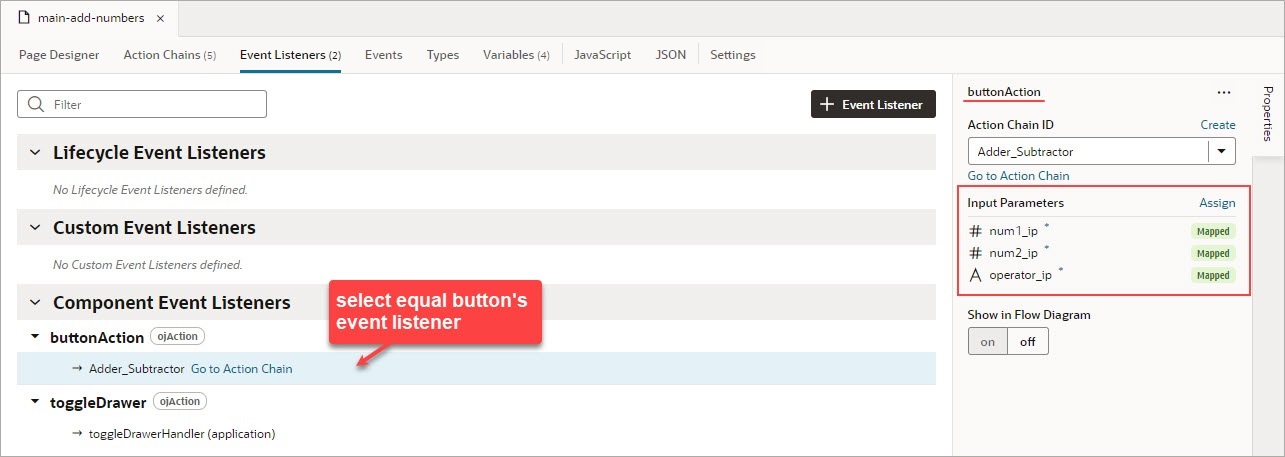
- Next, you need to provide the values for your input parameters. Open the Event Listeners tab and select the equal button’s event listener. In the Properties pane, click the Assign link for the Input Parameters property:
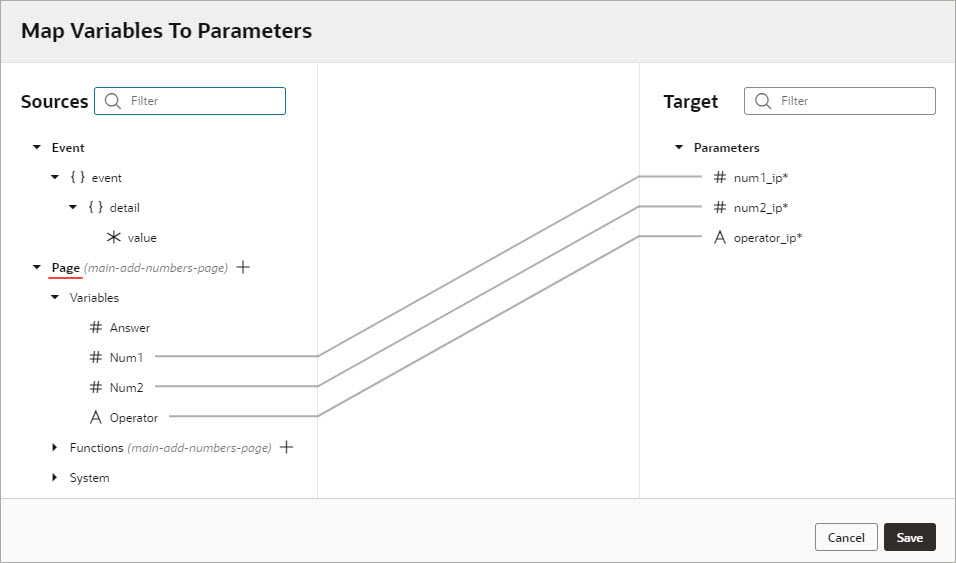
- In the mapper, map the page variables that were bound to the text components for the numbers and the operator to the action chain’s input parameters:
To implement this action chain, we need to handle each possible entry for the operator field: a plus, a minus and an invalid entry. - Start by dragging and dropping the If action from the Action Palette onto the canvas.
- Select the
Ifcondition on the canvas, and in the Properties pane enter operator_ip === '+' in the Condition field to check if the user entered a plus sign.To handle this case, let’s add a call to a simple action chain, which we'll create, that returns the sum of two numbers.
- Drag and drop the Call Action Chain action from the Actions palette onto the
Ifcondition. - To create the action chain that adds two numbers, in the Properties pane, click the Create link for the Action Chain ID property (shown above). In the dialog box, enter Add_Numbers in the ID field, and optionally, enter a description. Click the Create button.
The action chain has been created and set for the Action Chain ID property.
- We now need to implement the Add_Numbers action chain by clicking the Action Chain ID property's Go to Action Chain link.
The Actions Chain editor is now loaded with the Add_Numbers action chain.
- To implement the Add_Numbers action chain:
- In the Properties pane, click the Add link for the Parameters property and add two input parameters for the numbers to add:
num1andnum2. - Since the action chain needs to return a number, define its return type by selecting Number for Return Type.
- Drag and drop the Return action from the Actions palette onto the canvas. In the Properties pane, enter {{ num1 + num2 }} for the Payload property to return the sum of the two input parameters. Recall, wrapping the expression with double curly brackets indicates that it’s a literal expression and not a string:
- In the Properties pane, click the Add link for the Parameters property and add two input parameters for the numbers to add:
- Navigate back to the Adder_Subtractor action chain by clicking the Action Chains link at the top-left of the editor and selecting the action chain.
The editor is now loaded with the Adder_Subtractor action chain.
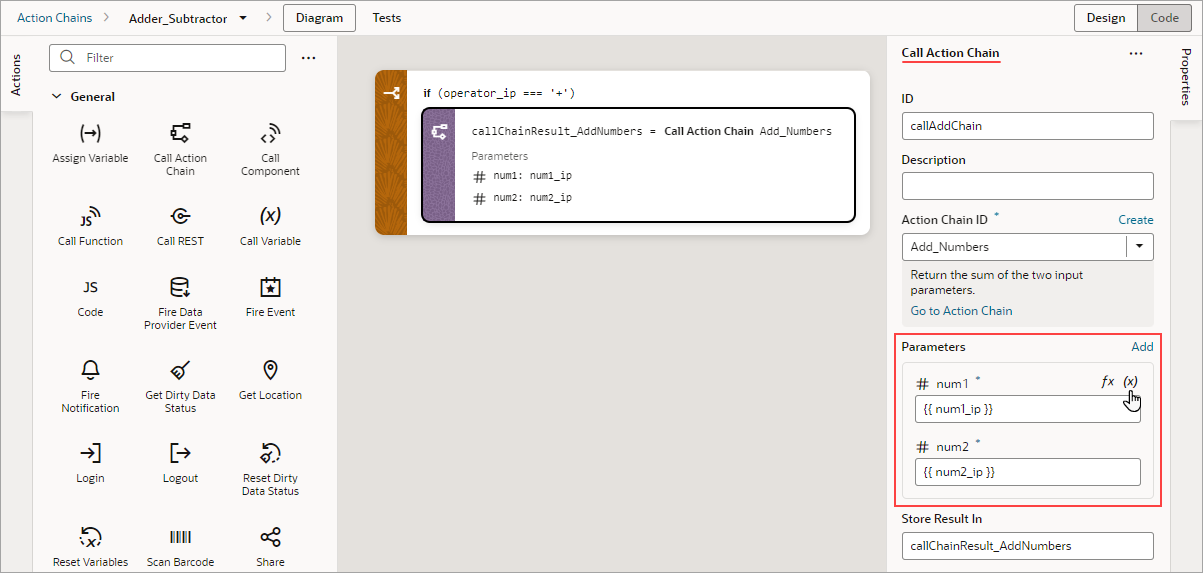
- The two numbers that were passed as input parameters to the Adder_Subtractor action chain now need to be passed to the Add_Numbers action chain. Select the Call Action Chain action on the canvas, and in the Properties pane, for the Parameters property, select the number input parameters:
You now need to assign the result from the Add_Numbers action chain to the page variable that’s bound to the text component that displays the answer.
- Drag and drop the Assign Variables action to the bottom edge of the Call Action Chain action on the canvas. For the Variable property, in the Properties pane, select the page variable that’s bound to the text component displaying the answer, and for the Value property, select the result from the Add_Numbers action chain:
Next, we need an
Else Ifcondition to handle the case when a user enters a minus sign for the operator. - Drag and drop the Call Action Chain action onto the Create branch area at the bottom of the
Ifcondition: - Change the
Elsecondition into anElse Ifby entering operator_ip === '-' for the Condition field, in the Properties pane. - Complete this
Else Ifcondition by following the previous instructions on how to handle the plus sign case.Here’s the completed
Else Ifcondition: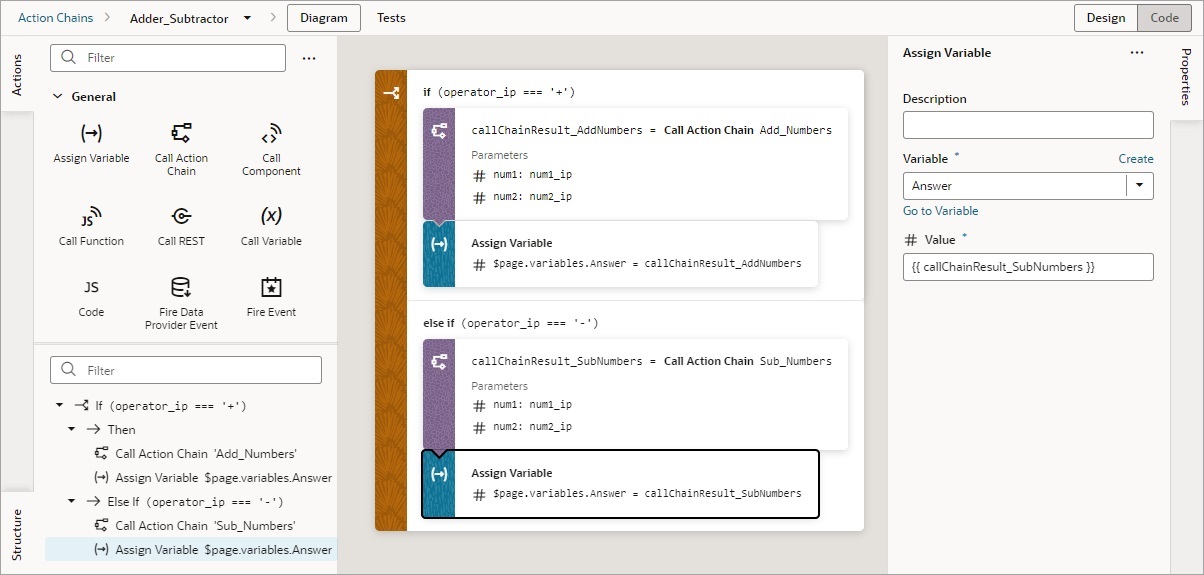
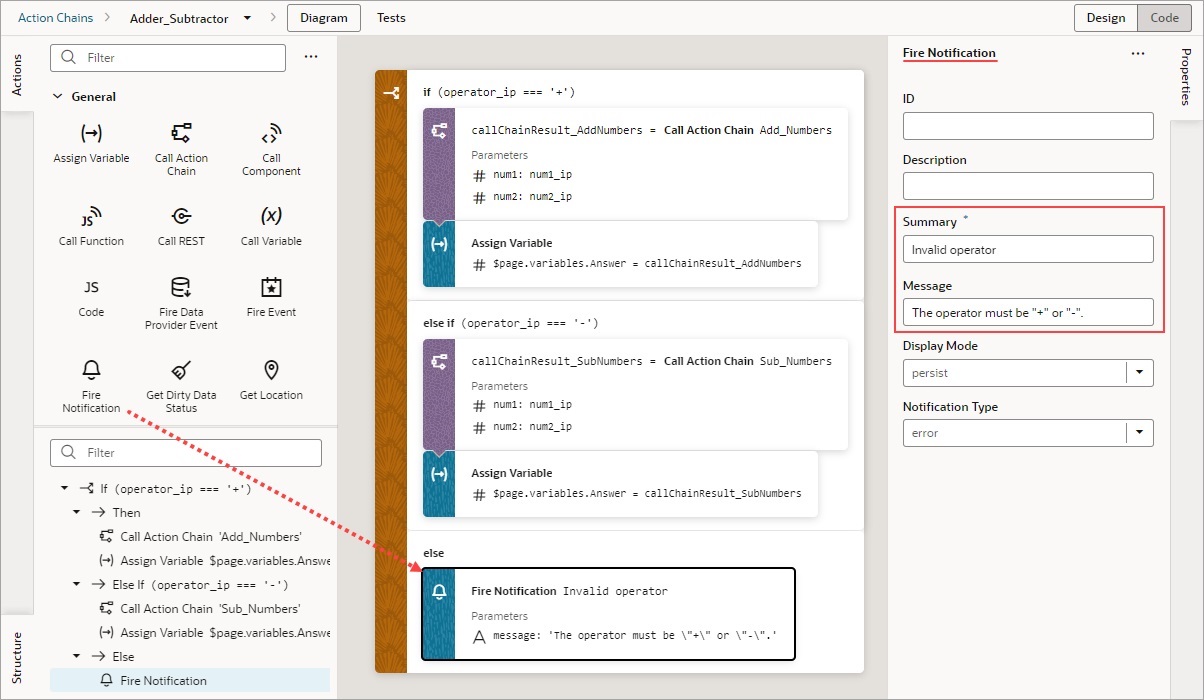
Description of the illustration jsac-completed-else-if.jpg - Lastly, we need to handle the case when a user doesn’t enter a plus or a minus sign for the operator. Drag and drop the Fire Notification action from the Actions palette onto the
Elsecondition. In the Properties pane, enter Invalid operator for the Summary property, and for the Message property, enter:The operator must be "+" or "-".Our action chain is now complete.
- At this point it makes sense to create some unit tests to test your new action chain. For details on how to do so, refer to Test Action Chains.
define([
  'vb/action/actionChain',
  'vb/action/actions'
], (
  ActionChain,
  Actions
) => {
  'use strict';

  class Adder_Subtractor extends ActionChain {

    /**
     * Take 2 numbers, perform mathematic operation and display the result.
     * @param {Object} context
     * @param {Object} params
     * @param {number} params.num1_ip
     * @param {number} params.num2_ip
     * @param {string} params.operator_ip
     */
    async run(context, { num1_ip = '0', num2_ip = '0', operator_ip }) {
      const { $page, $flow, $application, $functions } = context;

      if (operator_ip === '+') {
        const callChainResult_AddNumbers = await Actions.callChain(context, {
          chain: 'Add_Numbers',
          params: {
            num1: num1_ip,
            num2: num2_ip,
          },
        }, { id: 'callAddChain' });

        $variables.Answer = callChainResult_AddNumbers;

      } else if (operator_ip === '-') {

        const callChainResult_SubNumbers = await Actions.callChain(context, {
          chain: 'Sub_Numbers',
          params: {
            num1: num1_ip,
            num2: num2_ip,
          },
        });

        $variables.Answer = callChainResult_SubNumbers;
      }
      else {
        await Actions.fireNotificationEvent(context, {
          summary: 'Invalid operator',
          message: 'The operator must be "+" "-".',
        });
      }
    }
  }

  return Adder_Subtractor;
});
