Built-In Actions
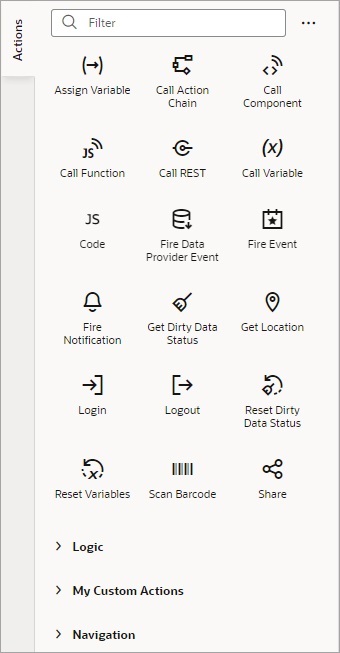
VB Studio provides a set of built-in actions that you use to create your action chain. If an action you need isn't available in the Actions palette, use the Code action to add your own block of code, or if a future need warrants it, create a custom action that can be reused.
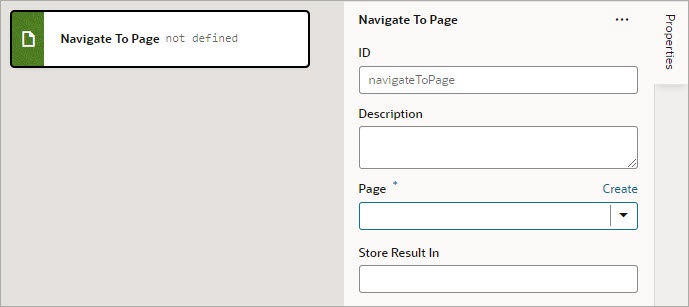
Each action performs a specific function and requires you to set different properties. For example, when you add the Call REST action to your action chain, you need to specify the endpoint and other details about the response to the Call REST action. Similarly, when you add a Navigate To Page action, you'll need to select a page to navigate to: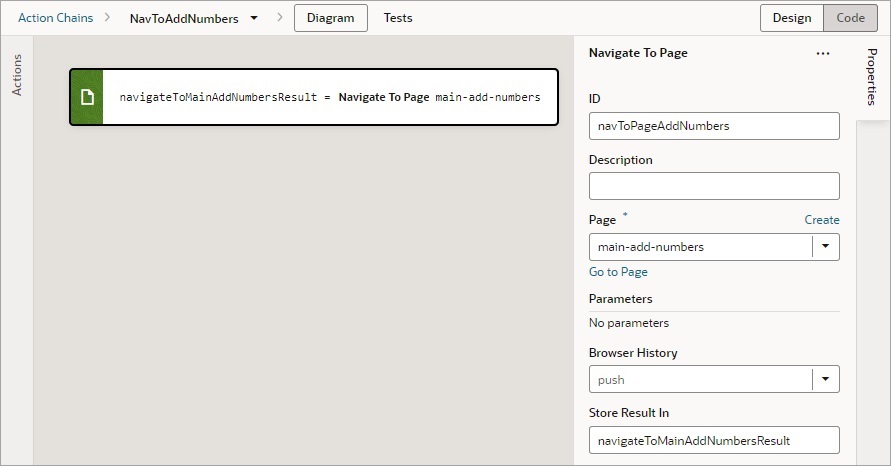
Description of the illustration jsac-navigate-action-editor.jpg
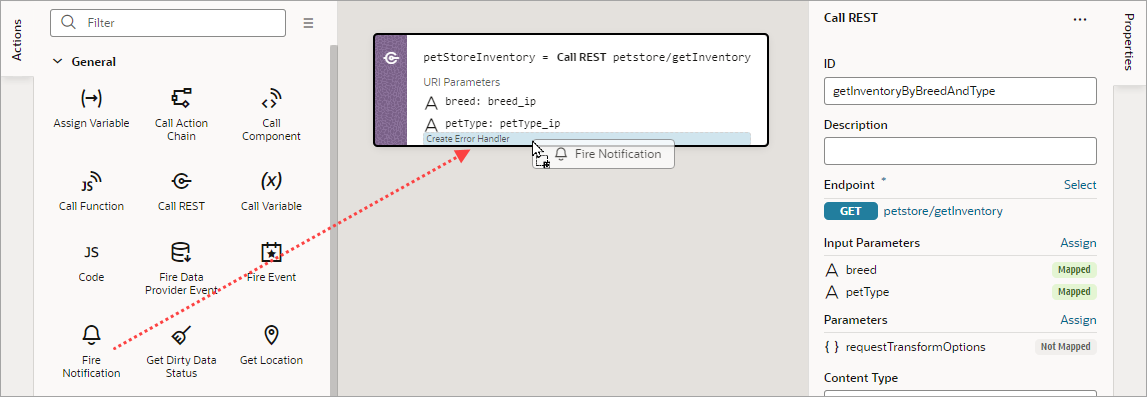
- Drag and drop the action from the Actions palette onto the bottom edge of the action it's to follow, or onto the top edge of the action it's to precede.
- Double-click the action in the Actions palette to add it to an empty canvas or to the end of an action chain.
- Select the action on the canvas that you want the new action to follow, then double-click the new action in the Actions palette.
If you need more details about an action than are provided in this section, refer to the JavaScript Actions section in the Oracle Visual Builder Page Model Reference.
Add an Array Operation Action
Includes
You use an Includes action to check if an array includes a specific value, returning true or false.
After you add the action, select the array using the Variable property. For the Search Element parameter that appears, specify the value to search for, and for the From Index parameter, select the index to start the search from.
Pop
You use a Pop action to remove and return the last element from an array, which decreases the array's length by one.
After you add the action, select the array using the Variable property. The last element is returned by the variable shown by the Store Result In property.
Push
You use the Push action to add an element to the end of an array. This action also returns the new length of the array.
After you add the action, select the array using the Variable property. The new length of the array is stored in the variable shown by the Store Result In property.
Slice
You use the Slice action to return a copy of an array, by specifying the indexes to start and end the copying. The array is copied from the start to the end indexes you provide.
After you add the action, use the Variable property to select the array for the operation. For the Start Index and End Index parameters that appear, enter the indexes to start and end the copying. The copy of the array is returned in the variable shown by the Store Result In property.
Add an Assign Variable Action
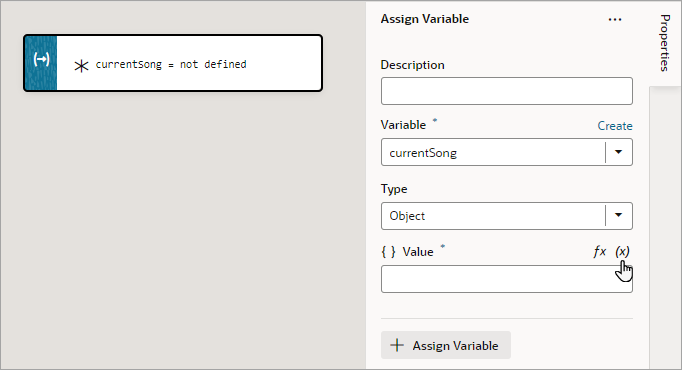
You use an Assign Variable action to assign a local, page, flow, or application variable a value. This action can also be used to create a local variable.
For example, if your action chain sends a request to a GET endpoint, you can use the Assign Variable action to map the response to a page variable that's bound to a page component. Or, suppose you want to capture the ID of an item selected in a list. You could use a Selection event to start an action chain that assigns the selected item’s ID to a variable.
To use an Assign Variable action to create a local variable:
- For Variable, enter its name and hit Enter on your keyboard.
- For Type, select its data type.
- If necessary, use the Value field to assign it a value.
To use an Assign Variable action for a value assignment:
- Add the action in one of three ways, as explained at the end of Built-In Actions.
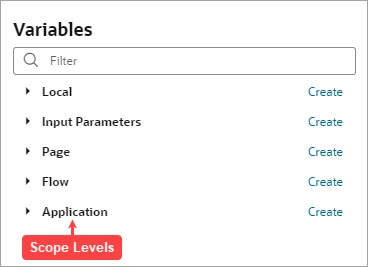
- If you need to create a variable for the assignment, click the Variable property's Create link, otherwise, start to type the variable's name in the field and select it when it appears. You could also select the variable from the list.
- To set the variable's value, hover over the far-right side of the Value property and click
 to choose the variable that holds the value, or click fx to create an expression for the value.
In this example, the page variable
fullNameis assigned the result from a module function: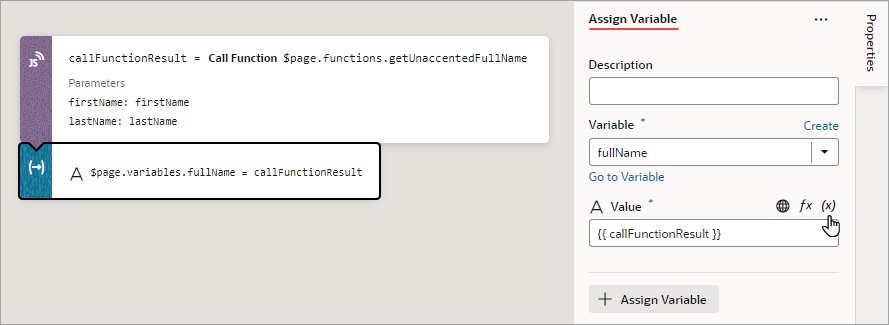
Description of the illustration jsac-assign-variables-action.jpg
If you need to do another assignment, click the + Assign Variable button in the Properties pane: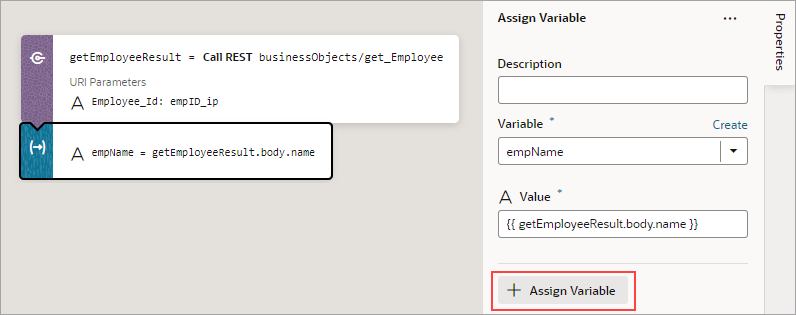
Description of the illustration jsac-assign-another-var.png
Then make the assignment using the Variable and Value fields that appear for the new variable assignment: 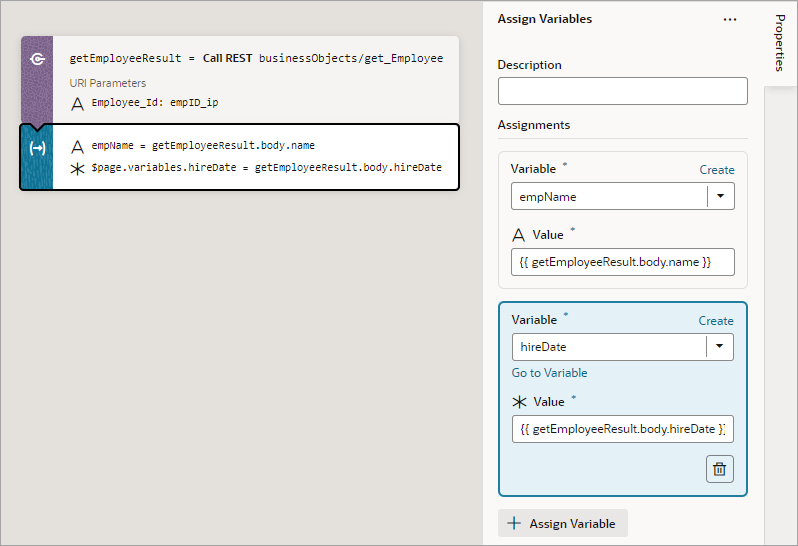
Description of the illustration jsac-assign-another-var2.png
If you'd like to move a variable assignment to a different position, in the Properties pane, click and hold an assignment, then move it to its new position.
Use Filter Builder to Create Filter Criteria for an SDP
If you're using an SDP to provide a table or list's data, and you'd like to filter out rows, you can use the Assign Variable action to create and assign the filter criteria to the SDP's filterCriterion property. For further details about using an SDP to filter a table or list's rows, see Filter Data by Filter Criteria.
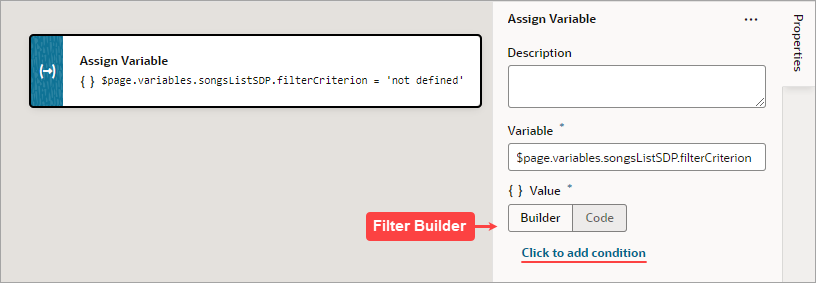
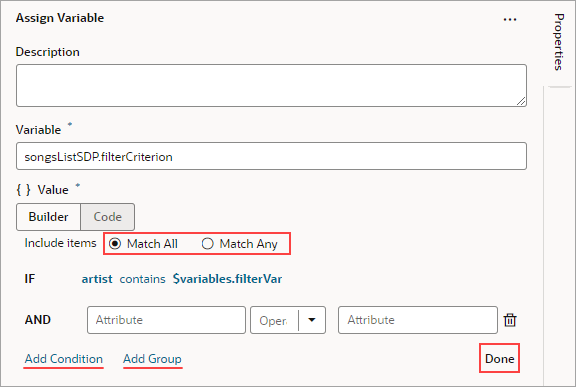
When the Assign Variable action's Variable property is set to an SDP's filterCriterion property, the Filter Builder appears under the Variable property for you to create the filter criterion. To directly work with the code, click the Code button. For details, see Filter Builder's Code Editor.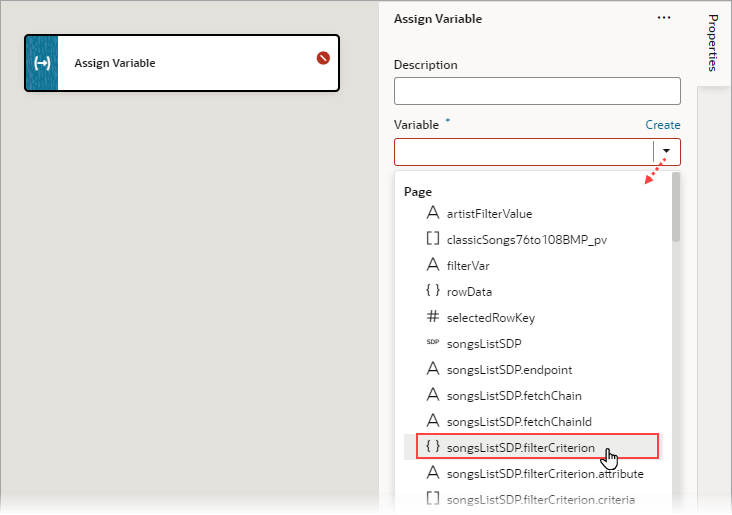
Description of the illustration jsac-assign-action-pick-sdp.png
To use the Assign Variable action's Filter Builder to create the filter criterion for an SDP:
- Click the Filter Builder's Click to add condition link:
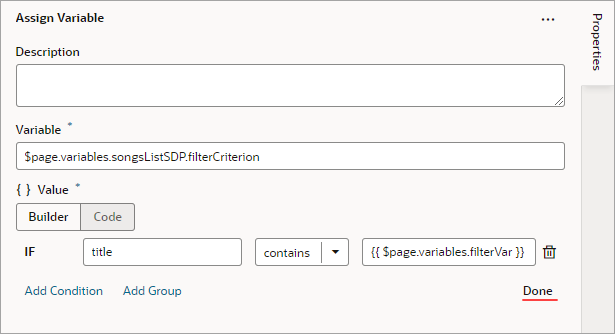
- For the first Attribute textbox, enter the name of the column (field in record, like "city") that you want compared against a specific value (like "Tokyo").
- For the Operator list, select the operator for the criterion.
- For the second Attribute textbox, enter the specific value to compare against, or select the variable that contains the value. For instance, the value could be stored by a page variable that was bound to an Input Text component for a user to enter the value.
- To add another condition, click the Add Condition link to add one with an AND or OR operator, or click the Add Group link to add a group of conditions that are to be evaluated together (conditions enclosed in brackets). To combine conditional expressions with the AND operator, select Match All, and to combine them with the OR operator, select Match Any:
- Click Done when you're finished.
Filter Builder's Code Editor
You can use the Filter Builder's Code tab to view and edit the filter's code. After defining a condition on the Builder tab, you will see that the Code tab contains an attribute, op and value property.
Here's an example of a filter with two conditions combined by an AND operator:
{
 "op": "$and",
 "criteria": [
  {
   "op": "$eq",
   "attribute": "name",
   "value": "{{ $variables.filterVar }}"
  },
  {
   "op": "$eq",
   "attribute": "id",
   "value": "{{ $variables.idVar }}"
  }
 ]
}- The Oracle JET operator is "
$eq" (it must include the dollar sign (“$”)). - The
attributeproperty is set to the name of the field (column) that you want to be evaluated against thevalueproperty. - The
valueproperty ($variables.customerListSDP.filterCriterion.criteria[0].value) is mapped to a page variable ($variables.filterVar) that holds the value to be evaluated against each field (column) value.
Add a Call Action Chain Action
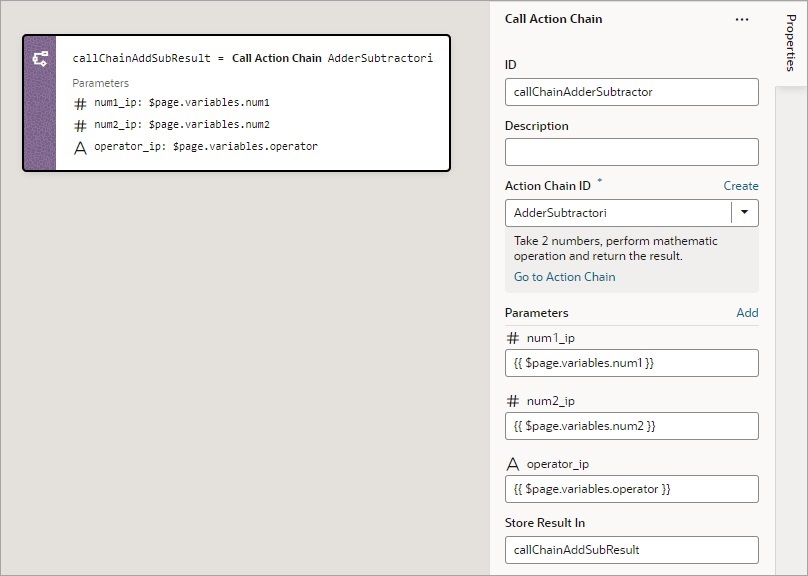
You add a Call Action Chain action to start an action chain. This action can call action chains defined in the same page, flow, or App UI.
For API information about this action, see Call Action Chain in the Oracle Visual Builder Page Model Reference.
To use a Call Action Chain action:
Add a Call Component Action
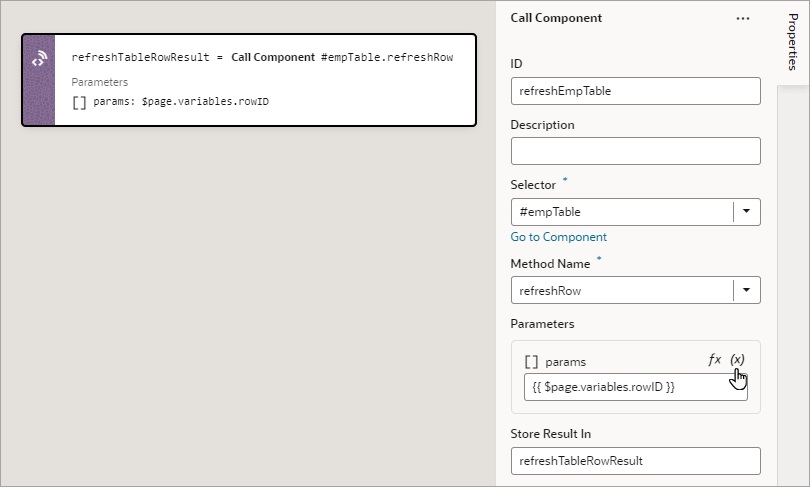
You add a Call Component action to call a method on a component.
For API information about this action, see Call Component Method in the Oracle Visual Builder Page Model Reference.
To use a Call Component action:
Add a Call Function Action
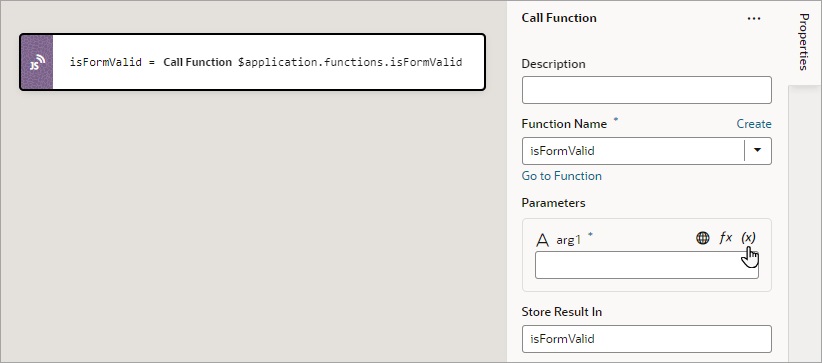
You add a Call Function action to call a function defined for the current page, flow, or App UI, and you can also call a global function. For more about global functions, see Add JavaScript Modules As Global Functions. Functions for a page, flow and App UI are created using their JavaScript editor.
For API information about this action, see Call Function in the Oracle Visual Builder Page Model Reference.
To use a Call Function action:
Add a Call REST Action
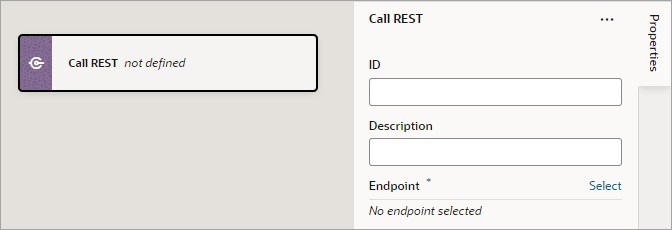
A Call REST action is used to call a REST API endpoint to create, update, delete or display records.
For API information about this action, including details about error handling and its return object, see Call REST in the Oracle Visual Builder Page Model Reference.
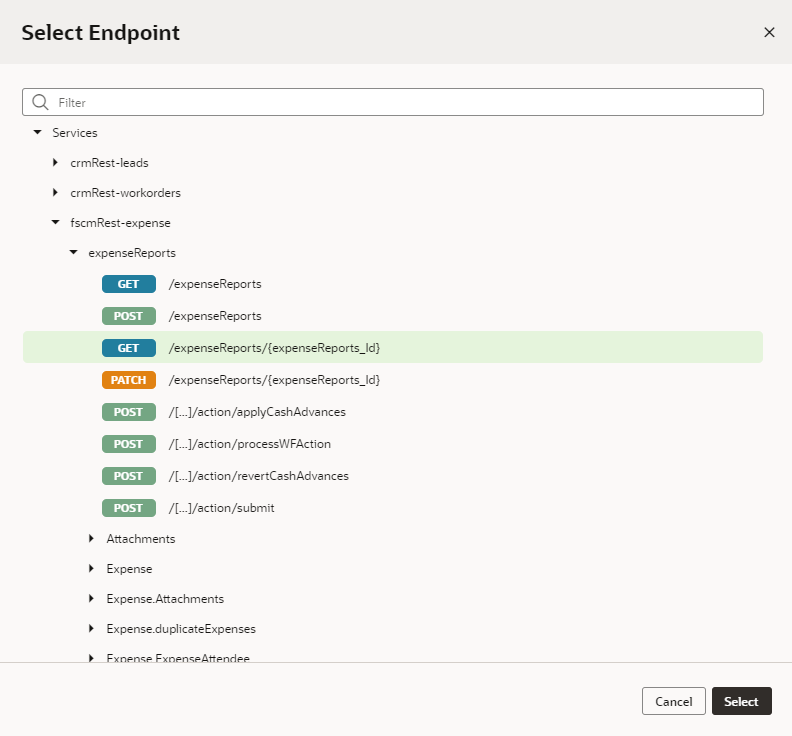
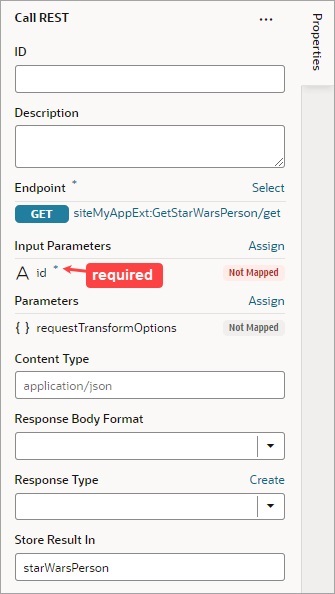
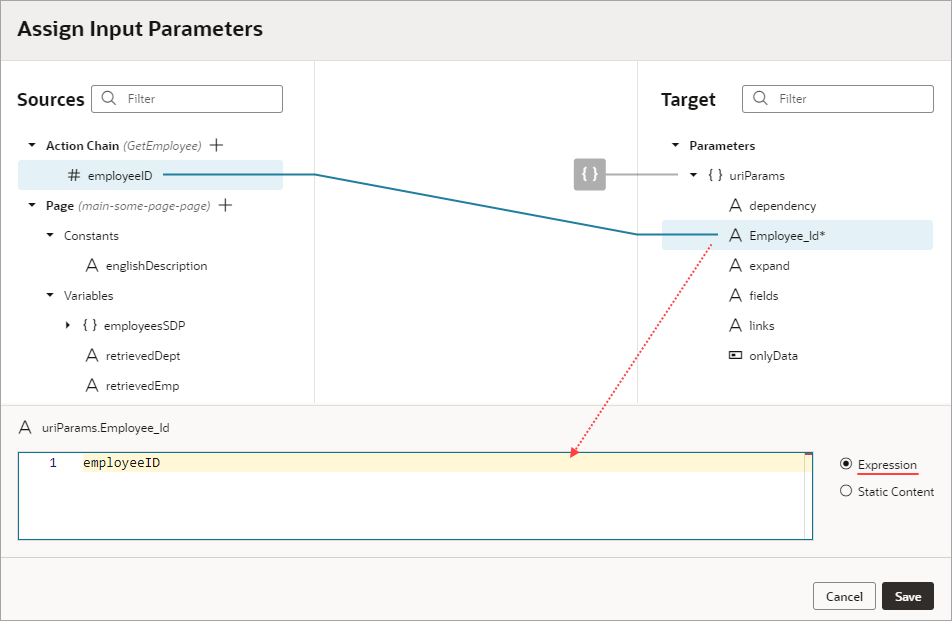
After you add a Call REST action, you need to specify the endpoint for the request. Depending on the endpoint, you might also need to provide input parameters, such as an ID to identify a record.
This table lists the parameters that you typically need to provide for a Call REST action, for each type of endpoint. For a code example of a call to each endpoint type, see Call REST in the Oracle Visual Builder Page Model Reference. Regarding the action's returned result, it's assigned to the automatically generated variable set for the Store Result In property.
| Type of Endpoint | Use | Typical Requirements |
|---|---|---|
| POST | Add a new record. |
|
| GET | Get one or many records. |
To get single record, provide the record's ID: In the Input Parameters section of the Properties pane, provide the record's ID using the input parameter for the record's ID. |
| DELETE | Delete a record. |
|
| PATCH | Update a record. |
|
To use a Call REST endpoint:
The object returned by the Call REST action is automatically named and shown by the Store Result In property.
If the underlying REST API request returns a status code, the error object is returned for you to handle the error yourself, otherwise an auto-generated error notification is shown.
Service Definitions
To change the details of a service connection endpoint, such as its path, method (example: GET, PUT, HEAD) or the schema of the request or response, see Edit a Service Connection.
Transform Functions
For details about creating JavaScript functions that modify the format of data and parameters for REST requests and modify the format of data from Rest responses, see Add Transforms.
Add a Call Variable Action
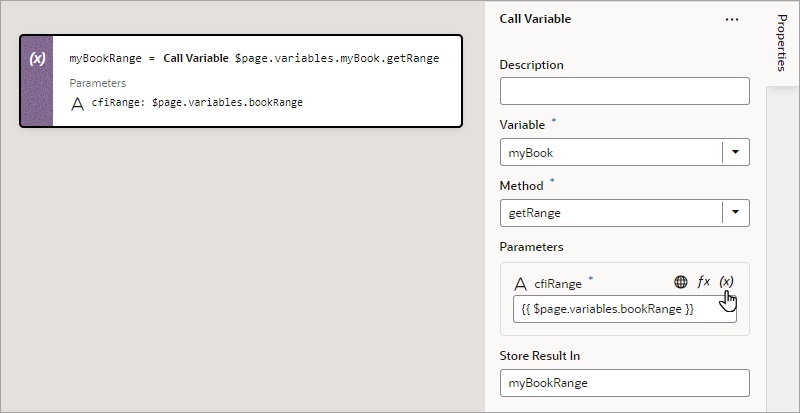
You add a Call Variable action to an action chain to call a method on an InstanceFactory variable defined for the current scope (flow, page, or App UI). Using this action with any other type results in an error.
You can call any method on the current instance associated with the InstanceFactory variable, including asynchronous ones. However, since actions are by design synchronous, this action will wait for the asynchronous call to resolve before proceeding to the next action in the chain.
Before you use a Call Variable action, make sure an InstanceFactory type variable is already defined for the App UI. See Create a Type From Code.
For API information about this action, see Call Variable in the Oracle Visual Builder Page Model Reference.
To use a Call Variable action:
Add a Code Action
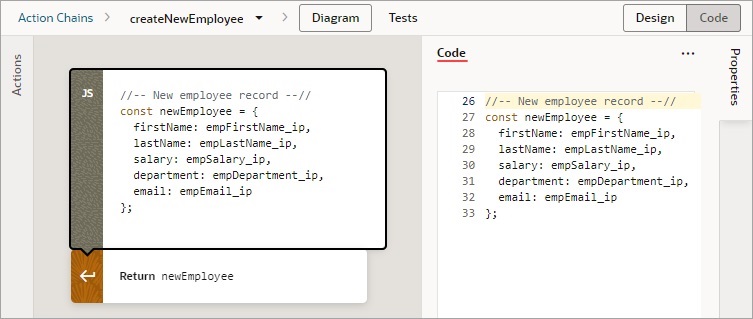
You use a Code action to add JavaScript code to an action chain.
To use a Code action:
- Add the action in one of three ways, as explained at the end of Built-In Actions.
- Using the Properties pane, write or edit your custom code:
If needed, you can drop an action between single line and block statements in custom code, but not within a block statement (for example, not within a while or for block statement). A drop indicator line appears where you can drop an action within custom code.
Add a Fire Data Provider Event Action
You add a Fire Data Provider Event action to dispatch an event on a data provider in order to reflect changes to your data. For example, a component using a particular Service Data Provider (SDP) may need to display new data because new data has been added to the endpoint used by the SDP.
Note:
This action is not necessary for an Array Data Provider (ADP) variable, since the data array of an ADP variable, exposed via thedata property, can be updated directly using the Assign Variable action. Assigning the data array is automatically detected by VB Studio, and all listeners are notified of this change. Users will be warned of this when the fireDataProviderEvent is used with an ADP, before mutating the data property directly.
For API information about this action, including further details about its properties, see Fire Data Provider Event Action in the Oracle Visual Builder Page Model Reference.
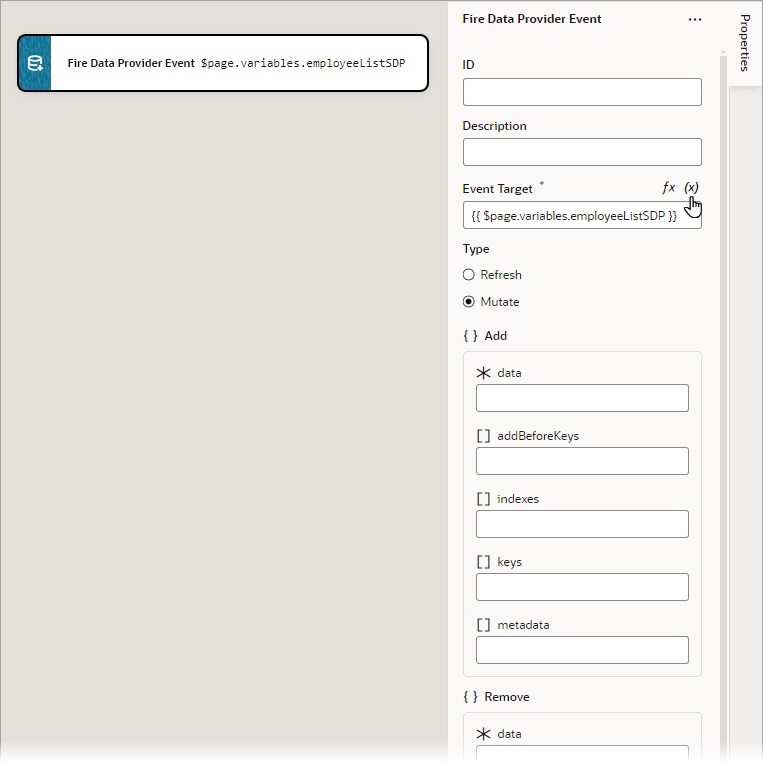
To use a Fire Data Provider Event action:
- Add the action in one of three ways, as explained at the end of Built-In Actions.
- Update the ID field in the Properties pane to make the action more identifiable.
- From the Event Target list, select an existing variable based on a data provider (like
ServiceDataProvider) as the target of the event. If necessary, click Create to create a new data provider variable as the event's target. - Select the type of event you want to dispatch:
- Refresh: Used to show all changes.
- Mutate: Used to specify which changes to show. For example, after a record is deleted, you can use the Mutate option to indicate the deleted record, prompting the UI component bound to the SDP to remove it from the display.
A mutation event can include multiple mutation operations (add, update, remove) as long as the ID values between operations do not intersect. This behavior is enforced by JET components. For example, you cannot add a record and remove it in the same event, because the order of operations cannot be guaranteed.
- If you chose the Mutate event, ensure that the
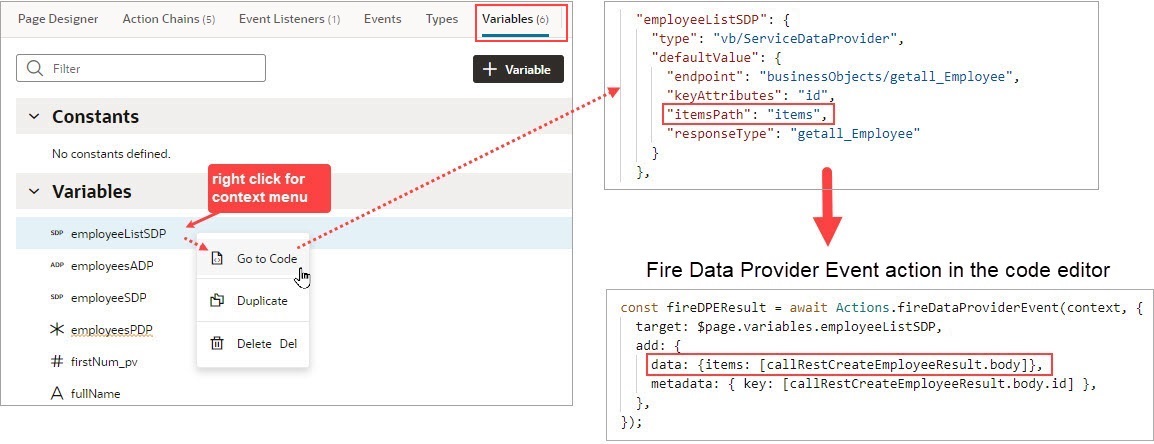
keyAttributesproperty is set for the SDP variable. The parameters for showing the added, removed, and updated records are under the Add, Remove and Update sections. For the mutate event to perform optimally, here's what's required for each section:- Add: Use the data parameter to pass the added record or records from the add operation’s returned result. If you are using an SDP variable, the structure of the data must match the structure specified by the
itemsPathparameter of the SDP variable’s definition:
Use the keys parameter to pass the key values of the added records with theSet<*>format. Lastly, use the metadata parameter to pass the key values of the added records with the formatArray.<ItemMetadata.<KeyValue>>.For example:data: {items: [callRestCreateEmployeeResult.body],}, keys: [callRestCreateEmployeeResult.body.id], metadata: [{key: callRestCreateEmployeeResult.body.id,}], - Remove: Use the keys parameter to pass the key values of the deleted records with the
Set<*>format. - Update: Same as add.
- Add: Use the data parameter to pass the added record or records from the add operation’s returned result. If you are using an SDP variable, the structure of the data must match the structure specified by the
Add a Fire Event Action
You add a Fire Event action to invoke a predefined event or a custom event that you have defined in your application.
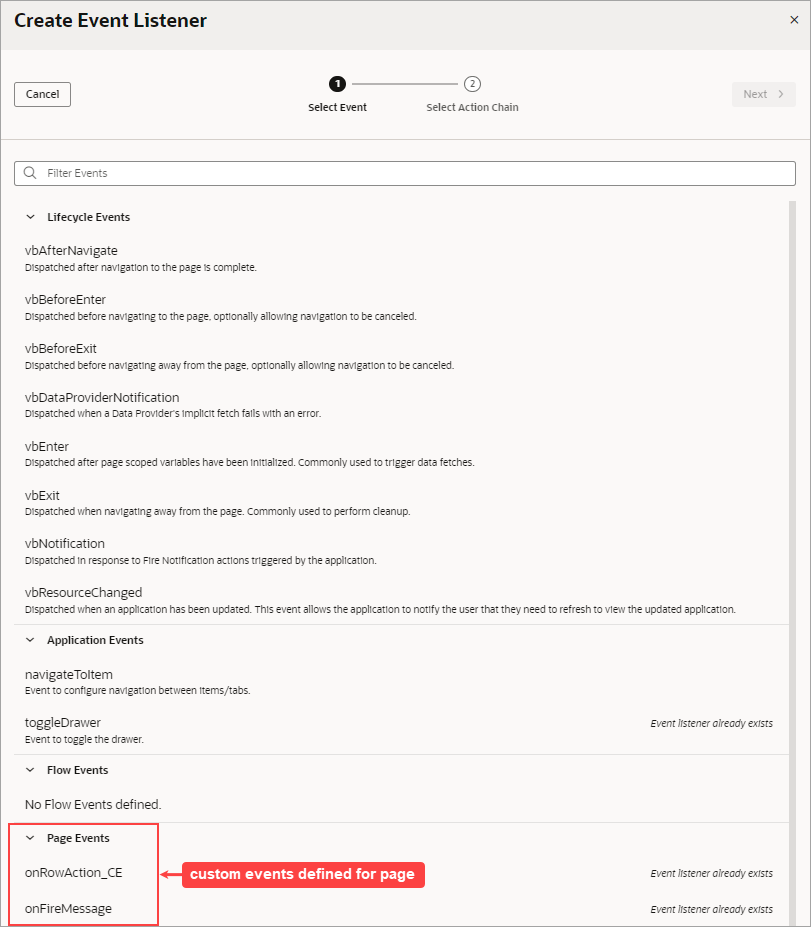
A custom event, created using the Events tab, is defined for an App UI, flow, page, or fragment. It can be used to perform some action, such as navigating to a page, and it can carry a payload that you define when you create the event.
You can trigger a custom event by using a Fire Event action in an action chain, which can be started in several ways (see Start an Action Chain). You could also trigger a custom event by using an event helper's fireCustomEvent() method (see Module Function Event Helper) in a module function (JavaScript function). For more about triggering a custom event this way, see Start an Action Chain By Firing a Custom Event.
For API information about this action, see Fire Event in the Oracle Visual Builder Page Model Reference.
- Create a custom event, defining parameters if required.
- Create an event listener, which can start more than one action chain:
- In the Create Event Listener wizard, assign the event listener the custom event:
- Create an action chain for the custom event, which will be started when the event is triggered by a Fire Event action. Create the action chain through the Event Listener tab, because if the listener's custom event has input parameters, the action chain is created with and passed an
eventobject that contains the input parameters (example:event.param1,event.param2...).
- In the Create Event Listener wizard, assign the event listener the custom event:
- To trigger the custom event and start its action chain, create an action chain and add a Fire Event action to trigger the custom event, providing any parameters defined for the event.
To use a Fire Event Action:
- Add the action in one of three ways, as explained at the end of Built-In Actions.
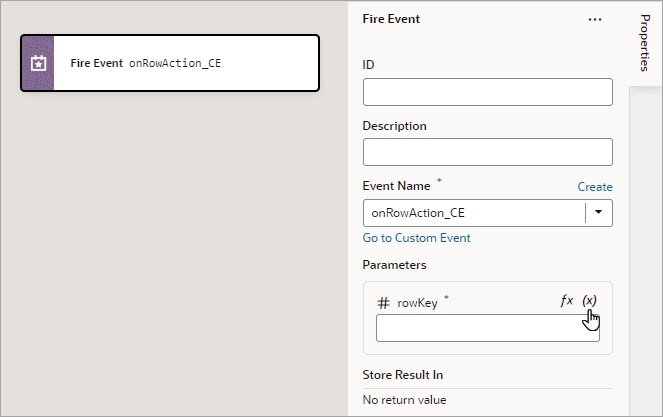
- In the Properties pane, select an existing event from the Event Name list of available events, or click Create to create a new custom event at the appropriate scope level (page, flow, or App UI). The list contains events that are available within the current scope.
- If the event has input parameters, the Parameters property is shown. To pass in a parameter, hover over the far-right side of the parameter and click
 to choose the variable. If you need to create a variable, use a Create link in the Variables dialogue to create it at the appropriate scope level.
 - If the event returns a value, it is assigned to the auto-generated variable shown by the Store Result In property.
Add a Fire Notification Action
You add a Fire Notification action to display a notification to the user in the web browser.
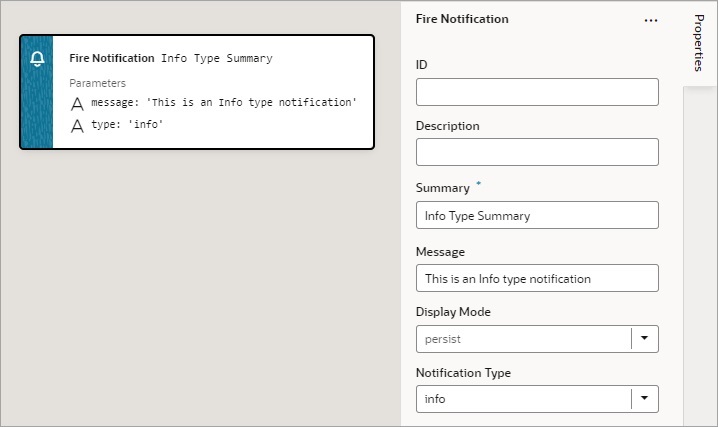
There are four types of notifications: Info, Error, Warning, and Confirmation. They display a summary and a message underneath: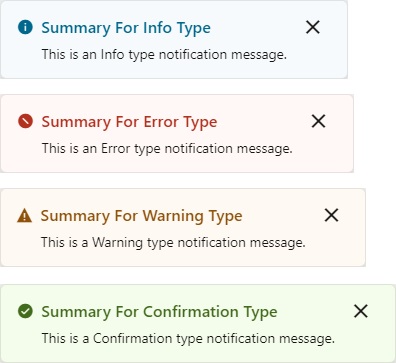
Description of the illustration jsac-notification-types.jpg
For API information about this action, see Fire Notification Event in the Oracle Visual Builder Page Model Reference.
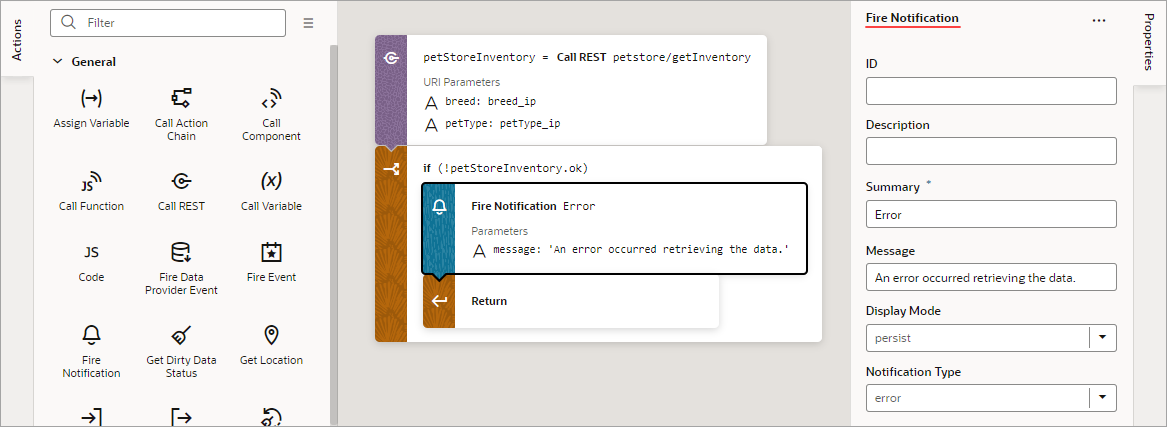
To use a Fire Notification action:
Add a For Each Action
You add a For Each action to execute actions for each item in an array.
For API information about this action, see For Each in the Oracle Visual Builder Page Model Reference.
To use a For Each action:
- Add the action in one of three ways, as explained at the end of Built-In Actions.
- Configure the action's properties in the Properties pane:
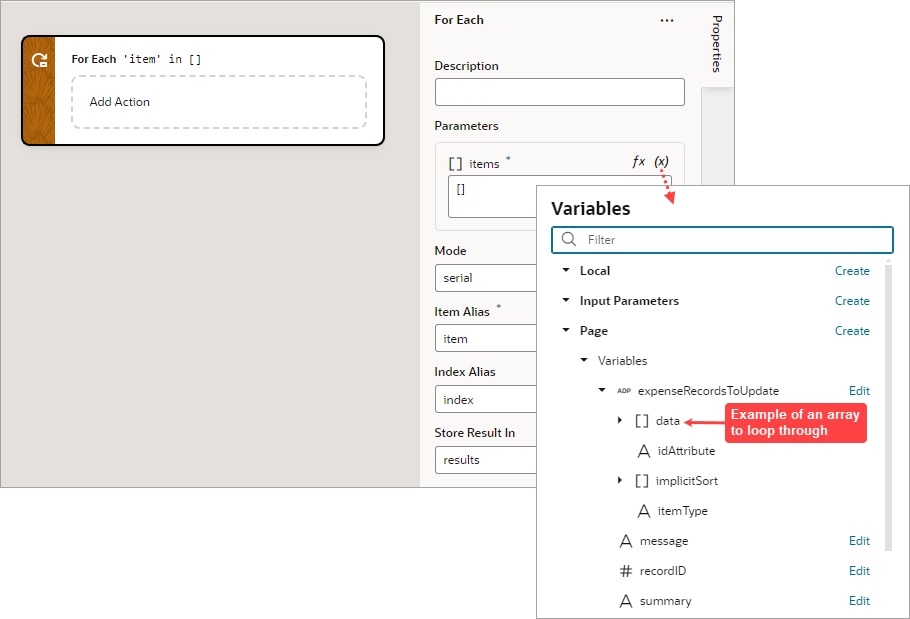
- For Parameters, hover over the property's far-right side and click
 to choose the array to loop through, such as this array,
 $page.variables.expenseRecordsToUpdate.data: - For Mode, select whether your called actions run serially (default) or in parallel. Regardless of the mode, the For Each action will not complete until the actions for each item in the array are complete.
- For Item Alias, optionally, enter an alias for the current item in the array; the default is
item. - For Index Alias, optionally, enter an alias for the loop index, which starts at 0 and increases by 1 for each iteration. The default alias is
index.
- For Parameters, hover over the property's far-right side and click
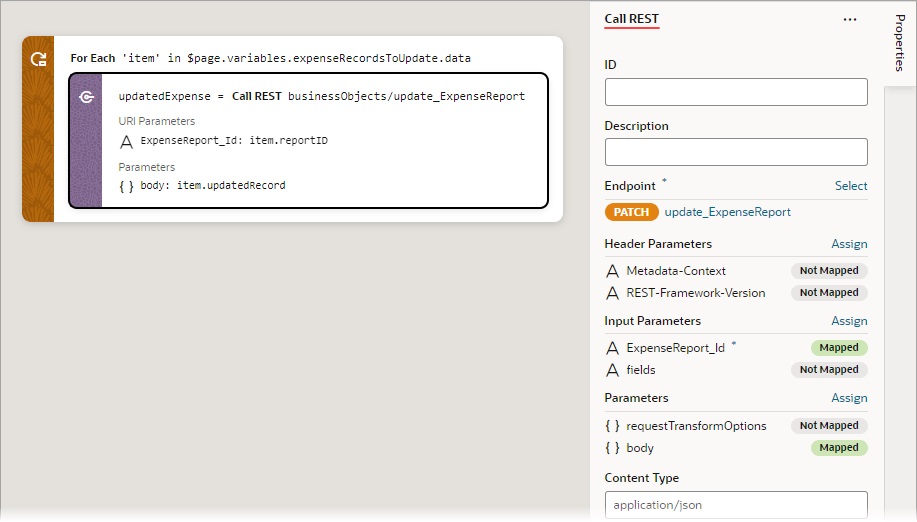
- Add the actions you want to take for each item of the array to the Add Action area of the For Each action. Here's an example that loops to call a REST endpoint (
PATCH /ExpenseReport/{ExpenseReport_Id}) that updates the expense record at the current iteration:
Add a Get Dirty Data Status Action
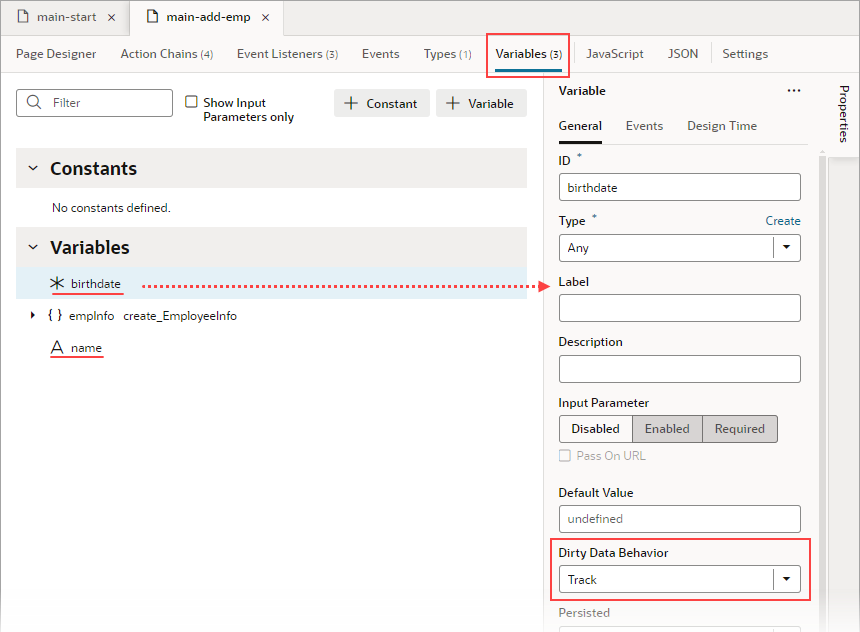
Use a Get Dirty Data Status action to check if any of the values have changed for the tracked variables within a particular scope (application, flow, page, fragment, layout), including any contained flows, pages, fragments, layouts, and their extensions. Tracked variables outside the scope being checked aren't considered. For example, in this image, both variables defined at the page level have their Dirty Data Behavior property set to Track.: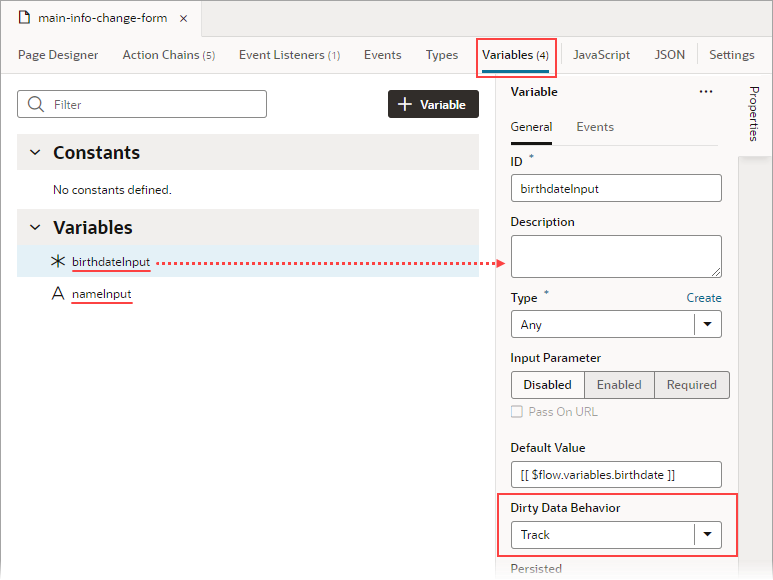
Description of the illustration jsac-variable-dirty-data.png
Whenever the value for any of these tracked variables changes, the dirty data status for their scope (referred to as context in code) is automatically changed from 'notDirty' to 'dirty'. If any tracked variables are defined for this page's layout, fragment, or extension, and one of those variables changes, the page's dirty data status is also automatically set to 'dirty'. To reset the scope's dirty data status back to 'notDirty', use the Reset Dirty Status action.
When checking the dirty data status of a particular scope and its subscopes, it’s the scope from which the action chain is called that matters, not the scope in which the action chain is defined. For instance, if a page event initiates a flow's action chain with a Get Dirty Data Status action, the Get Dirty Data Status action returns that page's dirty data status, not the flow's, because the action chain is called from the page.
This functionality works with all data types except Service Data Providers (SDPs). You'll have to handle tracking value changes for SDPs manually, if needed.
For information about this action in the Oracle Visual Builder Page Model Reference, see Get Dirty Data Status.
Get Dirty Data Status Action vs Dirty Data Status Property
The Get Dirty Data Status action is used to check the dirty data status of a scope's tracked variables, so you can do things like implement a Save button that checks if a page actually has dirty data before posting its data to a database. The action doesn't account for the consequences of navigating away from the page. If you want to check if navigating away from a page will result in the tracked variables losing their data, use the page's vbBeforeExit event listener. This event listener is triggered when navigating away from the page and starts an associated action chain that receives an event parameter with a dirtyDataStatus property. Here's an example of an action chain started by a page's vbBeforeExit event listener, which prevents navigating away from the page if the tracked variables will lose their data: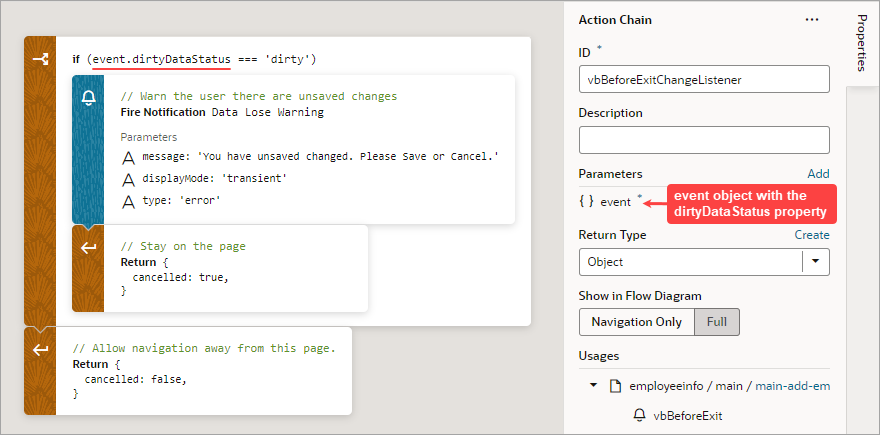
Description of the illustration jsac-dirty-data-exit-event-action-chain.png
The event.dirtyDataStatus property, unlike the Get Dirty Data Status action, considers the effect that navigating away from the page would have on the tracked variables. The property is set to 'dirty' if navigating away from the page will cause the tracked variables to lose their data; otherwise, it's set to 'notDirty'. Variables within a scope retain their values as long as the destination of the user's navigation is within the scope or its subscopes. For instance, variables defined for a flow retain their values when a user navigates to a different page within the same flow, but not when navigating to a page in a different flow. Variables defined for a page do not retain their values when a user navigates to a different page in the same or a different flow.
Example:
This example shows an Add Employee page for adding a new employee's information. The page has two fields, one for a name and one for a birthdate, and their dirty data status needs to be tracked. The page also has a Save, Cancel, and Go to Home Page button. When the Save button is clicked, the employee's information is posted to storage.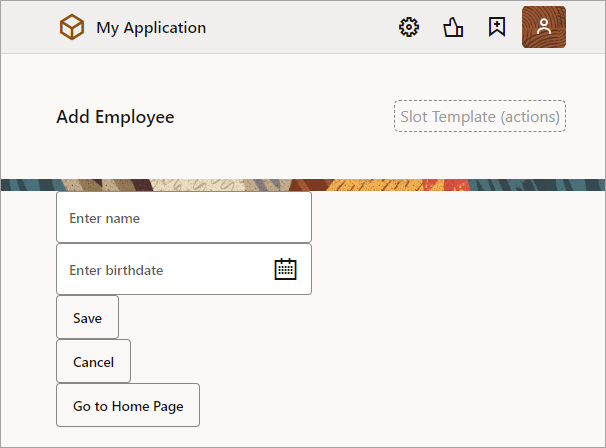
Description of the illustration jsac-personal-info-form.png
The name and birthdate components are bound to page variables to hold their values: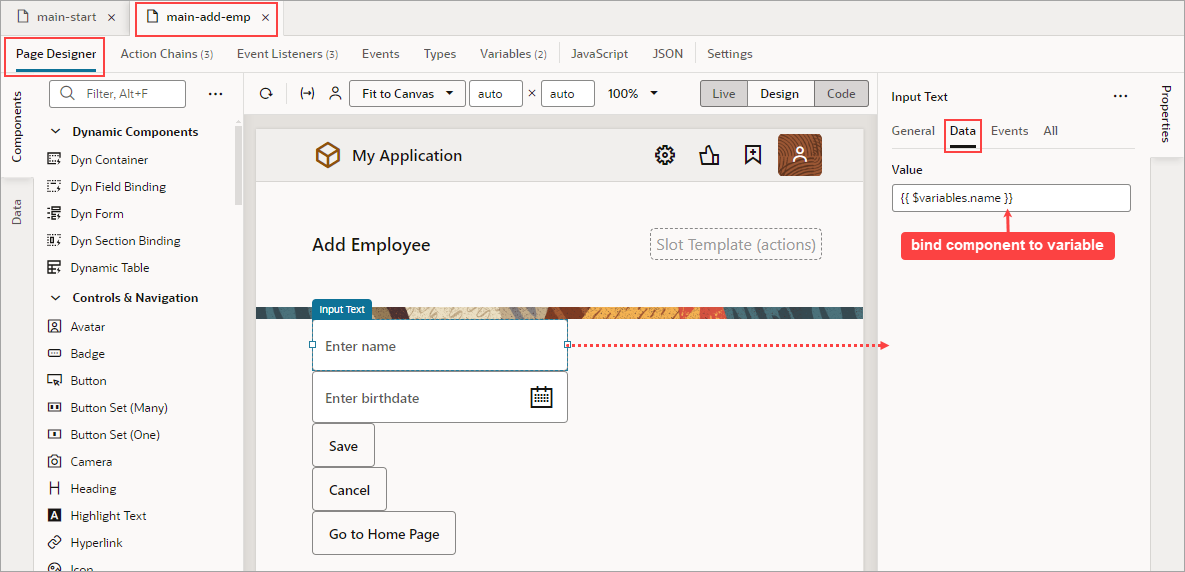
Description of the illustration jsac-dirty-data-bind-component.png
- Set the page variables' Dirty Data Behavior property to "Track".
- For the Save button's action chain, add a Get Dirty Data Status action to check if the page actually has dirty data (unsaved changes) before posting the new employee's information to storage.
- To warn users of unsaved changes due to navigating away from the page, add a
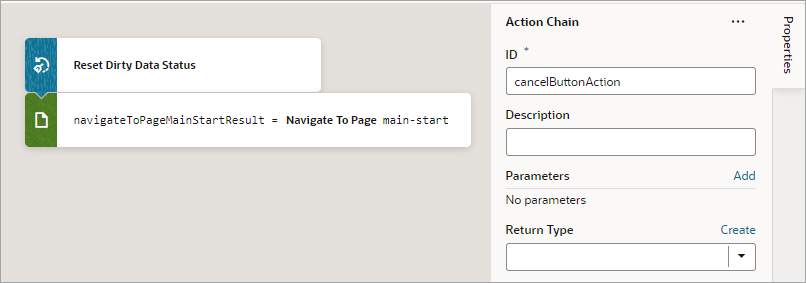
vbBeforeExitevent listener and use theeventparameter'sdirtyDataStatusproperty to check if navigation away from the page will result in the tracked page variables losing their data. - For the Cancel button's action chain, which navigates to the home page, add a Reset Dirty Data Status action to reset the page's dirty data status. This is needed for the
vbBeforeExitevent listener's action chain to allow the navigation to the home page when there is dirty data.
To begin:
- Go to the page's Variables tab and set the page variables' Dirty Data Behavior property to Track:
- To add the dirty data functionality to the Save button's action chain, to check if there's actually dirty data before posting:
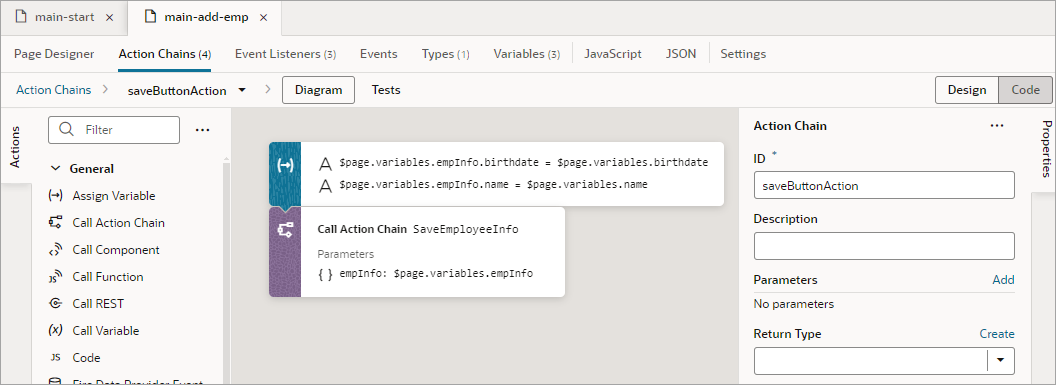
- Go the Save button's action chain. Here's an example, which passes a new employee's information to an action chain that posts the data to storage:
- Add a Get Dirty Data Status action to the top of the action chain.
- Wrap the code for posting the new employee's data in an If action to check if there's dirty data to post. If there's no dirty data, do nothing.
- At the end of the If action's code, add a Reset Dirty Data Status action to reset the dirty data status back to '
notDirty'.
Here's the action chain with the added dirty data functionality:
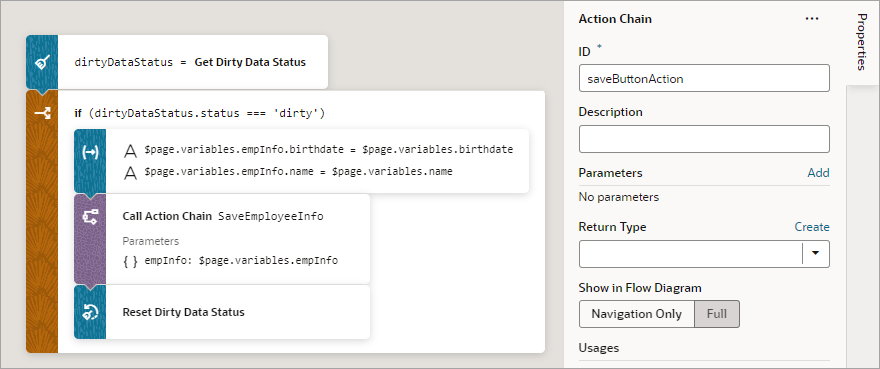
Description of the illustration jsac-dirtydata-action-check.png - Go the Save button's action chain. Here's an example, which passes a new employee's information to an action chain that posts the data to storage:
- Next, we need to create a
vbBeforeExitevent listener to listen for when a user tries to navigate away from the page, which includes using the browser's Back and Forward buttons. If there are unsaved changes, a notification will warn the user of the unsaved changes and prevent the navigation. The event listener's action chain will be automatically passed aneventobject with adirtyDataStatusproperty to check if the navigation away from the page will result in the tracked page variables losing their data.To begin:
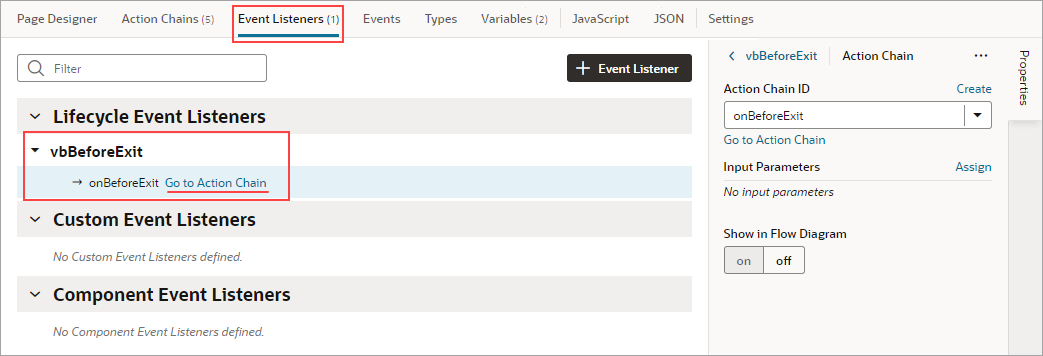
- Open the Event Listeners tab and click the + Event Listener button to create a new event listener.
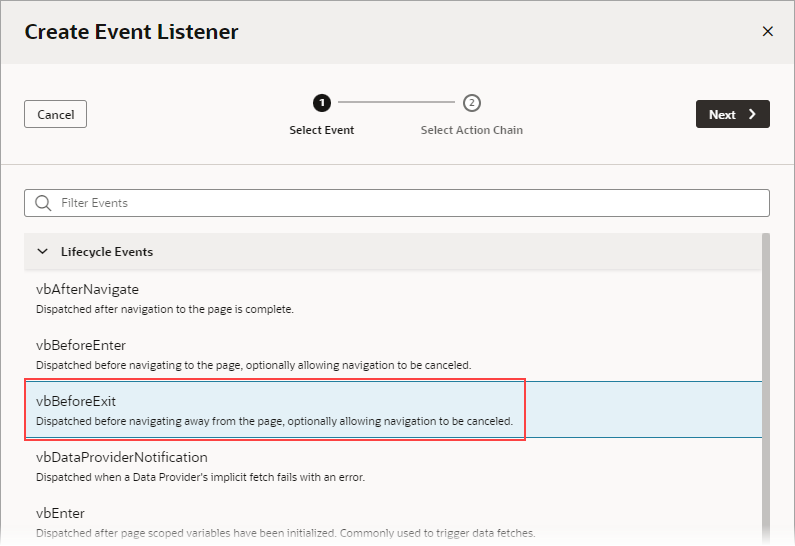
- Select vbBeforeExit, which starts its associated action chain whenever a user tries to navigate away from the page. Click Next:
We now need to create the action chain that's started by this event listener.
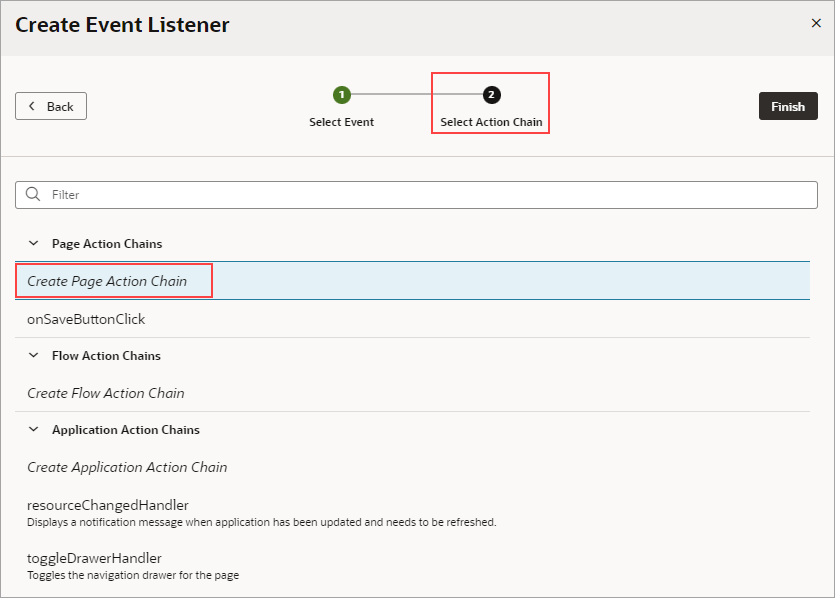
- On the Select Action Chain step of the Create Event Listener wizard, select the Create Page Action Chain option, under Page Action Chains. Click Finish.
- Back on the Event Listeners tab, hover over the new event listener that you just created and click the Go to Action Chain link that appears:
You're taken to the Action Chain editor to create the action chain that warns the user of unsaved changes.
- Add an If action to check if the navigation away from the page results in the tracked variables losing their data.
Use the
eventparameter that was passed to the action chain, which has adirtyDataStatusproperty. The property is set to'dirty'if there will be lost tracked data, otherwise it's set to'notDirty'. - To handle the case in which the navigation results in a lose of tracked data, within the If action, add a Fire Notification action to notify the user of unsaved changes. To prevent the navigation away from the page, add a Return action to return the return object with its
cancelledproperty set totrue. - To handle the case in which there is no dirty data, return the return object with its
cancelledproperty set tofalse.Here's the completed action chain:

Description of the illustration jsac-dirty-data-exit-event-action-chain.png
- Finally, go to the Cancel button's action chain, which navigates to the home page. Add a Reset Dirty Data Status action to reset the page's dirty data status back to '
notDirty'. This is needed in case there's dirty data, which would prevent thevbBeforeExitevent listener's action chain from allowing the navigation to the home page.
Add a Get Location Action
You add a Get Location action to get a user’s live location.
This action requires the user's consent. As a best practice, it should only be fired on a user gesture, so the users can associate the system permission prompt for access with the action they just initiated.
For API information about this action, see Get Location in the Oracle Visual Builder Page Model Reference.
To use a Get Location action:
- Add the action in one of three ways, as explained at the end of Built-In Actions.
- Update the ID property in the Properties pane to make the action more identifiable.
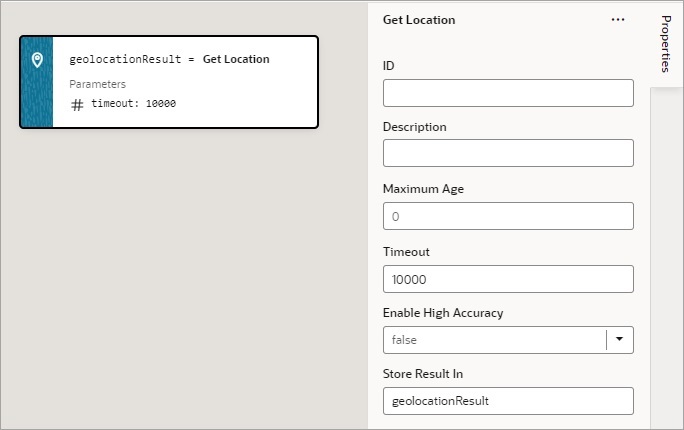
- Set the Maximum Age (in milliseconds) of a possible cached position that is acceptable to return. If set to 0 (default), the device cannot use a cached position and must attempt to retrieve the real current position. If set to Infinity, the device must return a cached position regardless of its age.
- Set the Timeout value, representing the maximum length of time (in milliseconds) that the device is allowed to take in order to return a position.
- Set the Enable High Accuracy value that indicates whether the application would like to receive the best possible results. If true and if the device is able to provide a more accurate position, it will do so. This can result in slower response times or increased power consumption. If false (default), the device can save resources by responding more quickly or using less power. For mobile devices, you should set this to true in order to use GPS sensors.
If a value is returned by the action, it is assigned to the auto-generated variable shown by the Store Result In property.
Add an If Action
You use this action to add If, Else and Else If conditions.
To use an If action:
- Add the action in one of three ways, as explained at the end of Built-In Actions.
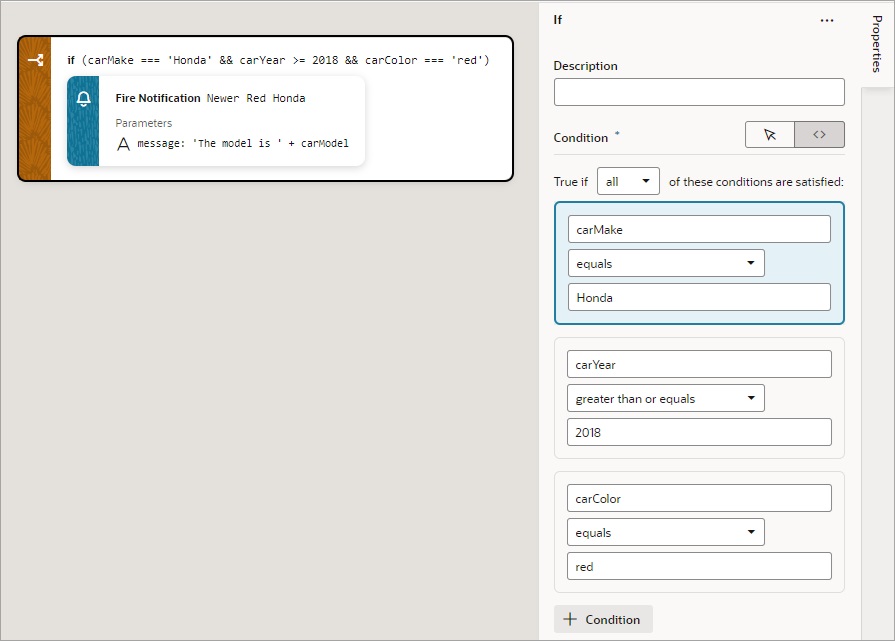
- With the If block selected on the canvas, use either the visual condition builder or the code condition builder to create the condition. To visually create the condition, click the first field in the blue box and select the variable to compare against a value or another variable. Select the comparison operator using the second filed, and enter the value or variable to compare against in the third field.
- To add another condition, click the + Condition button and create the condition as explained in the previous step.
- To reorder, delete, or add a condition before or after an existing condition, right-click the condition to bring up its context menu.
- To combine the conditions with an AND operator, select all from the True if list. To combine the conditions with an OR operator, select any from the list.
- Add the action to take for the If block when the conditions are met. You can either select the block and double-click the action, or drag and drop the action onto the Add Action area. If another action is to follow, double-click the next action or drag and drop it onto the bottom edge of the preceding action.
- To add an Else or Else If condition, you have a few options:
- To add a block with a specific action, from the Action
palette, drag an action onto the Create Branch drop
area (for the last node) or onto the Create Branch drop line (if it's not
the last node).
- To add an empty Else block at the bottom, right-click the
If block and click Add Else.
- If the If block is the last block, VB Studio adds an Else block.
- If there’s already an Else-If or Else block after it, VB Studio adds an Else-If block instead.
- To add an empty block at a specific position, right-click an
Else or Else-If block and then:
- Click Add Else Before to get an Else-If block above.
- Click Add Else After to get an Else block if there's nothing after, or an Else-If block if other blocks already follow.
- To duplicate an If or Else If block, right-click the block
and click Duplicate. This saves time because you can
modify a copied block instead of recreating it from scratch.
By default, an Else condition is created. To turn it into an Else If, enter a condition for it in the Properties pane.
- To add a block with a specific action, from the Action
palette, drag an action onto the Create Branch drop
area (for the last node) or onto the Create Branch drop line (if it's not
the last node).
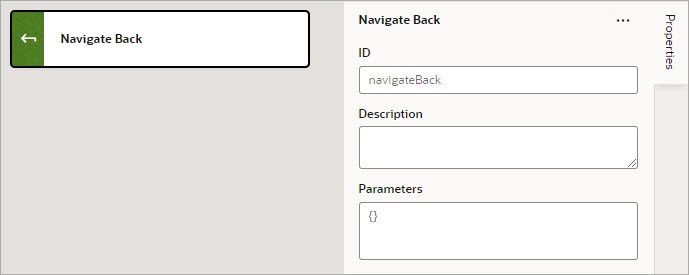
Add a Navigate Back Action
Add a Navigate Back action to return to the previous page in a browser's history.
For API information about this action, see Navigate Back in the Oracle Visual Builder Page Model Reference.
To use a Navigate Back action:
- Add the action in one of three ways, as explained at the end of Built-In Actions.
- Optional: For Parameters, specify a key/value pair map of parameters to pass to the previous page. If a parameter is not specified, the original value of the input parameter on the destination page is used. If a parameter is specified, it has precedence over
fromUrlparameters.
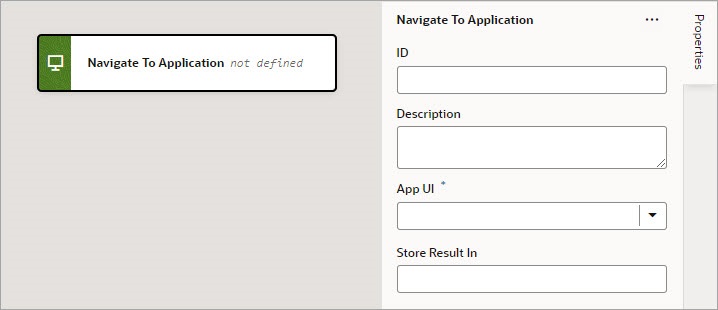
Add a Navigate To Application Action
You use this action to navigate to an App UI. By default this action navigates to the specified App UI's default page, but you can also specify which flow and page to navigate to, as long as that flow or page has been set as navigable. For details on how to use the navigable setting, see steps 3 and 4 below.
For API information about this action, see Navigate To Application in the Oracle Visual Builder Page Model Reference.
To use a Navigate To Application action:
- Add the action in one of three ways, as explained at the end of Built-In Actions.
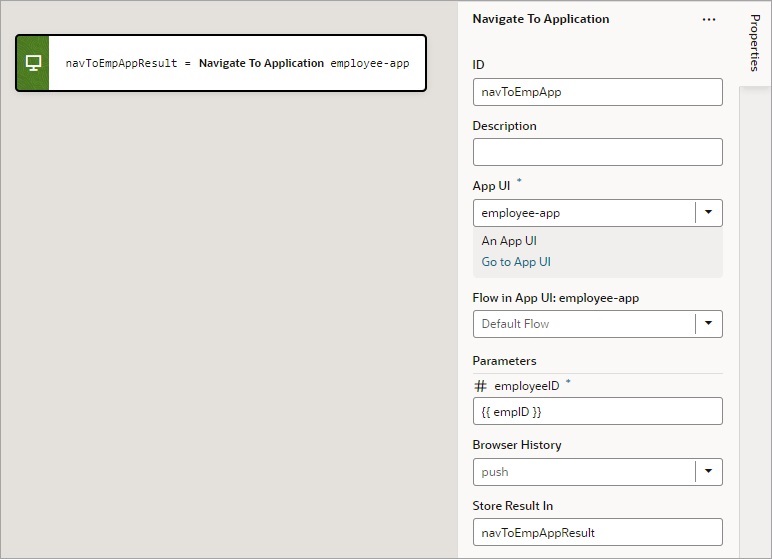
- For the App UI property, select the App UI to navigate to. To find it more quickly, start to type the name of the App UI in the text area and select it when it appears.
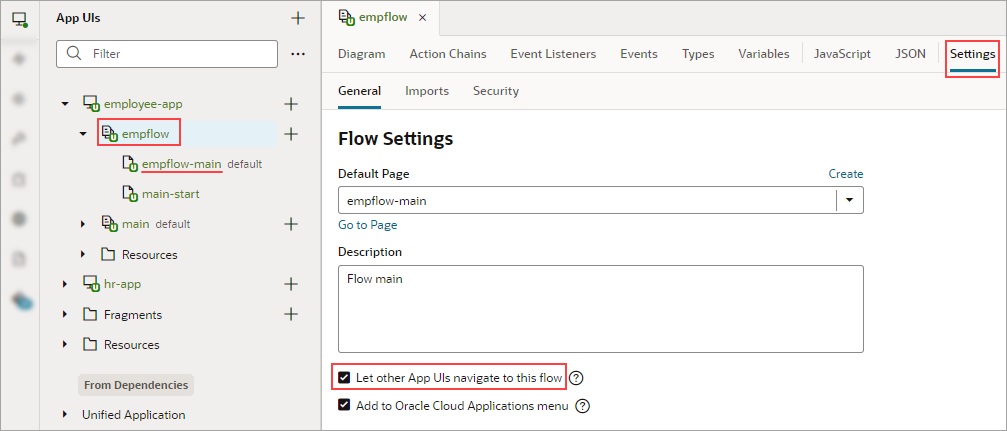
- For the Flow in App UI property, which appears after selecting an App UI, select the flow within the selected App UI to navigate to. Only default flows and flows that have their "Let other App UIs navigate to this flow" setting enabled can be navigated to and are available in the dropdown list:
- For the Page in Flow property, select the page within the selected flow to navigate to. Only default pages and pages that have their "Let other App UIs navigate to this page" setting enabled on their Settings tab can be navigated to and are available in the dropdown list:
- If the selected App UI has input parameters, enter them under Parameters, which appears after selecting the App UI.
- For the Browser History property, select either push (default), skip, or replace to define the effect on browser history. This value is used only if the resource is used in the same window. If you choose skip, the URL is not modified. If you choose replace, the current browser history entry is replaced instead of pushed, meaning that the back button will not go back to that page.
If a value is returned by the App UI, it is assigned to the auto-generated variable shown by the Store Results In property.
Add a Navigate To Flow Action
You use this action to navigate to a flow in the current App UI, and if necessary, to pass parameters to the flow. To navigate to a flow in a different App UI, use the Navigate to Application action.
For API information about this action, see Navigate To Flow in the Oracle Visual Builder Page Model Reference.
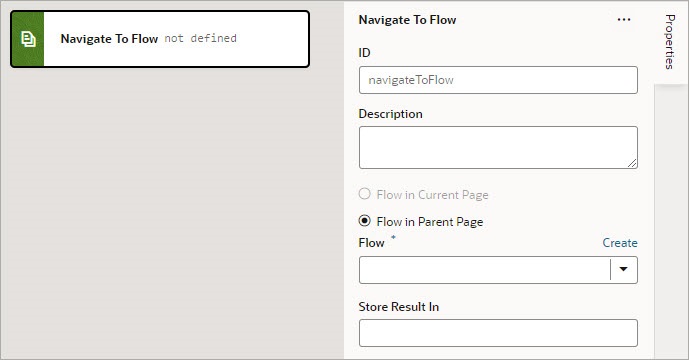
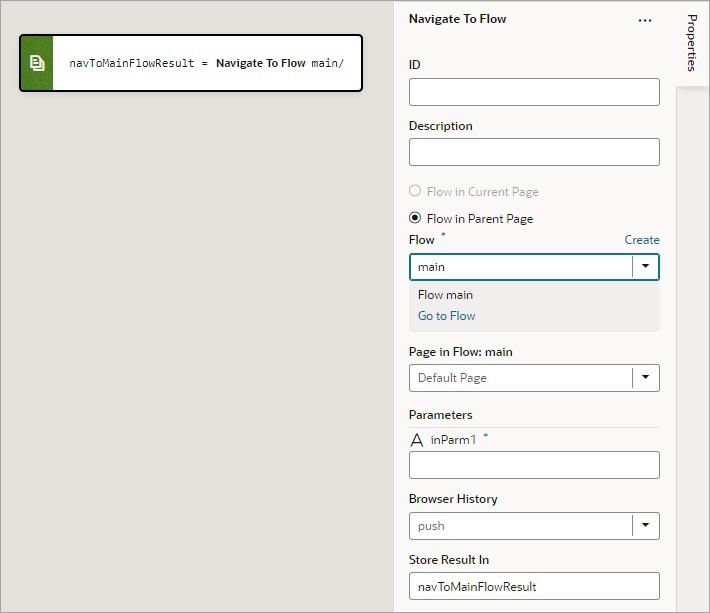
To use a Navigate To Flow action:
- Add the action in one of three ways, as explained at the end of Built-In Actions.
- For the flow options, the Flow in Current Page option is only available if the page includes a Flow Container component. Selecting it provides you with the options for navigating to a flow or page within the current page. Selecting Flow in Parent Page provides you with the options for navigating to a flow of the parent page.
- For the Flow property, select a flow or click the Create link to create a new flow to navigate to.
- If the selected flow has input parameters, enter them for the Input Parameters property that appears after selecting the flow.
- For Browser History, select either
push(default),skip, orreplaceto define the effect on browser history. This value is used only if the resource is used in the same window. If you chooseskip, the URL is not modified. If you choosereplace, the current browser history entry is replaced instead of pushed, meaning that the back button will not go back to that page.
If a value is returned by the flow, it is assigned to the auto-generated variable shown by the Store Result In property.
Add a Navigate To Page Action
You use this action to navigate to a page in the current App UI, and if necessary, to pass parameters to the page. To navigate to a page in a different App UI, use the Navigate to Application action.
For API information about this action, see Navigate To Page in the Oracle Visual Builder Page Model Reference.
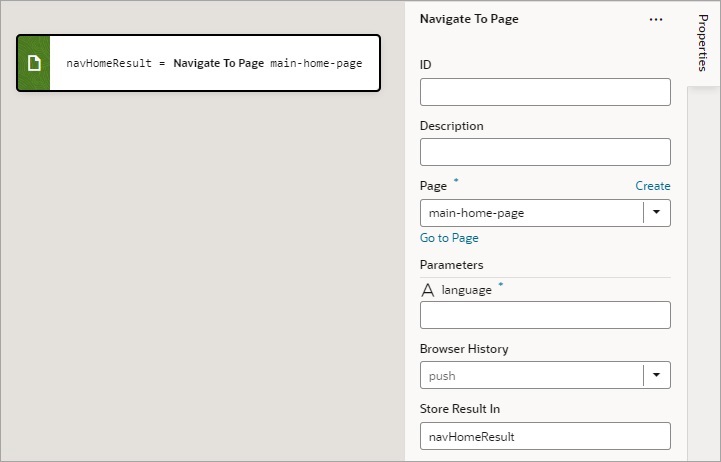
To use a Navigate To Page action:
- Add the action in one of three ways, as explained at the end of Built-In Actions.
- For the Page property, select a page or click the Create link to create a new page to navigate to.
- If the selected page has input parameters, enter them for the Input Parameters property that appears after selecting the page.
- For Browser History, select either push (default), skip, or replace to define the effect on browser history. This value is used only if the resource is used in the same window. If you choose skip, the URL is not modified. If you choose replace, the current browser history entry is replaced instead of pushed, meaning that the back button will not go back to that page.
If a value is returned by the page, it is assigned to the auto-generated variable shown by the Store Result In property.
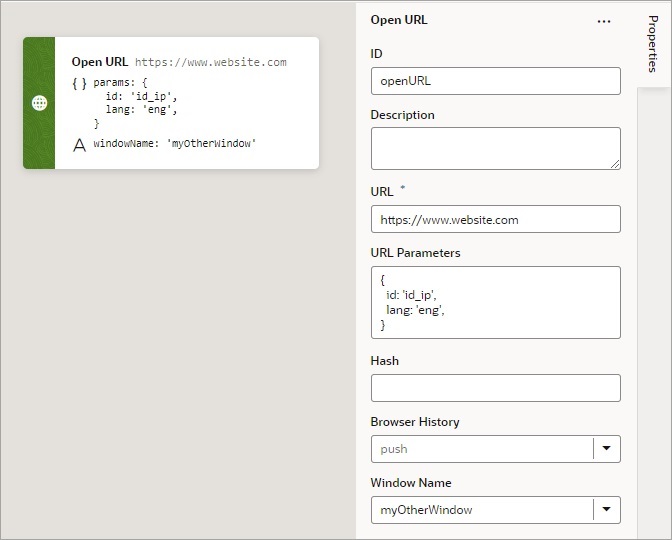
Add an Open URL Action
You add an Open URL action to navigate to an external URL. In a web app, this action opens the specified URL in the current window or in a new window.
For API information about this action, see Open URL in the Oracle Visual Builder Page Model Reference.
To use an Open URL action:
Add a Reset Dirty Data Status Action
You use a Reset Dirty Data Status action to reset the Dirty Data status of the tracked variables in the scope where the action is used (application, page, fragment, layout, flow), and in any subscopes (contained pages, fragments, layouts, flows, and any extensions of them). The Dirty Data status of the tracked variables gets set to 'notDirty'.
This action is used with the Get Dirty Data Status action, which returns 'dirty' if any tracked variable in the current scope or its subscopes has a Dirty Data status of 'dirty'.
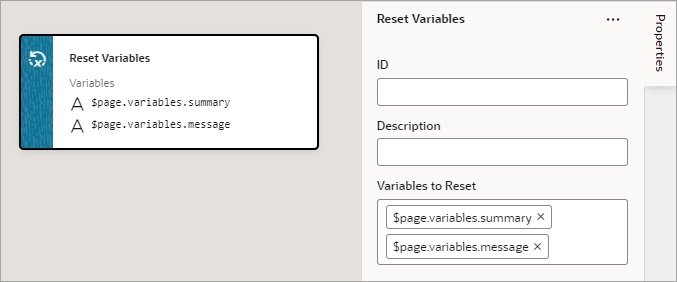
If you'd like to reset the Dirty Data status of specific variables so they don't cause the Get Dirty Data Status action to return 'dirty', enter or select them using the Variables to Reset property.
Description of the illustration jsac-dirty-data-reset-variables.png
Add a Reset Variables Action
You add a Reset Variables action to reset variables to their default values, as specified in the variable definitions.
For API information about this action, see Reset Variables in the Oracle Visual Builder Page Model Reference.
To use a Reset Variables action:
Add a Return Action
The Return action is used to return a payload for an action chain and to return control back to where the action chain was called. For instance, action chain A can call action chain B, which returns a value, then action chain A can use that returned value for further processing.
The Return action can also be used to exit an action chain early due to an exception, such as an invalid value, or some other condition. If no value is returned by the Return action, the value of undefined is returned by default.
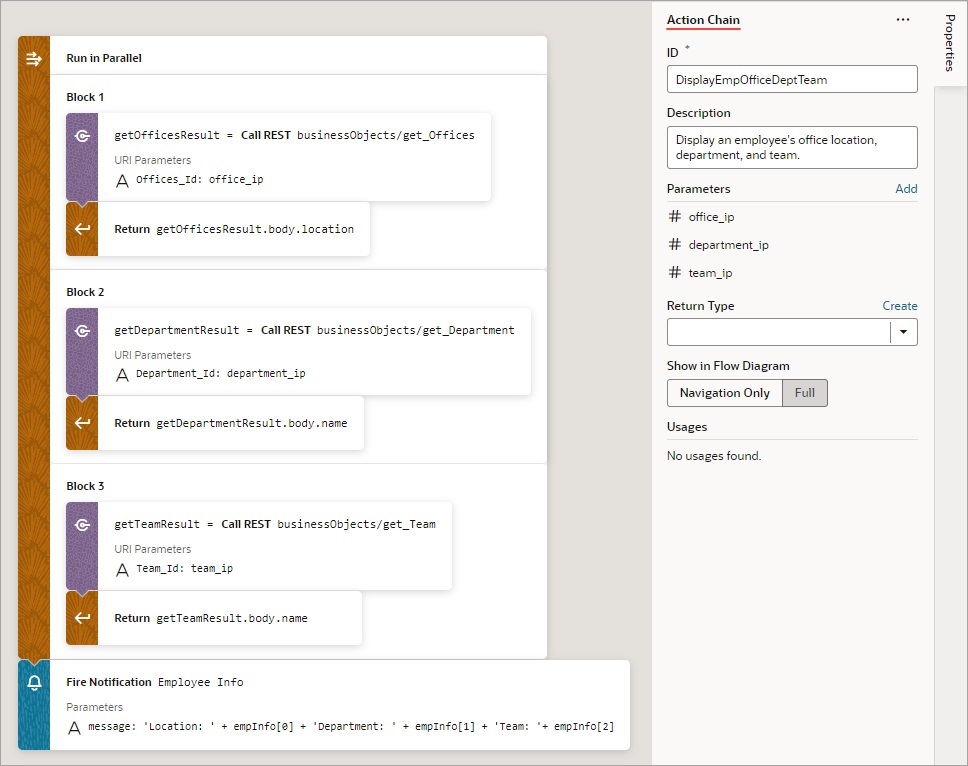
For the Run In Parallel action, which uses aysc() functions to run blocks of code in parallel, the Return action can be used to return a value for a block of code. For further details, see the Use 2: Run Multiple Action Chains in Parallel to Produce a Combined Result section here.
To use a Return action:
- Add the action in one of three ways, as explained at the end of Built-In Actions.
- For the Payload property, hover over the far-right side of the property and click
 to choose the variable to return.
Add a Run In Parallel Action
Use the Run In Parallel action to run multiple code blocks in parallel or to wait for results in order to produce a combined result.
For API information about this action, see Run in Parallel in the Oracle Visual Builder Page Model Reference.
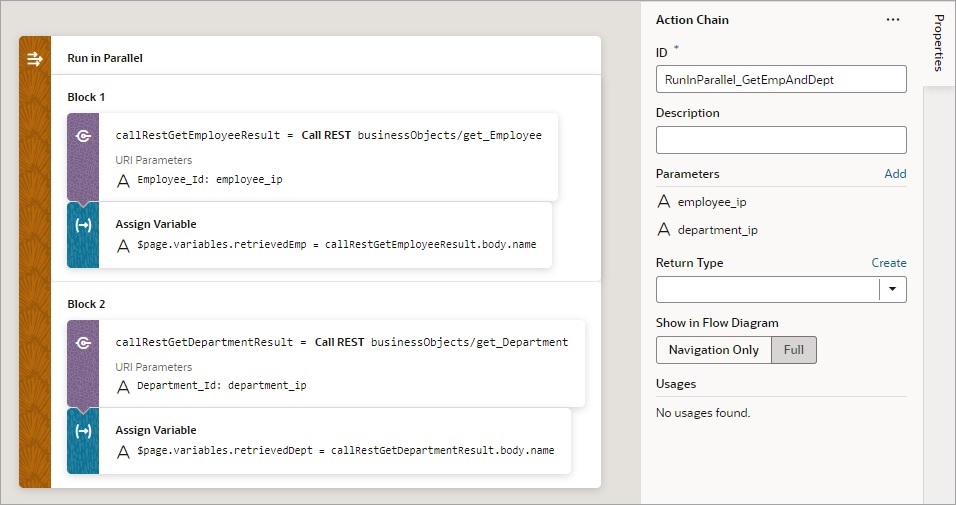
Use 1: Run Multiple Action Chains in Parallel
To use a Run In Parallel action to just run multiple action chains in parallel:
- Add the action in one of three ways, as explained at the end of Built-In Actions.
- Drop the actions to run for each block in the Add Actions area of the Run in Parallel action. For example, you could make two REST calls and assignments in parallel:
- To add another block of code to run in parallel, you have a few options:
- To add an empty block at the bottom, right-click the Run in Parallel node and click Add Block.
- To add an empty block at a specific position, right-click a block and click Add Block Before or Add Block After.
- To add a block with a specific action, from the Action
palette, drag an action onto the Create Block
drop area (for the last node) or onto the Create Block drop line (if
it's not the last node).
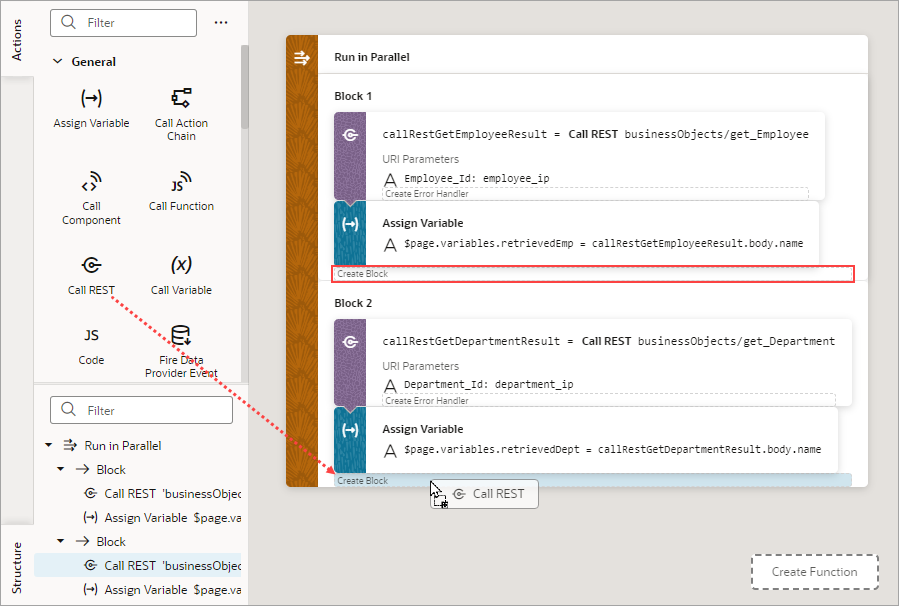
Description of the illustration jsac-run-parallel-add-third-block.png

Description of the illustration jsac_parallel_add_block.png
- To duplicate a block, right-click the block and click Duplicate. This saves time because you can modify a copied block instead of recreating it from scratch.
Use 2: Run Multiple Action Chains in Parallel to Produce a Combined Result
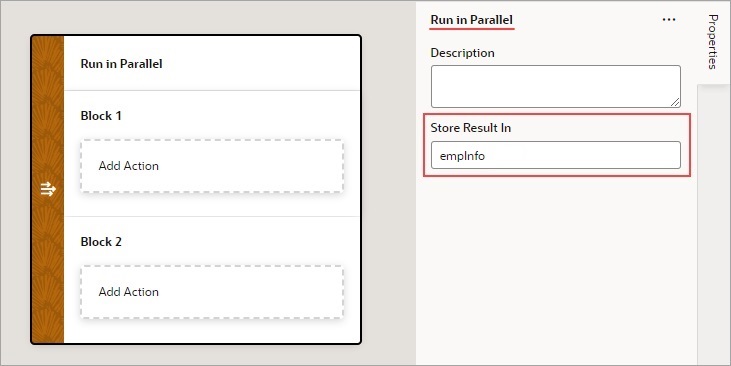
To use a Run In Parallel action to produce a combined outcome from the results of multiple action chains:
- Add the Run In Parallel action in one of three ways, as explained at the end of Built-In Actions.
- For the Store Result In property, provide a name for the array that will hold the result from each block. The first block's result is stored at index 0, the second block's result is stored at index 1, and so on.
- Drop the actions to run for each block in the Add Action area of the Run in Parallel action.
- To add another block of code to run in parallel, you have a few
options:
- To add an empty block at the bottom, right-click the Run in Parallel node and click Add Case.
- To add an empty block at a specific position, right-click a block and click Add Block Before or Add Block After.
- To add a block with a specific action, from the Action
palette, drag an action onto the Create Branch
area (for the last node) or onto the Create
Function drop line (if it's not the last node).

Description of the illustration jsac-run-parallel-add-third-block.png

Description of the illustration jsac_parallel_add_block.png
- To duplicate a block, right-click the block and click Duplicate. This saves time because you can modify a copied block instead of recreating it from scratch.
- Drop a Return action at the end of each block to return its result in the array that was named using the action's Store Result In property:
An array is returned by the Run in Parallel action (
empInfofor this example, set in step 2): the first element contains the first block's result, the second contains the second block's result, and the third contains the third block's result.
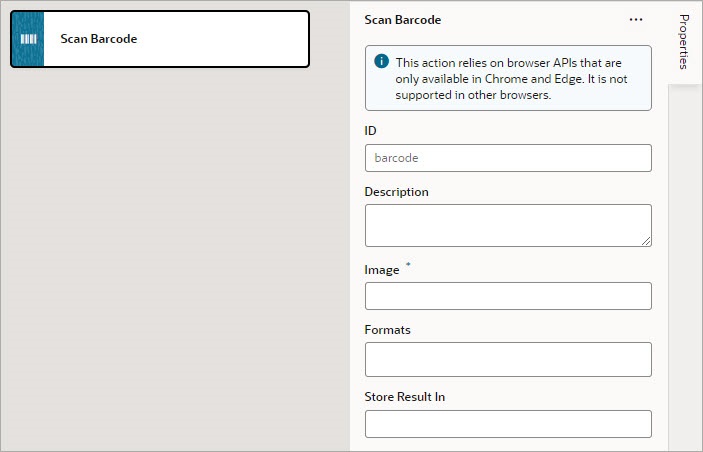
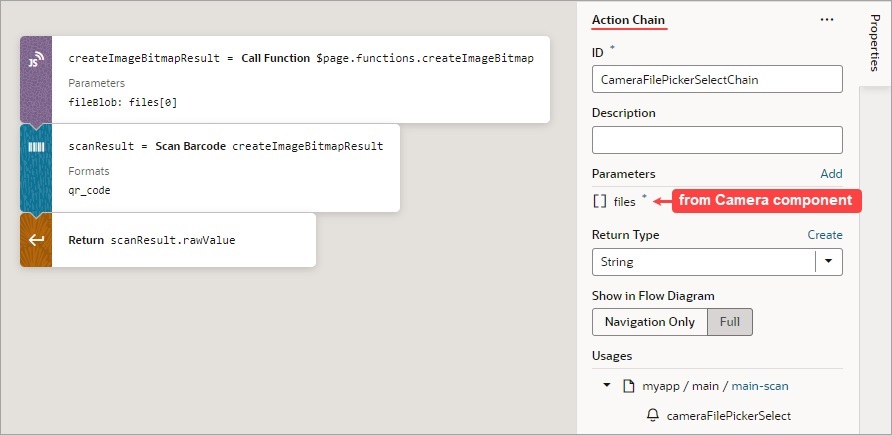
Add a Scan Barcode Action
You can add the Scan Barcode action when you want your application to decode information such as URLs, Wi-Fi connections, and contact details from QR codes and barcodes.
For API information about this action, see Scan Barcode in the Oracle Visual Builder Page Model Reference.
Note:
The Scan Barcode action relies on the Shape Detection API for browsers and is only supported by these operating systems: Operating system support.To use a scan barcode action:
- Add the action in one of three ways, as explained at the end of Built-In Actions.
- Specify the action's properties in the Properties pane:
On success, a DetectedBarcode object is returned using the auto-generated variable shown by the Store Result In property. If the browser does not support the Shape Detection API or if a specified format is not supported, an exception is thrown.
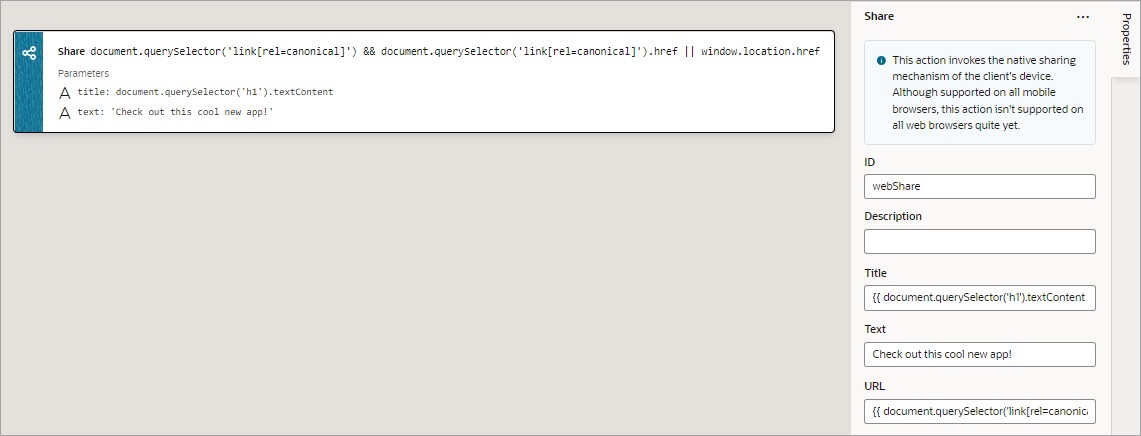
Add a Share Action
You add a Share action to share content with other applications, such as Facebook, Twitter, Slack, and SMS, by invoking the native sharing capabilities of the host platform. This action requires the user's consent, and as a best practice, consent should only be sought on a relevant user action.
For API information about this action, see Share in the Oracle Visual Builder Page Model Reference.
Note:
Web apps require the web browser running the app to support the Share action. Currently, not all browsers support this native feature.To use a Share action:
Add a String Operation Action
Index Of
You use an Index Of action to search a string for a substring. If the substring is found, the index where the substring starts is returned; otherwise, -1 is returned.
After you add the action, use the Variable property to select the string. For the Search String parameter that appears, enter the substring to search for. Optionally, specify the starting index for the search in the Position parameter. The copy of the array is returned in the variable shown by the Store Result In property.
Split
You use a Split action to divide a string into substrings by specifying separator character(s). The substrings are returned in an array without the separator character(s). For example, if you provide a string with several words, and provide the space character as the separator, an array is returned containing the words between the spaces.
After you add the action, select the string using the Variable property. For the Separator parameter that appears, enter the character(s) to use as the separator. Optionally, enter the maximum number of returned substrings using the Limit parameter.
Substring
You use the Substring action to return a substring by specifying its start and end indexes.
After you add the action, select the string using the Variable property. Enter the start and end indexes in the Start Index and End Index parameters. The resulting substring is stored in the variable shown by the Store Result In property.
Trim
You use a Trim action to return a copy of a string with blank spaces removed from both ends.
After you add the action, select the string using the Variable property. The trimmed string is stored in the variable shown by the Store Result In property.
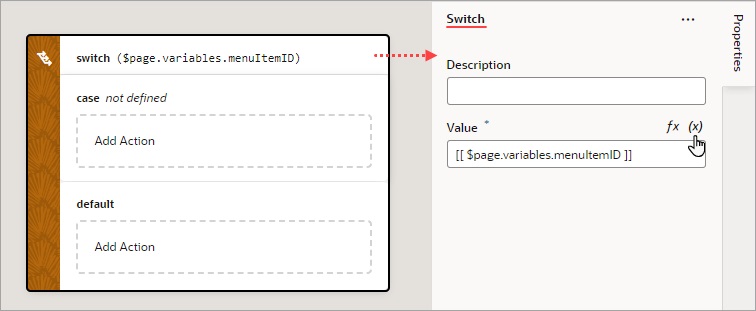
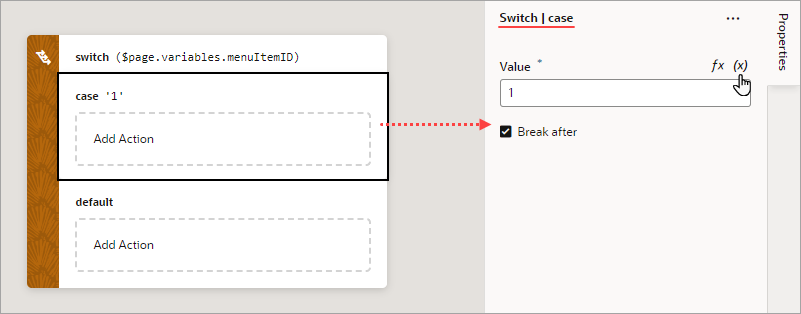
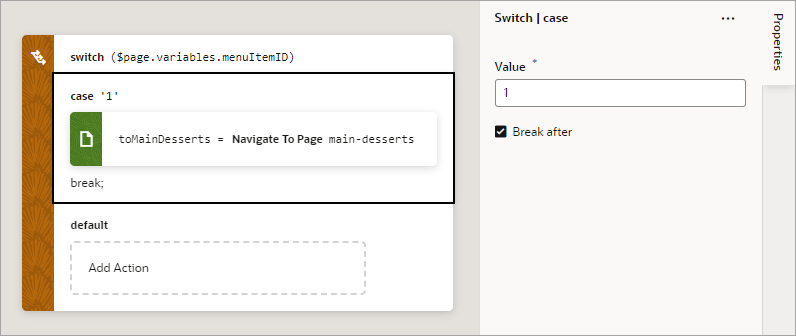
Add a Switch Action
You add a Switch action when you want to match a value against a set of values, in order to execute appropriate actions for that case.
For API information about this action, see Switch in the Oracle Visual Builder Page Model Reference.
To use a Switch action:
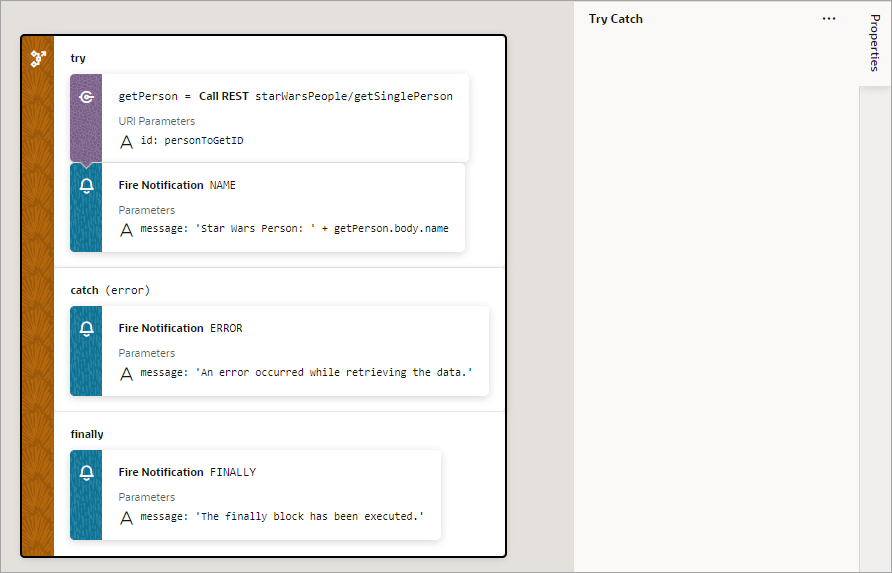
Add a Try-Catch Action
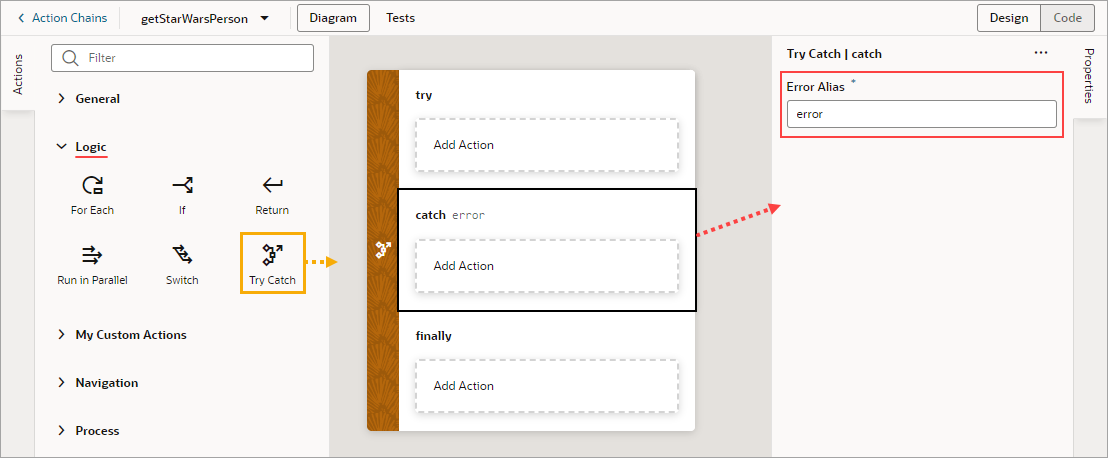
You add a Try-Catch action to gracefully handle errors and avoid program crashes.
- Add the action in one of three ways, as explained at the end of Built-In Actions.
- To change the alias for the error object, which has the
nameandmessageproperties, select the Catch block on the canvas and change the alias in the Properties pane: - To add an action to a Try-Catch block, select the block and double-click the action in the Actions palette, or drag an action from the Action's palette onto the desired block:
- To add a Catch node, in Design view, right-click the try or finally block and click Add Catch.
- To add a Finally node, in Design view, right-click the catch block and click Add Finally.
You can also surround an action with a Try-Catch action by right-clicking it and selecting Surround with Try-Catch: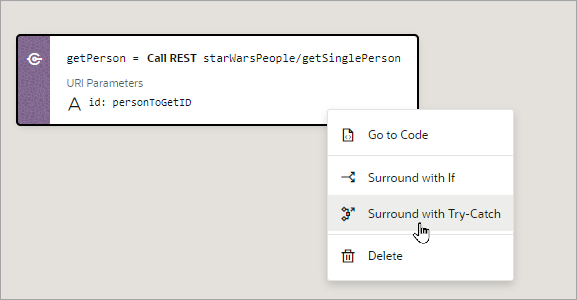
Description of the illustration jsac-surround-try-catch.png
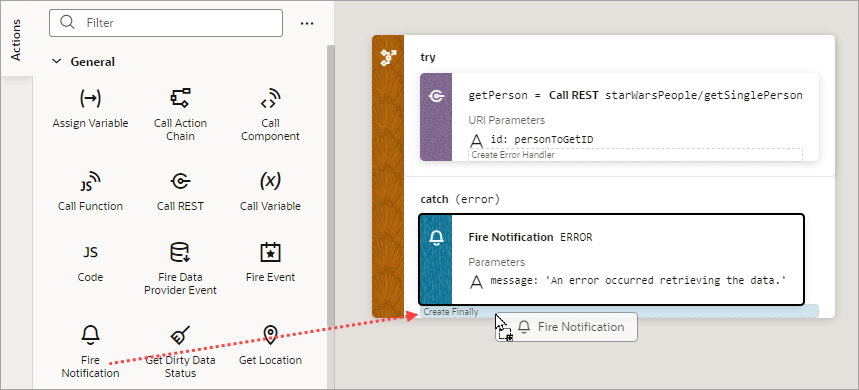
- To add a Finally block with a specific action, drag the action that
you want to the Try-Catch action and drop it into the Create
Finally area that appears:
- To add an empty Finally block, right-click the try or catch block and click Add Finally.
