Sample Use Case: How to Use Authentication to Connect to Oracle Integration Cloud REST APIs
We've provided one end-to-end example that walks you through the steps for setting everything, including authentication, up to connect to an Oracle Integration Cloud REST API. As VB Studio provides additional authentication mechanisms, we'll include more examples like this one, using other services and other authentication mechanisms.
For our example, we'll be using Oracle Integration Cloud (OIC) REST API as the target REST API but the process is largely the sane for other REST APIs that are protected by the same IDCS with a JWT Assertion OAuth type grant.
Example Scenario
Your Oracle Cloud Applications test instance is preconfigured with VB Studio. You want to consume an OIC REST API in your extension. You have an OIC test instance, say https://oic-test.integration.mycorpcloud.com, that has a REST API /ic/api/integration/v1/flows/rest/HELLO_WORLD/1.0/names/ that you want to connect to the extension that's deployed on the test instance. However, when deploying to production, you'd like to use your OIC production instance, say https://oic-prod.integration.mycorpcloud.com, in your service connection.
Prerequisites
- The OIC test instance REST API must:
- Accept an IDCS-issued token (that is, the OIC test instance and the Oracle Cloud Applications instance should reside in the same IDCS/Identity domain).
- Have CORS support for the test VB Studio and the corresponding Oracle Cloud Applications domain.
- The production instance REST API must:
- Accept an IDCS-issued token (that is, the OIC production instance and the Oracle Cloud Applications instance should reside in the same IDCS/Identity domain).
- Have CORS support for the production Oracle Cloud Applications domain.
Steps
- Locate the Oracle Cloud Applications OAuth Client application in IDCS
- Add the required scope of the OIC instance to the Oracle Cloud Applications OAuth Client application
- Set up a backend and a service connection in the extension
- Deploy the extension to the Test instance
- Deploy to the Production instance or to other instances
Locate the Oracle Cloud Applications OAuth Client application in IDCS
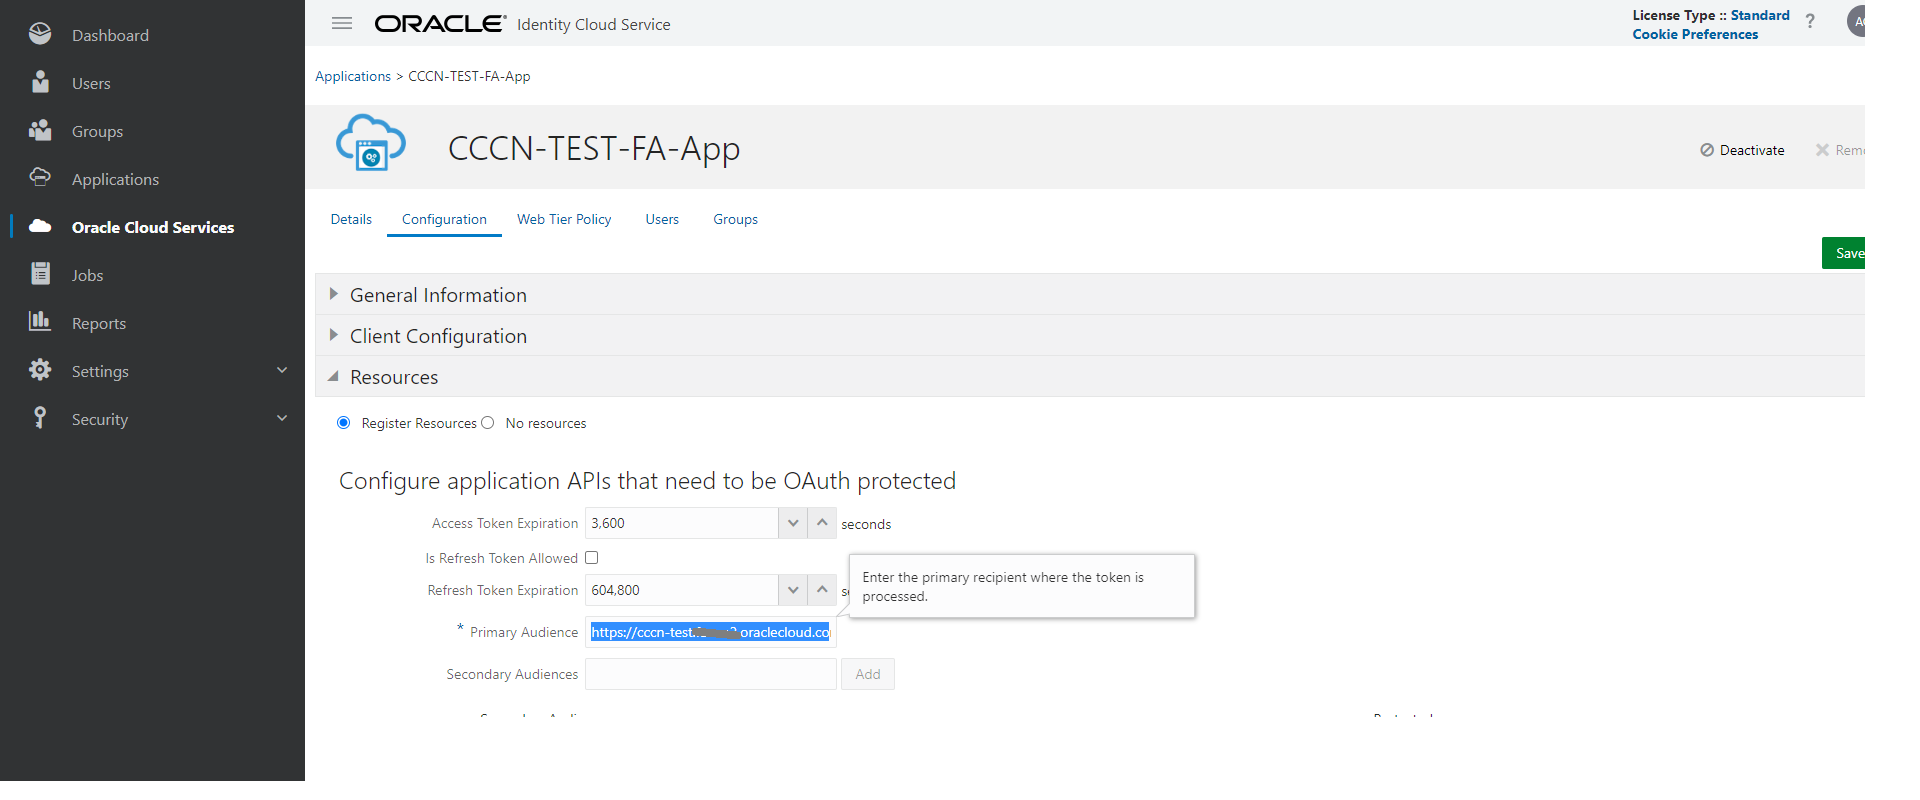
- In IDCS (connected to the Test instance), navigate to “Oracle Cloud Services” from the hamburger menu.
- From the list of all the services shown, find the one that represents the Oracle Cloud Applications Test instance and select it.
- To confirm this, navigate to the Configuration > Resources section.
The primary audience or the secondary audience URL is the Oracle Cloud Applications Test instance's base URL.
Add the required scope of the OIC instance to the Oracle Cloud Applications OAuth Client application
- In the Oracle Cloud Applications OAuth client, navigate to the Client Configuration > Token Issuance Policy > Resources - Add scope.
A popup opens.
- Choose the scope from the existing resource applications in IDCS.
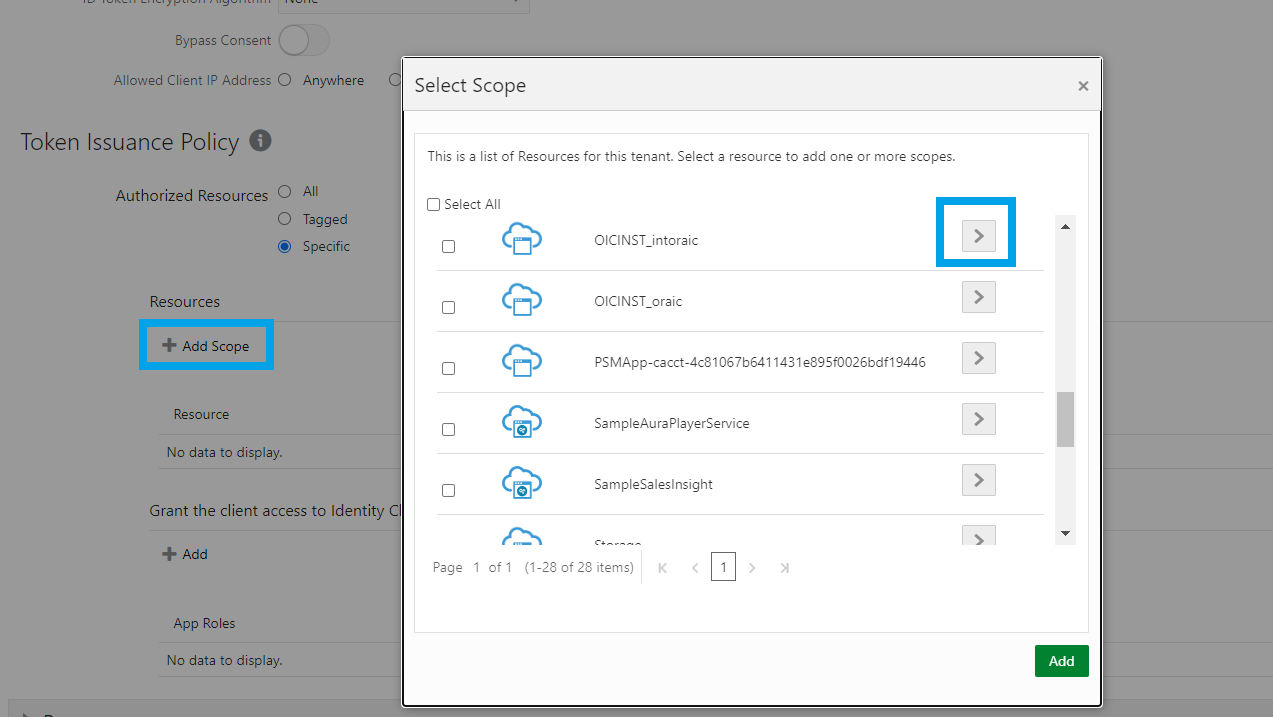
- Navigate through the list of resources and locate the resource application that represents the OIC instance.
- Click the > button to select this resource app.
The available scopes are displayed.
- Select the scope that represents your REST API.
For OIC, this will usually be the
urn:opc:resource:consumer::allscope.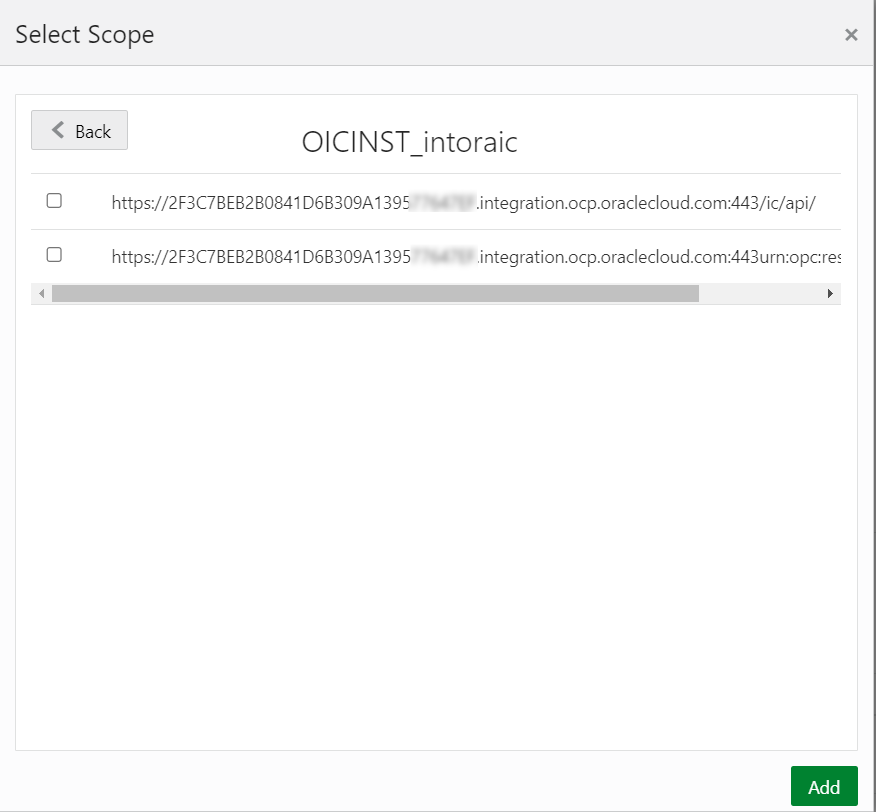
- Note the scope
https://<test uuid>/ic/apibecause you'll be adding it later in the VB Studio extension. - Click Add to add this scope to the Oracle Cloud Applications OAuth Client application.
- Click Save to persist your changes.
Set up a backend and a service connection in the extension
- In VB Studio, create a custom backend.
See Create a Backend for more information.
Set the following attributes:
- Specify a valid name, like oicBackend, for example, for your custom backend.
- Make the type custom.
- In the Server details page:
- Set URL to the service connection's base URL (
https://oic-test.integration.oraclecloud.ocp.comin our example). - Set Authentication to OAuth 2.0 User Assertion.
If you can't see this option, see the Tip below.
- Set Scope so it corresponds to the IDCS OIC REST application (for example
https://<test_uuid>/urn:opc:resource:consumer::all).
Tip:
If the version of VB Studio you're using is older than 22.04), you may not be able to see the OAuth 2.0 User Assertion option in the Authentication selection menu. Follow these steps to assign the authentication mechanism and scope:- Create the backend and set Authentication to None.
-
From Backends, navigate to the Source tab and locate the "servers" section for the oicBackend in the
catalog.jsonfile. - Add the authentication mechanism and the scope in the "servers" section:
"servers": [
        {
            "url": "https://oic-test.integration.oraclecloud.com",
            "description": "OIC Backend",
            "x-vb": {
                "authentication": {
                    "authenticated": {
                        "type": "oauth2_user_assertion",
                        "scope": "https://<test uuid>/ic/api"
                    }
                }
            }
        }
    ],
- Set URL to the service connection's base URL (
- Click Create.
The backend is created in a file called
catalog.json, as shown.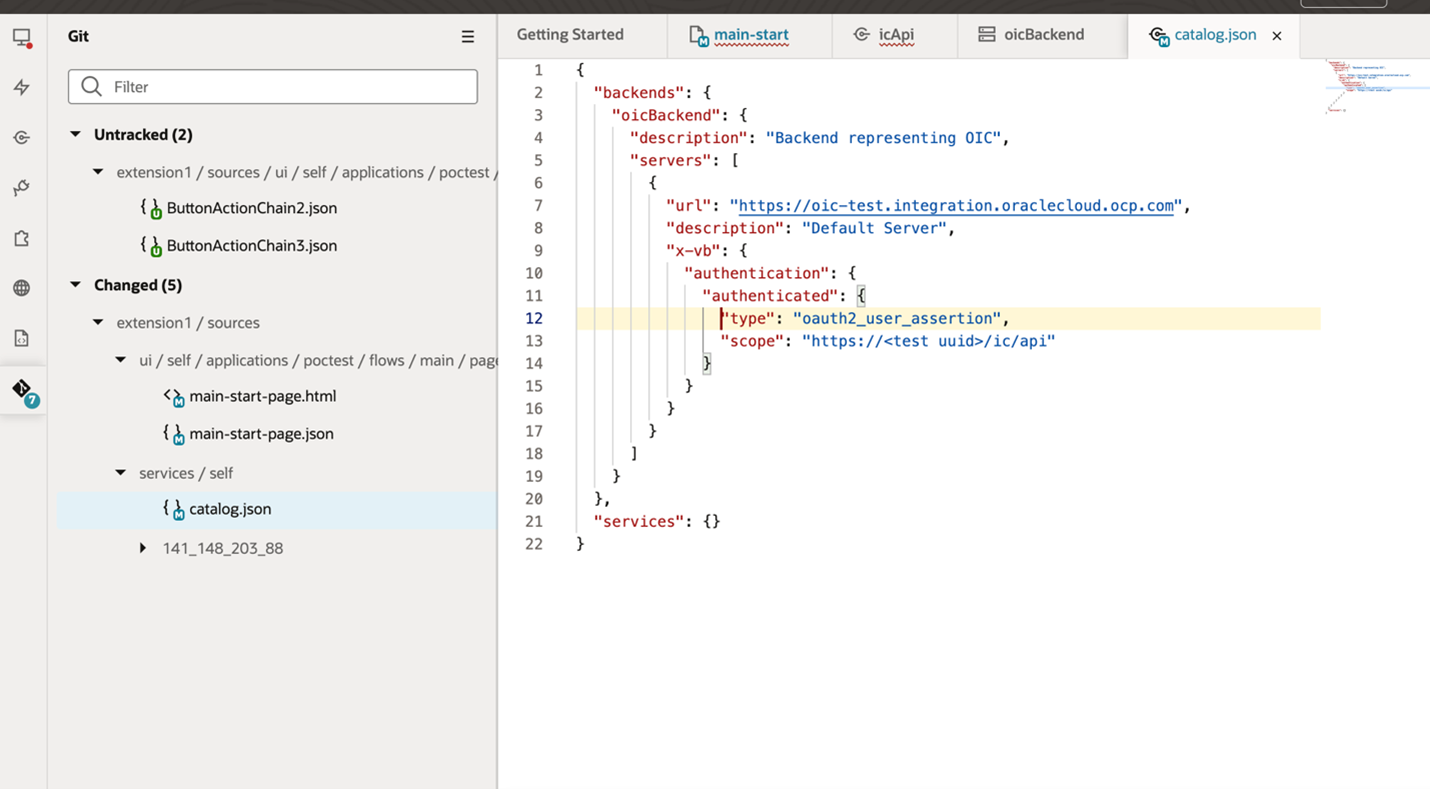
Now that we've created a backend that represents the OIC system, we'll create a service connection that uses this backend. The advantage of using a backend is that you can create multiple service connections based on it, without having to add the Server and Authentication details each time.
- Add the service connection to the extension.
See Create a Service Connection to learn about multiple ways you can create service connections. The example we show in this step uses the Define by Endpoint option, which is explained in greater detail in Create a Service Connection from a REST Endpoint, but you could use one of the other options to create the service connection too.
Create the service connection by endpoint:- Click + Service Connection.
- Click on the URL field to display a list of existing backends.
- Select the backend you just created (for example, oicBackend) and the URL will become
vb-catalog://backends/<extn>:oicBackend. - Add the rest of the URL path to the service connection (for example,
/ic/api/integration/v1/flows/rest/HELLO_WORLD/1.0/names.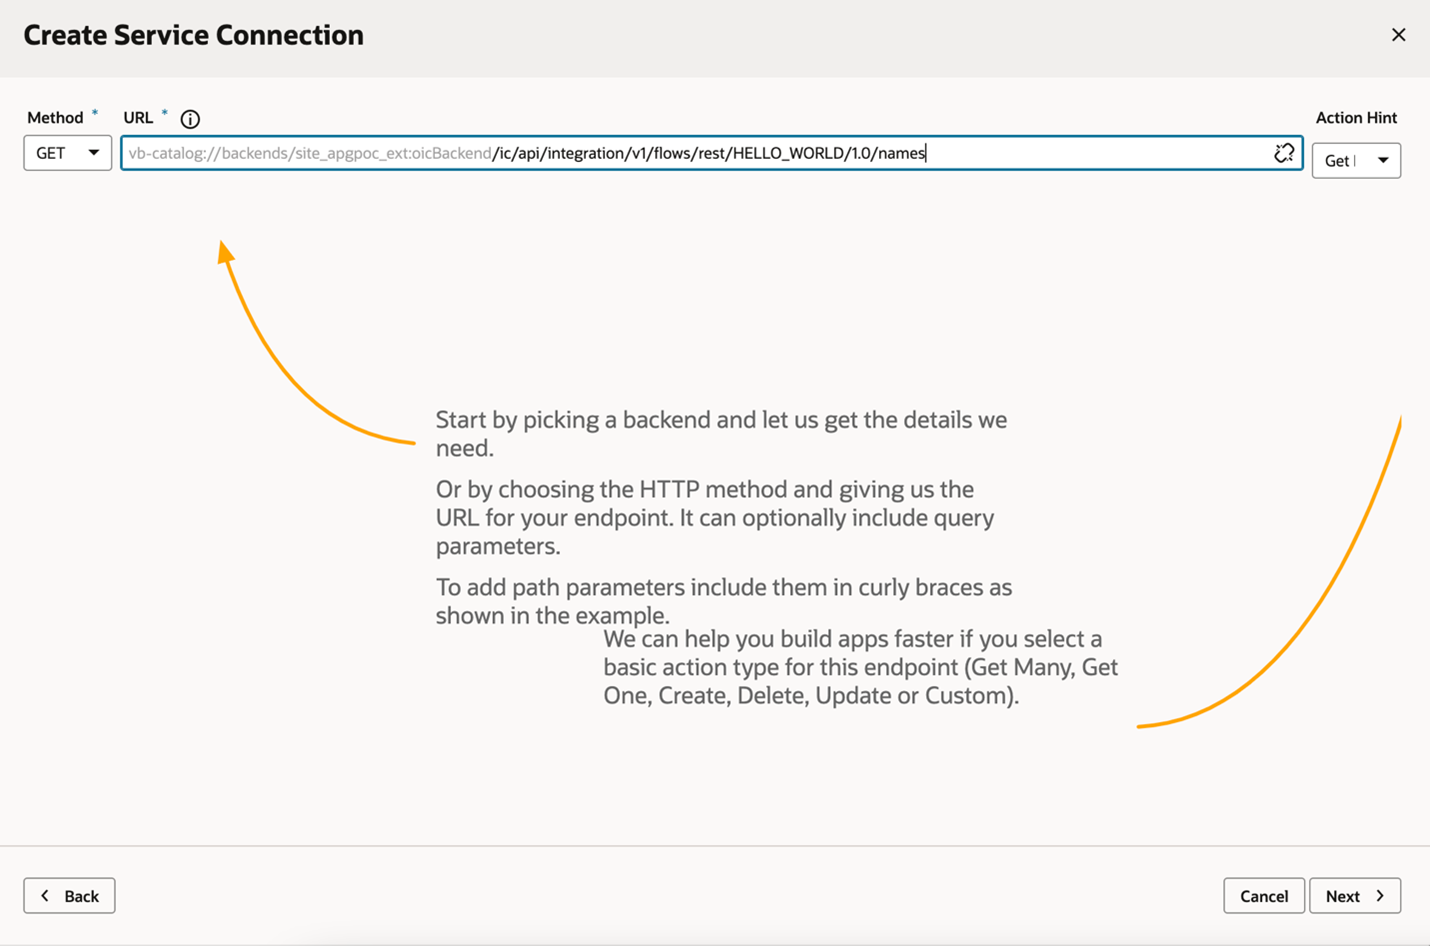
- Click Next and add an appropriate Service Name.
- Then add other details, like headers, query parameters etc., if any are needed.
- Navigate to the Test tab and test the service connection.
- When you're done, click Create.
- Note the name of the service connection. You'll be using it later.
Let's use the name "icApi" in this example. The source for this service connection is in the
extension1/sources/services/self/icApi/openapi3.jsonfile. You can confirm this by looking at the source tree.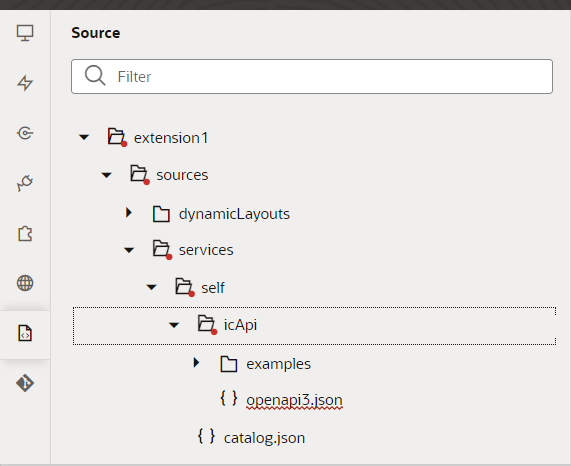
Deploy the extension to the Test instance
- Follow the instructions in Preview Your App UI to run (preview) the extension and check if it was successful.
- If it was successful, commit the sources and push (or merge) them to the branch you'll be packaging from.
- If the extension hasn't been configured already, follow the instructions in Set Up the Project for Testing to configure it.
- Deploy the extension on the test instance.
- Test the deployed extension and ensure that it works correctly in the test instance.
Deploy to the Production instance or to other instances
- Repeat the steps in Locate the Oracle Cloud Applications OAuth Client application in IDCS and Add the required scope of the OIC instance to the Oracle Cloud Applications OAuth Client application for the production IDCS, production Oracle Cloud Applications pod, or production Oracle Integration Cloud instance.
Note:
Since you hardcoded the URL and the scope in the Backend source, you'll need to change them before deploying them to production pods if the OIC production instance is different than the test instance. - To do so, in the pipeline, add a preprocessing step that changes the URL and scope to that of the OIC production instance:
- Follow the instructions in Create and Configure Production Build Jobs to create the production build pipeline.
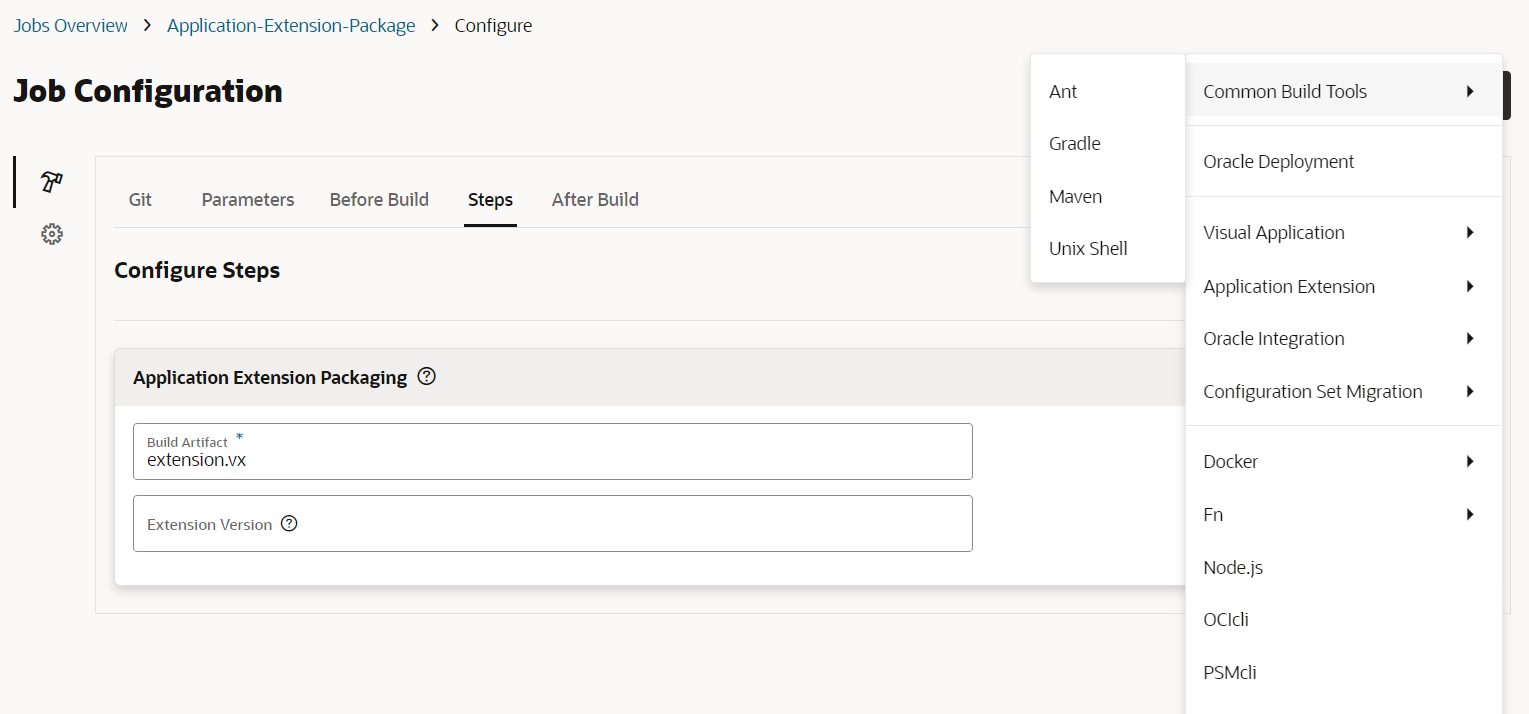
- Open the Packaging Build job in the pipeline and click Configure.

- From the menu Common Build Tools select Unix Shell and add a new step.
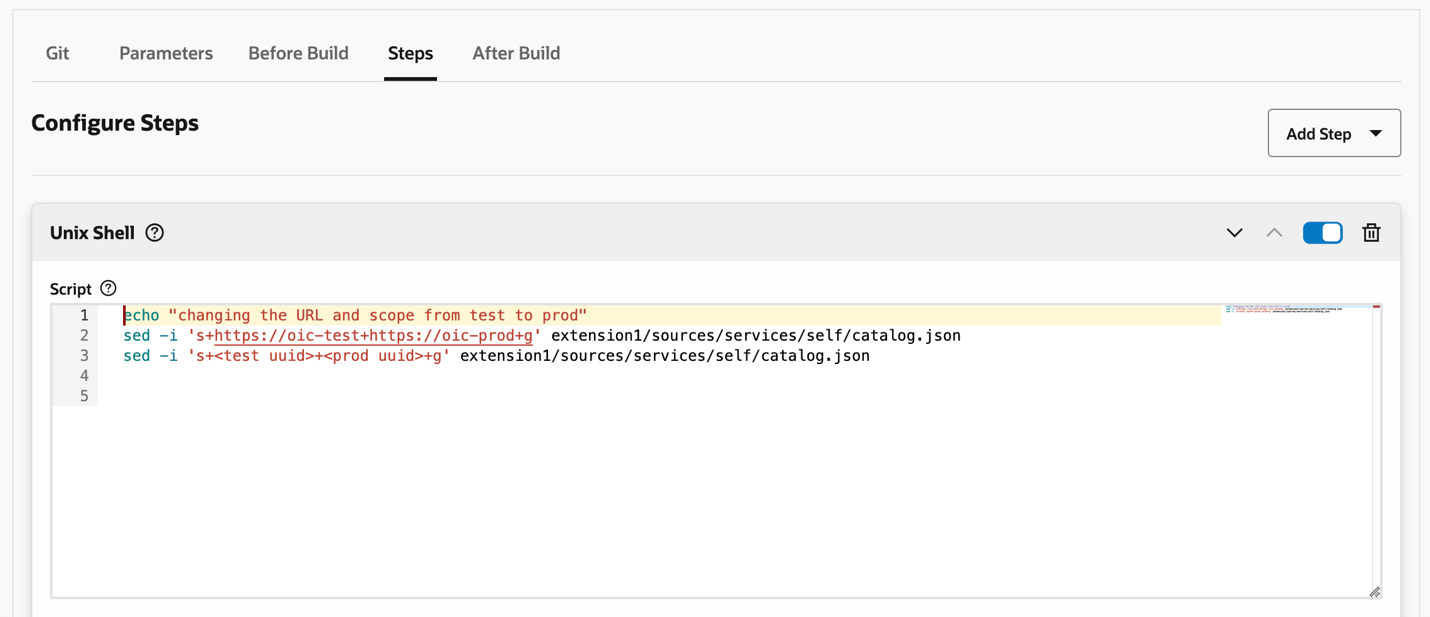
- • In the script area, add the command to change the OIC test instance URL and scope to that of the production
catalog.jsonfile. Use this format for the commands:sed -i 'originalText+modifiedText+g' filename_with_fullpathFor our example, we'll use this:
sed -i 's+https://oic-test+https://oic-prod+g' extension1/sources/services/self/catalog.json sed -i 's+<test uuid>+<prod uuid>+g' extension1/sources/services/self/catalog.json - Click the up arrow
 to move the newly added step to the top of the job, before the Application Extension Packaging step.
- Save the job.
- Run the production pipeline and check the deployed extension.
- Perform the same steps for any other instances where the extension needs to be deployed.
Note:
In this case specifically, we created custom service connections with hardcoded URLs and scopes in thecatalog.json file. Therefore, when refreshing Test extensions with Production versions, the URL won't be automatically changed to the one used in Test. You need to redeploy the production branch to the test instance to have the correct URLs/scopes after refreshing the Test extensions with the Production versions. This redeployment isn't needed if you don’t have custom service connections to other services.