Use an Expression in a Translatable String
You can create and test an expression or ICU message in VB Studio using the String Editor. This editor parses your expression as you type it to ensure that it is syntactically correct.
If the expression is valid, the editor displays your expression's parameters as well as the resulting message in a preview area. You can use the preview area to type in values for your parameters to see how your message looks.
You can access the String Editor from either your App UI's translation bundle or from the Translatable String popup available from the Properties pane for a UI component. See either Create Translation Keys or Associate a Translation Key with a UI Component for the steps.
After you bind a translatable string with an expression to a UI component, you'll need to assign a variable to each parameter in your expression. You'll do this using the Expression Editor.
Finally, you may want to add metadata for any "placeholders" in your expression so that your translators know how to translate it. You'll need to do this from the Properties pane for the translation key.
A placeholder is text in the translatable string that stands in for the value of a variable and doesn't need to be translated. Placeholders are surrounded by curly brackets ({}) in the string. If you are concerned that the purpose of a placeholder isn't clear and that this could lead to an incorrect translation, you can add a description to provide more context.
Note:
This task only covers creating the expression and assigning variables to it. Before you begin, ensure you have a variable defined in the App UI that holds the appropriate value for each parameter in your expression.To create a translation key that uses an expression or ICU message:
- Open the translation bundle and click + String to create a new string.
You can also create a new string from the Properties pane for a UI component. See Associate a Translation Key with a UI Component.
- Create your expression in the String Editor.

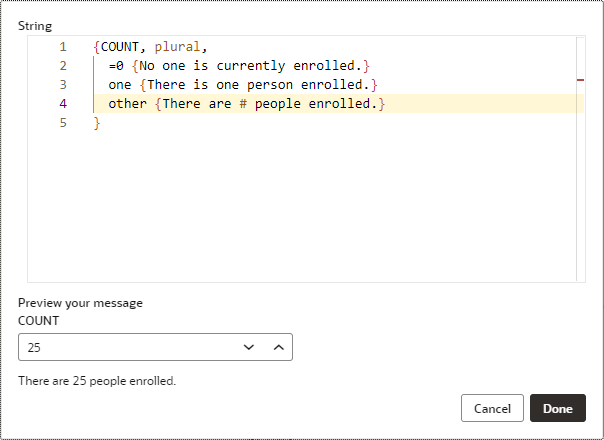
In this example, the ICU message outputs a different message based on the number of people enrolled in a course.
If there are any errors, these are displayed in the Preview your message area. If the expression is valid, the String Editor displays any parameters you've entered as well as a preview of your string. If desired, you can test your expression by providing values for your parameters to see that the message is properly formatted.
When you have created and tested your expression, click Done. Your expression is displayed in the String field.
You are now ready to use this translatable string in your App UI.
- Bind the translatable string to a UI component.
If you created the translatable string from your translation bundle, you can now associate it with a UI component. Open the Translatable String popup from the component's Properties pane, select Use Existing, then search for your new string.
If you created your translatable string from the Translatable String popup using the Create New option, you can now click Save. See Associate a Translation Key with a UI Component.
When you bind your translatable string with a UI component, a JavaScript function call,
[[$translations.extensionBundle.bind_text_value_9ef4({ 'count': 2 })]], replaces the value in the text field for your component.VB Studio assigns a default value to each parameter in your expression. (In this example, the default value for the count
parameteris2.) Next, you'll need to replace the default values with variables that contain appropriate values. - Assign variables to your expression:
- Click the Expression Editor icon (
 ) above the text field to open the Expression Editor.
- From the Expression Editor, replace the default value for each parameter with an appropriate variable from the Variables pane.
In this example, when you assign a variable for enrollees to your
countparameter, the updated JavaScript function call might look like this:[[$translations.extensionBundle.bind_text_value_9ef4({ 'count': $variables.enrollees })]] - Click Save.
- Click the Expression Editor icon (
- Add placeholder metadata for the translatable key.
- Open the translation bundle and select the translation key with the expression.
- From the Properties pane, click Add next to the Placeholders heading.
- Type the name of the placeholder in the available field, then click the right arrow.
- Type a description for the placeholder in the Description field.
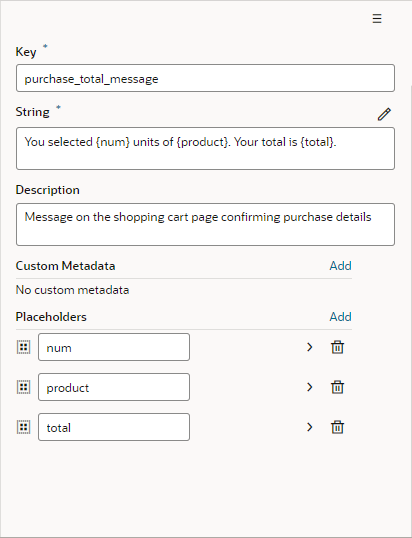
In this example, the translatable string includes three placeholders:
num,product, andtotal. Metadata are included for these placeholders under Placeholders.Note:
You may want to add metadata for a placeholder that is not used in the root (English) string, but which may be used by a translator creating a different localization. If a translation of the string uses this placeholder, it's the developer's responsibility to ensure an appropriate value is assigned to the placeholder at runtime.To view the translation key in the JSON file, click <> Go to Code. The code should look like this:
"purchase_total_message": "You selected {num} units
          of {product}. Your total is {total}."
"@purchase_total_message": {
    "description": "Message on the shopping cart page confirming
          purchase details",
    "placeholders": {
        "num": {
            "description": "The number
          of units selected for purchase"
        },
        "product": {
            "description": "The name of the product
          selected for purchase"
        },
        "total": {
            "description": "The total for the items
          selected for purchase"
        }
    }
}
