Work with Branches

Branching lets you work on different features and updates at any time without affecting the original source code.

This section helps you work with your Git branches in the context of the Designer.

Merge Remote Branches

Use the Merge Requests tool in VB Studio to merge remote branches, such as when you want to merge a remote branch with your changes into the main branch. Your team members can use the tool to review your changes, leave comments, and to approve or reject your merge request. If your request is rejected, you'll need to fix any problems and create a new merge request.

A merge request is created automatically when you use the Merge After Review option in the Publish Changes dialog box in the Designer. To publish the extension, you'll need to open the Merge Requests page in VB Studio and merge the branch into the main branch.

You can also create merge requests in the Merge Requests page. You'll need to create a merge request when you want to merge two remote branches. For details on how to create and work with merge requests, see Review Source Code with Merge Requests in Using Visual Builder Studio.

It's good practice to ask some project members to review your changes, but it isn’t mandatory to get approval from all reviewers before you merge the review branch. Note that you can’t merge the review branch if the target branch is locked. If it's locked you need to contact the project owner to unlock the target branch. For details on how to merge branches, see Merge Branches and Close the Merge Request in Using Visual Builder Studio.

To merge two remote branches:

  1. Open Merge Requests in the main menu in VB Studio and open the merge request.
  2. On the right side of the page, click Merge.
  3. In the Merge dialog box, type a description of the merge and click Create a Merge Commit.

    If changes in your sandbox are not yet published, it's recommended that you publish the sandbox before merging your application extension changes to avoid potential problems.

    To delete the review branch after the commits are merged with the target branch, you can select Delete Branch in the dialog box.

When your merge is complete you'll see a summary of the merge request in the Conversation tab. If you didn't select Delete Branch in the Merge dialog box, you can delete it now by clicking Delete Branch. After merging a branch to the main branch, the branch is automatically closed and you can no longer use it. To make additional changes you'll need to create a new branch in your workspace or open an existing branch.

In the main Merge Requests page, you can see the status of merge requests in the table, and locate requests using the built-in filters, for example, Created By Me.


Cherry-Pick Commits Between Branches

You can cherry-pick commits when you want to apply a commit from one branch to another in your workspace. Typically, you'd cherry-pick commits from a remote branch to the working branch in your workspace.

Cherry-picking is useful when you work with multiple Git branches in a repository, either on your own or in a team environment. When you only need a specific commit from another branch, it's easier to cherry-pick that commit, instead of merging that entire branch to a remote repository. You can cherry-pick commits only between branches in the same repo.

Get the Revision ID of a Commit

Before you can cherry-pick a commit, you'll need the ID of the revision you want to include in your branch.

  • If the commit is local to your workspace, follow these steps:
    1. Click the Git History panel in your workspace.
    2. Select Commit from the action filters and click Apply Filter.
    3. Select the commit you want, then copy the revision ID in the details pane:
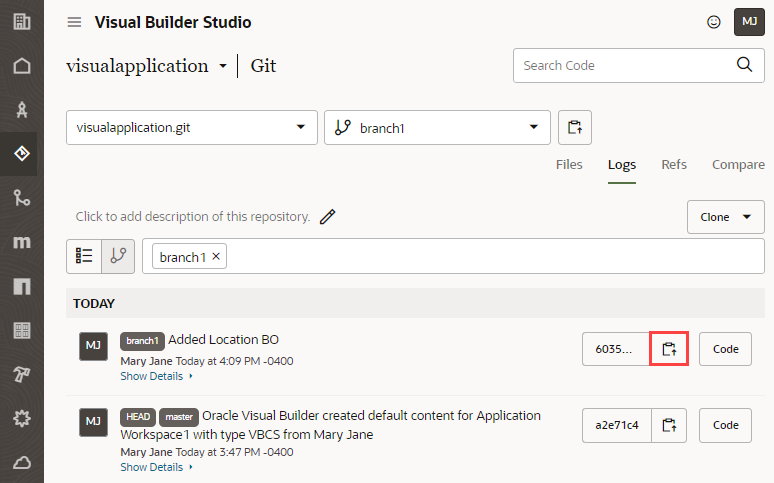
  • If you or one of your teammates already pushed the commit to a remote repository, follow these steps:
    1. In the left navigator, click Git Git in the main navigation for your project..
    2. If required, select the branch with the commit you're looking for.
    3. Click the Logs tab and find the commit.
    4. Click Copy revision to clipboard (Copy revision to clipboard icon) to copy the revision ID.

Cherry-Pick a Commit From Another Branch

Once you have a commit's revision ID, you can cherry-pick it to your working branch. Make sure you select the correct branch to cherry-pick the commit.

A cherry-pick applies the changes from a commit to your working branch, but it does not commit the changes automatically. You'll need to review the cherry-picked changes and explicitly commit them to your branch. This new commit will have a different revision ID, even if its changes are just those from the original cherry-picked commit.

To cherry-pick a commit to your working branch:

  1. Click the Git menu in the header and select Cherry-Pick.
  2. In the Cherry-Pick dialog, enter the ID of the revision you want to cherry-pick and click Fetch Revision (Fetch revision icon).

    Use the Changes and Log tabs to view the changes associated with the commit you're cherry-picking:
    Description of cherrypick.png follows
    Description of the illustration cherrypick.png

    If your branch has uncommitted changes, you'll be prompted to commit your changes.

  3. Click Cherry-Pick. Alternatively, click Commit All and Cherry-Pick to first commit your unsaved changes, then do the cherry-pick. (You'll still need to explicitly commit the cherry-picked changes afterward.)

    If you run into conflicts (say, because a file has been modified on two different branches), you'll see a message similar to this image:
    Description of cherrypick-conflict.png follows
    Description of the illustration cherrypick-conflict.png

    To resolve the conflict, click Close, then go to the Git Panel to resolve the issue in the conflict editor.

  4. Once the commit is successfully applied (and any conflicts resolved), commit the cherry-picked changes to your branch, either from the Git Panel or the Commit option in the header's Git menu.

Create or Switch a Branch

When you create an extension with a Git repository (instead of a scratch repo), VB Studio creates two branches in the repo: the default branch (usually, main) and a working branch.

The main branch contains the initial set of source files for the extension. The working branch contains the same set of source files initially, but as you work on your extension, this branch will contain the changes that you make. Using the Switch Branch/Sandbox option, you can switch branches and commit your changes to the branch you switch to, or create a new branch from the branch you are currently working in.

Note:

You don't have to switch to another workspace to configure another page in your App UI, as long as the target for your change is in your current Git repository. It's much faster to switch branches within a workspace than to switch workspaces. For example, suppose you're working in an extension (that is, a Git repo) for the Digital Sales App UI. Let's say you're configuring the Accounts page, but then get an urgent request to fix something on the Opportunity page and deploy it to your production instance. Rather than create a new workspace, you simply create a new branch, make the fix and publish it, then switch back to the Accounts page code line and resume your work.

You use the Switch Branch/Sandbox dialog to switch branches or create a new branch from the existing branch that you are working on, or, optionally, switch from one sandbox to another.

  1. Click the Git menu in the header, next to the name of the current branch.
  2. Select Switch Branch/Sandbox.

    The Switch Branch/Sandbox dialog displays the current branch in the Branch drop-down list and the number of uncommitted files, if any.

  3. Choose the appropriate option:
    • To switch branches, select the branch that you want to switch to and click Commit and Switch or Switch. The button’s label depends on whether you selected the Commit changes before switching (recommended) check box.
      Description of switchbranch.png follows
      Description of the illustration switchbranch.png
    • To create a new branch, select the New branch from selected check box, enter the name for the new branch, and click Commit and Switch (or just Switch).
    • To associate this branch with a new sandbox, choose one from the Sandbox drop-down. Some sandboxes might be marked "Unpublishable", which means they either have dependencies that haven't been resolved or were created without the ability to publish. Avoid choosing an unpublishable sandbox, as doing so is likely to break your extension.

Rename a Branch

When you want to rename a Git branch, you can use the Rename Branch option to change the name of your local branch, then push the renamed branch to the remote repository.

Note:

Exercise caution when renaming branches, especially if other team members are still using those branches. Renaming the default branch (main, for example) might break build scripts that your repository uses. Before you rename the branch, you'll want to update references to the old branch name in your code or scripts.

Renaming a branch changes your current branch's name while keeping its history and pushes the renamed branch to remote, but the current remote branch is not renamed or deleted. Suppose your current branch is mybranch and you want to change its name to newbranch, the rename first replaces the local mybranch with newbranch, then pushes the local newbranch to the remote repository. No changes are made to mybranch, the previous existing remote branch. You'll have to manually delete this remote branch if you want to.

If the branch you want to rename is local (that is, it isn't tracking a remote branch), the branch is renamed, but isn't automatically pushed to the remote repository—the branch stays local even after the rename.

To rename a branch:

  1. Click the Git menu in the header and select Rename Branch.
  2. In the Rename Branch dialog, enter a new name for the branch. Make sure you're not using the name of an existing branch.
  3. If the current branch has any uncommitted changes, you have the option of committing those changes.
    • To commit your changes before renaming the branch, enter a commit message (with the Commit changes before renaming branch check box selected).
    • To rename the branch without committing your changes, deselect the Commit changes before renaming branch check box.
  4. If you chose to commit changes, click Commit All and Rename; otherwise, click Rename Branch.

    When the rename is successful, close the confirmation message that appears.

The renamed branch shows up in the header as your current branch.

Delete a Local Branch

You can delete a local Git branch that you no longer need to keep your workspace free of clutter. Typically, after your work on a branch is done and you've pushed your changes to a remote repository, it's good housekeeping to delete your local branch.

If your work required you to create a merge request, you can delete the branch immediately following the merge. For all other scenarios, you can use the Delete Local Branch option in the Git menu.

If you delete a branch that hasn't been pushed, its unique commits are likely to be lost. Make sure you push any commits you want to keep.

To delete a local branch:

  1. Click the Git menu in the header and select Delete Local Branch.
  2. In the Delete Local Branch dialog, select the local branch you want to delete.

    A list of local branches that you can delete are shown. This list will not include your current working branch. If you want to delete the current working branch, you'll need to switch to another branch to make your original current working branch available for deletion.

  3. Select Yes, I want to delete the branch to confirm your action.
  4. Click Delete Branch.

    When the delete is successful, close the confirmation message that appears.

Using Branches with a Sandbox

Within your workspace, you can use separate branches for changes you want to make for two different sandboxes, or for different versions of a feature that use the same sandbox.

For example, when modifying a table component in your extension, you might want to work on two different versions of the table. By creating a branch for each version, you can work on one version in one branch with Workspace A mapped to it, and then switch to another branch by using Workspace B to work on the other version. This way you can use your workspaces to help you isolate the branches with your changes. After you decide which version you want to use, you can share the branch with others and delete the branches you no longer need. See How Do Sandboxes Relate to Git Branches?.