Exporting Oracle Unity segments to Google
After importing your organization's email data into the Oracle Unity data model, you can export segments to deliver the data to Google.
To export segments to Google, you will have to do the following:
-
Create a Google destination. Three different Google destination can be created.
-
Google DV360 Partner
-
Google DV360 Advertiser
-
Google Ads
-
After successfully creating, publishing, and running the Google campaign, you can access the segment data by logging in to your Google Ads or DV360 account, where you can then set up your advertising campaign.
Create a Google destination
The first thing you will to do is create a Google destination.
To create the Google destination:
-
Click the Oracle icon
 in the bottom-right corner to open the navigation menu.
-
Select Destinations.
-
In the top-right corner, click Create destination.
-
Define destination details.
The job details section allows you to define the type of destination and how it will display in Oracle Unity. Use the drop-down list to choose either Google Ads or Google DV360 Advertiser or Google DV360 Partners.

-
Type: Choose either Google Ads, Google DV360 Advertisers or Google DV360 Partners.
-
Name: Enter a name. The name must be 1 or more characters, up to a maximum of 50. Use only letters (a–z and A–Z), numbers (0–9), underscores (_), hyphens (-), and spaces. The first character cannot be a space.
-
Destination ID: The unique system identifier that is auto-populated from the destination name you enter. You can't change this value after you create the destination.
-
Description: Enter a description. This field is optional, but it is highly recommended to add descriptions for any entity created. This helps all other users get additional context when using and navigating Oracle Unity. The description can have a maximum of 512 characters with no restrictions on characters used.

-
-
Configure the MediaBridge Account.
MediaBridge is the Oracle Advertising delivery system used by Oracle Unity.
-
Client ID: Provided to you as part of the MediaBridge provisioning.
-
Client Secret: Please contact your IDCS Admin to get the Client Secret.
-
Scope: Provided to you as part of the MediaBridge provisioning.
-
Org ID: Provided to you as part of the MediaBridge provisioning.
Once you enter all the details, click Verify connection to ensure that Oracle Unity can access the MediaBridge service.

If there are connection issues, please verify the accuracy of the MediaBridge credentials. If you still encounter issues, contact Oracle Support for assistance.
-


Configure Google Ad Accounts
After you have created your Google destination and verified your MediaBridge account, the next step is to configure Google Ad Accounts.
Important: you must authorize Oracle as a Customer Match Upload Partner in your Google Advertising Manager and share your Ad Accounts with Oracle before requesting Unity access to the Ad Accounts. If you have not enabled this sharing, Oracle Unity will return a DOES_NOT_EXIST error.
Request Google Ad Accounts
The Google destination uses Ad Account sharing in your Google Advertising Manager account. Oracle Unity will send a request to Google asking you for permission to share access to specific Ad Accounts with Oracle Unity. You make this request in the previously configured Google destination.
To request new ad accounts, click on the icon on the Google Destination and choose Edit. You will see the newly configured Google Destination configuration screen. Scroll past the Authenticate MediaBridge Account section to the Google ad accounts section

Click on the Request for enabling Google ad accounts link. On the right side of the screen, input your Google add account ID and click Get Approval.
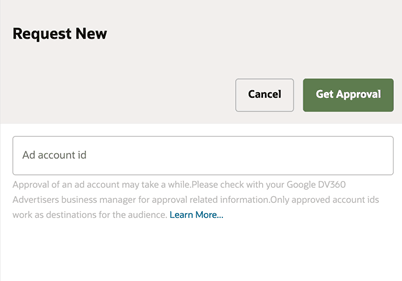
This will initiate a request in your Google Business Manager to share that ad account with Oracle.
NOTE: If you have shared the Ad Account with Oracle, Google Ad Account approval will happen immediately unlike Facebook Ad Account approval which can take up to one hour. If you have not shared the Ad Account with Oracle, the Add Account approval request will fail.
Create a Google Campaign
Creating a campaign involves the following steps:
To create a new campaign:
-
Click the Oracle icon in the bottom-right corner to open the navigation menu.
-
Select Campaigns.
-
In the top-right corner, click Create campaign.
The Create campaign page is displayed.
Note: You can open and close the different sections on the page by clicking the Arrow button ![]() , or anywhere else in the section heading.
, or anywhere else in the section heading.
Step 1: Define campaign details
The campaign details section allows you to define how the campaign will display in Oracle Unity.
To define the campaign details:
-
Enter the details for the campaign.

- Name: Enter a name. The name must be 1 or more characters, up to a maximum of 30. Use only letters (a–z and A–Z), numbers (0–9), underscores (_), hyphens (-), and spaces. The first character cannot be a space.
-
Campaign ID: The unique system identifier for your campaign. You can't change this value after you create the campaign.
- If the campaign name uses English characters, the Campaign ID field is auto-populated from the campaign name you enter. You can change this value before the campaign is created.
- If the campaign name uses characters from another language supported in the language settings, the Campaign ID field will be left blank. You will need to enter a name using English characters.
- Description: Enter a description. This field is optional, but it is highly recommended to add descriptions for any entity created. This helps all other users get additional context when using and navigating Oracle Unity. The description can have a maximum of 512 characters with no restrictions on characters used. You can use characters from all languages supported in the language settings.
- Click Continue.

Step 2: Select the destination
The Destination section allows you to select where you want to export the segment.
To select the destination:
-
Choose the Google destination you created in the steps above. You can verify the MediaBridge connection by clicking Verify connection.
-
Click Select Google ad account and choose from the list of ACTIVE ad accounts.

Note: if you do not see the ad account you are looking for, verify the ad adccount is in the ACTIVE state. If it is not, go to Google Advertising Manager and share the ad account.
- Click Continue.

Step 3: Select the segment
The Segment section allows you to select the segment you want to export for the campaign.
You must choose a segment that has a emailSha256 personalization attribute. If you choose a segment that does not include a emailSha256 personalization attribute you will see an alert asking you to choose another segment.
To select a segment:
-
Search for segments that have been created by entering the segment name.
-
The list of personalization attributes for the segment will display. To edit the list of personalization attributes, you will need to update the personalization attributes selected for the segment before creating the campaign. Learn more about Managing segments.
-
Review the details for the segment and click Continue.


Step 4: Schedule and notify
You will need to configure the schedule and notification settings for the campaign.
To schedule the campaign and define the notification settings:
-
Configure the schedule for the campaign:
-
Click Recurring to automatically run the campaign job on a regular schedule. If a job is still running while the next one is scheduled to run, the next scheduled run will not start until the current one completes. Two scheduled instances of the same campaign can't run simultaneously.
-
Note that On demand campaigns are not an option for Google and are disabled.
-
-
If the campaign job is recurring, select the Frequency, Start time, and Days it will run. Note that Hourly frequency is not an option for Google and has been disabled.
-
In the field for Notify, enter the email addresses of people to be notified when the campaign job runs. You can use characters from all languages supported in the language settings. Separate multiple emails with a comma.
-
If you only want a notification if the campaign job fails, click the Only notify on failure option.


Step 5: Save and publish the campaign
After saving the campaign you will need to publish the changes before it can run.
-
Scroll to the top of the page and click Save or Save and close.
-
Follow the steps for Publishing changes.
When the publishing task successfully completes, the campaign can run.
Activation/Audience Status and their description
Audience Status is associated with the Campaign Screen in the following way.
Note that activation is the step where Audience is created on Google. Hence we are referring Activation Status as Audience Status on Campaign Screen.
|
PENDING |
This is a temporary status that is shown on UI till Activation is submitted to MediaBridge. |
|
INITIATED |
The status of a new activation |
|
ACTIVATED |
After metadata has been sent to a partner platform, the activation is ACTIVATED. |
|
DEACTIVATED |
Activation is no longer in use |
|
ERROR |
Problem in performing Activation |
|
DELETED |
The audience has been removed from the partner platform. |
|
PAUSED |
They do not currently delivery data |