Adobe Target
You can use your first- and third-party Oracle Data Cloud platform cookie data in Adobe Target to experiment, create personalized experiences, and deliver content
Delivering audience data to Adobe Target
To deliver data to Adobe Target, use the create audiences and Delivering Audiences workflows. After those steps, you generate a JSON return tag in the Oracle Data Cloud platform, deploy it on your sites, then complete configuration in the Adobe Target
Generate a JSON return tag and connect it to your global mbox
To pass your data to Adobe Target, you need to create a container, generate a JSON return tag, and deploy the tag to the same page where your Adobe Target global mbox is implemented. The global mbox is coded at the top of the page and is used pull in offer code from Adobe Target to change content elsewhere on the page.
You then add code to your site to parse the campaign and category IDs returned by the JSON return tag into the profile attributes of your mbox so that they are available as visitor profile attributes when you create your audiences in Adobe Target. This allows you to associate different customer experiences in the mbox based on your campaign- or category-level data. (Campaigns and campaign IDs are created automatically by the Oracle Data Cloud platform. You do not create them explicitly in the platform UI.)
Note: This document mentions campaigns. Although users do not explicitly create campaigns in the UI, the Oracle Data Cloud platform creates them automatically to manage audience data delivery. Each campaign has a unique ID. The campaign name corresponds to the audience name.
To generate a JSON return tag and connect it to your global mbox:
- In the Oracle Data Cloud platform, select Manage Containers.
- Click Create New.
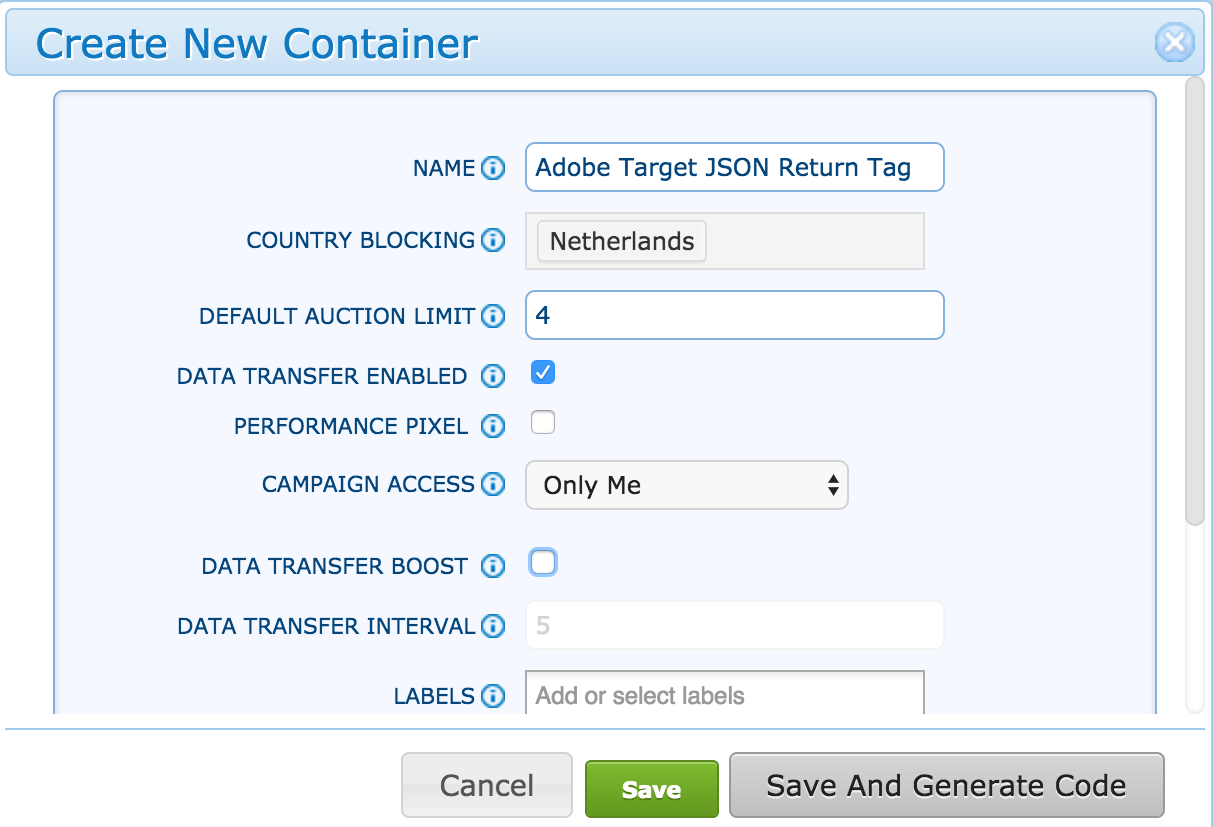
- Use the following settings for your container:
- Name: Enter a descriptive name such as Adobe Target JSON return (or another name that makes it easy to identify your container’s purpose).
- Country Blocking: Accept the default of the Netherlands.
- Data Transfer Enabled: Leave this check box selected.
- Default Auction Limit: Keep the default value of 4 for the number of slots to be allocated on your site for firing third-party pixels.
- Campaign Access: Keep the default of Only Me.
- Data Transfer Boost: Clear this check box.
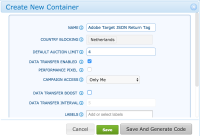
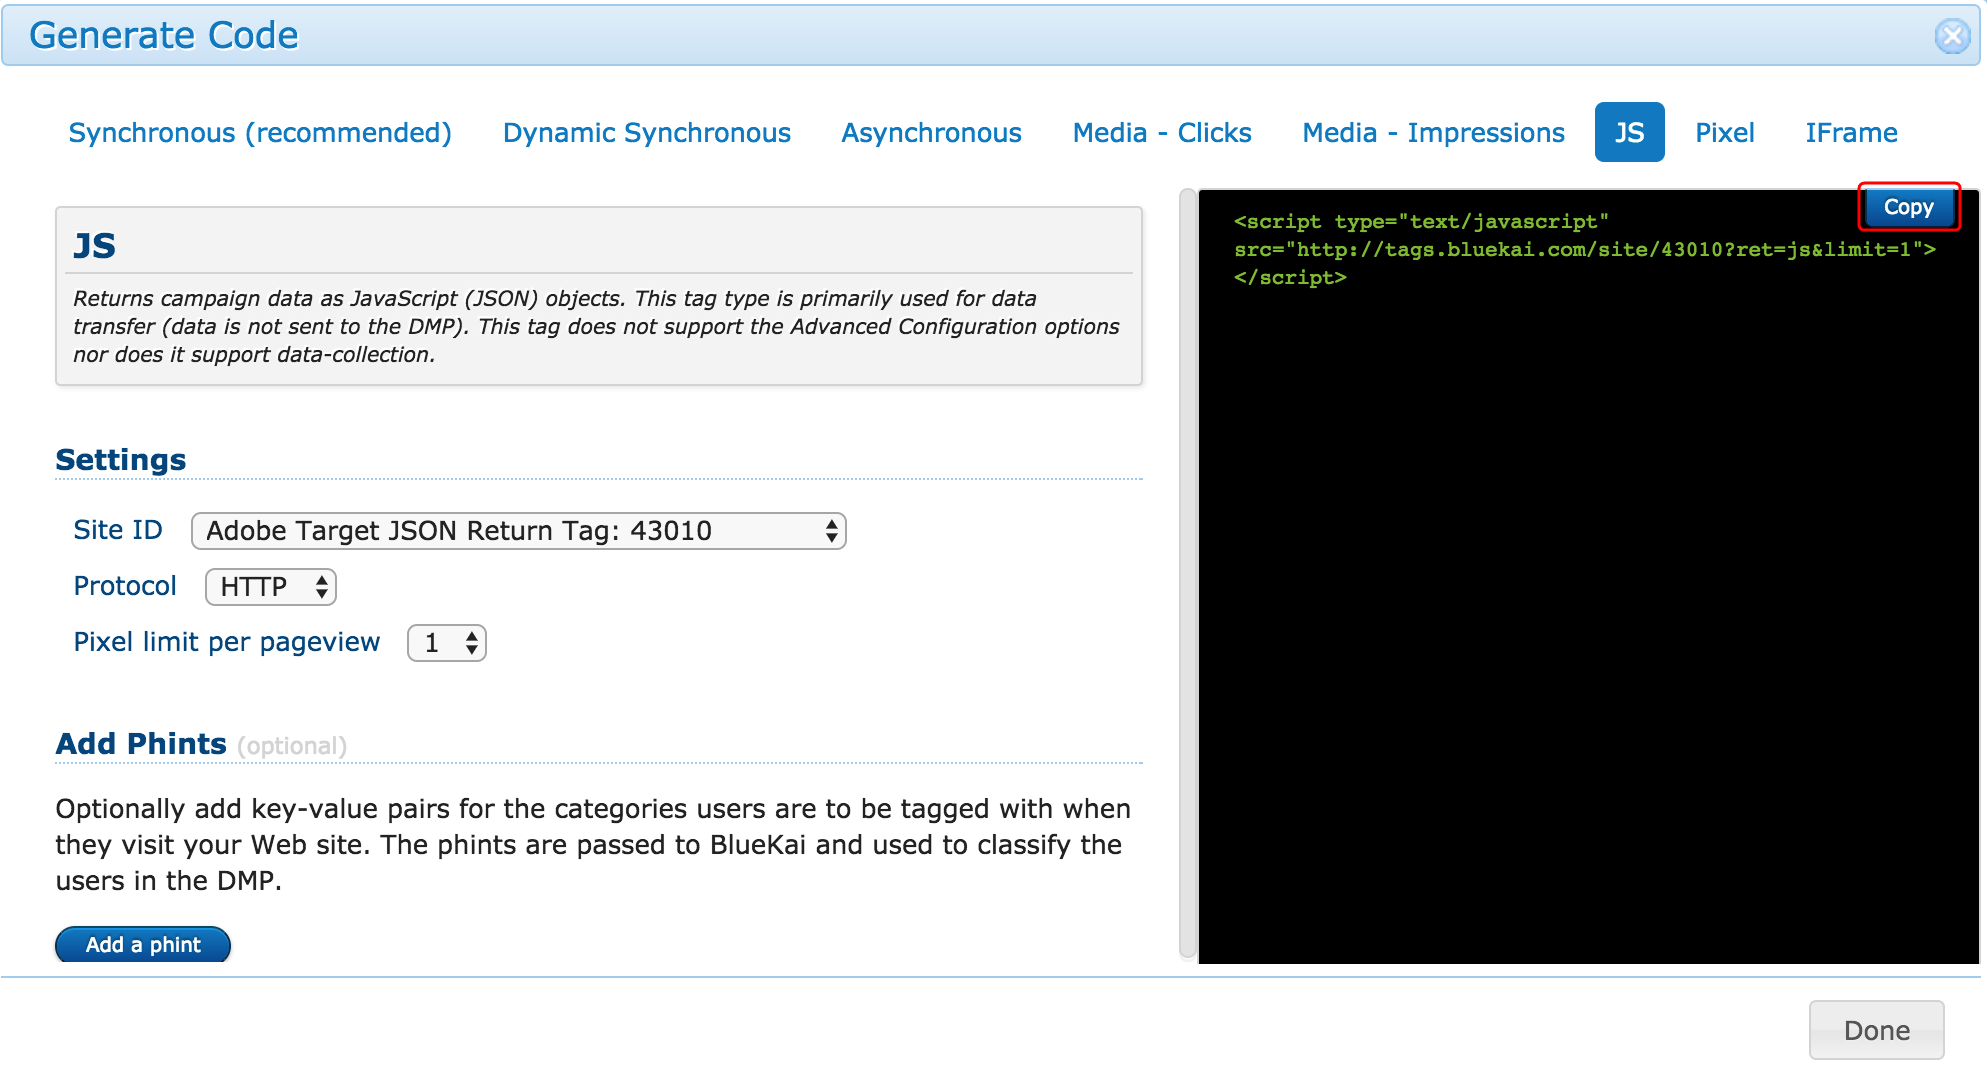
- Click Save and Generate Code. The Generate Code dialog is displayed.
- In the Generate Code dialog, click the JS tab for the JSON return tag type.

Each time a user in your audience visits a web page hosting this JSON return tag, a JavaScript object namedbk_resultsis returned to the page that includes the campaign ID and the categories for which the user qualified. You will pass this data into your global mbox to identify the campaigns and categories users are in. The tag has the following syntax:<script type="text/javascript" src="https://stags.bluekai.com/site/siteID?ret=js&limit=pixelLimit"</script>
Where:httporhttps: Specifies whether you are making calls to the platform via HTTP or HTTPS. If you are optimizing a secure web page, select HTTPS from the Protocol list.siteID: The unique identifier used to manage your site in the Oracle Data Cloud platform. When the platform receives a request from your container tag, it knows that the incoming data belongs to your site.pixelLimit: Specifies the maximum number of pixels that can be fired during a single page view. You can omit this parameter when adding the JSON return tag code to your page.
- Click Copy and then paste the JSON tag before the
mbox.jsfile reference in the<head>element of each web page you plan to optimize as demonstrated in the following example. Sample JSON return tag
<head> <!--Begin BlueKai JSON Return Tag --> <script type="text/javascript" src="https://stags.bluekai.com/site/38937?ret=js&limit=4"></script> <!--End BlueKai JSON Return Tag --> <!-- Begin Global Mbox --> <script src="mbox/mbox.js"></script> <!--End Global Mbox --> </head> - To synchronously connect your JSON return tag and global mbox, add the following code to the
parametersFunction()method in your mbox.js file:Sample code for passing campaign and category IDs in bk_results to the mboxparametersFunction: function() { var campStr = ","; var catIdStr = ","; var blueKaiParams = "pathname=" + location.pathname; if (typeof(bk_results) != "undefined" && typeof(bk_results.campaigns) != "undefined") { for (var i = 0; i < bk_results.campaigns.length; i++) { campStr += bk_results.campaigns[i].campaign + ","; for (var j = 0; j < bk_results.campaigns[i].categories.length; j++) { if (typeof(bk_results.campaigns[i].categories[j].categoryID) != "undefined") { var s = bk_results.campaigns[i].categories[j].categoryID + ""; catIdStr += bk_results.campaigns[i].categories[j].categoryID + ","; } } } if (campStr == ",") { campStr = "none"; } if (catIdStr == ",") { catIdStr = "none"; } blueKaiParams = blueKaiParams + "&profile.bkCampaignIDs=" + campStr + "&profile.bkCategoryIDs=" + catIdStr; } return blueKaiParams; }, ...
This code parses the campaign and category IDs in thebk_resultsobject returned to your page and passes it into the mbox'sparametersFunction(). This makes the campaign and category IDs (bkcampaignIDsandbkCategoryIDs) available as visitor profile attributes when you create your target audiences in Adobe Target.Alternatively, you can use the asynchronous global mbox code or the asynchronous profile pixel code and an asynchronous Oracle Data Cloud core tag.
If you use Adobe Target Classic, you can add code to your JSON return tag to link your Oracle Data Cloud platform data with a single mbox.
Asynchronous global mbox
Instead of synchronously firing the JSON return tag and global mbox code, you can add asynchronous global mbox code to the end of your mbox.js or at.js file. Using this code enables you to fire the JSON return tag asynchronously (if it has not already been loaded) and pass the results into the global mbox, without having to modify any code on your web pages.
To use this code:
- Modify line 5 of the following sample by replacing
siteIDwith the site ID from your container's JSON return tag. - Append the modified code to the very end of your mbox.js or at.js file.
- If you are doing data collection with the Oracle Data Cloud core tag on the same page you are executing site optimizations, use the asynchronous version of the Oracle Data Cloud core tag.
// Create object to store functions
window.bk_adobet_integration = {};
window.bk_adobet_integration.functions = {};
window.bk_adobet_integration.data = {};
window.bk_adobet_integration.bluekai_jsonreturn_id = "siteID"; // CHANGE TO YOUR ID

/*
##########################################################################################
DO NOT EDIT BELOW THIS LINE
##########################################################################################
*/

// FUNCTION : Logger
bk_adobet_integration.functions.logger = function(message) {

    if (document.cookie.indexOf('bk_adobet_logger=true') > -1) {
        console.log(message);
    }
}

// FUNCTION : Parse Oracle Data Cloud platform data and send to Adobe Target
bk_adobet_integration.functions.parseBkResults = function() {

    // Parse BlueKai Campaign Results
    window.bk_adobet_integration.data.bkCatIdSt = ",";
    window.bk_adobet_integration.data.bkCampStr = ",";

    if (typeof(bk_results) != "undefined") {

        if (typeof(bk_results.campaigns[0]) != "undefined") {
            //if (typeof(bk_results) != "undefined" && typeof(bk_results.campaigns) != "undefined") {

            bk_adobet_integration.functions.logger("BLUEKAI ADOBE TARGET : 'bk_results' object found");

            for (var i = 0; i < bk_results.campaigns.length; i++) {

                window.bk_adobet_integration.data.bkCampStr += bk_results.campaigns[i].campaign + ",";

                for (var j = 0; j < bk_results.campaigns[i].categories.length; j++) {

                    if (typeof(bk_results.campaigns[i].categories[j].categoryID) != "undefined") {

                        window.bk_adobet_integration.data.bkCatIdSt += bk_results.campaigns[i].categories[j].categoryID + ",";
                    }
                }

            }

            bk_adobet_integration.functions.generateMbox(); // Generate mbox

        } else {
            bk_adobet_integration.functions.logger("BLUEKAI ADOBE TARGET : No campaigns object");
        }

    } else {
        bk_adobet_integration.functions.logger("BLUEKAI ADOBE TARGET : No 'bk_results' object");
    }

}

bk_adobet_integration.functions.generateMbox = function() {

    // Parse BlueKai Campaign Results
    window.bk_adobet_integration.data.insertProfileBKCamps = ("profile.bkCampIDs=" + window.bk_adobet_integration.data.bkCampStr);
    window.bk_adobet_integration.data.insertProfileBKCatIds = ("profile.bkCategoryIds=" + window.bk_adobet_integration.data.bkCatIdSt);

    // Parse BlueKai Campaign Results
    if (typeof mboxDefine === "function") {

        bk_adobet_integration.div = document.createElement("div");
        bk_adobet_integration.div.id = "oracle_bluekai_mbox_div";
        document.body.appendChild(bk_adobet_integration.div);
        bk_adobet_integration.functions.logger("BLUEKAI ADOBE TARGET : mbox <div id='oracle_bluekai_mbox_div'> created");

        mboxDefine('oracle_bluekai_mbox_div', 'oracle_bluekai_mbox', window.bk_adobet_integration.data.insertProfileBKCamps, window.bk_adobet_integration.data.insertProfileBKCatIds);
        mboxUpdate('oracle_bluekai_mbox');

        bk_adobet_integration.functions.logger("BLUEKAI ADOBE TARGET : mbox defined");
        bk_adobet_integration.functions.logger("BLUEKAI ADOBE TARGET : mboxDefine('oracle_bluekai_mbox_div','oracle_bluekai_mbox'," + window.bk_adobet_integration.data.insertProfileBKCamps + "," + window.bk_adobet_integration.data.insertProfileBKCatIds + ");")
        bk_adobet_integration.functions.logger("BLUEKAI ADOBE TARGET : mbox updated");
        bk_adobet_integration.functions.logger("BLUEKAI ADOBE TARGET : mboxUpdate('oracle_bluekai_mbox');");

    } else {
        bk_adobet_integration.functions.logger("BLUEKAI ADOBE TARGET : mboxDefine() doesn't exist");
    }

}

// FUNCTION : Call BlueKai
bk_adobet_integration.functions.callBlueKai = function(bluekai_jsonreturn_id) {

    // Check if JSON return tag already there
    if ((document.head && document.head.innerHTML.indexOf(bluekai_jsonreturn_id + '?ret=js') > -1) || (document.body && document.body.innerHTML.indexOf(bluekai_jsonreturn_id + '?ret=js') > -1)) {

        bk_adobet_integration.functions.logger("BLUEKAI ADOBE TARGET : JSON Return tag found");
        bk_adobet_integration.functions.logger("BLUEKAI ADOBE TARGET : Parsing 'bk_results' directly");
        bk_adobet_integration.functions.parseBkResults(); // Parse results (don't call JSON ret tag)

    } else {

        bk_adobet_integration.functions.logger("BLUEKAI ADOBE TARGET : JSON Return tag NOT found");
        bk_adobet_integration.functions.logger("BLUEKAI ADOBE TARGET : Calling JSON Return tag");
        var bk_json_ret = document.createElement("script");
        bk_json_ret.type = "text/javascript";
        bk_json_ret.onload = function() {
            bk_adobet_integration.functions.logger("BLUEKAI ADOBE TARGET : JSON Return tag loaded");
            bk_adobet_integration.functions.logger("BLUEKAI ADOBE TARGET : Parsing 'bk_results'");
            bk_adobet_integration.functions.parseBkResults(); // Parse results
        };
        bk_json_ret.src = "//tags.bluekai.com/site/" + bluekai_jsonreturn_id + "?ret=js&limit=1";
        document.head.appendChild(bk_json_ret);
    }

}

// RUN CODE
bk_adobet_integration.functions.callBlueKai(window.bk_adobet_integration.bluekai_jsonreturn_id);
Asynchronous profile pixel
Instead of synchronously firing the JSON return tag and global mbox code, add asynchronous profile pixel code to the end of your mbox.js or at.js file. Using this code enables you to fire the JSON return tag asynchronously (if it has not already been loaded) and pass the results into your Adobe Target profile pixel, without having to modify any code on your web pages.
To use this code:
- Modify line 5 of the following sample by replacing
siteIDwith the site ID from your container's JSON return tag. - Modify line 6 by replacing
companywith your company's name that you use in Adobe Target (this is included in theclientCodeparameter in your mbox.js or at.js file). - Append the modified code to the very end of your mbox.js or at.js file.
- If you are doing data collection with the Oracle Data Cloud core tag on the same page you are executing site optimizations, use the asynchronous version of the Oracle Data Cloud core tag.
// Create object to store functions
window.bk_adobet_integration = {};
window.bk_adobet_integration.functions = {};
window.bk_adobet_integration.data = {};
window.bk_adobet_integration.bluekai_jsonreturn_id = "siteID"; // CHANGE TO YOUR ID
window.bk_adobet_integration.adobe_company = "company"; // CHANGE TO "COMPANY" IN "//COMPANY.tt.omtrdc.net/m2/COMPANY/"
/*
##########################################################################################
DO NOT EDIT BELOW THIS LINE
##########################################################################################
*/
// FUNCTION : Logger
bk_adobet_integration.functions.logger = function(message) {

    if (document.cookie.indexOf('bk_adobet_logger=true') > -1) {
        console.log(message);
    }
}

// FUNCTION : Parse Oracle Data Cloud platform data and send to Adobe Target
bk_adobet_integration.functions.parseBkResults = function() {

    // Parse BlueKai Campaign Results
    window.bk_adobet_integration.data.bkCatIdSt = ",";
    window.bk_adobet_integration.data.bkCampStr = ",";

    if (typeof(bk_results) != "undefined") {

        if (typeof(bk_results.campaigns[0]) != "undefined") {
            //if (typeof(bk_results) != "undefined" && typeof(bk_results.campaigns) != "undefined") {

            bk_adobet_integration.functions.logger("BLUEKAI ADOBE TARGET : 'bk_results' object found");

            for (var i = 0; i < bk_results.campaigns.length; i++) {

                window.bk_adobet_integration.data.bkCampStr += bk_results.campaigns[i].campaign + ",";

                for (var j = 0; j < bk_results.campaigns[i].categories.length; j++) {

                    if (typeof(bk_results.campaigns[i].categories[j].categoryID) != "undefined") {

                        window.bk_adobet_integration.data.bkCatIdSt += bk_results.campaigns[i].categories[j].categoryID + ",";

                    }
                }

            }

            bk_adobet_integration.functions.generateMbox(); // Generate mbox

        } else {
            bk_adobet_integration.functions.logger("BLUEKAI ADOBE TARGET : No campaigns object");
        }

    } else {
        bk_adobet_integration.functions.logger("BLUEKAI ADOBE TARGET : No 'bk_results' object");
    }

}

bk_adobet_integration.functions.generateMbox = function() {

    // Parse BlueKai Campaign Results
    window.bk_adobet_integration.data.insertProfileBKCamps = ("profile.bkCampaignIDs=" + window.bk_adobet_integration.data.bkCampStr);
    window.bk_adobet_integration.data.insertProfileBKCatIds = ("profile.bkCategoryIds=" + window.bk_adobet_integration.data.bkCatIdSt);

    // Parse BlueKai Campaign Results
    (new Image).src = "//" + window.bk_adobet_integration.adobe_company + ".tt.omtrdc.net/m2/" + window.bk_adobet_integration.adobe_company + "/ubox/image?mbox=bk_data_feed&" + window.bk_adobet_integration.data.insertProfileBKCamps + "&" + window.bk_adobet_integration.data.insertProfileBKCatIds + "&mboxDefault\x3dhttp%3A%2F%2Ftags.bkrtx.com%2F1x1.gif"

    bk_adobet_integration.functions.logger("BLUEKAI ADOBE TARGET : Profile Pixel fired");
    bk_adobet_integration.functions.logger("BLUEKAI ADOBE TARGET : Pixel URL is '" + "//" + bk_adobet_integration.adobe_company + ".tt.omtrdc.net/m2/" + bk_adobet_integration.adobe_company + "/ubox/image?mbox=bk_data_feed&" + window.bk_adobet_integration.data.insertProfileBKCamps + "&" + window.bk_adobet_integration.data.insertProfileBKCatIds + "&mboxDefault\x3dhttp%3A%2F%2Ftags.bkrtx.com%2F1x1.gif'");

}

// FUNCTION : Call BlueKai
bk_adobet_integration.functions.callBlueKai = function(bluekai_jsonreturn_id) {

    // Check if JSON return tag already there
    if ((document.head && document.head.innerHTML.indexOf(bluekai_jsonreturn_id + '?ret=js') > -1) || (document.body && document.body.innerHTML.indexOf(bluekai_jsonreturn_id + '?ret=js') > -1)) {

        bk_adobet_integration.functions.logger("BLUEKAI ADOBE TARGET : JSON Return tag found");
        bk_adobet_integration.functions.logger("BLUEKAI ADOBE TARGET : Parsing 'bk_results' directly");
        bk_adobet_integration.functions.parseBkResults(); // Parse results (don't call JSON ret tag)

    } else {

        bk_adobet_integration.functions.logger("BLUEKAI ADOBE TARGET : JSON Return tag NOT found");
        bk_adobet_integration.functions.logger("BLUEKAI ADOBE TARGET : Calling JSON Return tag");
        var bk_json_ret = document.createElement("script");
        bk_json_ret.type = "text/javascript";
        bk_json_ret.onload = function() {
            bk_adobet_integration.functions.logger("BLUEKAI ADOBE TARGET : JSON Return tag loaded");
            bk_adobet_integration.functions.logger("BLUEKAI ADOBE TARGET : Parsing 'bk_results'");
            bk_adobet_integration.functions.parseBkResults(); // Parse results
        };
        bk_json_ret.src = "//tags.bluekai.com/site/" + bluekai_jsonreturn_id + "?ret=js&limit=1";
        document.head.appendChild(bk_json_ret);
    }

}

// RUN CODE
bk_adobet_integration.functions.callBlueKai(window.bk_adobet_integration.bluekai_jsonreturn_id);
JSON return tag for Adobe Target Classic
If you use Adobe Target Classic, you can add code to your JSON return tag to link your Oracle Data Cloud platform data with a single mbox.
To use this code:
- Add the following code directly below the JSON return tag in the
<head>element to generate a comma-separated list of the campaign IDs and category IDs in thebk_resultsobject that is returned directly to your page when the JSON return tag is fired:JavaScript for processing campaign and category IDs in bk_results object<head> //code... <!-- Begin BlueKai JSON Return Tag --> <script type="text/javascript" src="https://stags.bluekai.com/site/38937?ret=js&limit=4"></script> <!--End BlueKai JSON Return Tag --> <!-- Begin Parsing JSON Return bk_results object --> <script type="text/javascript"> var bkCatIdSt = ","; var bkCampStr = ","; if (typeof(bk_results) != "undefined" && typeof(bk_results.campaigns) != "undefined") { for (var i = 0; i < bk_results.campaigns.length; i++) { bkCampStr += bk_results.campaigns[i].campaign + ","; for (var j = 0; j < bk_results.campaigns[i].categories.length; j++) { if (typeof(bk_results.campaigns[i].categories[j].categoryID) != "undefined") { var s = bk_results.campaigns[i].categories[j].categoryID + ""; bkCatIdSt += bk_results.campaigns[i].categories[j].categoryID + ","; } } } } </script> <!-- End Parsing JSON Return bk_results object --> <!-- Begin Creating mbox Profile Parameters --> <script> var insertProfileBKCampaignIds = ("profile.bkCampaignIDs=" + bkCampStr); var insertProfileBKCategoryIds = ("profile.bkCategoryIDs=" + bkCatIdSt); </script> <!-- End Creating mbox Profile Parameters --> <!-- Begin Global Mbox --> <script src="mbox/mbox.js"></script> <!--End Global Mbox --> </head> - In the
<body>element, insert an mbox div (<div class="mboxDefault">) for each area of the page to be optimized and insert themboxCreate()function directly below the closing mbox</div>tag. - Pass the
insertProfileBKCampaignIdsandinsertProfileBKCategoryIdsvariables as parameters in themboxCreate()function as shown in the following code sample:Creating mboxDefault <div> and mboxCreate() Method<body> <div id="container"> <div class ="mboxDefault"> <header id="banner" role="banner">Adobe Target Demo:<br>Site Optimization (SSO)</header> </div> <script type = "text/javascript" > mboxCreate('bannerMbox', insertProfileBKCamps, insertProfileBKCatIds); </script> <hr> <div class ="mboxDefault"> <h1 id="sectionHeader">Site Optimization Results</h1> </div> <script type = "text/javascript" > mboxCreate('headerMbox', insertProfileBKCamps, insertProfileBKCatIds); </script> //code... </body>
Verifying campaign and category IDs in the mbox
To verify that your campaign and category IDs are passed to your mbox:
- Use a browser inspector to look for a URL-encoded, comma-separated list of campaign IDs and category ID, such as:
bkCampaignIDs=%2C130750%2C112721%2C&profile.bkCategoryIDs=%2C686531%2C679495%2C
- If you do not see the campaign and category IDs, make sure that the audience delivery has a status of Active.
- If the delivery is active but you do not see the campaign and category IDs, make sure you properly deployed the JSON return tag followed by the
mbox.jsreference in the<head>tag of your web page and properly added code to your mbox.js file to parse and process the data returned by the JSON return tag.
Create an audience in Adobe Target
You can specify the targeting conditions for your mbox in the Adobe Target platform by creating an audience, creating a new profile-based rule, and selecting an Oracle Data Cloud platform campaign ID or category ID.
To create an audience in Adobe Target:
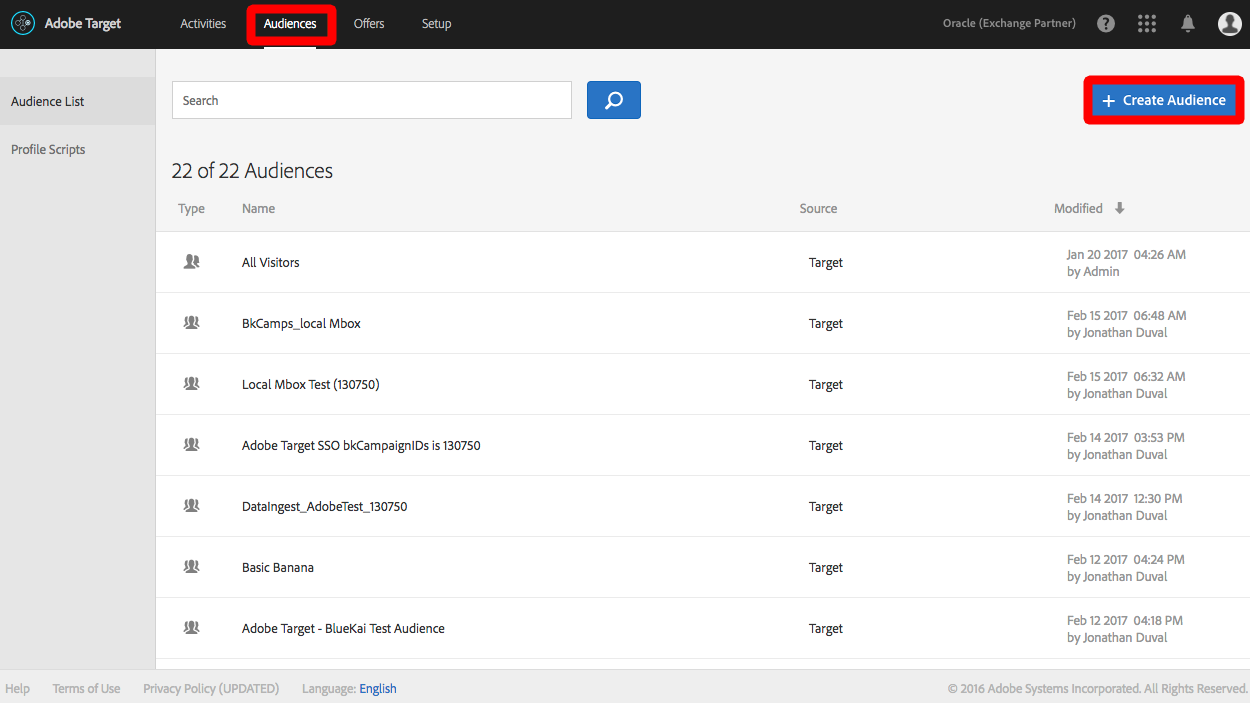
- Log into your Adobe Target account.
- Click Audiences.
- Click Create Audience.

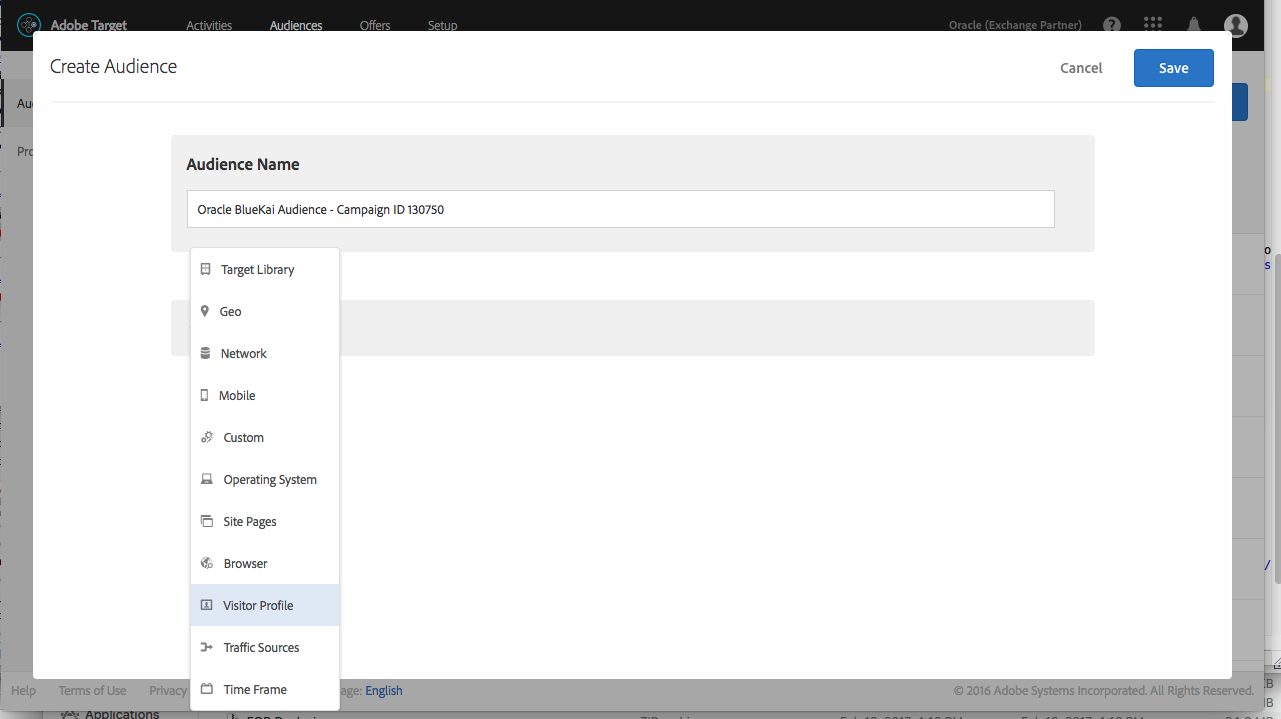
- In the Audience Name box, enter a descriptive name that makes it easy to identify your Oracle Data Cloud platform audience. For example, include the campaign or category name and ID.
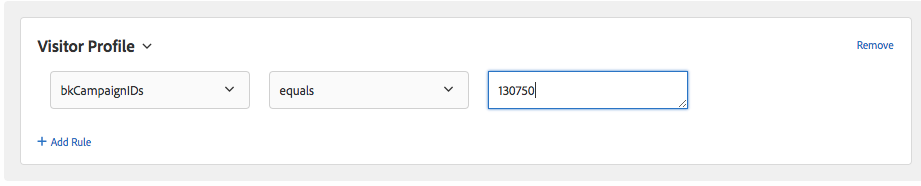
- Click Add Rule, and then select Visitor Profile.

- From the Visitor Profile list, select the bkcampaignIDs attribute if you are targeting at the campaign level or bkcategoryIDs if you are targeting at the category level. The attribute name in the drop-down list matches the
profile.nameyou specified in the mbox'sparametersFunction()method.
- Select the equals operator and then enter the campaign or category ID you are targeting.
- Click Save. You can now create activities that use your Oracle-powered audience.