User Steps

User Prerequisites

You must have the Views - Create role in order to create views, and the Participant(Write) permission on the application in order to make changes to application data.

User Process

To resolve differences between the source and target hierarchies, a user:

  1. Creates a view containing viewpoints for both the source and target hierarchies. The new viewpoints should use the same node sets used by the viewpoints in the default views.
  2. Opens the view and compares the two viewpoints, see Running Viewpoint Comparisons.
  3. Creates a request if the comparison indicates that the source hierarchy contains nodes that the target hierarchy does not contain, see Making Changes Using Requests.
  4. Uses the comparison results to drag and drop the missing nodes from the source to the target hierarchy, see Correcting Node Differences From Compare Results.
  5. Submits the request.

User Detailed Steps

To perform this procedure, an administrator must have performed the procedure in Administrator Steps.
  1. Create a view, then add viewpoints for both hierarchies by performing the following steps:
    1. Click Definition.
    2. Click Create.
    3. From Application Dimension, select the Cost Center dimension for the Source Hierarchy application.
    4. Enter Source Hierarchy, and then click Create.
    5. Click Edit.
    6. Select Cost Center from Node Set.
    7. Click Save.
    8. On the bottom of the page, click the tab containing the name of the view.
    9. Click Definition.
    10. Click Create.
    11. From Application Dimension, select the Cost Center dimension for the Target Hierarchy application.
    12. Enter Target Hierarchy, and then click Create.
    13. Click Edit.
    14. Select Cost Center from Node Set.
    15. Click Save, and then click Close.
  2. Open the view.
  3. From the left pane, select the Side by Side button side by side button.
    The two viewpoints display side by side. The Source Hierarchy viewpoint is on the left.
  4. Perform the following steps in the Compare Viewpoints section:
    1. Select Left to Right from the first dropdown list.
    2. Select Bottom Nodes from the second dropdown list.
  5. Click Compare button to run the comparison.
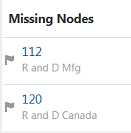
    The Missing Nodes section lists nodes named 112 and 120, as shown in the following example:
    The comparison indicates nodes named 112 and 120 are missing.
  6. Add the missing nodes to the target hierarchy by taking the following steps:
    1. Click New Request.
    2. In the Missing Nodes section, select the node named 112.
      The node is highlighted in the source hierarchy.
    3. Drag and drop the 112 node from the source hierarchy onto the top node of the target hierarchy.
    4. In the Missing Nodes section, select the node named 120.
      The node is highlighted in the source hierarchy.
    5. Drag and drop the 120 node from the source hierarchy onto the top node of the target hierarchy.

      The two hierarchies now have identical leaf nodes, as shown in the following example:


      The target application now contains the same leaf nodes as the source application.

      Note:

      The prefix cc_ was automatically added to the nodes of the target hierarchy. This is because the node type for the Target Hierarchy application has a node type qualifier of cc_.
  7. Click Refresh Comparison button. to rerun the comparison to verify that all Source Hierarchy leaf nodes are in the Target Hierarchy viewpoint.
    The Missing Nodes section should display a message that says No Differences to Display.
  8. Click Submit.