Administrator Steps

Administrator Prerequisites

You must have the Application - Create role to register the applications. After you register the applications, you are assigned the Owner permission to the application and default view. Users must have the Views - Create role in order for them to create a view, and the Participant(Write) permission on the application to enable them to make changes to data.

Administrator Process

An administrator:

  1. Registers two Universal applications.

  2. Imports data.

  3. Creates a node type converter, see Working with Node Type Converters.

Administrator Detailed Steps

To perform these steps, you must be familiar with Registering a Universal Application.
  1. Create a Universal application named Source Hierarchy, then add a dimension by taking the following steps:
    1. Enter Cost Center as the Dimension Name and then click Next.
    2. Click Add.
    3. Enter Cost Center as the Node Type Name and then click Next.
    4. Click Select.
    5. Select the Core.Description property and then click OK.
    6. Enter Description as the Column Header and then click Next a few times until the Import and Export for Dimension page displays.
    7. Perform the following steps:
      • Select Use Node Type Column.
      • Enter Node Type as the Node Type Column Header.
      • Select Use Parent Node Type Column.
      • Enter Parent Node Type as the Parent Node Type Column Header.
    8. Finish registering the Source Hierarchy application.
  2. Create a Universal application named Target Hierarchy, then add a dimension by taking the following steps:
    1. Enter Cost Center as the Dimension Name and then click Next.
    2. Click Add.
    3. Enter Cost Center as the Node Type Name.
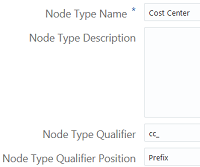
    4. Specify cc_ as the Node Type Qualifier, as shown in the following example:

      The Node Type Qualifier is "cc_".
    5. Click Next.
    6. Click Select.
    7. Select the Core.Description property and then click OK.
    8. Enter Description as the Column Header, then click Next a few times until the Import and Export for Dimension page displays.
    9. Perform the following steps:
      • Select Use Node Type Column.
      • Enter Node Type as the Node Type Column Header.
      • Select Use Parent Node Type Column.
      • Enter Parent Node Type as the Parent Node Type Column Header.
    10. Finish registering the Target Hierarchy application.
  3. Import a comma-delimited (.csv) file containing the following fields into the Source Hierarchy application:
    Name,Description,Node Type,Parent,Parent Node Type
    1000,Total Cost Centers,Cost Center, , 
    100,Research and Development,Cost Center,1000,Cost Center
    110,R and D US,Cost Center,1000,Cost Center
    111,R and D Growth,Cost Center,1000,Cost Center
    112,R and D Mfg,Cost Center,1000,Cost Center
    120,R and D Canada,Cost Center,1000,Cost Center
  4. Import a comma-delimited (.csv) file containing the following fields into the Target Hierarchy application:
    Name,Description,Node Type,Parent,Parent Node Type
    cc_1000,Cost Centers,Cost Center, , 
    cc_100,Research and Development,Cost Center,cc_1000,Cost Center
    cc_110,R and D US,Cost Center,cc_1000,Cost Center
    cc_111,R and D Growth,Cost Center,cc_1000,Cost Center

Create a node type converter by performing the following steps.
  1. Click Node Types.
  2. Click the Cost Center link for the Target Hierarchy application.
  3. Click Converters.
  4. Click Edit and then click Add.
  5. Select the Cost Center node type for the Source Hierarchy application and then click OK.
    The node type converter should look like the following example:
    The target application's node type converter.
  6. Click Save and then click Close.
  7. Check the default views of both applications to verify that the nodes were correctly imported.
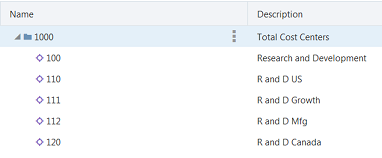
    The source hierarchy should look like the following example:
    The viewpoint contains a top node named 1000 and child nodes named 100, 110, 111, 112, and 120.

    The target hierarchy should look like the following example:


    The viewpoint contains a top node named cc_1000 and child nodes named cc_100, cc_110, and cc_111.