Viewing Node Locations
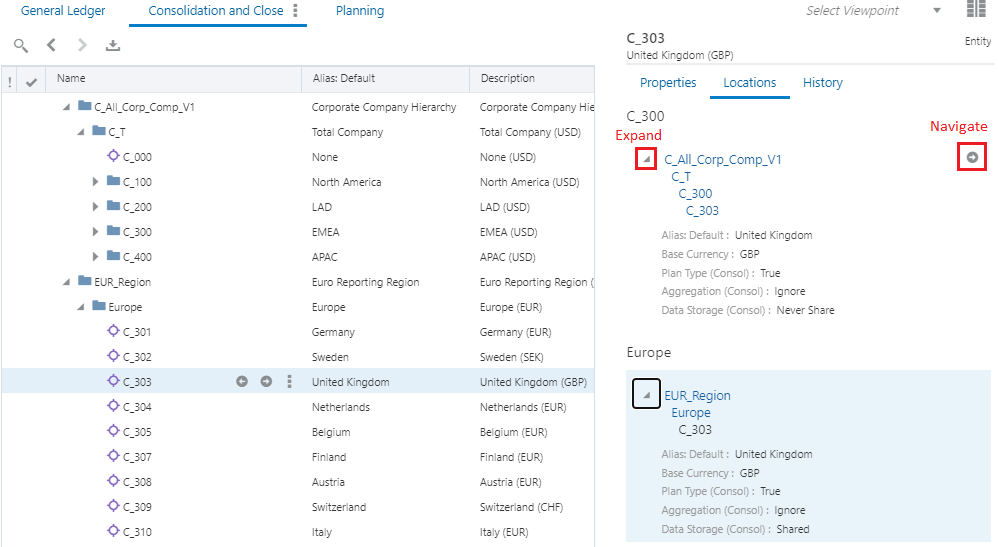
The Locations tab identifies the locations of a selected node in a hierarchy viewpoint. Multiple locations for the same node can be visualized together and you can navigate to any location where a node exists.
Locations are grouped by parent and can be viewed in a collapsed or expanded format. Property values for each location can be displayed to determine similarities or differences across locations.
| Your Goal | Watch This Video |
|---|---|
|
Learn about viewing and navigating to multiple locations of a node in a hierarchy. |
|
Note:
The Locations tab displays up to a maximum of 250 locations for a node. If a node exists in more than 250 locations, the total number of locations is displayed.For shared nodes that exist in multiple locations in a hierarchy viewpoint, the Locations tab provides an easy way to:
-
Identify all of the locations - including the full ancestry of the node
-
Navigate to any of the locations to browse or modify data
-
Visually compare properties for the node in different locations
Note:
The properties that display in the Locations tab are configured in the viewpoint inspector. For more information, see Configuring Locations Tab Properties.
Tip:
Even if a node doesn't exist in multiple locations, the Locations tab provides a list of ancestors for the node. Expand the ancestry list to navigate to any of the node's ancestors.
To view node locations:
-
Open a view and select a hierarchy viewpoint.
-
Expand a hierarchy and select a node.
-
Click the Locations tab.

- Do any of the following to navigate in the Locations tab:
-
Click the expand button to see the node's ancestry.
-
In the expanded view, click any of the node's ancestors to navigate to that node.
-
Click the navigate button to go to a different location of the node in the viewpoint.
Note:
In the collapsed view, you can navigate to the node only. You cannot navigate to a node's ancestor from the collapsed view. In the expanded view, you can navigate to the node or you can navigate directly to an ancestor of the node.
-