Resizing, Editing, and Repositioning Report Objects
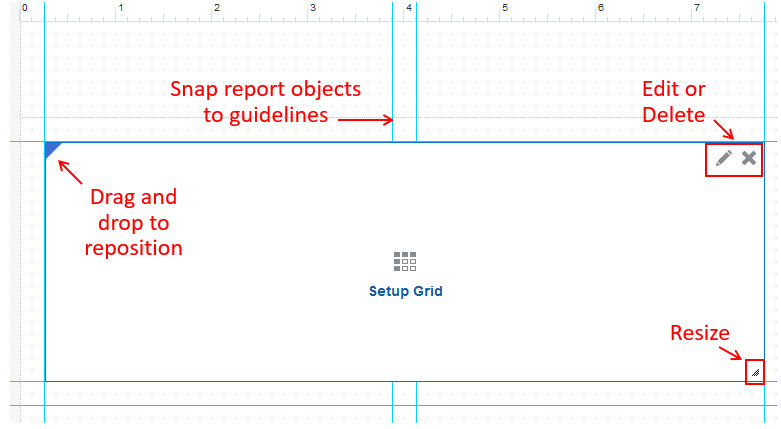
After you insert a report object, you can resize, edit, or reposition the object directly on the design canvas.

-
To resize the report object, click the arrow in the lower right-hand corner and drag to the desired size.
Tip:
If Snap to Guide is enabled, you can also drag the right border to the nearest vertical guide line and the bottom border to the nearest horizontal guide line. See Resizing with Guidelines -
To reposition the object, select the object and drag it to the desired position on the design canvas.
Note:
You cannot overlap objects on the report design canvas. See Correcting Report Errors.
-
To delete the object, click
 .
.
-
To edit the object, click
 or Setup (Object), where (Object) is the object type. For example, Setup Grid.
Using Guidelines
Guidelines enable you to line up your report objects horizontally and vertically for a uniform appearance. By default, report objects are set to "snap to" these guidelines. To toggle this feature on or off, click ![]() , and then Snap to Guide. Your setting is saved for future sessions.
, and then Snap to Guide. Your setting is saved for future sessions.
You can also create new guidelines by clicking ![]() , then New Guides, and then specifying the horizontal and vertical position of the guide.
, then New Guides, and then specifying the horizontal and vertical position of the guide.
Finally, you can drag and drop an existing guideline to change its position in the report.
Resizing with Guidelines
If Snap to Guide is enabled in the grid Action menu, report objects can be resized to the nearest guidelines with the following actions:
-
Drag or double-click the right edge of an object to resize the object to the nearest vertical guideline.
-
Drag or double-click the bottom edge of an object to resize the object to the nearest horizontal guideline.
-
Drag the bottom right corner of an object to resize the object to the nearest vertical guideline.
For more information about working with report objects, see: