Setting up the Incremental File Adapter
To set up an incremental data file load:
- From the Home page, click the Navigator icon and then from the Integration category, select Data Management.
- Select the Setup tab, and then under Register, select Target Application.
- In Target Application, in the summary grid, click Add, and then select Data Source.
- From Source System, select Incremental File.
- In Prefix, specify a prefix to make the source system name unique.
Use a prefix when the source system name you want to add is based on an existing source system name. The prefix is joined to the existing name. For example, if you want to name an incremental file source system the same name as the existing one, you might assign your initials as the prefix.

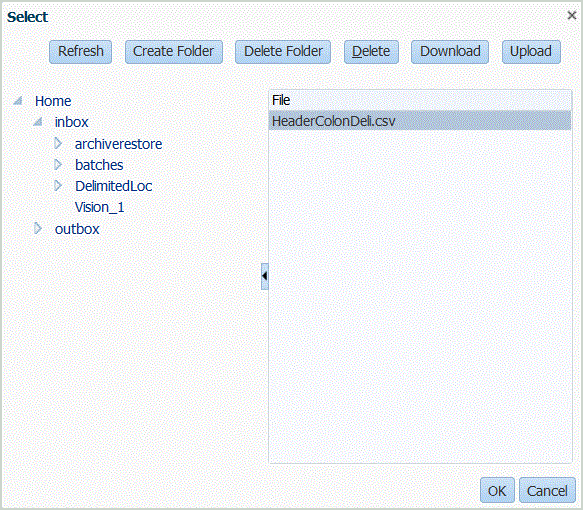
- From the Select screen, select the data file.
The file must be a delimited file using one of the supported delimiters, and must contain a header record in the first row.

- Click OK.
- Click Save.
The system creates the dimension details automatically.

- On the Setup tab, under Integration Setup, select Import Format.
- In the Import Format summary task bar, select Add.
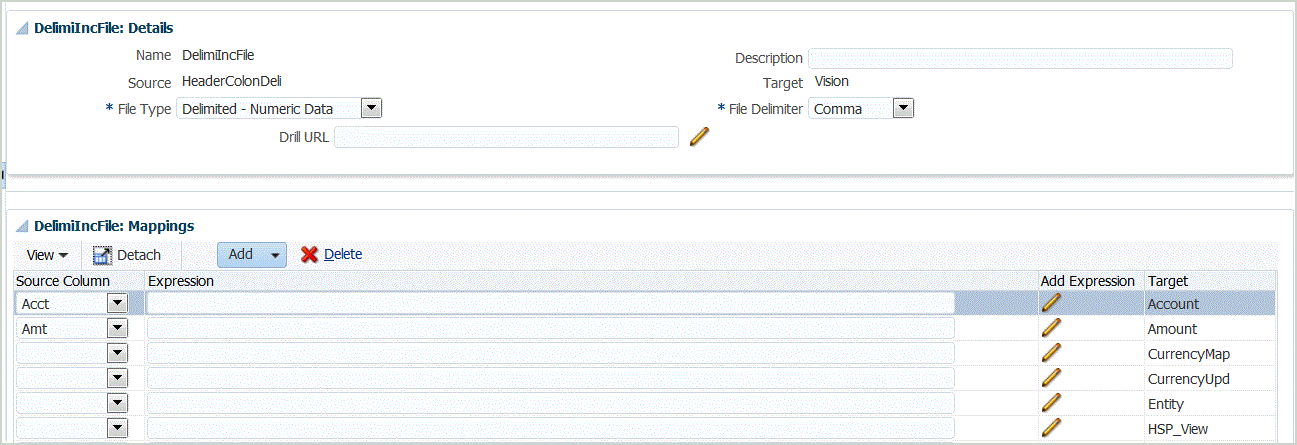
- In Name, enter a user-defined identifier for the import format.
- In Source, select File for the source.
- From File Type drop-down, select delimited file type.For example, you might select Delimited - Numeric Data as the format of the file.
- From the File Delimiter drop-down, select a type of delimiter.
Available delimiters:
-
comma (,)
-
exclamation (!)
-
semicolon (;)
-
colon (:)
-
pipe (|)
-
tab
-
tilde (~)
-
- In Target, select the name of the target application.
- Click Save.
For more information, see Working with Import Formats.
- Optional: On the Mappings tab, map dimensions between the source system and target application, and click Save.
Note:
Only single period loads are supported. - On the Setup tab, under Integration Setup, select Location, define the location used to associate the import format.
See Defining Locations.
- Optional: On the Workflow tab, under Data Load, select Data Load Mapping, define member mappings to map the members from the source to target.
- Optional: On the Workflow tab, under Data Load, select Data Load Rule.
- From the POV bar, select the POV of the location for the data load rule.
- In the Data Load summary area, click Add.
- In Details, in Name, enter the data load rule name.
- In Category, select the category to map source system data to target Scenario dimension members.
- In Period Mapping Type, select either Default or Explicit.
Default period mappings default to the list of source application periods using the application or global period mappings based on the period key. The list of source periods is added as Year and Period filters.
The Explicit method for loading data is used when the granularity of the source periods and target application periods are not the same.
- Optional: In Import Format select the import format to use with the file so override the import format. If the import format is unspecified, then the import format from the location is used.
- If the target system is a Planning application, from the Target Plan Type drop-down, select the plan type of the target application.
- Select the Source Filters tab.

- In Source File, select the data file name that contains the data you are loading. It may be the same one from which you created the data source application, or another file that has data as well as the appropriate header.
Select the file that contains your data, as before. It may have the same name as the original file, or it may have a new name. The differences in the file (i.e. the incremental load file) is created automatically between the two files loaded. So if file A.txt has 100 rows and file B.txt has 300 rows where the first 100 are identical, your first load should select file A.txt when the ID is 0. The second load will be against file B.txt and the ID automatically points to the load ID that was assigned to A.
- In Incremental Processing Options, select the method for sorting data in the source file.
Available options:
- Do not sort source file—Source file is compared as provided. This option assumes that the source file is generated in the same order each time. In this case, the system performs a file comparison, and then extracts the new and changed records. This option makes the incremental file load perform faster.
- Sort source file—Source file is sorted before performing the file comparison for changes. In this option the source file is first sorted. The sorted file is then compared to the prior sorted version of this file. Sorting a large file consumes a lot system resources and performs slower.
Note:
If you have rule that uses the Do Not Sort option and then switch to a Sort option, then the first load will have invalid results since the files are in different order. Subsequent runs load data correctly.
- The Last Process ID shows the last run ID for the original source data file.
When the load is first run for the original data file, the Last Process ID shows the value of 0.
When the load is run again, the Last Process ID shows the run number of the last load.
If the newly created file comparison version and the original data file shows no differences, or the file is not found, the value of the Last Process ID is assigned to the last load ID that ran successfully.
To reload all data, set the Last Process ID back to 0, and select a new source file to reset the baseline.
- View the data before exporting it.
