Creating and Managing Distributions
You create, edit, and execute distributions from the Manager tab of the Distribution Center. When you create a distribution, you specify which users will receive the distribution and what action they can take (view, download, or download as PDF); however, you do not specify what access those users will have. You use the Access tab to assign access to users and groups. In other words, use the Manager tab to define who gets the distribution, and the Access tab to define what those users can see.
Creating Distributions
-
From a report package, click
to open the Distribution Center.
-
Click
 .
.
-
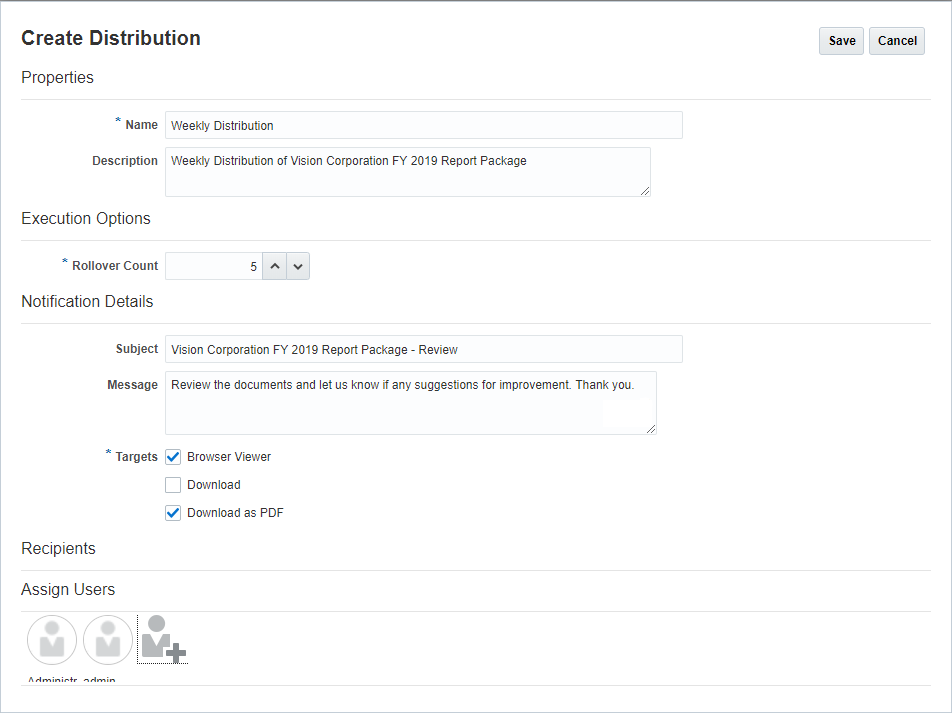
In Properties, enter a name and, optionally, a description for the distribution.
-
In Rollover Count, specify the number of executions that the system will store for the distribution. When a user views the distribution, they can select any of the saved executions to view. Each execution is named with the Distribution Name and an incremented number (for example, Weekly Distribution 1, Weekly Distribution 2, and so on). The system deletes prior executions that exceed the rollover count.
-
In Notification Details, enter the subject and message of the notification email, and then specify the actions that the recipients can take:
-
View in a browser
-
Download in native format
-
Download as PDF
Note:
You must specify at least one action.
-
-
In Recipients, click
 to assign users to the distribution.
Note:
Use the Access tab to determine the access for the users that you assign to the distribution. See Assigning Access to Distributions. All report package owners and viewers are automatically assigned full access to the distribution.
-
Click Save to save the distribution.

Executing Distributions
To execute a distribution, in the Actions column for the distribution, click ![]() and select Execute.
and select Execute.
When you execute a distribution, a distribution execution instance is created and notifications are sent to the users that you assigned to the distribution. Click ![]() next to the distribution name to see the result of the execution.
next to the distribution name to see the result of the execution.
Tip:
The Recipients column displays the number of recipients who received the distribution. Click the number to display the individual users and groups in the distribution.
To delete a distribution execution instance, in the Actions column of the execution, click ![]() and select Delete. Note that this will delete the execution instance, but not the distribution definition. To delete the distribution definition itself, see Editing and Deleting Distributions.
and select Delete. Note that this will delete the execution instance, but not the distribution definition. To delete the distribution definition itself, see Editing and Deleting Distributions.

Editing and Deleting Distributions
To edit a distribution, in the Actions column for the distribution, click ![]() and select Edit to display the Edit Definition dialog box. When you are finished editing, click Save to return to the distribution center.
and select Edit to display the Edit Definition dialog box. When you are finished editing, click Save to return to the distribution center.
To delete a distribution, in the Actions column for the distribution, click ![]() and select Delete.
and select Delete.