19 Import and Manage Facilities

After configuring an integration with Oracle Warehouse Management Cloud Service, you can import the facilities that you need to monitor. You can update the default check-in geofence, create custom geofences, upload a floor plan, and update the uploaded floor plan of the imported facilities.

A facility is a distribution center, a site, or a store where loading and unloading of shipments from vehicles are performed. After integrating with Oracle Warehouse Management Cloud Service, you select the facilities to import and monitor in your Oracle IoT Fleet Monitoring Cloud instance. A facility is imported with a default check-in geofence that you can edit. You can optionally create upto three geofences in an imported facility. You cannot modify any other facility details except the facility type icon.

Import Facilities from Oracle Warehouse Management Cloud Service

A fleet administrator can import those facilities into Oracle IoT Fleet Monitoring Cloud Service which have been marked as WMS Managed by the facility manager in Oracle Warehouse Management Cloud Service

You should have already configured and enabled an integration with Oracle Warehouse Management Cloud Service in an organization. To import facilities in that organization, sign in as the administrator and complete the steps:
  1. Click Menu (Menu icon) and then, click Facilities.
    For the first time, the Import Facilities button is displayed at the center. Otherwise, the Import/Update Facility icon is displayed above the list of facilities, on the left navigation bar. Import Facilities Button
  2. Click Import Facilities or click the Import/Update Facility(Import/Update Facility Icon) icon whichever is displayed.
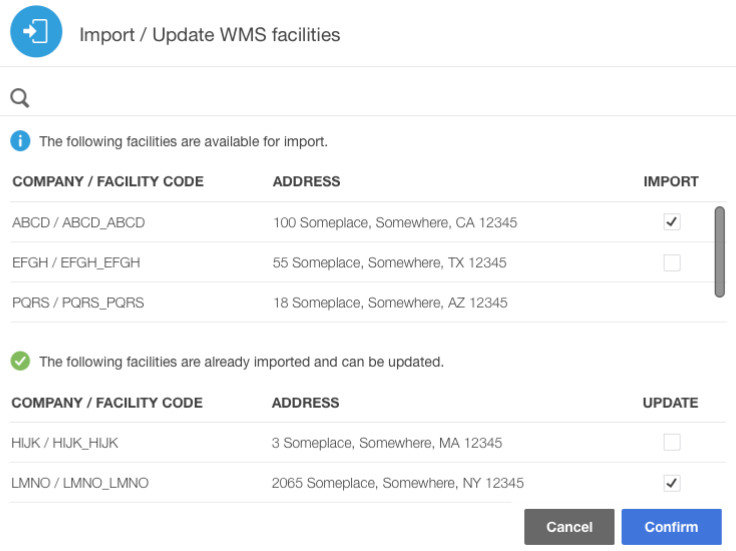
    You need to wait for sometime as Oracle IoT Fleet Monitoring Cloud Service fetches the facilities from Oracle Warehouse Management Cloud Service. A list of facilities that are available for import and a list of already imported facilities available for update are displayed.Import Update Facilities Page
  3. To select the facilities, click IMPORT for each facility and then, click Confirm.
On the Facilities page. the imported facilities are listed on the left navigation bar.

List and View Facilities

An administrator of an organization, you can obtain the list of facilities imported in that organization and also view the details of each facility including its facility code, address, check-in geofence, custom geofences, rules, and floor plans.

To list and view the facilities of an organization, you as an administrator should have imported the facilities from the Oracle Warehouse Management Cloud Service instance that is integrated with your Oracle IoT Fleet Monitoring Cloud Service instance for the organization.
  1. Click Menu (Menu icon), Design Center, and then, click Facilities.
    The list of facilities imported in the organization are displayed on the left navigation bar.
  2. To view the details of a facility, from the left navigation bar, click a facility.
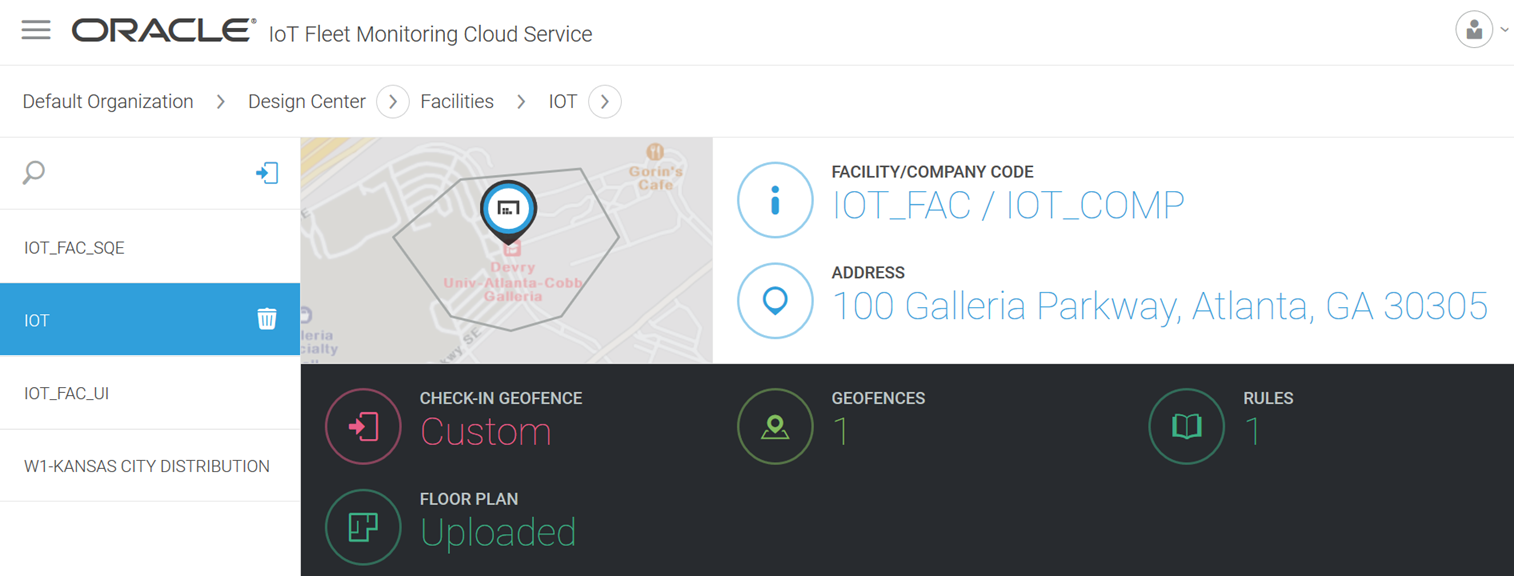
    The facility details such as the map preview of the check-in geofence, the Facility/Company Code, Address, the status of Check-in Geofence, the number of custom Geofences, the number of Rules, and the status of the facility Floor Plan are displayed. Facility Details Page
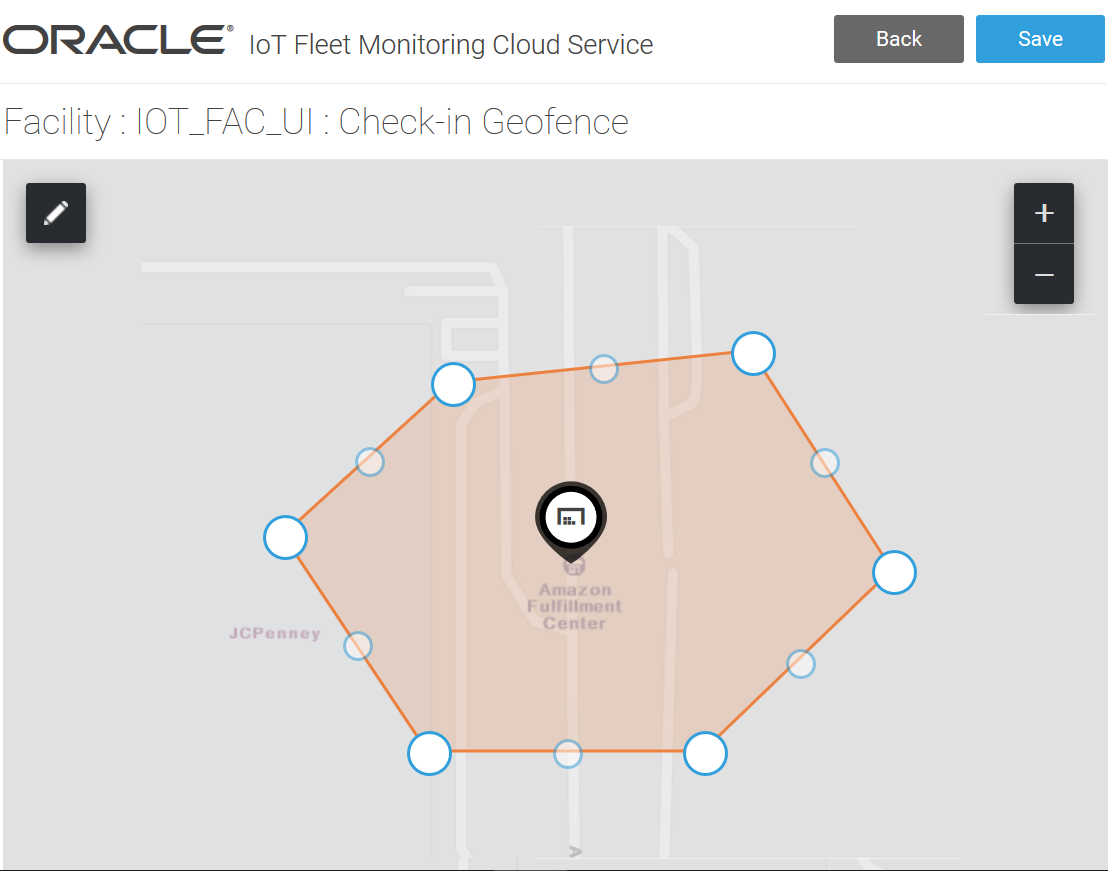
  3. A polygonal geofence by fitting a regular hexagon inside a circle of radius of around 2 KM is provided when a facility is imported. To view the details of the default check-in geofence, click CHECK-IN GEOFENCE and examine the default geofence of the facility.
  4. You can create additional custom geofences in the facility. To view the custom geofences, click GEOFENCES.
  5. To view the rules created for the facility click RULES.
  6. You can upload and update an image of the floor plan. To view the uploaded floor plan of the facility, click FLOOR PLAN.

Update the Check-in Geofence of a Facility

After integrating with Oracle Warehouse Management Cloud Service, when you import a facility in an organization of your Oracle IoT Fleet Monitoring Cloud Service instance, a geofence is provided by default to the facility. As a user, you can update this default check-in geofence.
Sign in as a user of the organization to update the check-in geofence that is provided in a facility by default.
  1. Click Menu (Menu icon), Design Center and then, click Facilities.
    The list of facilities imported in the organization are displayed on the left navigation bar.
  2. Click a facility from the left navigation bar.
    The facility details are displayed.
  3. Click CHECK_IN GEOFENCE (Check-in Geofence Icon), whose status is displayed as Default.
  4. On the Check-in Geofence map view page, click Edit (Edit Icon).
    In a map view, the default geofence's polygon appears highlighted with circular points, each representing a GPS coordinate. Edit Check-in Geofence
  5. Complete one of the two methods to edit the default check-in geofence:
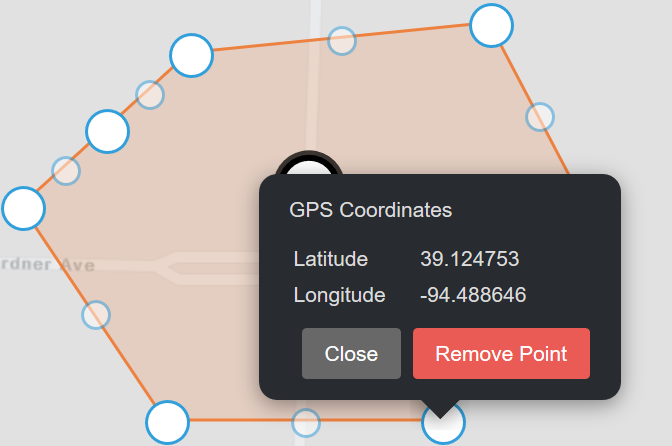
    • Modify the shape of the polygon: Drag a bigger circular point to modify the polygon's shape. To delete a point, right click the bigger points. If you left click a bigger circular point, the latitude and longitude values of the point are displayed that you can select to remove. You can click the smaller points to convert them to bigger points with GPS coordinates.Delete Point from Polygon

    • Delete the default polygon and create a new geofence: Click anywhere on within the red border of the polygon to display a Delete Polygon button and click the button. Use the Draw (Draw Icon) icon to create a new geofence. around the facility.

  6. Click Save and then Back. You're on the Check-in Geofence page of the facility.
  7. To return to the facility details page, from the breadcrumb information, click the facility name.
You are on the facility details page and the status of CHECK-IN GEOFENCE is displayed as Custom.Facility Details page

Create Geofences for a Facility

The facilities imported from Oracle Warehouse Management Cloud Service are provided with a default check-in geofence. Besides the default geofence, you can create multiple custom geofences for the facilities.
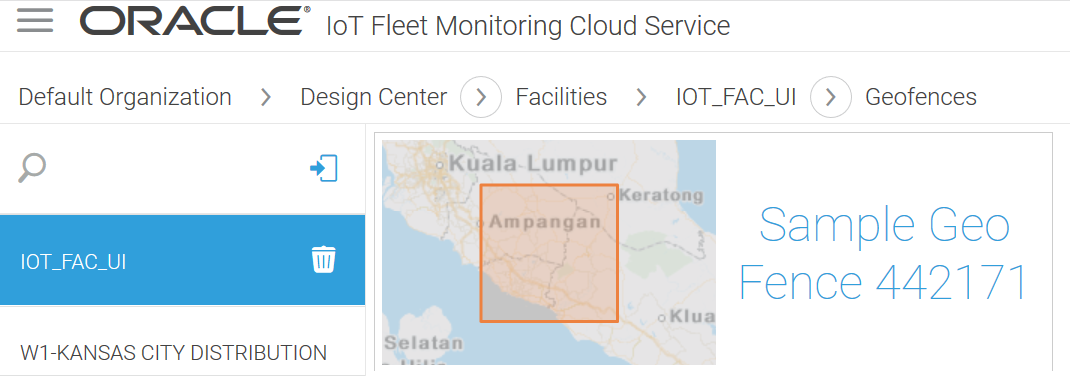
In Oracle IoT Fleet Monitoring Cloud Service after the administrator has configured an integration with Oracle Warehouse Management Cloud Service and imported the facilities into an organization, as a user of the organization, you can create geofences for a facility. Besides the check-in geofence provided by default, you may need custom geofences for a facility boundary fence, a yard boundary fence, or a dock area boundary fence.
  1. Click Menu (Menu icon), Design Center and then, click Facilities.
    The list of facilities imported in the organization are displayed on the left navigation bar.
  2. From the left navigation bar, click the facility for which you need to create a geofence.
    The facility details are displayed.
  3. Click GEOFENCES (Facilities Geofence Icon) and then on the Geofences page, click Create Geofence (Create Geofence Icon
    The Custom Geofences page for the facility is displayed
  4. Complete the Steps 3 - 7 in Create a New Geofence.
You are on the Geofences page of the facility and a snapshot of the new geofence is displayed. Custom Geofence of a facility To edit the newly created geofence, hover your mouse over the geofence, click Edit (Edit Icon), modify, and save the updates. To delete the newly created geofence, click Delete (Delete Icon). On the Confirm Delete dialog box, click Delete.

Upload a Floor Plan for a Facility

As am organization administrator, you can upload a floor plans for a facility imported from an Oracle Warehouse Management Cloud Service instance that is already integrated with your Oracle IoT Fleet Monitoring Cloud Service instance.

After configuring an integration with Oracle Warehouse Management Cloud Service, facilities can be imported into an organization of your Oracle IoT Fleet Monitoring Cloud Service instance. As a administrator, you can upload an image of a facility floor plan.
  1. Click Menu (Menu icon), Design Center and then, click Facilities.
    The list of facilities imported in the organization are displayed on the left navigation bar.
  2. From the left navigation bar, click the facility for which you need to upload a floor plan.
    The facility details are displayed.
  3. Click FLOOR PLAN (Floor Plan Icon) and then on the Floor Plan page, click Select a File to Upload
  4. On the File Upload dialog box, browse to the location where you've saved the floor plan image file, select it, and click Open. Alternatively, you can drag and drop the image file on the Floor Plan page.
    The image of the floor plan is displayed on the Floor Plan page.
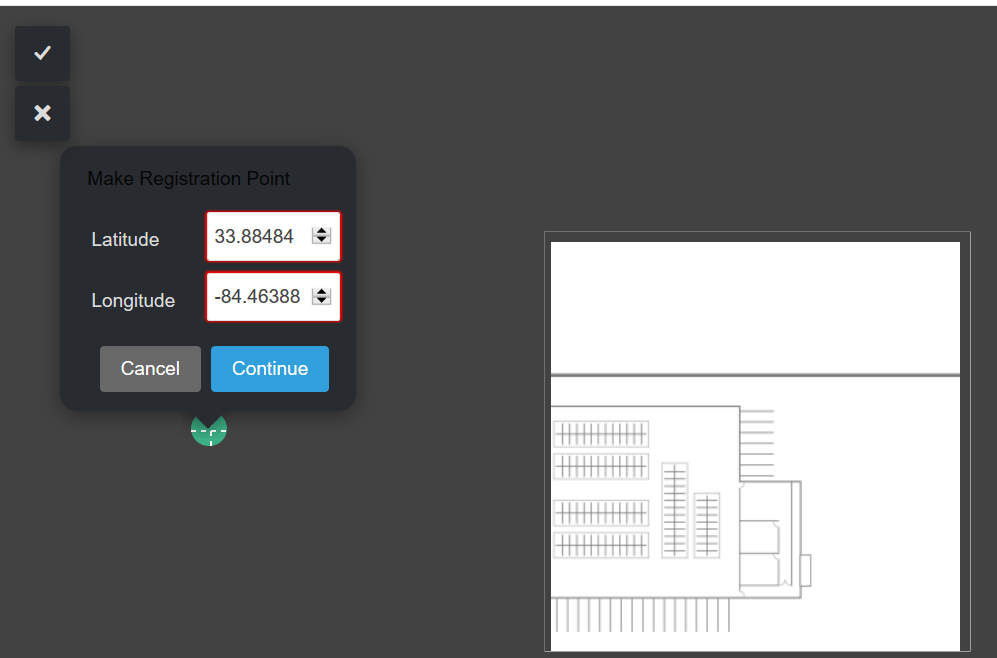
  5. Before you can save the floor plan, you need to provide its geo-coordinates to position the floor plan accurately on the map.
    1. Click the Globe icon (Globe Icon) and then, click on a position of the map.
    2. Enter the latitude and longitude values and then, click Continue
    3. Click on another position of the map and repeat the previous step.
    4. Click the Right Mark (Right Mark Icon) icon to complete the process.
    Floor Plan Position Coordinates
  6. Click Save and then click Back to return to the facility details page.
On the facility details page, the FLOOR PLAN status is displayed as Uploaded.

Update the Floor Plan of a Facility

As am organization administrator, you can update the floor plan of a facility imported from an Oracle Warehouse Management Cloud Service instance that is already integrated with your Oracle IoT Fleet Monitoring Cloud Service instance.

Sign in as an administrator of an organization in your Oracle IoT Fleet Monitoring Cloud Service instance and update the position, background, or size of the floor plan of a facility that is imported from an Oracle Warehouse Management Cloud Service instance. To upload a floor plan, you should have uploaded and saved the floor plan for a facility.
  1. Click Menu (Menu icon), Design Center and then, click Facilities.
    The list of facilities imported in the organization are displayed on the left navigation bar.
  2. From the left navigation bar, click the facility for which you need to upload a floor plan.
    The facility details are displayed.
  3. Click FLOOR PLAN (Floor Plan Icon) that displays the status as Uploaded.
  4. On the Floor Plan page of the facility, update the following attributes of the floor plan
    • From the left bar, click the Crop (Crop Icon) icon. The floor plan is highlighted with a border. Drag and drop the four points of the border to re-size the floor plan. Click the Right or the Cross icon to accept or undo the changes.
    • From the left bar, click the Slide Bar (Slide Bar Icon) icon. Use the slide bar to modify the background of the floor plan. Click the Right or the Cross icon to accept or undo the changes.
  5. Before you can save the changes to the floor plan, you need to provide its geo-coordinates again similar to what you had done when uploading the floor plan. See Step 5 in Upload a Floor Plan for a Facility
  6. Click Save and then click Back to return to the facility details page.

Create a Facility Rule

Create a rule to generate an incident or an alert when a facility's KPI value meets or exceeds a set threshold.

Create a rule for one or more facilities imported from Oracle Warehouse Management Cloud Service i nto an organization. Facility rules are based on their associated KPI values.
  1. Enter the text of the first step here.
    (Optional) Enter the result of the step here.
  2. Click Menu (Menu icon), Design Center and then, click Facilities.
    The list of facilities imported in the organization are displayed on the left navigation bar.
  3. From the left navigation bar, click the facility for which you need to create a rule.
    The facility details are displayed.
  4. Click Rules (Rules Icon) and then on the Rulespage, click Create Rule (Create Rule Icon
    The Create Rule page for the facility is displayed
  5. Enter a name for the rule in the Name field.
  6. Select one or more facilities from the Facility list:
  7. Select the rule condition(s) in the Condition area:
    • Attribute: Select one of the system defined facility metrics
    • Operator: Select one of the operators from the list.
    • Value: Select an attribute to generate an alert or incident notification.
  8. (Optional) Select additional conditions.
  9. Select these options in the Fulfillment area:
    • All Conditions Apply: Select this option to generate an incident report when all of the conditions are met or exceeded. or select Any Conditions Apply to generate an incident report when any of the conditions are met or exceeded.
    • Any Conditions Apply: Select this option to generate an incident report when any of the conditions are met or exceeded.
    • Incident: Select this option to generate an incident notification when the specified conditions are met or exceeded.
    • Alert: Select this option to generate an alert when the specified conditions are met or exceeded.
  10. If you selected Incident in the Fulfillment area, complete these fields in the Incident Details area:
    • Summary: Enter a summary that describes the rule.
    • Type: Select the rule type.
    • Priority: Select an optional priority for the rule.
    • Tags: Enter optional tags for the rule.
    • Description: Enter an optional description for the rule.
  11. (Optional) If you selected Incident in the Fulfillment area, select subscriber(s) in the Subscribers list in the Notification Subscription area.
    When you add a subscriber, the subscriber receives an SMS incident notification on their mobile device when the rule conditions are met or exceeded.
  12. If you selected Alert in the Fulfillment area, complete these fields in the Alert Details area:
    • Summary: Enter a summary that describes the rule.
    • Severity: Select an optional priority for the rule.
    • Type: Select the severity for generating the alert.
    • Suppression Period: Select the time in minutes to suppress the alert.
  13. (Optional) If you selected Alert in the Fulfillment area, select the data to include in the alert notification:
    • Source Attributes: Select this option to include the source attributes in the alert notification.
    • Context Information: Select this option to include the context information in the alert notification.
    • Message Payload: Select this option to include the message that generated the rule, in the alert notification.
  14. Select a Rule Schedule.
  15. For the Custom, rule schedule, select these options:
    • Repeat Weekly: The rule will be triggered once every week
    • Repeat Monthly: The rule will be triggered once every month
    • Select cells or drag over the rows to define a data window for the weekly or monthly rule schedule. The rule will use the selected day to trigger and the time range for metric data.
  16. Click Save.
  17. Click Back to return to the Rules list.
    You can view the incidents or alerts generated by a rule from the Incidents and Alerts options in Operation Center respectively.

Note:

Alternatively, you can create a facility rule from the Organization view in Design Center. The organization's rule option lets you create rules for all the entities of that organization.