20 Use External Storage Options for Long-Term Data Availability and Analysis
You can choose to use one of the external storage options, namely Oracle Autonomous Database or OCI Object Storage, to safely and cost-effectively store your IoT sensor and analytics data for long-term persistence.
The application can use your external storage to store raw or aggregated sensor attribute data, and data related to analytics artifacts, such as metrics. You can also store your rule incidents. In addition, you can use the historical data for visualization and analysis in external and third-party applications.
You can use the rich querying functionality in Oracle Autonomous Database, or chart and analyze the stored data in external applications, such as Oracle Analytics Cloud. For example, you can use analysis, projects, and dashboards in Analytics Cloud to find the answers that you need from key IoT data displayed in graphical formats. You can use applications such as Oracle Visual Builder to create dashboards and mashups.
Use OCI Object Storage to Store Historical IoT Data
The Oracle Cloud Infrastructure (OCI) Object Storage service is an internet-scale, high-performance storage platform that offers reliable and cost-efficient data durability. If you have a subscription for OCI Object Storage, you can use it to store your IoT sensor and analytics data for long-term persistence.
You can learn more about OCI Object Storage here:
Use the following steps to add and configure your external OCI Object Storage:
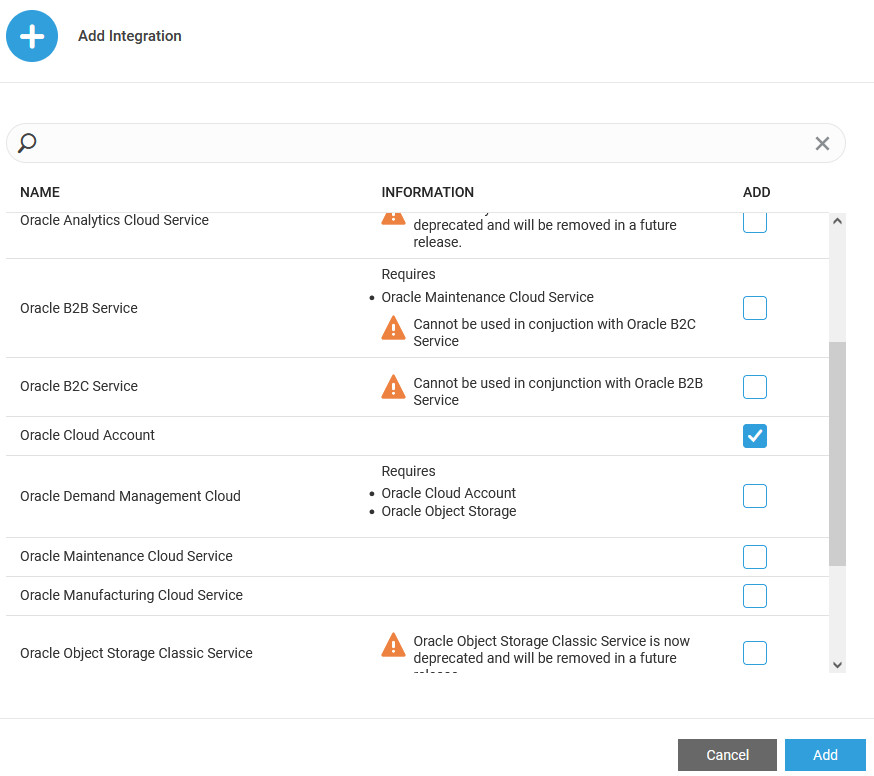
Add an Oracle Cloud Account
Use the Settings > Integrations page in your IoT application to configure an Oracle Cloud account. This Oracle Cloud account is used when specifying integration settings, such as OCI Object Storage settings.
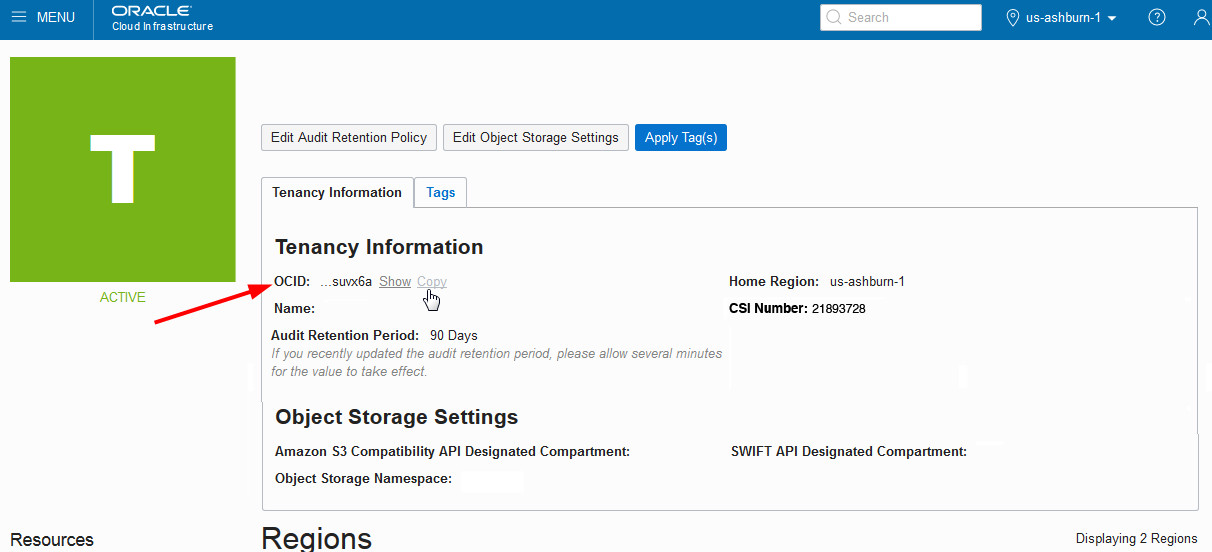
Connect to an OCI Object Storage Instance
Use the Integrations page in your IoT application to configure OCI Object Storage connection details and to enable Object Storage.
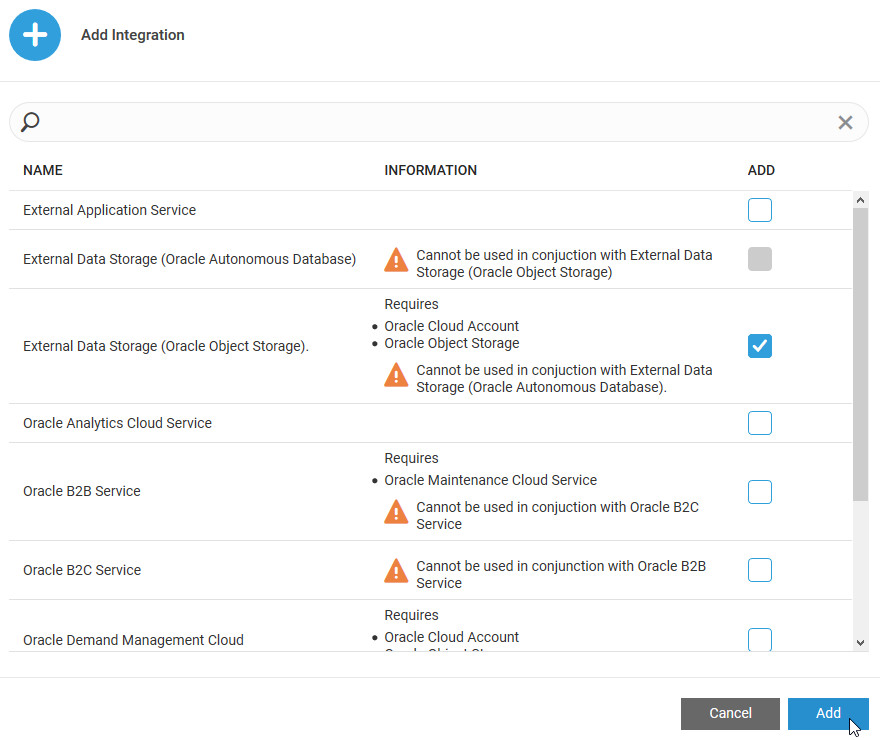
Add and Configure Your External OCI Object Storage Integration
To start storing IoT historical data in your OCI Object Storage, add and configure a new integration for External Data Storage (Oracle Object Storage).
Note:
You should have already added an Oracle Cloud account and specified the connection settings for your OCI Object Storage instance.
Use Oracle Autonomous Database to Store Historical IoT Data
Oracle Autonomous Database runs on Oracle Cloud Infrastructure and provides workload-optimized cloud services for transaction processing and data warehousing. If you have a subscription for Oracle Autonomous Database, you can use it to store your IoT sensor and analytics data for long-term persistence.
You can choose either an Oracle Autonomous Transaction Processing database , or an Oracle Autonomous Data Warehouse database to externally store your IoT data.
Use the following steps to add and configure your external Oracle Autonomous Database storage:
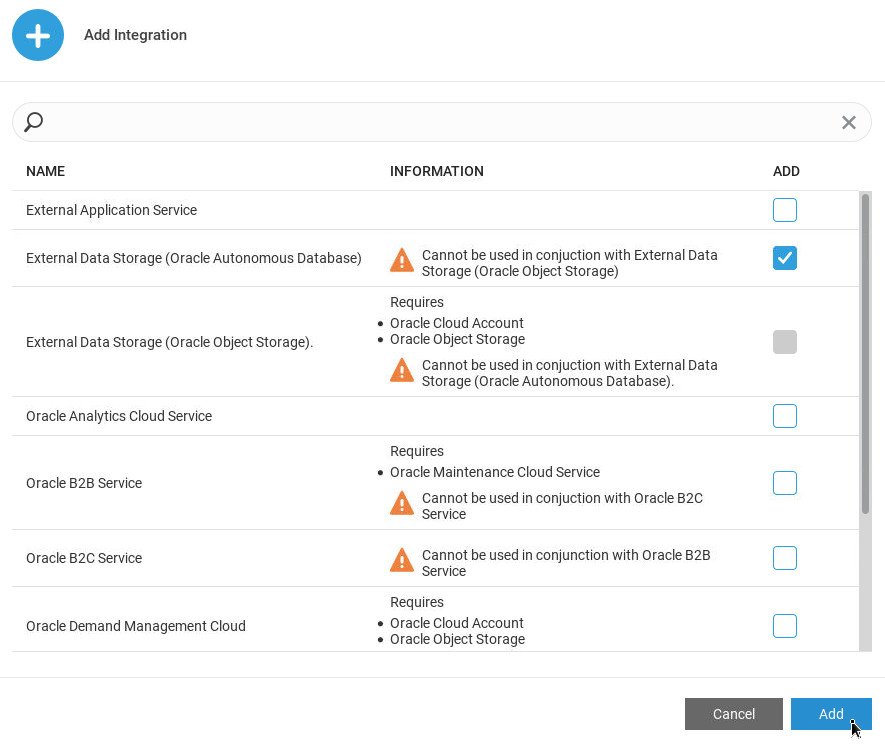
Add an Oracle Autonomous Database Integration
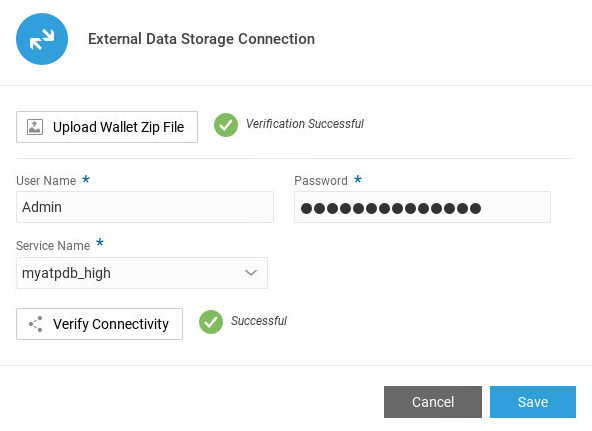
To start storing IoT historical data in an Oracle Autonomous Database, add and configure a new integration for External Data Storage (Oracle Autonomous Database).
Enable and Configure the Oracle Autonomous Database Integration
To start storing IoT historical data in your Oracle Autonomous Database, enable and configure the integration for External Data Storage (Oracle Autonomous Database).
- In your IoT application, click Menu (
 ), and then click Settings.
 - Click Integrations.
- Under External Data Storage (Oracle Autonomous Database), click Edit Configuration.
- Click Save to save your configuration settings.
Use Oracle Analytics Cloud to Chart and Analyze Externally Stored Data
You can chart and analyze the stored data in external applications, such as Oracle Analytics Cloud. For example, you can use analyses, projects, and dashboards in Analytics Cloud to find the answers that you need from key IoT data displayed in graphical formats.
Understand the Format of Your Externalized IoT Data
Learn the format in which your IoT sensor and analytics data is stored in an external store.
The IoT data that is externalized depends on the options that you choose to export while adding and configuring your external storage such as Oracle Autonomous Database or OCI Object Storage. In addition to externalizing data about entities in your application, you can choose to externalize IoT data for Metrics, Attributes, and Incidents.
The underlying schema for the externalized data remains the same irrespective of whether you use Oracle Autonomous Database or OCI Object Storage. In the case of Oracle Autonomous Database, externalized data is stored in tables and for OCI Object Storage, data is stored in CSV files. The rest of this topic is explained based on OCI Object Storage.
- Data of all entities in your application and the schema of the IoT data.
This data is exported to the following set of CSV files that are explained later in this topic:
- File_Prefix_ENTITY_TYPES
- File_Prefix_ENTITY_TYPE_ATTRIBUTES
- File_Prefix_ENTITIES
- File_Prefix_ENTITY_ATTRIBUTES
- File_Prefix_ANALYTICS
These CSV files are created and present in the ORG_NAME > Fleet Monitoring folder, where ORG_NAME represents the organization under which the entities are present in your application.
In the preceding CSV files list, File_Prefix is the prefix that you specified in the File Prefix field while adding and configuring your OCI Object Storage. When you externalize data, the IoT application prefixes the specified File Prefix to the file names that it stores in OCI Object Storage. This helps with easy identification of files.
Note that if you are using Oracle Autonomous Database, then data is exported into tables with the same naming convention as that of the CSV files. The only difference is that File_Prefix is replaced with Table_Prefixwhich is the prefix that you specified in the Table Prefix field while adding and configuring your Oracle Autonomous Database for externalization.
The following are the entities for which data is exported when an externalization job is run:- Vehicles
- Drivers
- Trips
- Shipments
- Stops
- Ship orders
- Equipments
- Ship units
- Ship items
Suppose the externalize job runs every one hour. When the job runs at 4 PM, all trips/ shipments and their stops, ship orders, equipments, ship units, ship items completed between 3 PM and 4 PM are included in the File_Prefix_ENTITIES_timestamp.csv file located in the ORG_NAME > Fleet Monitoring > Year > Month > Date > entities folder, and their respective attributes are included in the File_Prefix_ENTITY_ATTRIBUTES_timestamp.csv file located in the ORG_NAME > Fleet Monitoring > Year > Month > Date > entitiesAttributes folder. Any running trips and the corresponding trip attributes including ship orders, equipments, ship units, and ship items are included in the File_Prefix_ENTITIES.csv and File_Prefix_ENTITY_ATTRIBUTES.csv files, respectively.
- IoT data of attributes, metrics, and incidents.
These files are created based on the IoT data that you chose to externalize while adding and configuring your external store. The files are located in a set of time series subfolders under the ORG_NAME > Fleet Monitoring folder. The following is the list of files:
-
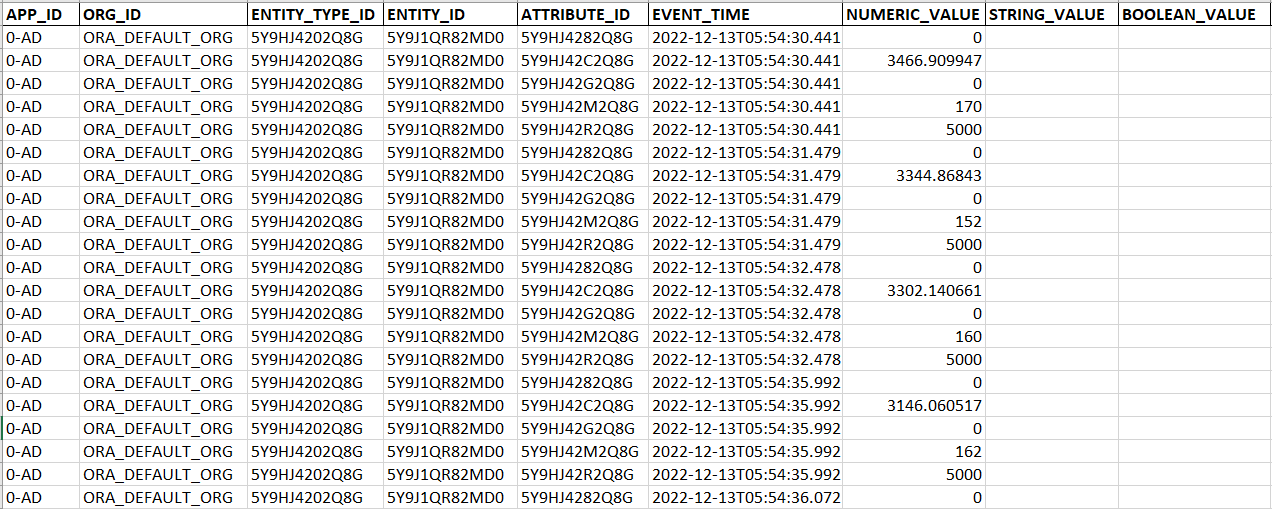
File_Prefix_ATTRIBUTE_VALUES_timestamp.csv and File_Prefix_AGG_ATTRIBUTE_VALUES_timestamp.csv: Depending on whether you chose to store raw attribute data or aggregated attribute data, the File_Prefix_ATTRIBUTE_VALUES_timestamp.csv or File_Prefix_AGG_ATTRIBUTE_VALUES_timestamp.csv file is created, respectively.
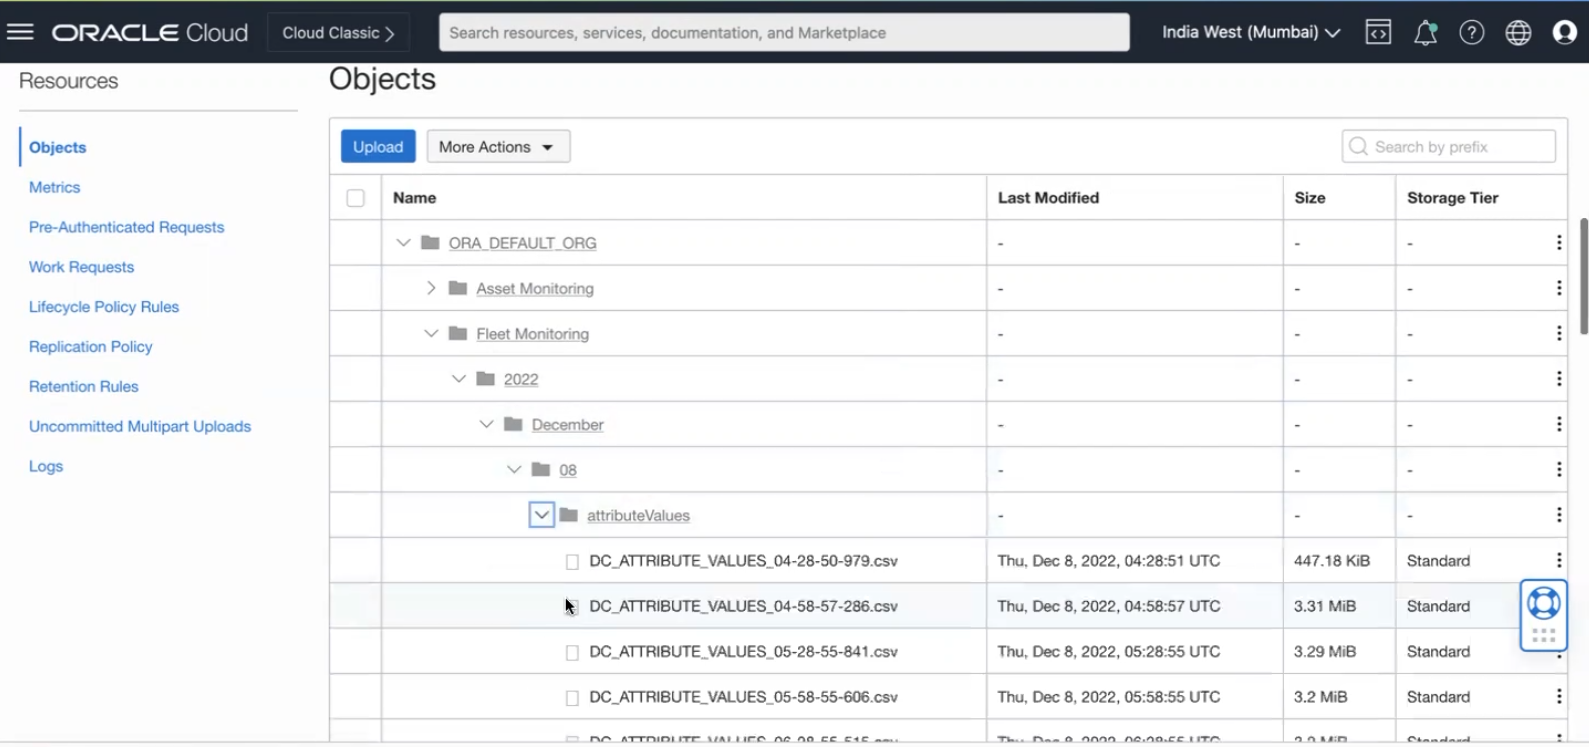
While configuring your external store, if you selected to export only raw data (selected the None (raw data) option), then the File_Prefix_ATTRIBUTE_VALUES_timestamp.csv file is created. This file contains all raw sensor attribute data and is located in the ORG_NAME > Fleet Monitoring > Year > Month > Date > attributeValues folder.
If you selected to export only aggregated attribute data (selected the Aggregated option), then the File_Prefix_AGG_ATTRIBUTE_VALUES_timestamp.csv file is created. This file is located in the ORG_NAME > Fleet Monitoring > Year > Month > Date > attributeValues folder.
The following image shows a sample File_Prefix_ATTRIBUTE_VALUES_timestamp.csv file extract:
The following image shows a sample File_Prefix_AGG_ATTRIBUTE_VALUES_timestamp.csv file extract:

-
File_Prefix_METRIC_VALUES_Timestamp.csv: This file contains all your metric data corresponding to system metrics and computed metrics. This file is located in the ORG_NAME > Fleet Monitoring > Year > Month > Date > metricValues folder.
The following image shows a sample File_Prefix_METRIC_VALUES_timestamp.csv file extract:

-
File_Prefix_INCIDENTS_Timestamp.csv: This file contains your rule incidents data and is located in the ORG_NAME > Fleet Monitoring > Year > Month > Date > incidents folder. This folder additionally contains the File_Prefix_INCIDENT_OCCURRENCESTimestamp.csv and File_Prefix_INCIDENT_COMMENTSTimestamp.csv files that contain information about every occurrence of an incident and incident progress comments, respectively.
The following image shows a sample File_Prefix_INCIDENTS_timestamp.csv file extract:

The following image shows a sample File_Prefix_INCIDENT_OCCURRENCES_timestamp.csv file extract:
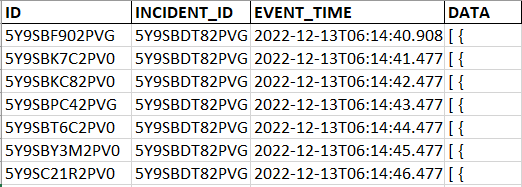
The following image shows a sample File_Prefix_INCIDENT_COMMENTS_timestamp.csv file extract:

The following screenshot displays the folder structure for attributeValues with timestamp-based CSV files:
-
The File_Prefix_ENTITY_TYPES.csv and File_Prefix_ENTITY_TYPE_ATTRIBUTES.csv files contain schema of IoT data, whereas the File_Prefix_ENTITIES.csv, File_Prefix_ENTITY_ATTRIBUTES.csv, and File_Prefix_ANALYTICS.csv files contain the IoT data of all entities.
Schema Files
-
File_Prefix_ENTITY_TYPES.csv: Describes the types of entities used in your application. These are vehicles, drivers, trips, shipments, stops, ship orders, equipments, ship units, and ship items. Except for vehicles, all other entities have only one type per organization. As you can have multiple vehicle types in your application, there can be corresponding multiple entries of vehicle types in the file.
The following image shows a sample File_Prefix_ENTITY_TYPES.csv file extract:

-
File_Prefix_ENTITY_TYPE_ATTRIBUTES.csv: Each entity type has several attributes associated with it. This CSV file has the definition for all the attributes associated with each of the entity types. Each attribute is in a separate row along with the associated fields. The ENTITY_TYPE_ID field indicates the entity type with which the particular attribute is associated. All entity types have a set of core attributes that are static, being built-in. The vehicle type can additionally have custom and sensor attributes that you might have defined in the application. The type of an attribute is accordingly indicated in the TYPE field as static, custom, or sensor.
The following image shows a sample File_Prefix_ENTITY_TYPE_ATTRIBUTES.csv file extract:

IoT Data Files
-
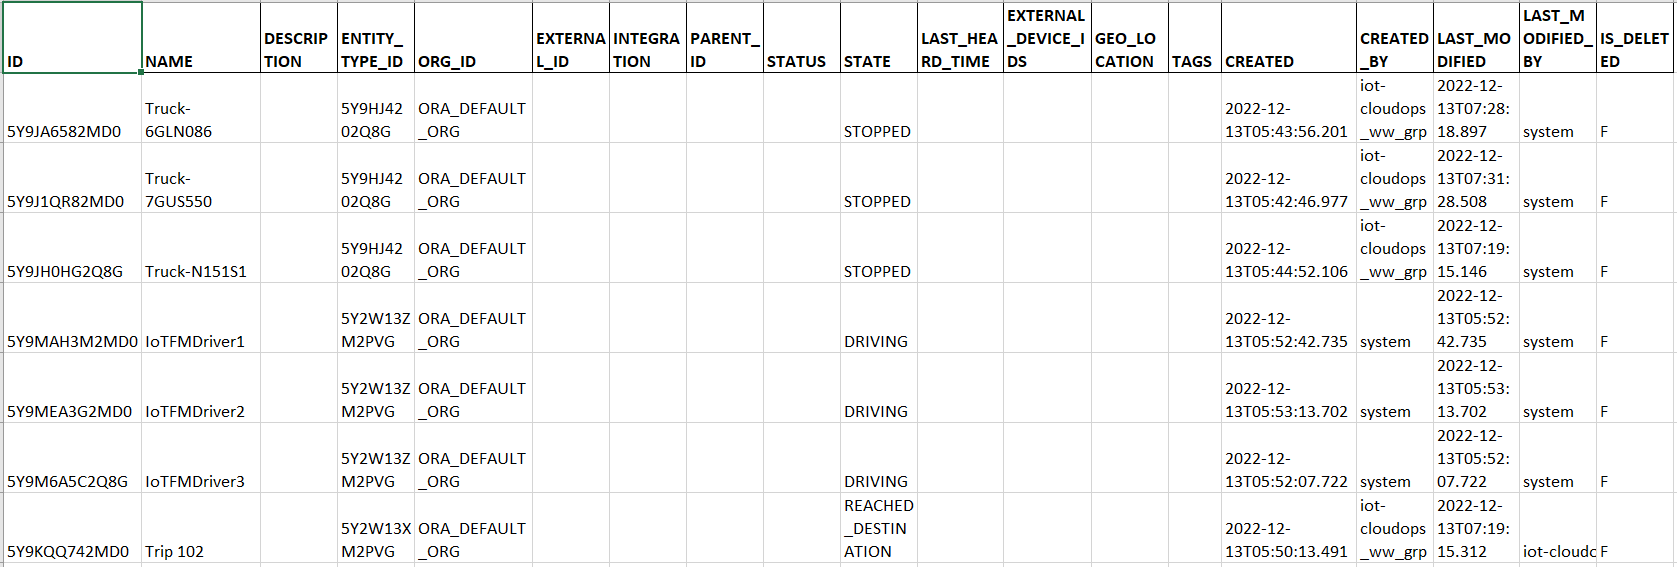
File_Prefix_ENTITIES.csv: Contains the basic data for all entity types. The basic data for an entity includes its name, entity type ID, Org ID, Parent ID, Status, State, and timestamp columns such as created, created by, and so on.
The following image shows a sample File_Prefix_ENTITIES.csv file extract:
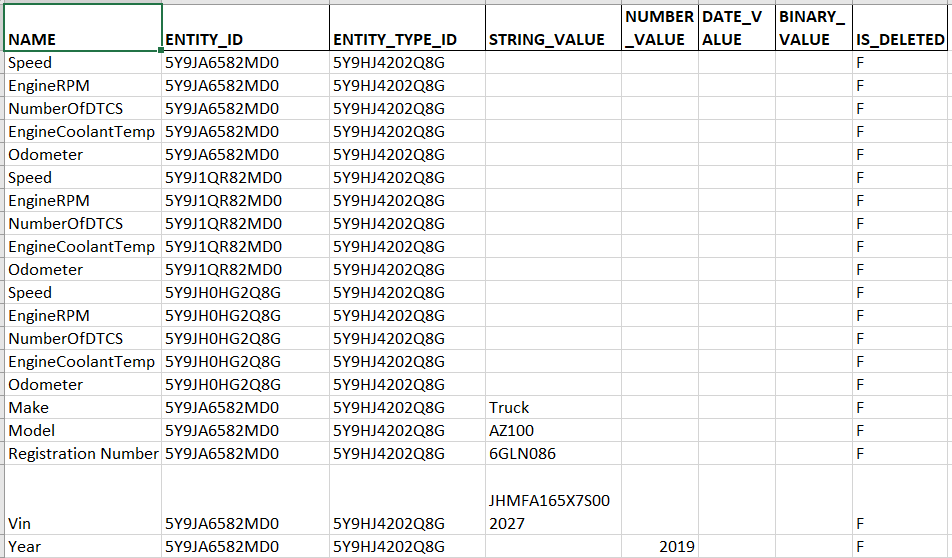
- File_Prefix_ENTITY_ATTRIBUTES.csv: Contains the attributes and their values for all entities. The entity to which each attribute belongs to can be determined from the ENTITY_ID column value. Each attribute value is represent by one row in the file and the values can be either in the STRING_VALUE, NUMBER_VALUE, DATE_VALUE, or BINARY_VALUE column, depending on the data type.
The following image shows a sample File_Prefix_ENTITY_ATTRIBUTES.csv file extract:
-
File_Prefix_ANALYTICS.csv: Contains the list of all custom or user-defined KPIs for vehicles, drivers, trips, shipments, ship orders, equipments, ship units, and ship items in your application.
The following image shows a sample File_Prefix_ANALYTICS.csv file extract:

Core Attributes for Entities
Core attributes are attributes of entities present in the entity schema.
The following is the list of core attributes for every entity that is externalized:
Vehicle
- Category
- Driver Id
- Driver Name
- Make
- Model
- Registration Number
- Trip Id
- Trip Name
- Type Name
- Vin
- Year
- Years
Driver
- Login Id
- Trip Id
- Vehicle Id
- Vehicle Name
Trip
- Actual End Time
- Actual Start Time
- Asset Or Tracker Source
- Bill Of Lading
- Capacity Utilization
- Carrier Name
- Carrier Ref Num
- Commodities
- Completed Remark
- Cost
- Cost Currency
- Cost In USD
- Creation Source
- Delivered
- Domain Name
- Driver External Id
- Driver Id
- Driver Login Id
- Driver Name
- Earliest Start Time
- End Location
- Equipment Count
- Estimated Duration Seconds
- External Id
- Has Error
- Integration Id
- Integration Type
- Is Hazardous
- Is Temperature Controlled
- Latest Start Time
- Next Stop Index
- Planned Drive Distance
- Planned Drive Duration Seconds
- Planned End Time
- Planned Start Time
- Priority
- Service Mode
- Ship Order Count
- Ship Unit Count
- Start Location
- Status
- Stops Classification
- Stops Completed
- Toll Road
- Total Loaded Distance
- Total Loaded Distance In KM
- Total Loaded Distance UOM
- Total Planned Transit Duration
- Total Stops
- Total Unloaded Distance
- Total Unloaded Distance In KM
- Total Unloaded Distance UOM
- Total Volume
- Total Volume In CBM
- Total Volume UOM
- Total Weight
- Total Weight In KG
- Total Weight UOM
- Tracker Id For Third Party Carrier
- Trip Class
- Trip Distance
- Trip Length Classification
- Trip Type
- Vehicle Id
- Vehicle Name
- Vehicle Registration Number
- Vehicle Type
- Version
Shipment
- Carrier Id
- Carrier Name
- Completed Remark
- Cost
- Cost Currency
- Delivered
- Domain Name
- Driver External Id
- Driver Id
- Driver Login Id
- Earliest End Time
- Earliest Start Time
- End Time
- Equipment External Id
- Equipment Group Id
- Equipment Utilization
- External Id
- External Reference
- Latest Start Time
- Loaded Distance
- Next Stop Sequence
- Number Of Orders
- Number Of Ship Units
- Planned Drive Distance
- Planned Drive Duration
- Power Unit External Id
- Power Unit Id
- Power Unit Registration Number
- Shipper Id
- Shipper Name
- Start Time
- Stops Completed
- Toll Road
- Total Stops
- TPL Managed
- Tracker Status
- Tracking Id
- Transport Mode
- Trip Id
- Unloaded Distance
- Volume
- Volume Utilization
- Weight
- Weight Utilization
Stop
- Actual Arrival Time
- Actual Departure Time
- City
- Country
- Equipment Drop Count
- Equipment Pickup Count
- Estimated Arrival Time
- Estimated Departure Time
- Estimated Distance To Next Stop
- Estimated Time To Next Stop
- External Stop Sequence
- Facility Id
- Fence Id
- Inner Fence Arrival Time
- Inner Fence Departure Time
- Load Id
- Location Ref
- Planned Arrival Time
- Planned Departure Time
- Planned Stop Duration
- Postal Code
- Ship Unit Drop Count
- Ship Unit Pickup Count
- State
- Stop Duration
- Stop Number
- Stop Type
- Street
- Time Zone
Ship Order
- Trip Id
- Order Number
- Order Key
- Early Pickup Date
- Late Pickup Date
- Early Drop Date
- Late Drop Date
- Ship Unit Count
- Ship Item Count
- Special Instruction
Equipment
- Trip Id
- Trip Equipment Ref
- Equipment Number
- Equipment Type
- Pickup Stop Sequence
- Drop Stop Sequence
- Length In Metre
- Length
- Length UOM
- Max Volume In Cbm
- Max Volume
- Max Volume UOM
- Max Weight In Kg
- Max Weight
- Max Weight UOM
- Is Detached
- Is Linked
- Asset Or Tracker Source
- Alerts
- Open Incidents
- Is Hazardous
- Commodities
- Parent Entity Id
- Parent Entity Name
- Parent Entity Type
- Asset Id
- Asset Name
- Asset Type
- Asset External Id
- Custom Attributes
- Device Endpoint Ids
- Device Endpoint Names
Ship Unit
- Trip Id
- Ship Order Numbers
- Ship Unit Number
- Ship Unit Key
- Ship Unit Type
- Special Instruction
- Trip Equipment Ref
- Count
- Pickup Stop Sequence
- Drop Stop Sequence
- Volume In Cbm
- Volume
- Volume UOM
- Weight In Kg
- Weight
- Weight UOM
- Is Detached
- Is Linked
- Asset Or Tracker Source
- Alerts
- Open Incidents
- Is Hazardous
- Commodities
- Parent Entity Id
- Parent Entity Name
- Parent Entity Type
- Asset Id
- Asset Name
- Asset Type
- Asset External Id
- Custom Attributes
- Device Endpoint Ids
- Device Endpoint Names
Ship Item
- Trip Id
- Ship Order Number
- Ship Item Number
- Ship Item Key
- Ship Unit Number
- Special Instruction
- Trip Equipment Ref
- Quantity
- Pickup Stop Sequence
- Drop Stop Sequence
- Volume In Cbm
- Volume
- Volume UOM
- Weight In Kg
- Weight
- Weight UOM
- Is Detached
- Is Linked
- Asset Or Tracker Source
- Alerts
- Open Incidents
- Is Hazardous
- Commodities
- Parent Entity Id
- Parent Entity Name
- Parent Entity Type
- Asset Id
- Asset Name
- Asset Type
- Asset External Id
- Custom Attributes
- Device Endpoint Ids
- Device Endpoint Names
