Enable Transit Time Predictions for Shipments

Oracle IoT Fleet Monitoring Cloud Service applies feature-based machine learning on data from Oracle Transportation Management Cloud (OTM) to gain insights and predict transit time for planned shipments and also provide real-time updates to that prediction for shipments that are enroute.

You can configure and enable an integration with Oracle Cloud Infrastructure Object Storage that stores the required shipment data from Oracle Transportation Management Cloud Service (OTM). Oracle IoT Fleet Monitoring Cloud Service creates training models from the ingested data, performs scoring to calculate on-demand forecasts, and then transmits the predictions to OTM.

Complete these tasks to enable Oracle IoT Fleet Monitoring Cloud Service to compute transit time predictions for shipments in OTM.

Tasks Description More Information

1. Add Your Cloud Account

You retrieve your tenancy details from Oracle Cloud Infrastructure Object Storage, create your cloud credential configuration in Oracle IoT Fleet Monitoring Cloud Service, copy the generated public key to the OCI Object Storage console, and then validate the fingerprint values.

Add an Oracle Cloud Account

2. Connect to an OCI Object Storage Instance

In Oracle IoT Fleet Monitoring Cloud Service, you enter the values for the storage URL, name-space, and default bucket to configure the integration with Oracle Cloud Infrastructure Object Storage.

Connect to an OCI Object Storage Instance

3. Configure an Integration with Oracle Transportation Management Cloud Service

In Oracle IoT Fleet Monitoring Cloud Service, you enable and configure the OTM integration with Oracle Object Storage container. You enter the required values to connect to an OTM instance and map its domain to an organization in Oracle IoT Fleet Monitoring Cloud Service.

  1. Enable Integration with Oracle Transportation Management Cloud
  2. Connect to an Oracle Transportation Management Cloud Service Instance

After you enable the integration, OCI Object Storage stores the shipment data as batches of compressed csv files (.gz). OTM then triggers a training request to Oracle IoT Fleet Monitoring Cloud Service to gain insights into the data provided.

After the training is completed, OTM triggers scoring requests for forecasts and retrieves the ETA predictions from Oracle IoT Fleet Monitoring Cloud Service.

Add an Oracle Cloud Account

Use the Settings > Integrations page in your IoT application to configure an Oracle Cloud account. This Oracle Cloud account is used when specifying integration settings, such as OCI Object Storage settings.

  1. In your IoT application, click Menu (Menu icon), and then click Settings.
  2. Click Integrations.
  3. Click Add Add icon to add a new integration.
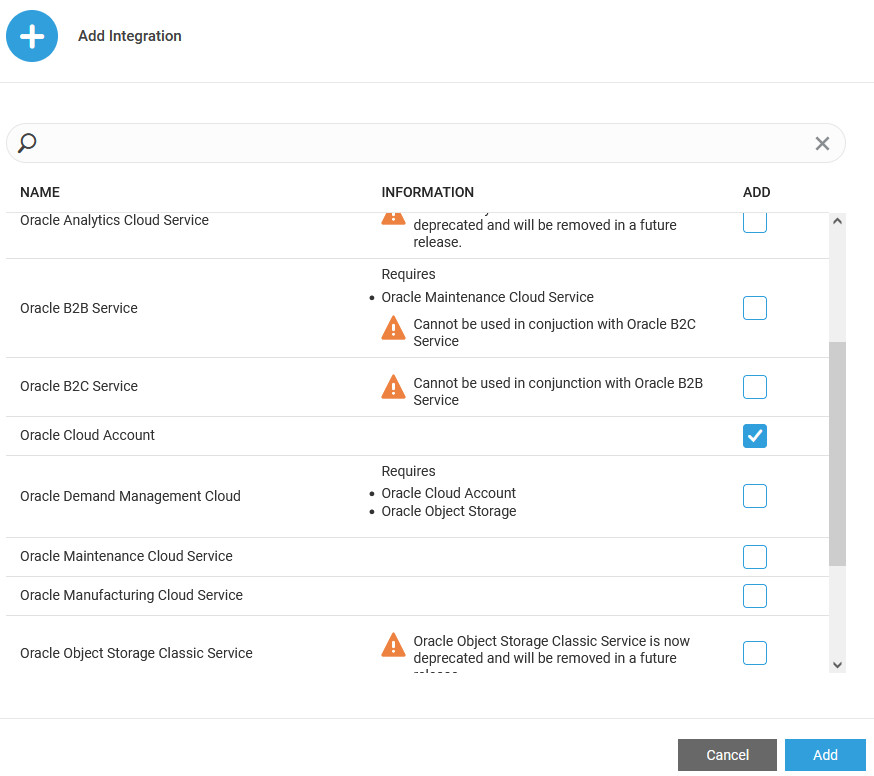
  4. In the Add Integration dialog, select Oracle Cloud Account and click Add.
    Tip: You can also search for an integration name in the list.

    Add Integration dialog with Oracle Cloud Account selected

    Oracle Cloud Account integration gets added to the Integrations page.
  5. Under Oracle Cloud Account, add your cloud account details:
    1. Enter your Tenant OCID.
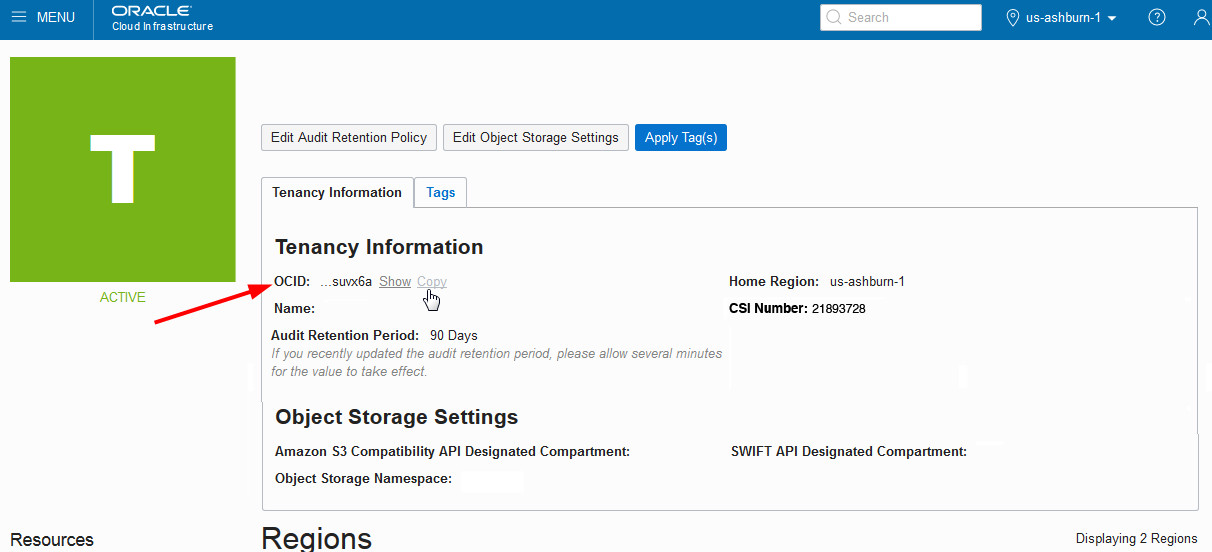
      The tenancy details are available from the Oracle Cloud Infrastructure Console. You need to log in to your Oracle Cloud Infrastructure Console. From the Profile menu, click Tenancy: <YourTenancyName>.
      The tenancy OCID is shown under Tenancy Information. Click Copy to copy it to your clipboard.

      Tenant OCID

      Paste this value under Tenant OCID in your IoT application.
    2. Enter the User OCID.
      The user details are available from the Oracle Cloud Infrastructure Console. You need to log in to your Oracle Cloud Infrastructure Console. From the Profile menu, click User Settings.

      The user OCID is shown under User Information. Click Copy to copy it to your clipboard.

      Paste this value under User OCID in your IoT application.
    3. Under Public Key, click Generate.
    4. Click Close.
  6. Set the public key in OCI Object Storage.
    1. On the Settings>Integration page of your IoT application, under Oracle Cloud Account, click Copy against Public Key to copy the public key that you generated earlier.
    2. Log in to your Oracle Cloud Infrastructure Console.
    3. Under the Profile menu, click User Settings.
    4. Click API Keys under Resources.
    5. Click Add Public Key.
      Note: If three public keys are already listed under API Keys, you have to first delete one public key. An OCI Object Storage service user can't have more than three public keys.
    6. Select Paste Public Keys and paste the key that you copied from your IoT application.
    7. Click Add.
      The fingerprint for the added public key appears under API Keys. The fingerprint should be the same as that displayed on the Settings page of your IoT application.

Connect to an OCI Object Storage Instance

Use the Integrations page in your IoT application to configure OCI Object Storage connection details and to enable Object Storage.

Before configuring the OCI Object Storage connection, you should have already added your Oracle Cloud account on the Settings page.
  1. In your IoT application, click Menu (Menu icon), and then click Settings.
  2. Click Integrations.
  3. Click Add Add icon to add a new integration.
  4. In the Add Integration dialog, select Oracle Object Storage Service and click Add.
    Tip: You can also search for an integration name in the list.
    Oracle Object Storage integration gets added to the Integrations page.
  5. On the Integrations page, under Object Storage Service, click Connect.
  6. In the Oracle Object Storage dialog, provide your object storage connection details.
    1. Enter the Storage URL for your OCI Object Storage.
      For example, https://objectstorage.us-phoenix-1.oraclecloud.com.
    2. Enter the object storage Namespace for your tenancy.
      You can find the object storage namespace in your Oracle Cloud Infrastructure Console. You need to log in to your Oracle Cloud Infrastructure Console. From the Profile menu, click Tenancy: <YourTenancyName>.
    3. Enter the Default Bucket name that stores the data.
      The bucket name must already exist in your OCI Object Storage instance and must be public.
    4. Click Verify Connectivity to verify the connection details and bucket name.
    5. Click Save to save the OCI Object Storage connection details.
  7. To enable the connection on the Integrations page, click Edit Configuration under Oracle Object Storage.
  8. Toggle the Integration Status switch to ON, and click Save.

Enable Integration with Oracle Transportation Management Cloud

Before you create and configure an integration with Oracle Transportation Management Cloud Service in Oracle IoT Fleet Monitoring Cloud Service, you need to enable the integration and provide an Oracle Object Storage container name if required.

You should have the name of the bucket in your Oracle Cloud Infrastructure Object Storage
  1. In your IoT application, click Menu (Menu icon), and then click Settings.
  2. Click the Integrations tile.
  3. Click Add Add icon to add a new integration.
  4. In the Add Integration dialog, select Oracle Transportation Management Cloud Service and click Add.
    Tip: You can also search for an integration name in the list.
    Oracle Transportation Management Cloud Service integration gets added to the Integrations page.
  5. On the Integrations page, under Oracle Transportation Management Cloud Service, click Connect.
    The Oracle Transportation Management Cloud Connection dialog is displayed.
  6. In the Object Storage container field, enter the bucket name of OCI Object Storage that stores the shipment data from Oracle Transportation Management Cloud Service.
  7. Click Save.
  8. Click Edit Configuration.
  9. In the Oracle Transportation Management Cloud Configuration dialog box, enable the Integration Status flag, and then click Save.
You have successfully configured the integration between Oracle Cloud Infrastructure Object Storage and Oracle Transportation Management Cloud Service that allows shipment data to be stored in OCI Object Storage.

Connect to an Oracle Transportation Management Cloud Service Instance

To share Oracle Transportation Management (OTM) shipment data in an organization, you specify the URL, domain name, and access credentials for the Oracle Transportation Management instance.
You can create the integration in Default Organization or switch to the appropriate organization before you configure the integration. See Change Your Current Organization. You should have the OTM instance URL, domain name, and the credentials to access it.
  1. Click the Menu (Menu icon) icon, and then click Design Center.
  2. From the Design Center sub-menu, click Organization
    The Default Organization page appears
  3. Click the Integrations (Integration icon) icon.
  4. Expand Oracle Transportation Management and then click OTM Configuration. On the OTM Configuration screen, to enable the integration, slide the Integration Status button.
    You need to perform this step only once for an organization.
  5. (Optional) If attributes' data, such a sensor values or metrics of an entity that have been used in rule conditions, need to be sent with the event payload, then enable the Send Rule Attributes flag.
    OTM is configured with refnums/value pairs and mapped to relevant attributes and values for it to accurately interpret the attributes that it receives in event notifications.

    if this flag is enabled only then the refnum/value pair would be sent to OTM otherwise it would be excluded from the event notification.

  6. If you want the arrival and departure date and time that a third-party carrier driver manually enters in the mobile app for Shipment stops to be propagated to OTM, then you must enable the Send Driver Manual Events flag. Optionally, you can enter the event codes that must be transmistted to OTM in the Driver Arrived Location and Driver Departed Location fields. The default values are DRIVER ARRIVE and DRIVER DEPART respectively. If the Send Driver Manual Events flag is disabled, then the arrival and departure values are captured and saved as driver-provided start and end times only in Fleet Monitoring.
  7. To save the changes, click Save and then click Close Close icon.
  8. In the Oracle Transportation Management System section, click Add Integration.
    The OTM Connection screen appears and the Integration Status appears enabled.
  9. Enter the following values in these fields:
    • URL: Enter the URL for the Oracle Transportation Management Cloud Service instance. Replace myOTM.com in the example and do not modify the remaining URL components. The complete URL must include /GC3/glog.integration.servlet.WMServlet.
    • Domain: Enter the external ID of OTM whose shipment data is exported to this organization of Oracle IoT Fleet Monitoring Cloud Service.
    • Username: Enter the user name to access the Oracle Transportation Management Cloud Service instance in this field.
    • Password: Enter the password to access the Oracle Transportation Management Cloud Service instance in this field.
    • (Optional) Description: Enter a description for this integration.
    • (Optional) Verify Connectivity: Click to verify the connection to the Oracle Transportation Management Cloud Service instance. You'll receive a connection successful message.
  10. Click Save.
    On the Integrations screen, beneath Oracle Transportation Management, the domain name and its description, if you've added, are displayed. OTM integration and mapping its domain with the organization is complete. To map another domain with this organization, repeat the previous three steps of this task.