10 Manage Global Configuration Settings and Organization Level Settings

Manage the global settings for all your Oracle IoT Intelligent Applications from the Settings page. For example, you can manage the application roles, integrations, storage, security, map provider, notification accounts, and appearance settings across all your IoT applications.

You can also navigate to the organization-specific settings from the Settings page. You can override several global settings, such as the map provider, units and measurements, and appearance settings at the organization level. You can also manage users, connectors, and notification subscribers for the organization under the organization settings.

Monitor Data Storage and Manage Capacity Usage

As an administrator, you can monitor the data storage for your Oracle IoT Intelligent Applications Cloud Service. Use the Storage Management page to review storage data in the system, to set up or adjust the time window for data retention, and to run data deletion jobs.

Note:

If you are using more than one application in Oracle IoT Intelligent Applications Cloud Service, then the data storage settings are shared between these applications. Also, any operations that you perform under data management, such as tweaking data life spans or creating deletion jobs, affects data in all these applications.

So, for example, if you are using the Asset Monitoring and Production Monitoring applications, the data usage includes usage across both these applications. Also, if you were to delete metric data older than, say, 30 days, then metric data that is older than 30 days is deleted in both your applications.

When you log in to your IoT application as an administrator, a notification appears with details on the storage capacity used. Notifications may also appear periodically for every 10% of capacity that is used up. High-priority notifications are sent after you have used up more than half of the storage capacity. You can use the Storage Management page to manage your storage capacity.

The Storage Management tile under application Settings lets you monitor and manage the data storage for your application. The Storage Management page has the following sections:
  • Summary: Shows you the total data storage capacity available for your account, and the currently used up capacity. Depending on your current usage, the status is indicated using one of the following colors:
    • Green: Indicates that more than 50% of the available capacity remains.
    • Orange: Indicates that between 25% and 50% of the available capacity remains. A recommendation on ways to manage your data is also included.
    • Red: Indicates that less than 25% of the available capacity remains, and you must take steps to manage your storage data.

    Data Storage Summary Section (described in text)

  • Data Management: Lets you manage data, change settings, and create data deletion jobs. The data capacity usage percentages are shown category-wise:
    • Raw Device Data: Raw time-series data from devices that is stored in a normalized JSON format. Comprises application messages, connector messages, integration-related messages, log messages, and other related messages.

      Oracle recommends a data life span of 7 Days, or less, for this category to avoid high storage consumption.

    • Sensor Data: Time-series data from devices and computed attributes used for machine-learning models and anomaly detection. Comprises incoming sensor data, visualization and training data.

      Set the data life span for this category to match your business requirements for data retention.

    • Custom Metric Data: Computed values of user-defined metrics. Comprises data specific to custom metrics or KPIs. Custom metrics are metrics that you create in the application for your production environment and scenarios.

      Set the data life span for this category to match your business requirements for data retention.

    • System Metric Data: Computed values of built-in system metrics that are automatically computed. Comprises data specific to system metrics or KPIs. System metrics are the built-in metrics that are calculated automatically in your application.

      Oracle recommends a data life span of 90 Days, or less, for this category to avoid high storage consumption.

    • Transaction Log Data: Comprises logs related to all shipment transactions that have occurred between Oracle IoT Fleet Monitoring Cloud and OTM or ITT.

      Set the data life span for this category to match your business requirements for data retention.

    You can select the data life span for each category. The data life span is the time period for which data is retained. If you set the data life span for a category to Delete Manually, then data for that category is never deleted, unless you manually run a data deletion job. Note that this setting may potentially lead to storage capacity issues, as stored data is never deleted.

    You can choose to create data deletion jobs to delete selective data. A data deletion job lets you select the data type and time span for which you wish to delete data.

Perform Data Management Tasks

Use the Data Management section to manage data storage settings for your application. You can select the data life span for the various data types. You can also create data deletion jobs to delete selective data.

  1. Click Menu (Menu icon) and then click Settings .
  2. Click Storage Management.
    The Storage Management page appears.
  3. To change the data life span, click Edit Edit icon under Data Life Span.
    The Data Life Span section appears under the Data Management section.
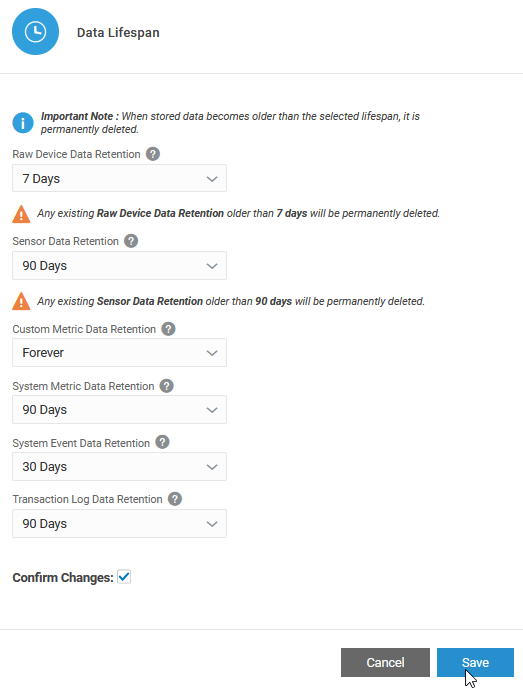
    1. Select the data life span for Raw Device Data, Sensor Data, Custom Metric Data, System Metric Data, and Transaction Log Data.

      Data lifespan

      If you select Forever for a category, then the data for that category is never deleted automatically. You would need to run a data deletion job, described in the subsequent steps, to select and delete any data for the category.
    2. Select Confirm Changes and click Save to save your settings.
  4. (Optional) To run a data deletion job, click the Create Data Deletion Job button.
    1. In the Create Data Deletion Job dialog box, select one or more data types for which you wish to delete data.
      The available choices are:
      • Device
      • System Metrics and Custom Metrics
      • Sensor
    2. Under Delete Data, choose the time period for which you wish to delete the data.
      For example, you may want to delete sensor data that is Older than 30 days.

      You can also choose a custom Time Range for which to delete data. For example, you may wish to delete data for a particular day or hour.

    3. Click Delete to create the delete job.
      You can monitor the job progress, and the number of records that were deleted, under the Data Deletion Jobs section. When the data delete job completes, its status changes from In Progress to Completed.
      You can also choose to delete a data deletion job. If the job is still running when you delete it, then the job is terminated and deleted. If the job has already failed or completed, then deleting the job simply removes it from the list of failed or completed jobs.

      Removing a Delete Job

Change the Map Provider

Oracle Intelligent Applications let you integrate with third-party map providers. Oracle Maps is the default map provider. Change the map provider to replace Oracle maps with the map data provided by a third-party map provider. Currently, only maps provided by HERE Technologies are supported.
This global setting applies to the organizations of all the applications of Oracle Iot Intelligent Aplications.
  1. Click Menu (Menu icon) and then click Settings .
  2. Click Map Provider.
  3. Select one of these options in the Map Provider list:
    • Oracle Maps: (Default) Select this option to use the maps provided by Oracle.
    • HERE Maps: Select this option to use the maps provided by HERE Technologies.
  4. Select one of the time options in the Refresh Time list. This determines the time interval at which the map data is refreshed in the application.
    If you select Custom, enter the number of seconds in Value.
  5. If you selected HERE Maps, complete these fields:

    Note:

    • From 22.4.1 release onward, Oracle recommends that you configure HERE maps using OAuth mechanism. In other words, instead of using HERE maps login credentials, generate an access token for authenticating to HERE maps. And to generate the access token, you must first generate OAuth credentials (access key ID and access key secret) as described in the HERE Developer portal at https://developer.here.com.

    • The Application ID and Application Code fields are displayed only if you have previously configured HERE maps.

    • Application ID: Enter your HERE Technologies application ID.
    • Application Code: Enter your HERE Technologies application code.
    • Access Key ID: This is the access key credential used for authenticating to HERE maps using OAuth mechanism. Generate and enter the access key from the https://developer.here.com website.
    • Access Key Secret: This is the secret credential used for authenticating to HERE maps using OAuth mechanism. Generate and enter the access key secret from the https://developer.here.com website.
    • Access Token URL: Accept the default value or enter the access token URL. The access token URL defines the API used to generate access tokens for authenticating to HERE maps using OAuth mechanism.
    • Base URL: Accept the default value or enter the base URL. The base URL defines the API used to render the map tiles.
    • Route URL: Accept the default value or enter the route URL. A route URL defines the API used to determine the route to be covered by a trip or shipment in map view.
    • Geocode URL: Accept the default value or enter the geocode URL. The geocode URL defines the API used to convert a human-readable address into geographic coordinates.
    • Reverse Geocode URL: Accept the default value or enter the reverse geocode URL. A reverse geocode URL defines the API used to convert geographic coordinates into a human-readable address.
    • Batch Reverse Geocode URL: Accept the default value or enter the batch reverse geocode URL. A batch reverse geocode URL defines the API used to convert multiple geographic coordinates into human-readable addresses.
    • Aerial URL: To display satellite imagery in the map view, accept the default value or enter the aerial URL An aerial URL defines the API used to display satellite imagery.
    • Traffic URL: To display real-time traffic data in the map view, accept the default value or enter the traffic URL A traffic URL defines the API used to display traffic data.
    • Map Tiles Language: Select the language in which you want the map tiles to be displayed in map view. Note that map tiles for a selected language is displayed only if the corresponding language data is available in HERE maps. If HERE maps doesn't have the corresponding language map tile, then it defaults to displaying the map tiles in English.
  6. Click Validate Credentials. After you receive a success message, click CloseClose icon

    Note:

    To change the map provider for a specific organization only, select the IoT Organizations, and select the organization name. Before you can select HERE Maps for any individual organization, you should configure its settings from the Settings > Map Provider page.

Set the Map Refresh Interval

A refresh keeps your maps in sync with the latest data.

This global setting applies to all the organizations of Oracle IoT Intelligent Applications.
  1. Click Menu (Menu icon) and then click Settings .
  2. Click Map Provider.
  3. Select an option for the Refresh Time list.
    If you need to specify a custom refresh time, select Custom and specify the Value in seconds.

Set the Unit of Measurement

Set the unit of measurement to match the measurement unit in your location. You can select US imperial or metric measurement units.

Measurement units are configured globally or at the organization level.
  1. Click Menu (Menu icon), and then click Settings.
  2. For a global setting, select Units and Measurement. For an individual organization, select IoT Organizations, select the organization name, and then select Units and Measurement.
  3. Click Edit Edit iconin the Units and Measurements area.
  4. Note:

    If you are configuring units for an organization for the first time, select a unit of measurement for the organization appropriately. If the organization was already configured, and a unit of measurement was previously selected, avoid updating the unit of measurement. Updating the unit of measurement may lead to incorrect reporting of historical data in the system.

    Select one of these options in the Unit System list:.
    • US Imperial: Displays distance, speed, temperature, and volume values in US imperial units, such as Miles, Miles Per Hour, Fahrenheit, and Gallon respectively.
    • Metric: Displays distance, speed, temperature, and volume values in metric units, such as Kilometer, Kilometer Per Hour, Celsius, and Litre receptively.
  5. Click Save. After you receive a success message, click CloseClose icon.

Set the Currency Unit

Set the currency unit to match the currency used in your location.

The monetary unit is configured at the organization level. If you are configuring an organization for the first time, select a unit of measurement for the organization appropriately. If the organization was already configured, and a unit of measurement was previously selected, avoid updating the unit.
  1. Click Menu (Menu icon), and then click Settings.
  2. Select IoT Organizations and then select your organization from the listed organizations.
  3. Click Context Specific and then Trip & Shipments.
  4. In the Monetary area, select a currency from the Currency list.
  5. Click Save. After you receive a success message, click CloseClose icon .

Set the Fuel Cost

Set the fuel cost to match the value used in your location.

  1. Click Menu (Menu icon), and then click Settings.
  2. Select IoT Organizations and then select your organization from the listed organizations.
  3. Click Context Specific and then Trip & Shipments.
  4. In the Monetary area, enter the fuel cost in the Fuel Cost field.
  5. Click Save to save the changes. After you receive a success message, click CloseClose icon .

Configure the ETA Computation Settings

The estimated time of arrival (ETA) indicates when a vehicle is expected to arrive at a destination. ETA computation settings include settings for computation interval, stop radius, and delay tolerance.

  1. Click Menu (Menu icon), and then click Settings.
  2. Select IoT Organizations and then select your organization from the listed organizations.
  3. Click Context Specific and then Trip & Shipments.
  4. In the ETA Computation section, optionally change the values for the following fields:
    • Calculate Trip ETA: This is selected by default and enables ETA calculation for trips.
    • Calculate Shipment ETA: Select to enable ETA calculation of shipments that includes shipments imported from an external transportation management system.
    • Refresh Time (min): Enter the refresh time in minutes. A lower value means more frequent ETA computations. The default value is 5 minutes.
    • Stop Radius: Increasing the stop radius identifies the stop location for a vehicle sooner, but the geographical accuracy is reduced. The default value is 0.6214 miles or 1 km.
    • Delay Tolerance (min): Specifies the threshold time duration after which a trip or shipment is marked delayed. The default value is 60 minutes, which means that a trip or shipment is marked delayed once it is delayed beyond 60 minutes. You can choose to increase or decrease this threshold.
  5. Click Save to save the changes. After you receive a success message, click CloseClose icon .

Configure Route Preferences

Configure organization-level preferences for routing and geofencing. You can specify whether the map provider must use the fastest or shortest route and include or exclude tolls for route creation. You can also configure route geofences that may be used to report vehicle route deviations. Route geofencing consumes significant computational resources.

As an administrator, you can configure route preferences for an individual organization.
  1. Click Menu (Menu icon), and then click Settings.
  2. Select IoT Organization and then select your organization from the listed organizations.
  3. Click Context Specific, and then Trip & Shipments.
  4. In the Route Preferences section, set the routing parameters as follows :
    1. Select either the Fastest or Shortest option that the map provider must use for route calculation. If you select Fastest, then the map provider calculates the route with the fastest travel time. If you select the Shortest option, then the map provider calculates the route with the shortest travel distance.
    2. From the Tolls drop-down list, select Include or Exclude to specify whether the map provider must retrieve a route that includes or avoids toll roads, respectively. Note that this drop-down list is displayed in the UI only if your map provider is HERE Technologies.

    Note:

    Any changes made to routing preferences will not affect existing trips.

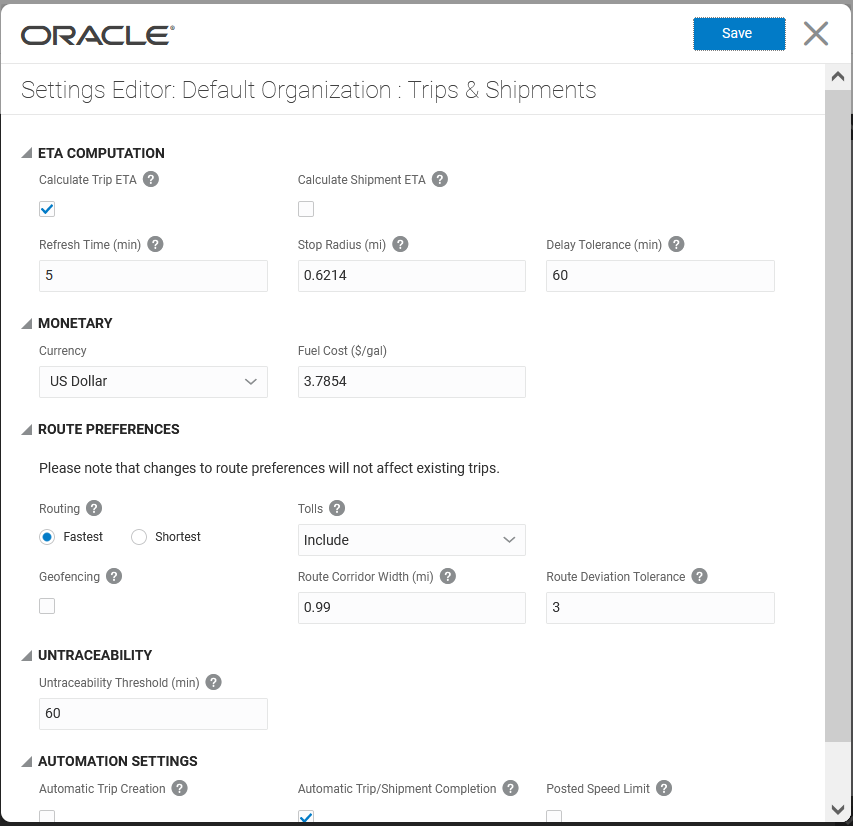
    The following screenshot displays the settings page for Trips & Shipments that includes the Route Preferences section for HERE Maps:
    HERE Maps Route Preferences Parameters

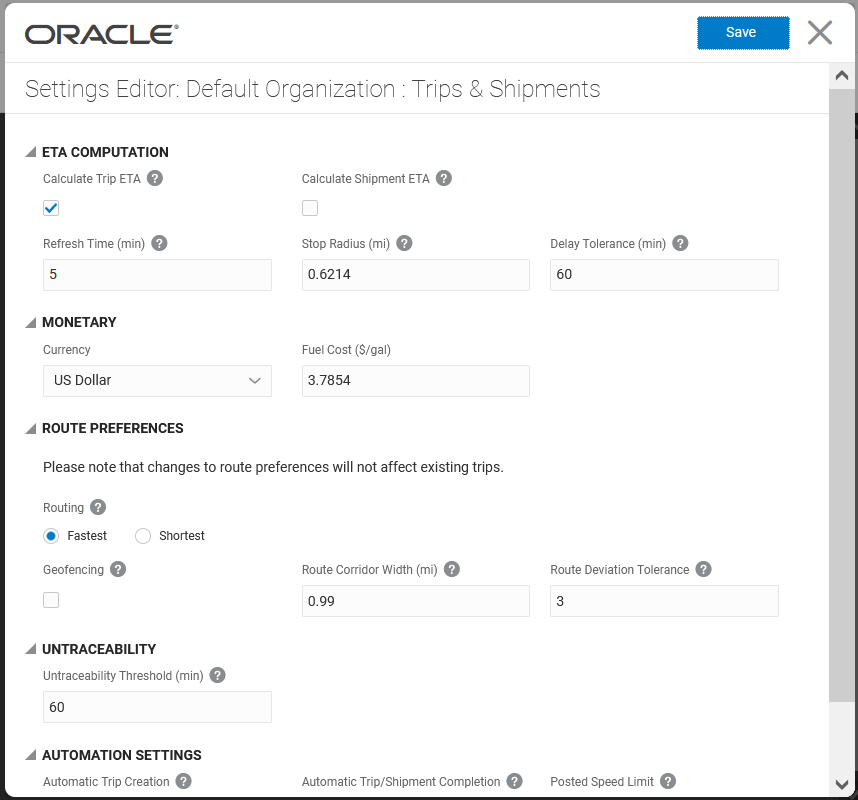
    The following screenshot displays the settings page for Trips & Shipments that includes the Route Preferences section for Oracle Maps:


    Oracle Maps Route Preferences Parameters

    If you are using maps provided by HERE Technologies, then note the following limitations of the map provider:
    • Sometimes, the map provider returns a route with toll road even though a request for a route with Tolls set to Exclude is made. In such a case, an error is displayed in the trip error or exceptions page.

    • Sometimes, when you request for a route with Tolls set to Include, the map provider does not return a route with toll road even though it exists.

    • HERE Routing API v7 does not support the Truck+Shortest option for a routing request. Therefore, Fleet Monitoring overrides it to Truck+Fastest before requesting for a route.

    If you are using Oracle Maps and you request for the shortest route, then sometimes the route returned may not be the shortest.

  5. To enable route geofences, select the Geofencing checkbox in the Route Preferences section.

    When enabled, you can optionally view the route-geofence of a shipment or a trip on their shipment or trip map views respectively. To view the route geofences on the map view, enable this feature before you've created/imported trips or shipments in the organization.

    You will get notifications when vehicles deviate from route geofences. As route geofences use significant computational resources, use this feature judiciously.

  6. Optionally change the following fields:
    • Route Corridor Width (mi): Specifies the width of the route corridor in which the vehicle travels. A geofence violation occurs when the vehicle moves outside the route corridor.
    • Route Deviation Tolerance: Specifies the number of times a vehicle can deviate from the planned route corridor before a geofence violation is recorded.
  7. Click Save to save the changes. After you receive a success message, click CloseClose icon .

Configure Other Trip and Shipment Settings

Configure organization-level trip and shipment settings, such as automatic trip enabling, automatic shipment completion, posted speed limit configurations, and traceability settings.

  1. Click Menu (Menu icon), and then click Settings.
  2. Select IoT Organizations and then select your organization from the listed organizations.
  3. Click Context Specific and then Trip & Shipments.
  4. In the Automation Settings section, optionally select or deselect the following settings:
    1. (Optional) Select Automatic Trip Creation to enable a trip to be created automatically.

      If a vehicle currently not assigned to a trip moves 1600 feet (500 meters) beyond its assigned location, a trip is automatically created.

    2. (Optional) From the Trip/Shipment Completion drop-down box, select one of the following options:
      • Auto Complete On Departure From Last Planned Stop: This is the default option. Select this option if you want trips and shipments to complete automatically when the vehicle departs from the destination (last planned) stop.
      • Auto Complete On Arrival At Last Planned Stop: Select this option if you want trips and shipments to complete automatically when the vehicle arrives at the destination (last planned) stop.
      • Do not Auto Complete: Select this option if you do not want trips and shipments to be completed automatically.

      Note:

      If you have a multistop trip or shipment and drivers don't adhere to the planned stop sequence (for example, the driver visits the destination stop first before going to intemediate stops), then it is recommeded that you disable the option to complete trips or shipments automatically by selecting the Do not Auto Complete option. If you do not select this option, then depending on whether you select Auto Complete On Departure From Last Planned Stop or Auto Complete On Arrival At Last Planned Stop, the trip or shipment completes automatically when the vehicle departs from or arrives at the destination stop by assuming that all intermediary stops have been completed.
    3. (Optional) Select Posted Speed Limit to enable support for posted speed limit configurations.

      Posted Speed limit is the maximum lawful speed for a particular location or a given road segment, which is displayed on a regulatory sign.

      When you enable this, the application:
      • Automatically detects violation of posted speed limits in a trip or a shipment and displays them on the map view along the route. See how to view a shipment's or trip's route on the map from View Shipment Route Details and Examine the Map View respectively.
      • Lets you use a set of system-defined KPIs such as count of posted speed limit violations or indication of a trip or a shipment's vehicle being driven beyond the posted speed limit. See how to view the system-defined metrics from View the KPI List.
      • Lets you create rules to generate alerts or incidents for posted speed limit violations in trips, in shipments, or by drivers. See how to create rules for trips and shipments from Create a Shipment Rule and Create a Rule.
  5. In the Untraceablity section, enter an integer value for the Untraceability Threshold (min) field. This value specifies the number of minutes after which shipments and trips will be marked untraceable when there are no geo-location updates.
  6. Click Save to save the changes. After you receive a success message, click CloseClose icon .

Configure Mobile Application Settings

You can configure mobile application settings for the organization. These settings determine whether drivers can select or update the trip vehicle, and whether drivers can create trips using the mobile application.

  1. Click Menu (Menu icon), and then click Settings.
  2. Select IoT Organizations and then select your organization from the listed organizations.
  3. Click Context Specific and then Mobile Applications.
  4. In the Mobile Applications section, optionally deselect or select the following settings:
    • Create Trip: Determines if drivers can create trips using the mobile application. If enabled, drivers can use the following options in the mobile application to create trips:
      • Repeat a Recent Trip
      • Create a Trip from a Template
      • Create a Custom Trip
    • Select/Update Assigned Vehicle: Determines whether drivers can select or update the trip vehicle using the mobile application.
  5. In the Enable Location Tracking section, select or deselect the Third Party Carrier Drivers option.
    Selecting this option enables a third-party carrier driver's mobile application to transmit the location information of an ongoing trip. Deselecting this option disables transmission of location information. This option is applicable only for Trips.
  6. Click Save to save the changes. After you receive a success message, click CloseClose icon .

Customize Appearance

Customize the name and logo of your application globally or at an organization level from the Settings option.

You can customize the appearance globally for all the applications from the Menu > Settings > Appearance > tile.

You can customize the appearance at the organization level from the Menu > Settings > IoT Organizations > Organization Name > Appearance tile.

Show or Hide the Application Name

Show or hide the application name when business requirements change.

  1. In the Operations Center, click Menu (Menu icon), and then click Settings.
    If you are in the Design Center, you need to click Previous (Previous icon) before you see the Settings option in the menu.

    Note:

    If you wish to change the appearance for an individual organization only, navigate to Menu > Settings > IoT Organizations > Organization Name.
  2. Click Appearance on the Settings page.
  3. Select one of these options:.
    1. Select Show Application Name to display the application name on all application pages.
    2. Clear Show Application Name to remove the application name from all application pages.
  4. Click Save.

Add or Update an Application Logo

Add or update corporate logos when business requirements change or a new corporate logo is issued.

  1. In the Operations Center, click Menu (Menu icon), and then click Settings.
    If you are in the Design Center, you need to click Previous (Previous icon) before you see the Settings option in the menu.

    Note:

    If you wish to change the appearance for an individual organization only, navigate to Menu > Settings > IoT Organizations > Organization Name.
  2. Click Appearance on the Settings page.
  3. Under Title Bar Logo, select Custom.
    Under Image, click the Drag and Drop area to select an image file to upload. Alternatively, you can also drag and drop the image file to the Drag and Drop area in your browser window.
  4. Click Save.

Remove an Application Logo

Remove a logo when an application logo is no longer required.

  1. In the Operations Center, click Menu (Menu icon), and then click Settings.
    If you are in the Design Center, you need to click Previous (Previous icon) before you see the Settings option in the menu.

    Note:

    If you wish to change the appearance for an individual organization only, navigate to Menu > Settings > IoT Organizations > Organization Name.
  2. Click Appearance on the Settings page.
  3. Under Title Bar Logo, select None.
  4. Click Save.

Enable Or Disable Number Formatting

Specify whether to display numeric values as formatted or unformatted numbers. You can specifiy this globally or at an organization level from the Settings option.

By default, all numeric values for attributes such as speed, temperature, distance travelled, and so on are formatted (rounded off to the nearest decimal). For example, a value of 51.45456 is rounded off to 51.5. You can choose to disable or enable formatting of number values at the global or organization-specific level by deselecting the Enable Number Formatting checkbox in the Number Formatting section of the Appearance tile.
  1. In the Operations Center, click Menu (Menu icon), and then click Settings.
    If you are in the Design Center, you need to click Previous (Previous icon) before you see the Settings option in the menu.

    Note:

    If you wish to change number formatting for an individual organization only, then navigate to Menu > Settings > IoT Organizations > Organization Name.
  2. Click Appearance on the Settings page.
  3. In the Number Formatting section, select one of these options:.
    1. Deselect the Enable Number Formatting option to display the exact numeric value, without rounding it off to the nearest decimal.
    2. Select the Enable Number Formatting option to display numeric values after rounding them off to the nearest decimal.
  4. Click Save.

Manage Organizations

Organizations are digital placeholders for the various heterogeneous entities that you have in your business, the locations where these entities operate from, and the associated users of these entities.

From the Settings > IoT Organizations tile, use Manage Organizations option to create, delete, import and export organizations.

Change Your Current Organization

If you are part of more than one organization, then you can change your current organization in Oracle IoT Fleet Monitoring Cloud Service.

  1. Sign in to Oracle IoT Fleet Monitoring Cloud Service
  2. Click Authentication Menu Authentication Menu icon displayed on the top right corner and click Switch Organization
  3. Select the organization name that you wish to switch to, and click Switch.
    The organization is switched, and you are put in the operations center view for the organization.
  4. Alternatively, you can click Menu (Menu icon), and then click Settings.
  5. Select IoT Organizations from the listed tiles
  6. Click Manage Organizations and then click Switch Organizations..
  7. Select the organization name that you wish to switch to, and click Switch.
    The organization is switched, and you are put in the operations center view for the organization.

Create a New Organization

Organizations are digital placeholders for the various heterogeneous entities that you have in your business, the locations where these entities operate from, and the associated users of these entities.

This operation is meant for application administrators only. Log in using the administrator account to create organizations in Oracle IoT Fleet Monitoring Cloud Service.
  1. Click Menu (Menu icon), and then click Settings.
  2. Select IoT Organizations from the listed tiles.
  3. Click Manage Organizations and then click Create Organization.
    The Create Organization dialog appears.
  4. Specify a Name for your organization.
    For example, North America Operations.
  5. Specify an optional Description.
  6. Click Create.
    A confirmation message appears, and the new organization is added to the list of existing organizations.

Assign Users to an Organization

Edit the organization to add or update the list of authorized users for the organization.

Ensure that you have created users and assigned them appropriate roles before you assign them to one or more organizations. See Create a New User.
  1. Click Menu (Menu icon), and then click Settings.
  2. Select the IoT Organizations tile from the Settings page.
  3. The Default Organization and other organizations, if they exist are displayed as tiles. Note that the active organization is labeled with the Active label and the in-built Default organization is active by default.
  4. Click the organization to which you need to assign users. Various tiles are displayed that allows you to configure organization specific settings.
  5. Select the User Access Control tile.
  6. In the Users section, from the table of the left, select the users that you wish to include in the organization, and click the right-arrow icon to move it to the table on the right.You can use the Select Filter drop-down list to search for a given user or a set of users.
  7. Click Save to save the changes to the organization and wait till you revive the Success message.
  8. Click Close.

Export and Import Organizations

You can export an organization, together with its entities, such as vehicles and vehicle types, settings, and integrations from an Oracle IoT Fleet Monitoring Cloud Service instance. You can then import the organization into another Oracle IoT Fleet Monitoring Cloud Service instance.

When you export an organization, all vehicles and their associated vehicle types are exported. The artifacts connected with the entities, such as metrics, rules, anomalies, predictions, and trends are also exported. Importing the organization into another instance creates the organization, together with its entities, configuration, and settings, in the importing instance.

Note:

Import of organizations exported from previous releases is not supported. If you try to import a previously exported organization from an earlier release into the current release of Oracle IoT Fleet Monitoring Cloud Service, the import may fail.

Any groups and places that exist in the exported organization are also brought into the importing instance. Note that any devices connected to vehicles in the original instance are not included in the export. If you have vehicle types with mandatory sensor attributes, you would need to create new device links for the vehicles in the imported organization.

Export an Organization

Export an organization to create an iot export file containing the organization along with its assets, asset types, groups and places.

  1. Click Menu (Menu icon), and then click Settings.
  2. Select IoT Organizations from the listed tiles.
  3. Click Manage Organizations and then click Export Organization.
  4. Select the organization name that you wish to export, and click Export.
    A .iot archive of the organization is generated.
  5. Save the generated .iot archive file to your hard disk or a storage location.
    You will use this file when importing the organization into another instance of Oracle IoT Fleet Monitoring Cloud Service.
Import an Organization

Import an organization into an Oracle IoT Fleet Monitoring Cloud Service instance to create the organizational artifacts previously exported from another instance.

  1. Click Menu (Menu icon), and then click Settings.
  2. Select IoT Organizations from the listed tiles.
  3. Click Manage Organizations and then click Import Organization.
  4. Click Import.
    The Import Organization dialog appears.
  5. Under Upload File, click the Drag and Drop area to select and upload the previously exported .iot archive file. Alternatively, you can also drag and drop the .iot archive file to the Drag and Drop area in your browser window.
  6. Click Done.
The organization is imported along with its containing artifacts. The organization appears in the list of existing organizations.

Change the Map Type

Change the map type in the map view to change the appearance of the map. Currently, map types are only available with maps provided by HERE Technologies.

  1. Change the map provider to HERE Technologies. See Change the Map Provider.
  2. In the Operations Center, click Fleet Map in the menu bar.
  3. Click Map Layers (Map layers icon) and then select one of these options:
    • Classic: Select this option to display the standard map view without satellite imagery, terrain, or traffic.
    • Satellite: Select this option to display a satellite image of the current map view.
    • Terrain: Select this option to display a map that includes physical terrain information.
    • Traffic: Select this option to display real-time traffic conditions in the current map view.